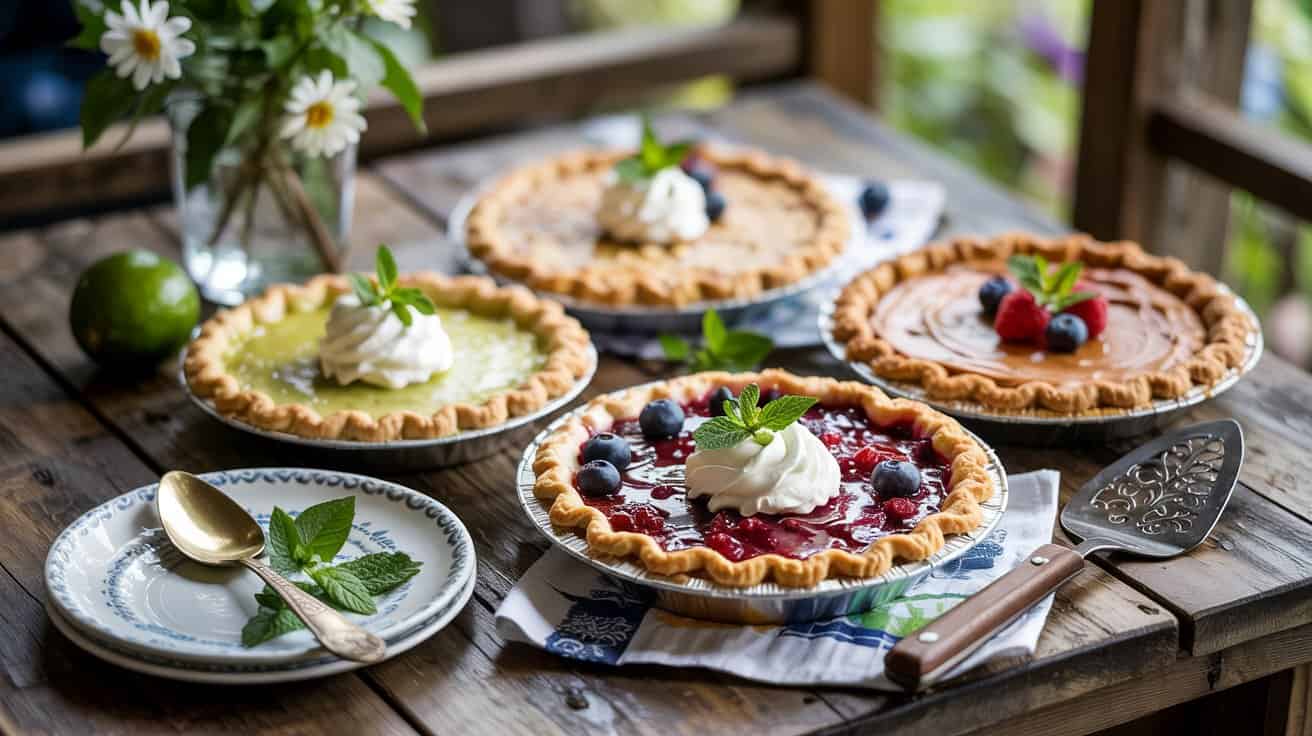
Summer calls for desserts that are cool, refreshing, and simple to prepare. This collection of 14 summer pie recipes that skip the oven offers a range of no-bake delights, often relying on gelatin, chilled custards, or whipped cream bases, which are chilled and set in the refrigerator instead of baked, perfect for warm days and relaxed gatherings.
Each recipe celebrates fresh, seasonal flavors without the need to heat up the kitchen.
Inside this lineup, you'll find a diverse selection of pies that suit every craving - from fruity and tangy to rich and creamy. Many feature bright fresh fruits like berries, peaches, and citrus alongside smooth, luscious fillings.
These crowd-pleasers are designed to require minimal steps and ingredients, making them ideal for busy days or casual celebrations.
What ties these recipes together is their ability to deliver big flavor with easy preparation. Because there's no baking involved, cleanup is minimal and these pies come together quickly.
Plus, chilling time means you can prepare ahead and enjoy hassle-free desserts anytime.
1. No-Bake Strawberry Cheesecake Pie
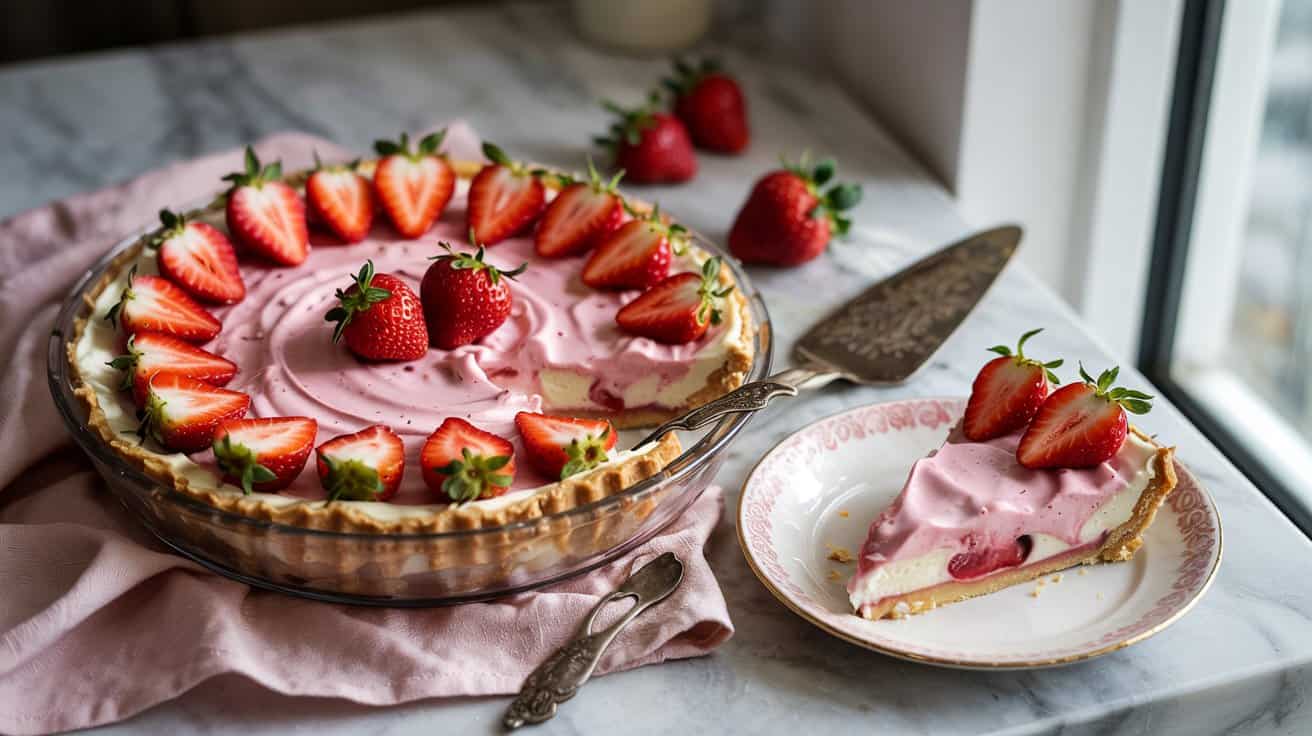
This no-bake strawberry cheesecake pie is a refreshing and creamy dessert, with a tangy cream cheese finish, that comes together quickly, typically chilled 4-6 hours to set. It features a smooth mascarpone and cream cheese filling loaded with fresh strawberries, all resting on a crisp graham cracker crust.
The simple process makes it an ideal treat for busy days or for sharing at a gathering; pair it with cheesecake side dishes for summer.
Why This Recipe Works
This pie offers a delicious balance of flavors and textures, balancing sweet strawberries and tangy cream cheese, with minimal time in the kitchen.
- Convenience - Requires no baking, saving time and energy.
- Flavor balance - Combines creamy, tangy filling with fresh, naturally sweet strawberries and pairs well with honey-based desserts for summer.
- Texture - Features a crunchy graham cracker crust paired with smooth, velvety filling.
- Appeal - Looks bright and inviting, great for family and guests.
Ingredient Swap Ideas
A few swaps can keep the texture and flavor similar while changing up the ingredients; for small desserts try small-batch cupcake ideas for intimate baking.
- Graham cracker crust - Use gluten-free graham crackers or crushed digestive biscuits for an alternative base.
- Mascarpone or cream cheese - Substitute with vegan cream cheese or coconut cream for a dairy-free version.
- Strawberries - Try raspberries, blueberries, or mixed berries for a different fruity touch.
- Sweetener - Replace granulated sugar with honey or maple syrup for a natural sweetener option.
Ingredients
- 1 ½ cups graham cracker crumbs - finely crushed to form the crust.
- 5 tablespoons unsalted butter - melted to bind the crust.
- 8 ounces cream cheese - softened at room temperature for smooth mixing.
- 8 ounces mascarpone cheese - adds richness and creaminess.
- ¾ cup granulated sugar - to sweeten the filling.
- 1 teaspoon vanilla extract - enhances flavor depth.
- 1 cup heavy cream - whipped until stiff peaks form for lightness.
- 2 cups fresh strawberries - hulled and sliced, plus extra for topping.
Instructions
- Combine the graham cracker crumbs and melted butter in a bowl. Press the mixture firmly into the base and up the sides of a 9-inch pie dish to form the crust. Chill in the refrigerator while preparing the filling.
- In a large bowl, beat the cream cheese, mascarpone, sugar, and vanilla extract together until smooth and creamy.
- In a separate bowl, whip the heavy cream until stiff peaks form. Gently fold the whipped cream into the cheese mixture until fully combined.
- Fold the sliced strawberries into the filling. Pour the filling into the prepared crust and smooth the top with a spatula.
- Refrigerate the pie for at least 4 hours, preferably overnight, to set. Before serving, garnish with extra strawberries on top.
This no-bake strawberry cheesecake pie delivers fresh flavor and creamy texture with minimal fuss, making it a great dessert any time.
2. Blueberry Lemon Icebox Pie

This Blueberry Lemon Icebox Pie combines a tangy lemon custard with juicy fresh blueberries, all set in a buttery crust, often made from graham crackers or crushed cookies, chilled at least 4 hours for best set. It's a chilled dessert that's refreshing and bright, making it ideal for warm days or any time you want a lighter sweet treat.
The creamy lemon filling has just the right balance of tartness and sweetness, using both lemon zest and juice for brightness, while the blueberries add bursts of flavor and a pleasing pop; for more quick berry ideas see quick blueberry desserts in minutes.
If you need alternatives, consider lemon juice substitutes for recipes that keep the bright citrus character.
Why This Recipe Works
This pie offers an easy, make-ahead dessert that balances tangy and sweet flavors wonderfully. It's also visually appealing, making it great for gatherings or casual family dinners.
- Convenience - The no-bake lemon custard sets in the fridge, allowing preparation a day ahead.
- Flavor balance - Bright lemon zest and juice provide a fresh zing that goes well with sweet blueberries.
- Texture - A crisp, buttery crust contrasts nicely with the smooth custard and burst of fresh berries.
- Appeal - Its colorful look and refreshing taste suit both everyday occasions and special events.
Ingredient Swap Ideas
Swapping ingredients can make this recipe fit different dietary needs or preferences without losing its essence. You can easily adjust to gluten-free, vegan, or dairy-free versions.
- Crust - Use a gluten-free cookie crust or crushed graham crackers if you need gluten-free options.
- Cream Cheese - Replace with vegan cream cheese or silken tofu blended smooth for a dairy-free twist.
- Sweetener - Swap granulated sugar with maple syrup or honey for a natural sweetener alternative.
- Lemon Flavor - Use lime juice and zest in place of lemon for a slightly different citrus profile.
Ingredients
- 1 ½ cups graham cracker crumbs - finely crushed to form the crust base.
- 6 tablespoons unsalted butter - melted, to bind the crust.
- ¼ cup granulated sugar - for sweetness in the crust.
- 2 cups heavy cream - chilled, for whipping into the filling.
- 8 ounces cream cheese - softened to room temperature for smooth blending.
- 1 cup powdered sugar - sifted, to sweeten the lemon custard.
- ½ cup fresh lemon juice - freshly squeezed for brightness.
- 2 teaspoons lemon zest - finely grated for added citrus aroma.
- 1 ½ cups fresh blueberries - washed and patted dry, for layering and topping.
Instructions
- Mix the graham cracker crumbs, melted butter, and granulated sugar in a bowl until the mixture resembles wet sand. Press this evenly into the bottom and up the sides of a 9-inch pie dish. Chill the crust in the refrigerator while preparing the filling.
- In a large bowl, use a hand mixer to beat the cream cheese until smooth and fluffy. Add powdered sugar, lemon juice, and lemon zest. Continue mixing until fully combined and creamy.
- In a separate bowl, whip the heavy cream until stiff peaks form. Gently fold the whipped cream into the lemon mixture until incorporated, taking care not to deflate the cream.
- Pour half of the lemon custard into the chilled crust. Spread half of the blueberries evenly over the filling. Top with the remaining lemon filling and then scatter the rest of the blueberries on top.
- Cover the pie with plastic wrap and refrigerate for at least 4 hours, or overnight, to allow the custard to set and flavors to meld. Slice and serve chilled.
3. Peach and Raspberry No-Bake Pie
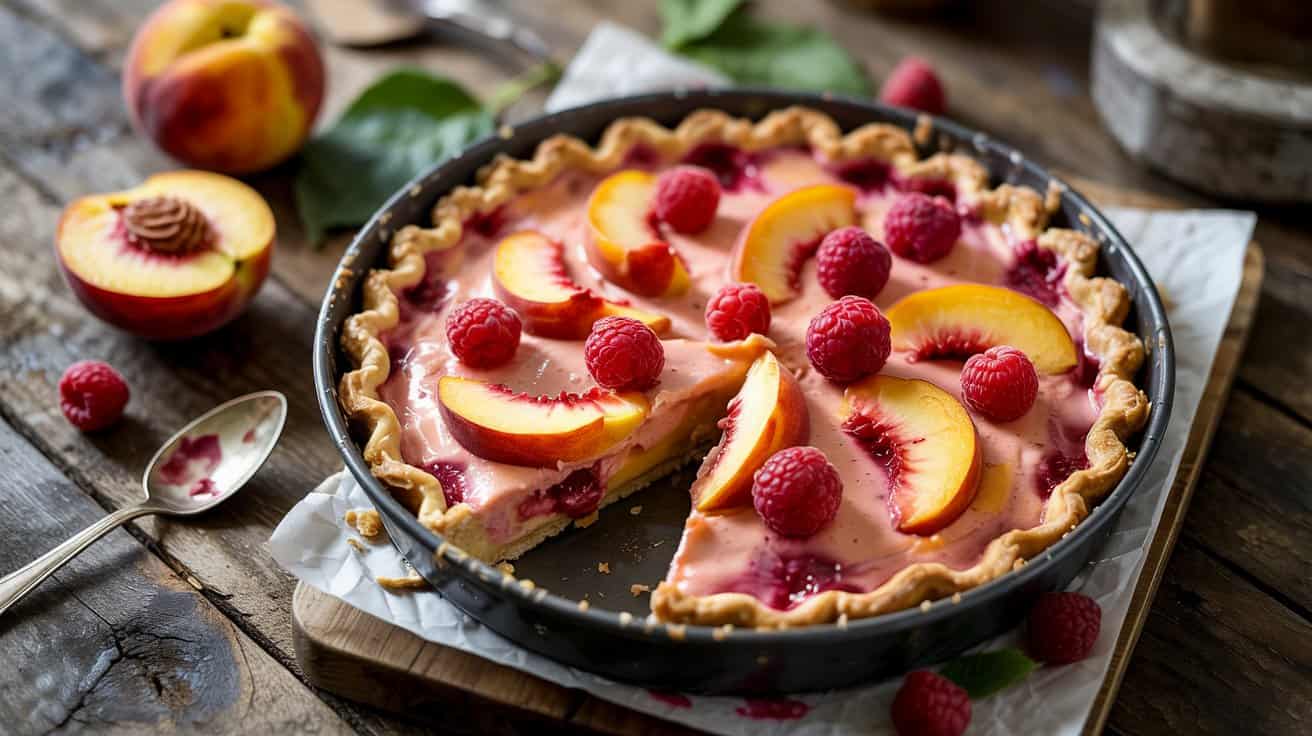
This Peach and Raspberry No-Bake Pie brings a fresh burst of summer fruits together in a creamy, light dessert that feels both indulgent and refreshing. The juicy sweetness of the peaches goes well with the bright tartness of raspberries, all located atop a buttery nut crust that adds just the right amount of crunch, often made with toasted pecans or almonds.
You won't need to turn on your oven for this one, making it a great pick on warm days or whenever you want a treat without a lot of fuss. It's a simple yet elegant dessert that you can prepare ahead and enjoy chilled.
For a complementary spread, try pairing with peach side dishes for summer that echo the pie's stone-fruit flavors.
Why This Recipe Works
This pie stands out for offering an easy way to enjoy seasonal fruit flavors in a dessert that's both light and satisfying.
- Convenience - No baking needed, saving time and keeping your kitchen cool.
- Flavor balance - Combines sweet peaches with tart raspberries and creamy whipped topping perfectly.
- Texture - The buttery, slightly crunchy nut crust contrasts nicely with the smooth, airy filling.
- Appeal - A pretty, colorful dessert that suits casual gatherings or special occasions.
Ingredient Swap Ideas
Sometimes we want to adjust a recipe to fit what we have on hand or our dietary preferences. Substitutions can keep this pie just as tasty while tailoring it to your needs.
- Crust nuts - Use almonds, pecans, or walnuts if you prefer a different nut flavor or need to avoid certain nuts.
- Fruit options - Swap peaches for nectarines or even mango, and use blueberries instead of raspberries for a new twist.
- Dairy alternative - Replace the whipped cream with coconut whipped topping for a dairy-free version that still feels light.
- Sweetener - Use honey or maple syrup instead of granulated sugar to add natural sweetness and depth.
Ingredients
- 1 ½ cups graham cracker crumbs - crushed finely for the crust base.
- ½ cup chopped toasted pecans - adds buttery richness and crunch to the crust.
- ⅓ cup unsalted butter - melted to bind the crust ingredients together.
- 1 cup heavy whipping cream - chilled and ready for whipping.
- ¼ cup powdered sugar - to sweeten the whipped cream filling gently.
- 1 teaspoon vanilla extract - adds warmth and flavor to the whipped cream.
- 2 large ripe peaches - peeled, pitted, and sliced thinly for layering.
- 1 cup fresh raspberries - carefully washed and drained.
- Optional garnish: fresh mint leaves - for a touch of color and freshness.
Instructions
- In a medium bowl, combine the graham cracker crumbs and toasted pecans. Pour in the melted butter and stir until the mixture holds together when pressed.
- Press the crust mixture evenly into the bottom and slightly up the sides of a 9-inch pie dish. Refrigerate while you prepare the filling.
- In a large bowl, beat the chilled heavy cream with an electric mixer until it starts to thicken. Add powdered sugar and vanilla extract, then continue beating until stiff peaks form.
- Gently fold half of the sliced peaches and raspberries into the whipped cream, saving the rest for decoration. Spoon the creamy fruit mixture over the chilled crust and smooth the top.
- Arrange the remaining peach slices and raspberries on top in a decorative pattern. Cover and refrigerate the pie for at least 2 hours before serving to allow it to set well. Garnish with fresh mint leaves if desired.
This no-bake peach and raspberry pie is ready to slice and enjoy chilled. It's a simple way to show fresh fruit with a light, creamy base and a satisfying nutty crust.
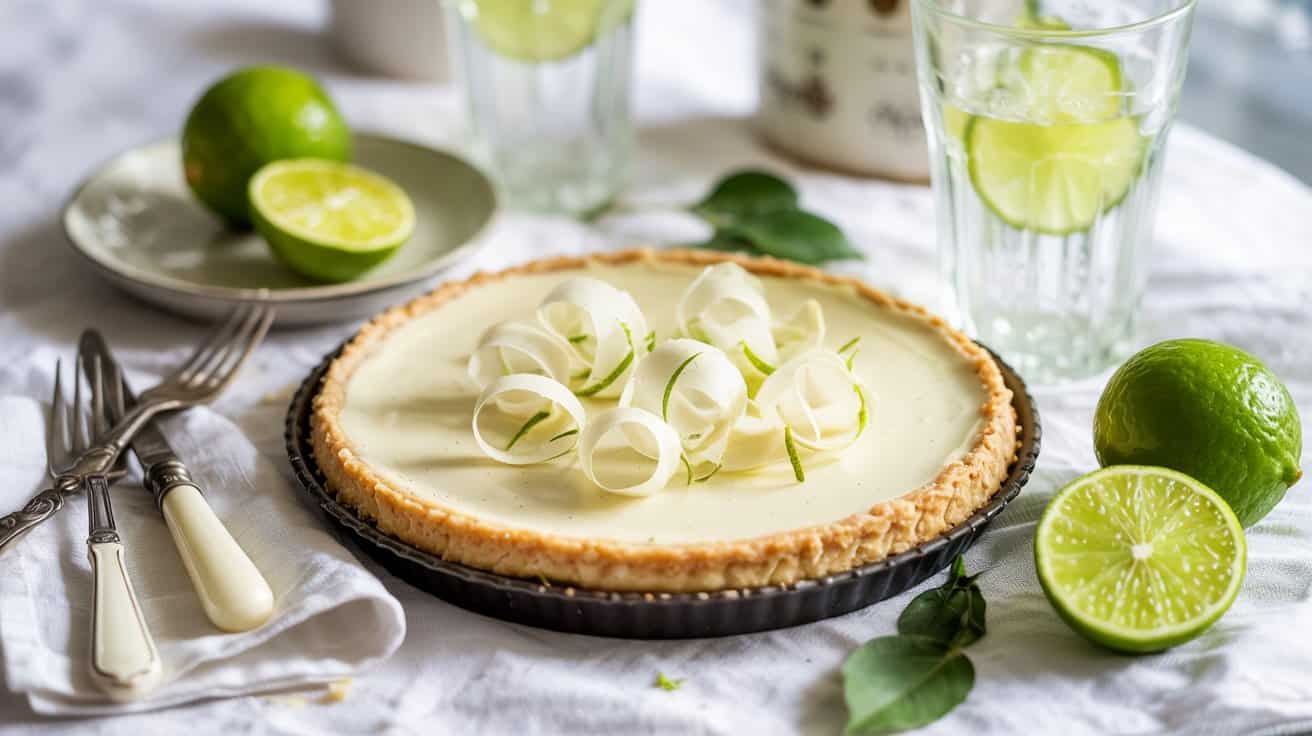
4. Key Lime Icebox Pie
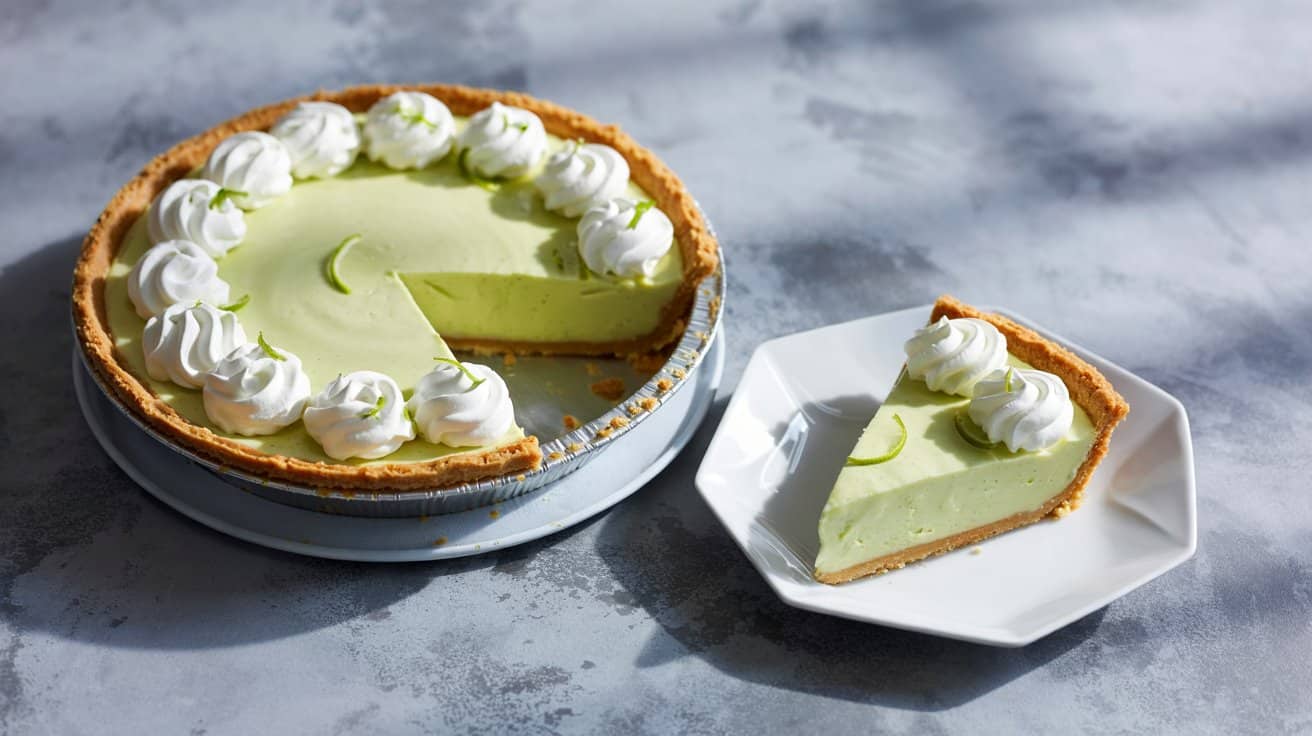
This Key Lime Icebox Pie is a refreshing treat that combines tangy key lime with a smooth, creamy texture. It's a no-bake dessert that comes together quickly, making it an excellent choice for busy days or last-minute gatherings.
The use of gelatin and cream cheese gives the pie a silky finish that feels light and airy. It's a lovely balance of tart and sweet that makes every bite enjoyable and satisfying.
Why This Recipe Works
This Key Lime Icebox Pie is a simple yet flavorful dessert that brightens any occasion with its crisp, citrusy notes.
- Convenience - No baking is required, so it comes together quickly and with minimal cleanup.
- Flavor balance - The tartness of key lime juice blends beautifully with the creamy smoothness of the filling.
- Texture - Silky cream cheese combined with whipped cream creates a light, airy mouthfeel.
- Appeal - This pie is ideal for family dinners, potlucks, or casual entertaining, pleasing a broad audience.
Ingredient Swap Ideas
Swapping ingredients can help tailor this pie to your preferences or dietary needs without losing its essential character.
- Cream cheese - Use a dairy-free cream cheese alternative to make the pie suitable for lactose intolerance or vegan diets.
- Whipping cream - Substitute coconut cream or a nondairy whipping topping to keep it dairy-free and maintain the fluffy texture.
- Graham cracker crust - Replace with a gluten-free cookie crust or crushed nuts mixed with a little butter for crunch and flavor.
- Key lime juice - If key limes aren't available, fresh regular lime juice can be used with a slightly adjusted quantity to maintain tartness.
Ingredients
- 1 ½ cups graham cracker crumbs - For the pie crust base.
- ⅓ cup granulated sugar - Sweetens the crust.
- 6 tablespoons unsalted butter, melted - Binds the crust ingredients together.
- 1 envelope unflavored gelatin (about 2 ½ teaspoons) - Helps set the filling firmly.
- ¼ cup cold water - To dissolve the gelatin.
- 8 ounces cream cheese, softened - Provides a smooth, creamy texture.
- 1 ½ cups granulated sugar - Sweetens the filling.
- 1 cup fresh key lime juice - Adds the signature tart flavor.
- 1 tablespoon grated lime zest - Enhances the lime aroma and flavor.
- 1 ½ cups heavy whipping cream, cold - Whipped to create the airy filling.
- Additional lime zest or thin lime slices for garnish - Optional finishing touch.
Instructions
- Combine graham cracker crumbs, ⅓ cup sugar, and melted butter in a medium bowl. Press the mixture firmly into the bottom and up the sides of a 9-inch pie plate to form the crust. Chill in the refrigerator while preparing the filling.
- Pour cold water into a small bowl and sprinkle gelatin over the surface. Let it bloom for 5 minutes, then gently warm it in the microwave or on the stove until fully dissolved. Set aside to cool slightly.
- In a large mixing bowl, beat the softened cream cheese and 1 ½ cups sugar until smooth. Gradually add the key lime juice, lime zest, and dissolved gelatin, mixing until fully combined.
- In a separate chilled bowl, whip the heavy cream to stiff peaks. Gently fold the whipped cream into the cream cheese mixture until well incorporated, keeping the mixture light and airy.
- Pour the filling into the prepared crust, smoothing the top. Refrigerate the pie for at least 4 hours or overnight until fully set. Garnish with extra lime zest or thin lime slices before serving.
Enjoy this cool, citrusy pie as a refreshing finish to any meal. It's ready to please with simple ingredients and straightforward steps.
5. No-Bake Chocolate Peanut Butter Pie
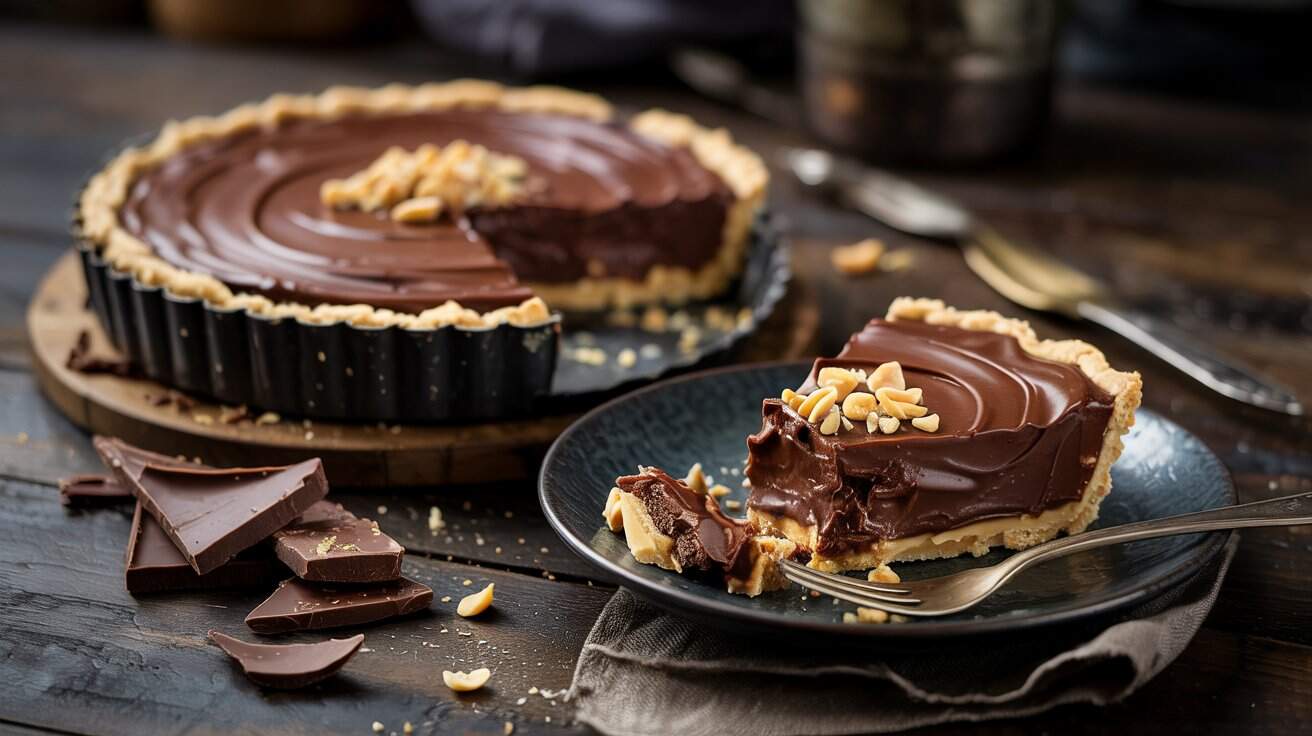
This no-bake chocolate peanut butter pie brings together two classic flavors in a rich, creamy dessert you can make without turning on the oven. The silky peanut butter layer blends smoothly with the chocolate mousse, creating a luscious texture that feels special but comes together easily.
The chocolate cookie crust adds a slight crunch, providing a nice contrast to the soft filling. This pie is ideal for busy days or when you want something indulgent but straightforward to prepare.
Why This Recipe Works
This pie offers the perfect balance of convenience and indulgence with minimal prep and no baking involved. It's a crowd-pleaser with peanut butter and chocolate flavors everyone enjoys.
- Convenience - No baking needed, making it simple to prepare and chill.
- Flavor balance - The peanut butter and chocolate layers complement each other beautifully.
- Texture - Creamy mousse and crunchy cookie base create an enjoyable contrast.
- Appeal - Great for family gatherings or casual get-togethers with its familiar flavors.
Ingredient Swap Ideas
Adjusting ingredients can help cater to allergies, preferences, or what you have in the pantry while keeping the spirit of this dessert intact.
- Crust alternative - Use gluten-free chocolate cookies if avoiding gluten.
- Peanut butter choice - Substitute natural almond or cashew butter for a different nut flavor.
- Dairy swap - Replace heavy cream with coconut cream to make it dairy-free.
- Sweetener change - Use maple syrup or honey instead of granulated sugar for a natural touch.
Ingredients
- Chocolate cookie crumbs - 1 ½ cups, for a crunchy base.
- Unsalted butter - 5 tablespoons, melted, to bind the crust.
- Cream cheese - 8 ounces, softened, for creamy texture in the peanut butter layer.
- Smooth peanut butter - 1 cup, adds rich peanut flavor.
- Powdered sugar - ¾ cup, to sweeten the filling.
- Heavy cream - 2 cups, divided, for whipping and mousse layers.
- Semi-sweet chocolate chips - 8 ounces, melted and cooled, for the chocolate mousse.
- Vanilla extract - 1 teaspoon, to enhance flavor.
- Pinch of salt - balances sweetness.
Instructions
- Combine the chocolate cookie crumbs and melted butter in a bowl, mixing until well blended. Press this mixture evenly into the bottom of a 9-inch pie dish. Place it in the refrigerator to firm up while preparing the filling.
- In a large bowl, beat the softened cream cheese, peanut butter, powdered sugar, and vanilla extract until smooth and creamy. Set aside.
- Whip 1 cup of the heavy cream with a pinch of salt until stiff peaks form. Gently fold the whipped cream into the peanut butter mixture until fully combined and light.
- In a separate bowl, whip the remaining 1 cup of heavy cream to stiff peaks. Fold the cooled melted chocolate into the whipped cream, creating a fluffy chocolate mousse.
- Spread the peanut butter layer evenly over the chilled crust, then carefully top with the chocolate mousse layer. Smooth the surface and refrigerate the pie for at least 4 hours, or until fully set, before serving.
6. Mango Coconut No-Bake Pie
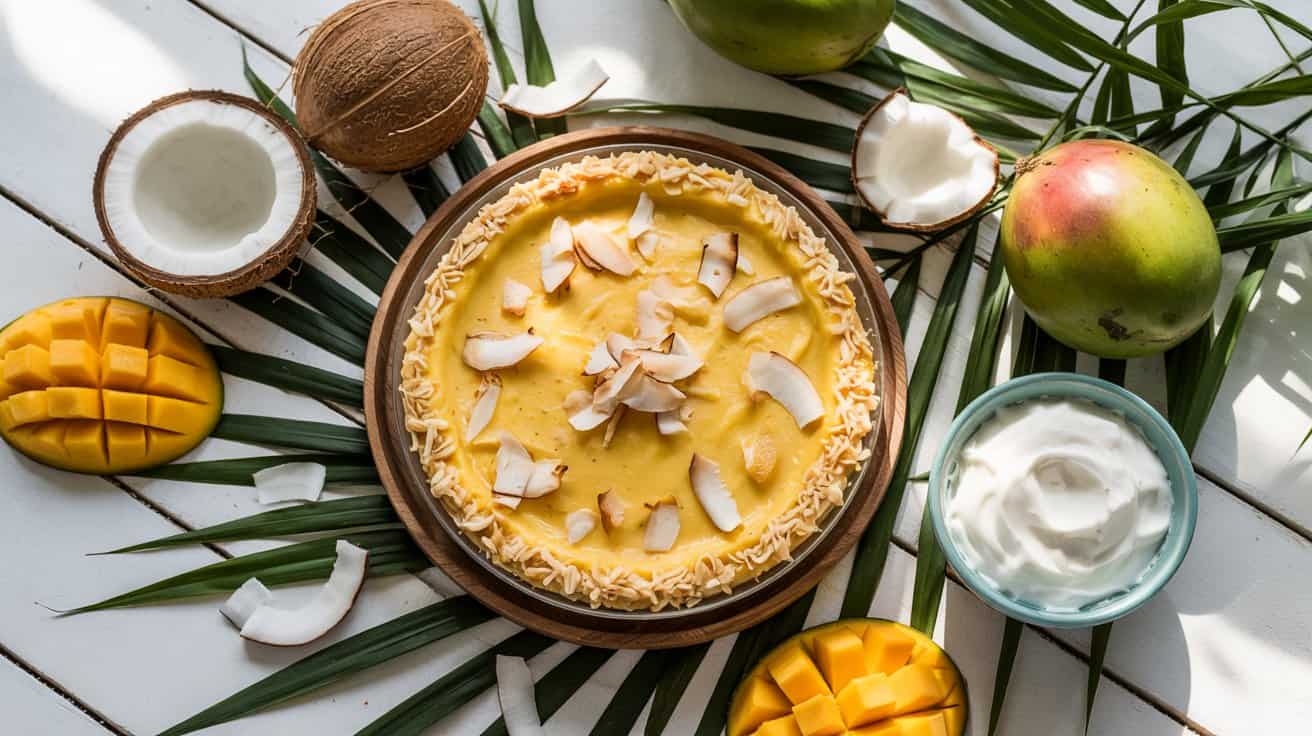
This Mango Coconut No-Bake Pie brings a fresh, tropical flavor that's both sweet and creamy. The bright mango puree combines beautifully with smooth coconut cream to create a luscious filling that's light and satisfying without needing an oven.
The crust made from nuts and dates adds a pleasant chewiness, balancing the softness of the filling. This pie is a great choice for warm days or when you want a dessert that feels indulgent but doesn't require much hands-on time.
Why This Recipe Works
This no-bake pie is easy to prepare ahead and offers a refreshing combination of fruit and coconut flavors. It fits well in casual or special settings, appealing to those who want a healthy, bright dessert option.
- Convenience - No baking required, making it quick and simple to assemble.
- Flavor balance - The natural sweetness of mango goes well with creamy coconut for a tropical taste.
- Texture - A firm nut-date crust contrasts nicely with the silky filling.
- Appeal - Attractive and colorful, suitable for family meals or entertaining guests.
Ingredient Swap Ideas
Adjusting ingredients here can accommodate dietary preferences or available pantry items. Substitutions still keep the core tropical and creamy notes intact.
- Nut alternatives - Use almonds, cashews, or pecans instead of walnuts depending on your taste or allergies.
- Sweeteners - Swap dates with dried figs or raisins for the crust; use maple syrup or agave in the filling for different sweetness profiles.
- Dairy-free cream - Use coconut yogurt or a vegan cream substitute instead of coconut cream for varied texture or lower fat.
- Fruit variations - Blend in some ripe pineapple or papaya with the mango puree for a more complex tropical flavor.
Ingredients
- 1 ½ cups mixed nuts - such as walnuts, almonds, or cashews, roughly chopped.
- 1 cup pitted Medjool dates - softened if needed, for binding the crust.
- 2 cups mango puree - made from fresh ripe mangoes, blended smooth.
- 1 cup coconut cream - chilled and thickened, providing richness.
- 2 tablespoons lime juice - for a touch of acidity to brighten flavors.
- 1 teaspoon vanilla extract - to improve the sweetness naturally.
- Pinch of salt - to balance sweetness and bring out depth.
Instructions
- Prepare the crust by combining chopped nuts and dates in a food processor. Pulse until the mixture sticks together but still has some texture. Press this mixture evenly into the base of a 9-inch pie pan. Set aside.
- In a mixing bowl, whisk together mango puree, coconut cream, lime juice, vanilla extract, and a pinch of salt until fully combined and smooth.
- Pour the mango coconut filling over the prepared crust, spreading it out evenly with a spatula.
- Refrigerate the pie for at least 4 hours, or overnight, to allow it to set firmly.
- Before serving, let the pie sit at room temperature for 10 minutes, then slice and enjoy as a refreshing dessert or sweet snack.
7. Cherry Almond No-Bake Pie
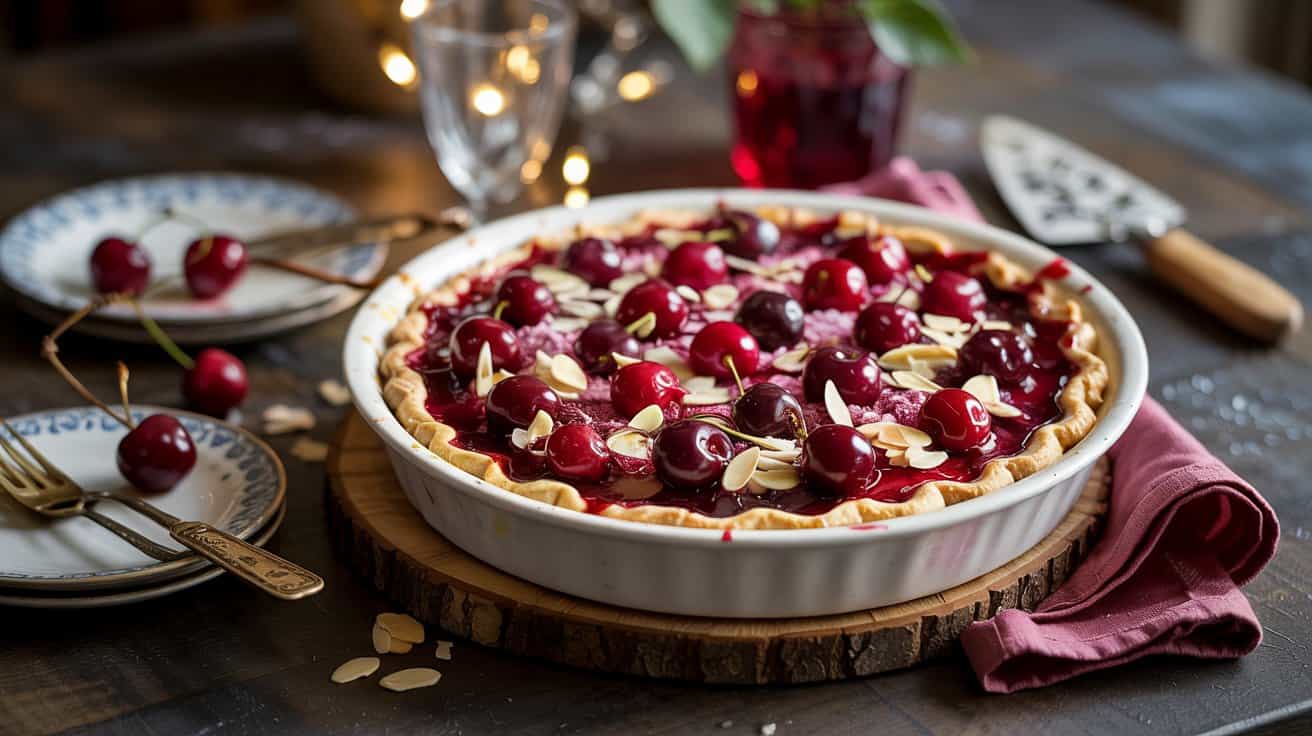
This Cherry Almond No-Bake Pie is an ideal choice for anyone looking for a tasty dessert that's easy to prepare without turning on the oven. The sweet and slightly tart fresh cherries bring brightness, while the almond extract adds a warm, nutty aroma that goes with the cream cheese filling beautifully.
The crisp crust holds the smooth, creamy filling well, creating a nice contrast in textures. Toasted almonds on top add just the right amount of crunch, making each bite an enjoyable experience.
You can have this pie ready in no time, making it great for busy days or when you're short on prep time.
Why This Recipe Works
This pie offers a combination of fresh flavors and simple preparation that fits well into any schedule and menu.
- Convenience - No baking is needed, which saves time and keeps the kitchen cooler.
- Flavor balance - The sweet cherries and creamy filling are enhanced by the subtle almond flavor.
- Texture - A crispy crust paired with a smooth, rich filling and crunchy toasted almonds.
- Appeal - A refreshing yet indulgent dessert that's approachable for all ages.
Ingredient Swap Ideas
Switching up ingredients can help adjust the pie to your taste preferences or dietary needs without changing its essence.
- Crust options - Use a gluten-free or nut-based crust to accommodate dietary restrictions.
- Nut alternatives - Replace almonds with pecans or walnuts for a different crunch and flavor.
- Fruit variety - Substitute fresh cherries with berries or sliced peaches to create seasonal variations.
- Dairy substitutions - Swap cream cheese for vegan cream cheese or coconut cream for a dairy-free alternative.
Ingredients
- 1 ¼ cups graham cracker crumbs - For the crisp, buttery crust base.
- ⅓ cup unsalted butter, melted - Binds the crust ingredients and adds richness.
- 2 tablespoons granulated sugar - Sweetens the crust slightly.
- 8 ounces cream cheese, softened - Creates the creamy filling with a mild tang.
- ½ cup powdered sugar - Adds sweetness to the filling without graininess.
- 1 teaspoon almond extract - Provides the signature almond flavor.
- 1 cup heavy cream - Whipped for lightness and volume in the filling.
- 2 cups fresh cherries, pitted and halved - Brings juicy sweetness and tartness.
- ¼ cup sliced almonds, toasted - Adds a crunchy, nutty garnish.
Instructions
- Combine the graham cracker crumbs, melted butter, and granulated sugar in a bowl. Press this mixture evenly into the bottom of a 9-inch pie pan to form the crust. Chill in the refrigerator while preparing the filling.
- Beat the softened cream cheese and powdered sugar together until smooth and creamy. Stir in the almond extract for extra flavor.
- In a separate bowl, whip the heavy cream until stiff peaks form. Gently fold the whipped cream into the cream cheese mixture until fully blended and fluffy.
- Pour the filling over the chilled crust and spread it evenly. Arrange the halved cherries on top, pressing them lightly into the filling.
- Sprinkle the toasted sliced almonds over the cherries as a final touch. Chill the pie in the refrigerator for at least 4 hours before serving to let it set properly.
Enjoy this fresh and flavorful no-bake pie as a quick dessert that looks beautiful and tastes inviting.
8. Vegan Mixed Berry Chia Seed Pie
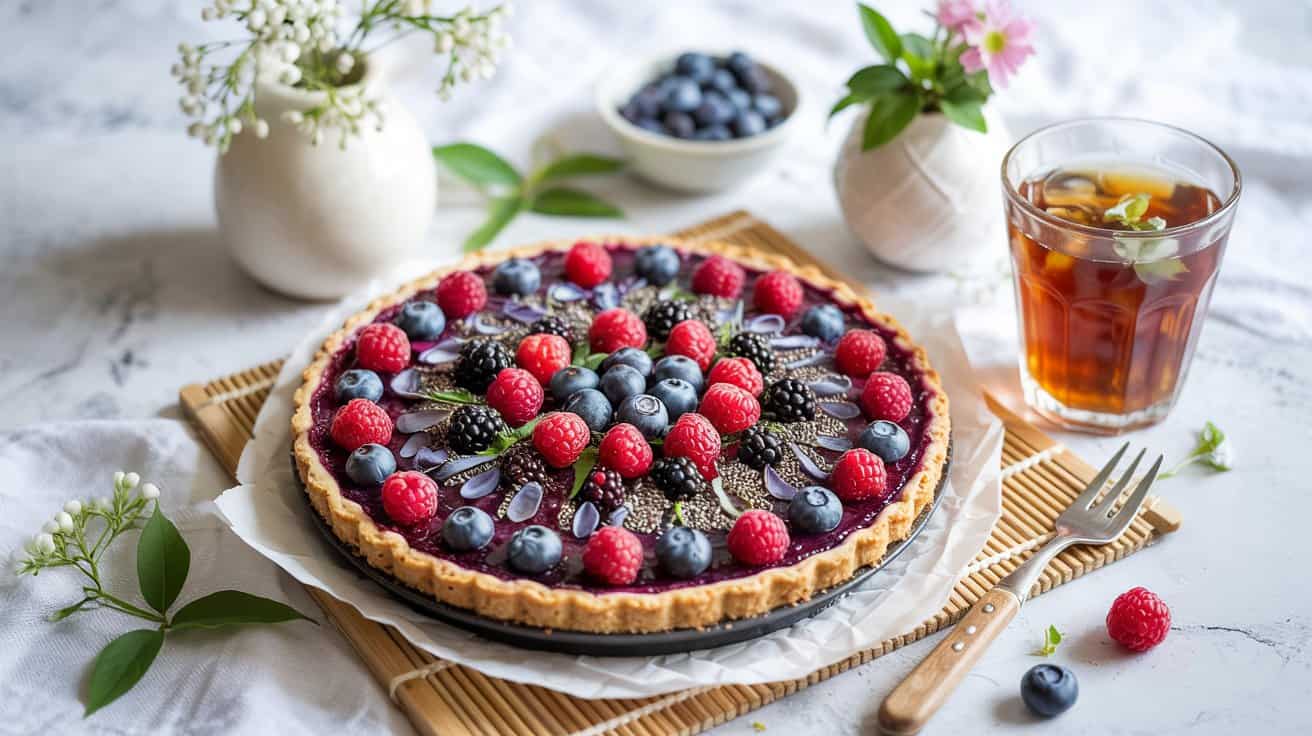
This vegan mixed berry chia seed pie offers a fresh, fruity treat that's both nourishing and refreshing. It combines a variety of berries with the natural thickening power of chia seeds, all resting on a slightly sweet, crunchy date-nut crust.
The pie is simple to assemble and requires no baking, making it a convenient option for those wanting a wholesome dessert or snack. The bright colors and balanced flavors make it attractive and appealing to serve any day.
Why This Recipe Works
This pie blends wholesome ingredients to create a nutritious dessert that's satisfying and easy to prepare. It balances sweet and tart berry flavors with the nutty crunch of the crust and smooth gel-like filling from chia seeds.
- Convenience - No baking needed, quick to prepare and set in the fridge.
- Flavor balance - Combines sweet, tart berries with a subtly sweet crust for a balanced taste.
- Texture - Features a crunchy crust, smooth chia filling, and soft juicy berries.
- Appeal - Eye-catching, colorful, and perfect for health-conscious family meals or gatherings.
Ingredient Swap Ideas
Swapping key ingredients in this recipe makes it flexible for different preferences or what's available in your pantry. You can maintain the essence of the pie while adjusting texture and taste to your needs.
- Mixed Berries - Use any fresh or frozen berries like strawberries, raspberries, blueberries, or blackberries depending on season and preference.
- Date-Nut Crust - Substitute walnuts with almonds or pecans for a different nutty flavor and texture.
- Sweetener - Replace maple syrup with agave nectar or a mild honey alternative if not strictly vegan.
- Chia Seeds - Use ground flaxseeds as a gel substitute if chia seeds aren't available.
Ingredients
- Dates - 1 cup pitted Medjool dates, packed, for natural sweetness.
- Walnuts - 1 cup raw walnuts, roughly chopped for the crust's crunch.
- Mixed Berries - 3 cups fresh or frozen mixed berries (blueberries, strawberries, raspberries).
- Chia Seeds - 3 tablespoons chia seeds to thicken the filling naturally.
- Maple Syrup - 2 tablespoons pure maple syrup to enhance sweetness.
- Lemon Juice - 1 tablespoon fresh lemon juice to brighten the berry flavor.
- Vanilla Extract - 1 teaspoon pure vanilla extract for subtle warmth.
- Salt - A pinch of salt to balance sweetness in the crust.
Instructions
- Prepare the crust by placing walnuts and dates in a food processor. Pulse until the mixture resembles coarse crumbs and starts to stick together. Press this evenly into the bottom of a 9-inch pie pan to form a firm crust.
- In a mixing bowl, combine the mixed berries, chia seeds, maple syrup, lemon juice, vanilla extract, and a pinch of salt. Stir well until the berries are coated and the chia seeds are evenly distributed.
- Let the berry mixture sit for about 15 to 20 minutes to allow the chia seeds to absorb liquid and thicken, stirring occasionally to prevent clumps.
- Pour the berry-chia filling over the prepared crust and spread it out evenly. Cover the pie with plastic wrap and refrigerate for at least 2 hours or until fully set and chilled.
- Once chilled, slice and serve as a light, nutritious dessert or snack. Store any leftovers covered in the fridge for up to 3 days.
9. No-Bake Lemon Meringue Pie
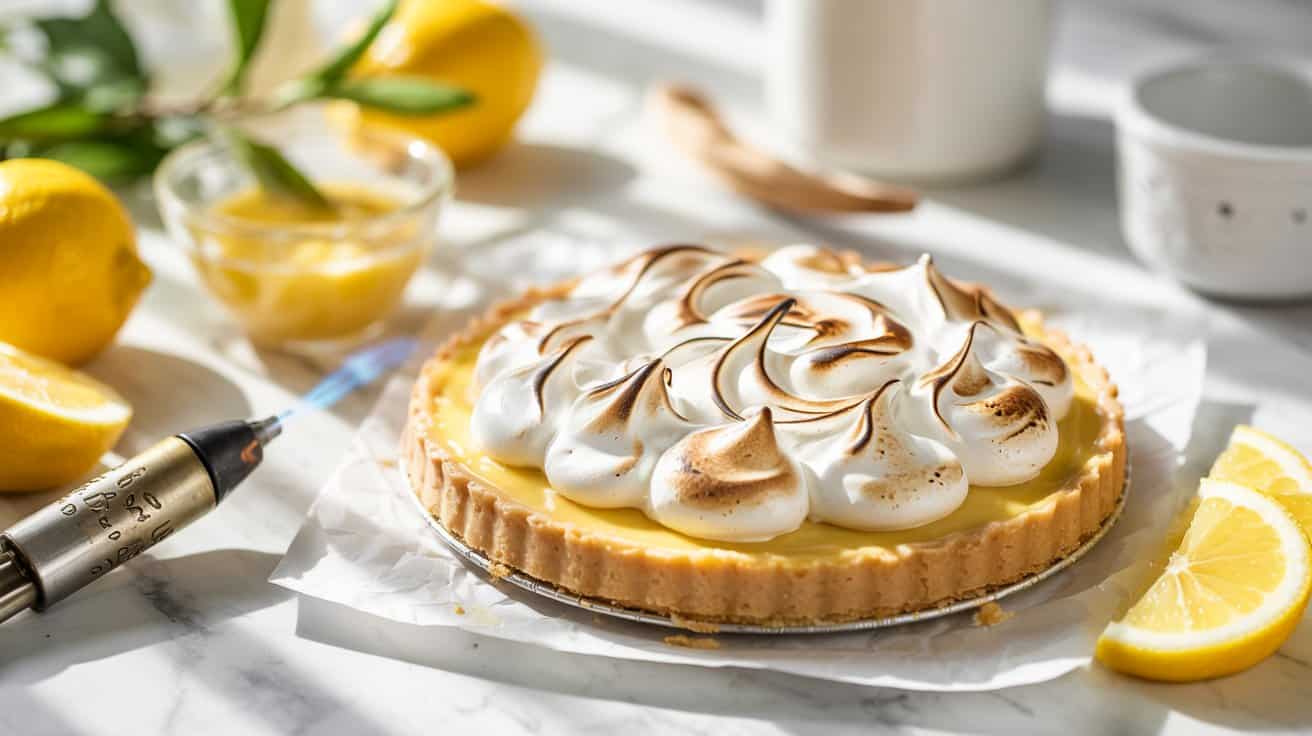
This no-bake lemon meringue pie offers a refreshing twist on the classic dessert, combining a zesty, chilled lemon filling with a crunchy graham cracker crust. It's an approachable recipe that skips the oven and simplifies the process without sacrificing flavor or texture.
The crisp crust, smooth citrus filling, and light, fluffy meringue topping create a balance that feels both bright and indulgent. It's a great dessert choice for warm days or anytime you want something impressive yet simple to prepare.
Why This Recipe Works
This no-bake lemon meringue pie delivers ease and flavor in a single dish, making it an ideal choice for busy cooks aiming for a fresh dessert.
- Convenience - No oven needed, which saves time and keeps your kitchen cool.
- Flavor balance - The tart lemon filling goes well with the sweet meringue and buttery crust.
- Texture - Crisp crust contrasts with the creamy filling and airy meringue for a satisfying bite.
- Appeal - Elegant enough for gatherings but simple enough for casual treats.
Ingredient Swap Ideas
Adjusting ingredients can help tailor this pie to your dietary needs or flavor preferences without losing its essence. Here are some swaps to consider.
- Graham cracker crust - Use gluten-free graham crackers or crushed digestive biscuits for a gluten-free option.
- Condensed milk - Substitute with coconut condensed milk to keep it dairy-free and add a subtle coconut flavor.
- Lemon juice - Try lime juice for a different citrus twist that still packs a punch.
- Egg whites for meringue - Use aquafaba (chickpea brine) whipped with sugar for a vegan meringue alternative.
Ingredients
- 1 ½ cups graham cracker crumbs - For the crunchy base of the crust.
- ⅓ cup unsalted butter, melted - Binds the crust and adds richness.
- ¼ cup granulated sugar - Sweetens and balances the crust flavor.
- 1 can (14 oz) sweetened condensed milk - Provides creamy sweetness to the filling.
- ½ cup fresh lemon juice - Adds bright, tangy flavor to the filling.
- 1 tablespoon lemon zest - Enhances the citrus aroma and taste.
- 3 large egg whites - Whipped to form the light meringue topping.
- ¼ teaspoon cream of tartar - Stabilizes the meringue to hold its shape.
- ½ cup granulated sugar (for meringue) - Sweetens and helps create stiff peaks.
Instructions
- In a medium bowl, combine graham cracker crumbs, melted butter, and ¼ cup sugar. Press the mixture firmly into the bottom and up the sides of a 9-inch pie dish to form the crust. Chill in the refrigerator for at least 30 minutes to set.
- In a separate bowl, whisk together the sweetened condensed milk, fresh lemon juice, and lemon zest until smooth and thickened. Pour this filling into the chilled crust and spread evenly.
- Prepare the meringue by beating egg whites and cream of tartar in a clean bowl until soft peaks form. Gradually add ½ cup sugar while continuing to beat until stiff, glossy peaks develop.
- Spoon the meringue over the lemon filling, spreading it to the edges to seal the filling. Use a spatula to create small peaks or waves on the surface for texture.
- Use a kitchen torch to lightly brown the meringue topping or place the pie under a broiler for 1-2 minutes, watching carefully to prevent burning. Chill the pie for at least 2 hours before serving to allow it to set fully.
10. Tropical Pineapple and Banana Pie
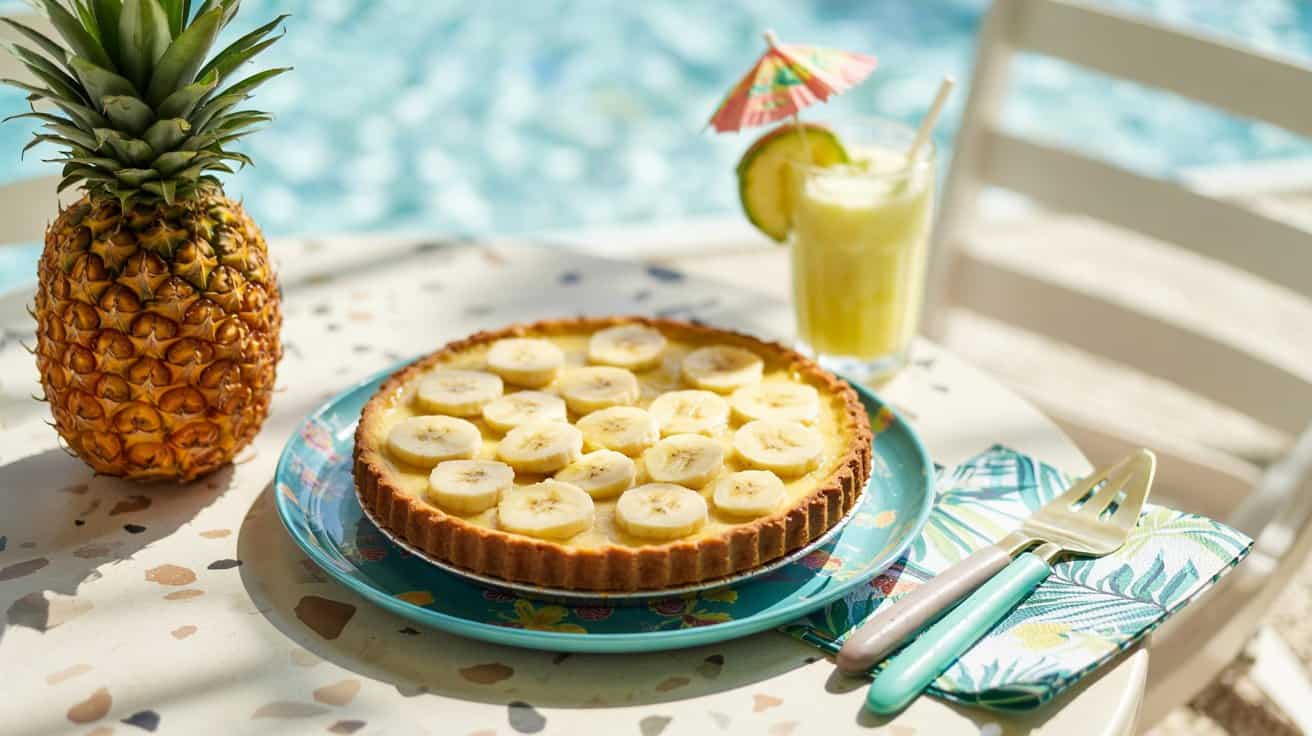
This pie brings together the bright flavors of pineapple and banana layered over a crunchy coconut crust, offering a refreshing and tropical treat. The combination is creamy and naturally sweet, with a subtle hint of lime that adds a zesty twist.
It's a dessert that feels indulgent yet light, making it suitable for warm days or any occasion that calls for something a little different. The preparation is straightforward, so you can enjoy this pie without spending too much time on complicated steps.
Why This Recipe Works
This tropical pie delivers a balance of creamy and fruity elements that are easy to prepare and share.
- Convenience - The no-bake filling and simple crust make it quick to assemble.
- Flavor balance - Sweet bananas and tangy pineapple blend with citrus notes for a bright taste.
- Texture - The crunchy coconut crust contrasts nicely with the smooth filling.
- Appeal - This pie is family-friendly and suitable for casual gatherings or dessert after a light meal.
Ingredient Swap Ideas
Adapting this pie to suit different preferences or dietary needs is simple, with a few thoughtful substitutions maintaining its tropical essence.
- Crust base - Use gluten-free graham crackers or almond flour for a gluten-free crust.
- Dairy substitute - Replace cream cheese or condensed milk with coconut cream for a dairy-free version.
- Sweetener alternative - Swap regular sugar with honey or maple syrup for a more natural sweetener.
- Fruit variation - Try mango or papaya instead of pineapple for a similar tropical flavor with a twist.
Ingredients
- 1 ½ cups shredded unsweetened coconut - For the crunchy crust base.
- ½ cup crushed graham crackers - Adds structure and mild sweetness to the crust.
- 5 tablespoons unsalted butter, melted - Binds the crust ingredients together.
- 2 ripe bananas, sliced - Provides creamy sweetness in the filling.
- 1 ½ cups fresh pineapple chunks - Brings bright tropical flavor.
- 1 package (8 ounces) cream cheese, softened - Creates a smooth, creamy layer.
- 1 can (14 ounces) sweetened condensed milk - Sweetens and thickens the filling naturally.
- ¼ cup freshly squeezed lime juice - Adds a fresh citrus tang.
- 1 teaspoon vanilla extract - Enhances overall flavor.
- 1 cup heavy cream - Whipped to add lightness to the filling.
Instructions
- Preheat your oven to 350°F (175°C). In a medium bowl, combine shredded coconut, crushed graham crackers, and melted butter. Mix well until the crumbs are evenly coated. Press this mixture firmly into the bottom of a 9-inch pie pan. Bake the crust for 8 to 10 minutes or until golden. Let it cool completely.
- In a large bowl, beat the cream cheese until smooth. Gradually add sweetened condensed milk, mixing well. Stir in lime juice and vanilla extract until evenly combined.
- Whip heavy cream in a separate bowl until stiff peaks form. Gently fold the whipped cream into the cream cheese mixture to keep the filling light and airy.
- Arrange sliced bananas evenly over the cooled crust. Pour half of the cream mixture over the bananas, spreading it gently. Layer fresh pineapple chunks on top, then pour the remaining cream mixture over the pineapple, smoothing the surface.
- Refrigerate the pie for at least 4 hours or until set. Before serving, you can garnish with extra shredded coconut or thin banana slices if you want added decoration. Keep refrigerated until ready to serve.
11. No-Bake Pumpkin Pie with Graham Cracker Crust
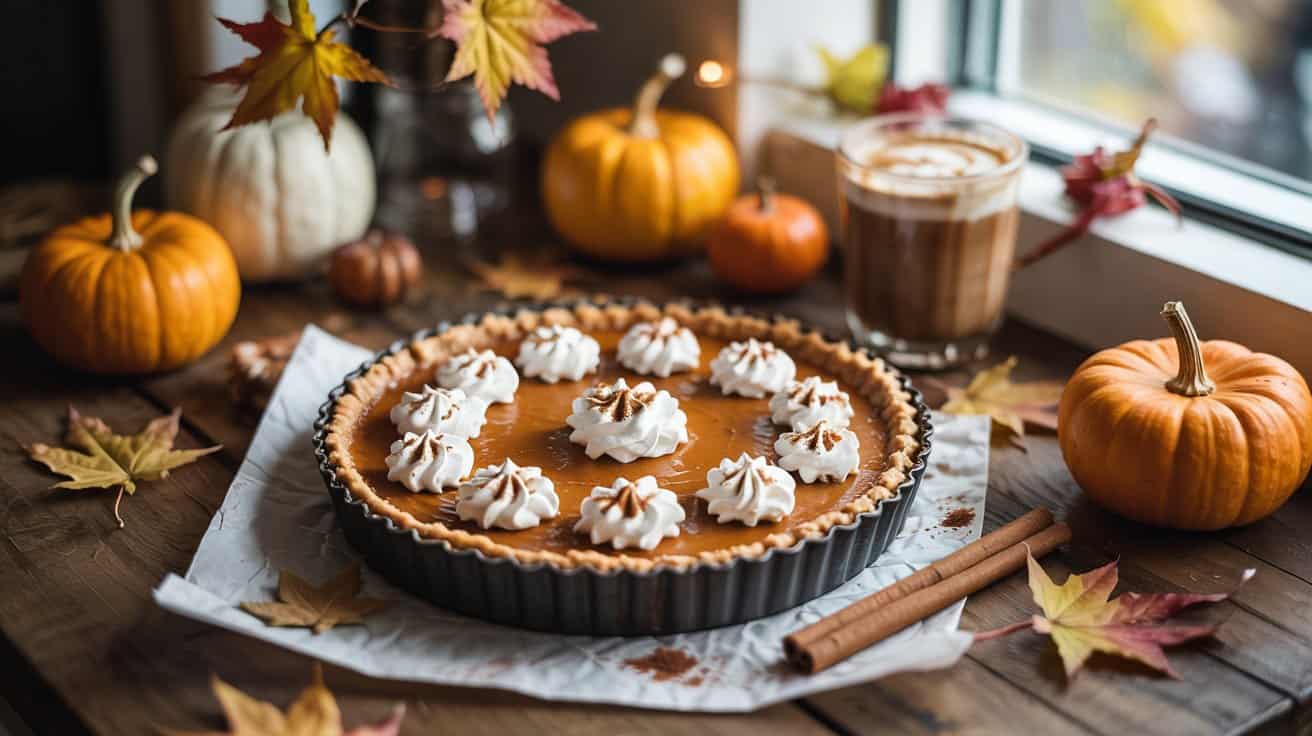
No-bake pumpkin pie offers a fresh take on the traditional dessert, combining creamy spiced pumpkin filling with a crisp graham cracker crust. This recipe skips the oven, making it an ideal choice for warmer days or when you want to save time without giving up flavor.
The filling has a smooth, tangy texture thanks to cream cheese, balanced with classic pumpkin pie spices. Once chilled, it sets firmly, allowing you to enjoy the familiar comforts of pumpkin pie in a lighter, cool form.
Why This Recipe Works
This recipe is a simple way to enjoy pumpkin pie without baking or fuss. It comes together quickly and delivers rich flavors with a smooth texture that everyone will appreciate.
- Convenience - No oven required, saving time and avoiding extra heat in the kitchen.
- Flavor balance - Combines sweet pumpkin with warm spices and tangy cream cheese.
- Texture - Creamy filling contrasts nicely with a crunchy graham cracker crust.
- Appeal - Great for family gatherings or any time you want a refreshing autumn-inspired dessert.
Ingredient Swap Ideas
Changing up some ingredients can make this dessert suit different dietary preferences or flavor preferences without losing its essence.
- Cream cheese substitute - Use full-fat Greek yogurt for a lighter, tangy filling.
- Sweetener options - Swap granulated sugar with maple syrup or honey to add depth.
- Crust alternatives - Choose gluten-free graham crackers or crushed pecans for a nutty twist.
- Dairy-free version - Replace cream cheese with a plant-based cream cheese alternative.
Ingredients
- 1 ½ cups graham cracker crumbs - Finely crushed for an even, crumbly crust.
- 6 tablespoons unsalted butter - Melted to bind the crust ingredients.
- 8 ounces cream cheese - Softened at room temperature for a smooth filling.
- 1 cup canned pumpkin puree - Provides natural sweetness and pumpkin flavor.
- ½ cup granulated sugar - Sweetens the pie without overpowering the spices.
- 1 teaspoon ground cinnamon - Adds warmth and classic pumpkin spice aroma.
- ½ teaspoon ground ginger - Gives a gentle, spicy kick.
- ¼ teaspoon ground nutmeg - Enhances the overall spice blend.
- 1 teaspoon pure vanilla extract - Deepens flavor and adds a pleasant fragrance.
- 1 cup heavy cream - Whipped to soft peaks for a light, airy texture in the filling.
Instructions
- In a medium bowl, combine graham cracker crumbs and melted butter with a fork until the mixture holds together when pressed. Press the crumbs evenly into the bottom and up the sides of a 9-inch springform or pie pan. Chill in the refrigerator while preparing the filling.
- In a large mixing bowl, beat the softened cream cheese until smooth and fluffy. Add pumpkin puree, sugar, cinnamon, ginger, nutmeg, and vanilla extract. Mix well to combine all ingredients evenly.
- In a separate chilled bowl, whip the heavy cream to soft peaks. Gently fold the whipped cream into the pumpkin mixture until fully incorporated without deflating the cream.
- Pour the pumpkin filling into the chilled crust and smooth the top with a spatula. Cover loosely with plastic wrap and refrigerate for at least 4 hours, or overnight, to set firmly.
- Before serving, remove the pie from the fridge and release it from the springform if used. Slice and serve chilled, optionally garnished with a dollop of whipped cream or a sprinkle of cinnamon.
12. No-Bake Salted Caramel Apple Pie
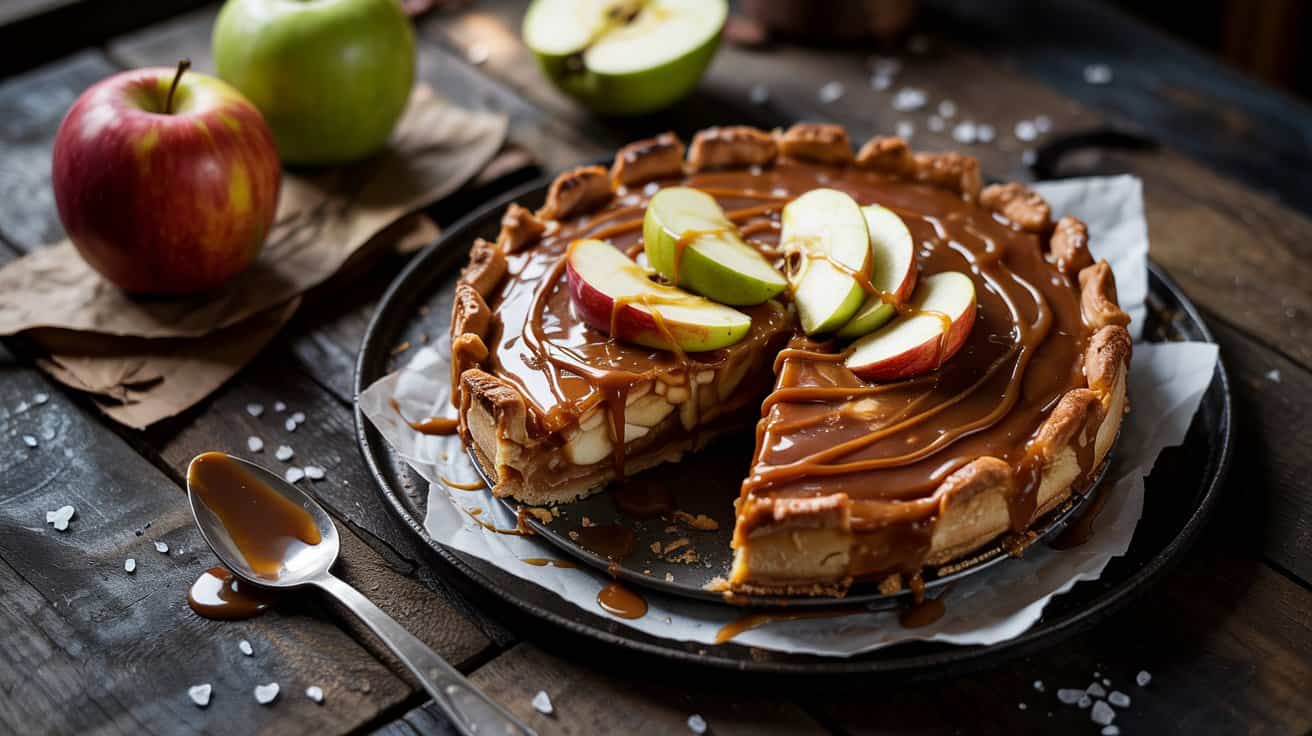
This no-bake salted caramel apple pie offers a fresh take on a classic dessert with a smooth caramel-apple filling located in a buttery shortbread crust. It's a great choice when you want a sweet treat that combines the familiar flavors of apple pie but without turning on the oven.
The silky whipped caramel filling sets up nicely with gelatin, giving a delicate, creamy texture that goes well with the crisp salted top and buttery base. It's surprisingly easy to put together and makes a great dessert for gatherings or whenever you crave something sweet with a bit of crunch and salt.
Why This Recipe Works
This recipe balances rich salted caramel and fresh apple flavors in a no-bake, easy-to-assemble format that's perfect for busy days or last-minute guests.
- Convenience - No baking required, saving time and avoiding heating up your kitchen.
- Flavor balance - Sweet caramel and tart apple flavors complemented by a touch of sea salt.
- Texture - Creamy, whipped filling set on a crisp, buttery shortbread crust.
- Appeal - Elegant enough for entertaining while still being family-friendly.
Ingredient Swap Ideas
Swapping ingredients in this recipe helps customize it for dietary preferences or to use what you have on hand, all while keeping its signature flavors.
- Shortbread crust - Use a gluten-free shortbread or crushed gluten-free cookies for a gluten-free version.
- Apples - Substitute with pears or a mix of tart berries for a different fruity twist.
- Gelatin - Replace with agar-agar for a vegetarian or vegan alternative; adjust setting times accordingly.
- Caramel - Use store-bought salted caramel sauce to save time or make a dairy-free caramel with coconut cream.
Ingredients
- 4 medium apples - peeled, cored, and finely chopped or grated.
- 1 ½ cups shortbread cookie crumbs - for the crust.
- 6 tablespoons unsalted butter - melted, to bind the crust.
- 1 ½ cups heavy cream - chilled for whipping the filling.
- 1 cup caramel sauce - homemade or store-bought salted caramel.
- 1 tablespoon powdered gelatin - dissolved in 2 tablespoons warm water.
- 1 teaspoon vanilla extract - to enhance flavor in the filling.
- ½ teaspoon sea salt flakes - for sprinkling on top.
Instructions
- Combine the shortbread crumbs and melted butter in a bowl until the mixture resembles wet sand. Press this firmly into the bottom of your pie dish to form an even crust. Chill in the refrigerator while preparing the filling.
- In a mixing bowl, whip the heavy cream with vanilla extract until soft peaks form. Gently fold in the caramel sauce until fully combined.
- Dissolve the powdered gelatin in warm water and add it quickly to the caramel whipped cream mixture, folding it in thoroughly.
- Stir in the chopped apples, then spread the filling evenly over the chilled crust. Smooth the top with a spatula.
- Sprinkle the pie with sea salt flakes to balance the sweetness. Refrigerate the pie for at least 4 hours or overnight to let it set firmly before serving.
This no-bake pie is best enjoyed chilled and fresh but can be stored covered in the refrigerator for up to 3 days.
13. No-Bake Key Lime and White Chocolate Pie
This no-bake key lime and white chocolate pie combines bright citrus flavors with creamy white chocolate, creating a refreshing dessert that's both smooth and tangy. The crumbly crust adds a nice contrast to the silky filling, making it an inviting treat for warm days or any time you want something light yet indulgent.
Since it requires no baking, this pie comes together quickly and easily, letting you enjoy a sophisticated dessert without spending time in the oven. It's a great choice for gatherings or when you want a crowd-pleasing finish that's straightforward to prepare.
Why This Recipe Works
This pie blends tart key lime with rich white chocolate, delivering balanced flavor and texture without needing to bake. It's simple to prepare and ideal for those looking to impress with minimal fuss.
- Convenience - No baking required, making it quick to assemble and chill.
- Flavor balance - Bright citrus tang harmonizes with sweet, creamy white chocolate.
- Texture - Smooth filling paired with a crisp, buttery crust offers a satisfying bite.
- Appeal - Light and fresh, this dessert suits many occasions and tastes.
Ingredient Swap Ideas
Swapping ingredients here lets you adjust the pie to suit dietary preferences or what you have in your pantry without losing its essential character.
- Key lime juice - Use regular lime juice or a mix of lemon and lime juice if key limes are unavailable.
- White chocolate - Swap for milk chocolate or a white chocolate alternative if you prefer less sweetness.
- Graham cracker crust - Substitute with crushed digestive biscuits, vanilla wafers, or gluten-free cookies to suit your needs.
- Sweetened condensed milk - Use evaporated milk with added sugar or a dairy-free condensed milk alternative for lactose intolerance.
Ingredients
- 1 ½ cups graham cracker crumbs - For a buttery and crunchy crust base.
- 6 tablespoons unsalted butter, melted - Binds the crumbs into a firm crust.
- ¼ cup granulated sugar - Adds sweetness to the crust.
- 12 ounces white chocolate, chopped - Provides creamy sweetness for the filling.
- 1 can (14 ounces) sweetened condensed milk - Gives the pie its creamy texture and sweetness.
- ½ cup fresh key lime juice - Adds bright and tart citrus flavor.
- 1 teaspoon key lime zest - Intensifies the lime aroma and taste.
- ½ teaspoon vanilla extract - Enhances overall flavor depth.
- Whipped cream (optional) - For serving and extra creaminess.
Instructions
- Combine the graham cracker crumbs, melted butter, and granulated sugar in a medium bowl. Press this mixture firmly into the bottom and up the sides of a 9-inch pie dish to form an even crust. Refrigerate while preparing the filling.
- Melt the chopped white chocolate gently using a double boiler or microwave in short bursts, stirring frequently until smooth. Set aside to cool slightly but not harden.
- In a separate bowl, whisk together the sweetened condensed milk, key lime juice, key lime zest, and vanilla extract until well combined. Slowly stir in the melted white chocolate until the mixture is smooth and uniform.
- Pour the filling into the prepared crust and smooth the top with a spatula. Cover the pie with plastic wrap and refrigerate for at least 4 hours, or until fully set.
- Before serving, top the pie with whipped cream if desired. Slice and enjoy the refreshing flavors of this creamy, tangy dessert.
14. No-Bake Chocolate Mint Grasshopper Pie
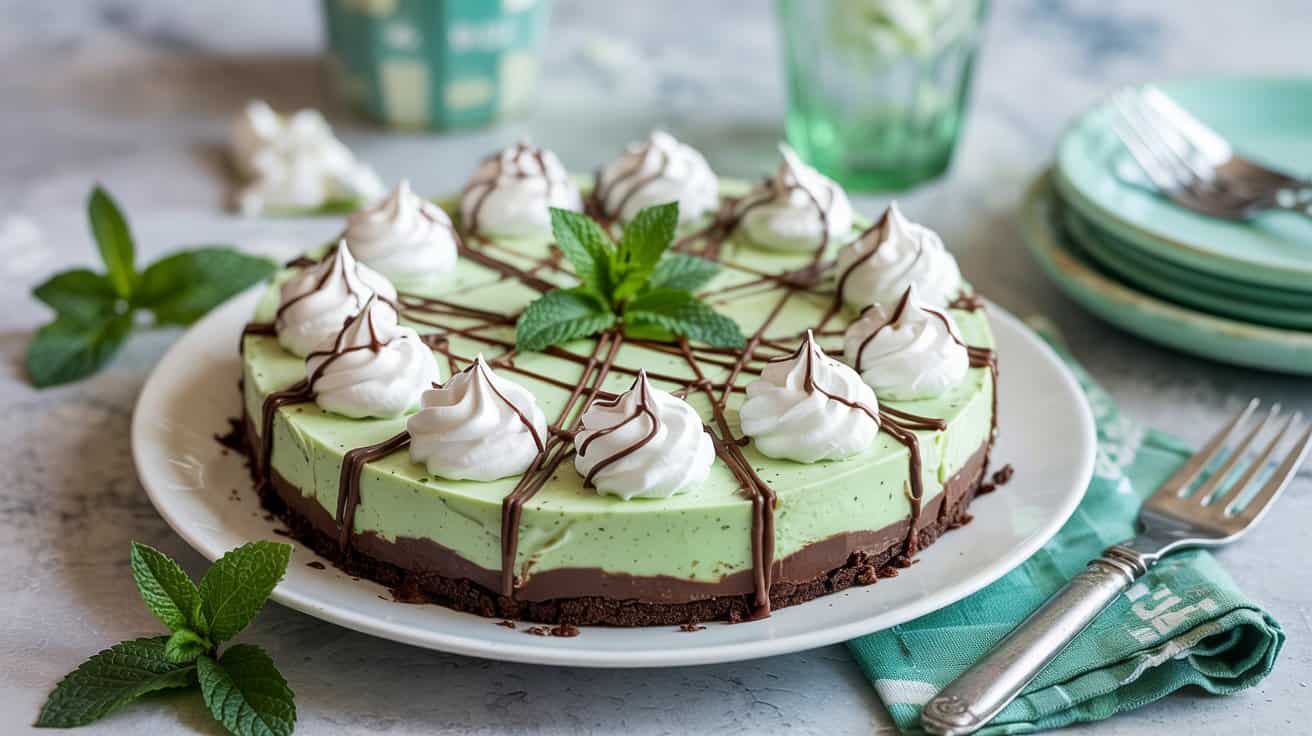
This no-bake chocolate mint grasshopper pie combines a minty, refreshing mousse with a crunchy cookie crust, making it an ideal treat for warm days. The cool, creamy texture goes well with the rich chocolate flavor and the bright hint of peppermint.
It's a dessert that doesn't require an oven, so preparing it feels simple and straightforward. Whether you're hosting a casual gathering or want a sweet finish to a family meal, this pie offers an enjoyable and easy solution.
Why This Recipe Works
This pie brings together accessibility and flavor in a way that ensures you can create a special dessert with minimal fuss.
- Convenience - No baking needed, saving time and effort in preparation.
- Flavor balance - The mint and chocolate flavors blend smoothly without overpowering each other.
- Texture - Crisp cookie crust contrasts with the airy, creamy mousse on top.
- Appeal - A crowd-pleasing dessert with fresh and indulgent elements, suitable for summer occasions.
Ingredient Swap Ideas
Swapping a few ingredients can help this pie fit different dietary needs or flavor preferences while keeping its essence intact.
- Cookie Crust - Use gluten-free chocolate wafers or cookies for a gluten-free option.
- Mint Flavor - Substitute peppermint extract with spearmint extract or fresh mint leaves for a milder taste.
- Dairy - Replace cream cheese with a dairy-free cream cheese alternative to keep it vegan-friendly.
- Chocolate - Try using dark chocolate chips instead of semisweet for a richer chocolate flavor.
Ingredients
- 1 ½ cups chocolate cookie crumbs - crushed finely to form the base crust.
- ⅓ cup unsalted butter - melted, to bind the crust.
- 8 ounces cream cheese - softened, to create the mousse base.
- 1 cup powdered sugar - to sweeten the filling uniformly.
- ½ teaspoon peppermint extract - adds fresh mint flavor.
- 2 cups heavy cream - chilled, whipped into soft peaks for a light mousse.
- 1 cup semisweet chocolate chips - melted and cooled, folded into the mousse for chocolate richness.
- Whipped cream - optional, for topping.
- Grated chocolate or chocolate shavings - optional, to garnish and enhance appearance.
Instructions
- In a medium bowl, combine the chocolate cookie crumbs with melted butter. Press this mixture firmly into the bottom of a 9-inch pie dish to form an even crust. Place it in the refrigerator while preparing the filling.
- In a large mixing bowl, beat the softened cream cheese with powdered sugar and peppermint extract until smooth and well combined.
- Fold the melted, cooled chocolate chips into the cream cheese mixture, stirring gently to blend.
- In a separate bowl, whip the chilled heavy cream until soft peaks form. Carefully fold the whipped cream into the chocolate and cream cheese mixture, preserving the airy texture.
- Pour the mousse over the chilled crust and smooth the top. Refrigerate the pie for at least 4 hours or until firm.
- Before serving, top with whipped cream and sprinkle with grated chocolate or shavings if desired. Slice and serve chilled for a refreshing dessert experience.
This roundup complements related collections such as the no-bake summer pies for warm days, which focuses on easy, oven-free pie recipes suited to hot weather. You can also browse the no-bake summer desserts for hot weather article for a broader selection of chilled sweets beyond pies.

Andrew Gray is a seasoned food writer and blogger with a wealth of experience in the restaurant and catering industries. With a passion for all things delicious, Andrew has honed his culinary expertise through his work as a personal chef and caterer.
His love for food led him to venture into food writing, where he has contributed to various online publications, sharing his knowledge and insights on the culinary world. As the proud owner of CooksCrafter.com, Andrew covers a wide range of topics, including recipes, restaurant reviews, product recommendations, and culinary tips.
Through his website, he aims to inspire and educate fellow food enthusiasts, offering a comprehensive resource for all things food-related.