Game day calls for snacks and appetizers that can bring people together and keep the energy high, often centered on shareable finger foods and hearty dips. This collection of 16 crowd-pleasing appetizers is designed specifically with that in mind, spanning American bar snacks to lighter Mediterranean bites, offering a range of dishes that are perfect for sharing during sports events and casual get-togethers.

The recipes range from classic favorites like buffalo chicken wings and loaded nachos to lighter options such as caprese skewers and buffalo cauliflower bites. Each recipe balances bold flavors with approachable ingredients, making them simple to prepare while still delivering satisfying tastes that appeal to a variety of preferences.
These appetizers are chosen for their ease of preparation and ability to serve a crowd without creating a lot of extra work or cleanup. They allow for quick assembly or make-ahead possibilities, making sure you can focus on enjoying the game and your guests rather than spending too much time in the kitchen.
1. Buffalo Chicken Wings

Buffalo chicken wings are a classic favorite for gatherings, casual dinners, and game day treats, originating in Buffalo, New York. They offer a spicy kick balanced by a tangy, buttery sauce that clings to crispy chicken wings.
The combination of heat and richness makes these wings irresistible and simple to prepare at home, achieved with a roughly 2:1 hot sauce-to-butter ratio for classic buffalo sauce.
Serving with crunchy celery sticks and a cooling ranch or blue cheese dip makes it a complete and satisfying snack or meal component, and for a lighter vegetarian option try air fryer cauliflower alternative, or explore buffalo dip side dishes for parties.
Why This Recipe Works
This recipe brings together convenience and bold flavor in a way that fits busy schedules and varied tastes. It delivers on spice and texture with straightforward ingredients, using pantry staples like hot sauce, cayenne, and melted butter.
- Convenience - The wings bake in the oven, at about 425°F, reducing mess and hands-on time compared to frying.
- Flavor balance - The spicy buffalo sauce goes well with a buttery, slightly tangy profile.
- Texture - Crispy skin contrasts with juicy, tender chicken inside.
- Appeal - These wings work well for parties, family dinners, or casual snacking, and pair nicely with blended cocktails for summer sipping.
Ingredient Swap Ideas
Swapping a few ingredients can tailor this recipe to suit different dietary needs or preferences without losing the classic buffalo wing character.
- Chicken parts - Use boneless chicken thighs or breasts for a leaner and easier-to-eat option.
- Sauce heat - Adjust the cayenne pepper or hot sauce for milder or more intense spice levels, using half the hot sauce for milder heat.
- Dairy-free - Replace butter with olive oil or a plant-based margarine for dairy-free buffalo sauce.
- Dip alternatives - Serve with hummus or guacamole instead of ranch for a different flavor and healthier twist, or pair with 3-ingredient appetizers for quick parties.
Ingredients
- 2 pounds chicken wings, separated into drumettes and flats, skin on
- 1 tablespoon baking powder (aluminum-free)
- 1 teaspoon salt
- ½ teaspoon black pepper
- ½ cup hot sauce (such as Frank's RedHot)
- 4 tablespoons unsalted butter, melted
- Celery sticks, for serving
- Ranch or blue cheese dressing, for serving
Instructions
- Preheat your oven to 425°F (220°C). Line a baking sheet with foil and place a wire rack on top. This setup helps the wings get crispy all around.
- Pat the chicken wings dry with paper towels thoroughly. This step is important for crispy skin. Toss the wings in a large bowl with baking powder, salt, and pepper until evenly coated.
- Arrange the wings in a single layer on the wire rack. Bake for 35 to 45 minutes, turning halfway through. The wings should be golden brown and crisp.
- While the wings bake, mix hot sauce and melted butter in a large bowl. Once the wings are done, immediately toss them in the buffalo sauce until fully coated.
- Serve the wings hot with celery sticks and your choice of ranch or blue cheese dressing. Enjoy the balance of spicy, buttery flavor with the crisp texture.
2. Loaded Nachos

Loaded nachos are a straightforward way to bring bold flavors and satisfying textures together in one dish, a Tex-Mex-inspired party staple. This recipe combines crispy tortilla chips with melty cheese, spicy jalapeños, hearty beans, and seasoned ground beef, all topped with fresh salsa and cool sour cream.
It's a dish that comes together quickly and offers a great mix of savory and tangy notes.
The layered flavors and varied textures make loaded nachos a favorite for casual meals or gatherings. You can prepare it in under 30 minutes, serving 4-6 people, making it a go-to option when you want something tasty without spending much time cooking.
Why This Recipe Works
Loaded nachos deliver a winning combination of convenience, flavor, and crowd appeal. They satisfy a craving for something cheesy and spicy while offering protein and fiber from beans and beef.
- Convenience - Easy to assemble with mostly pantry staples and quick cooking steps.
- Flavor balance - Combines savory ground beef, spicy jalapeños, and fresh salsa with creamy cheese and sour cream.
- Texture - Crisp chips contrasting with melted cheese and tender beans add satisfying mouthfeel variety.
- Appeal - Family-friendly and perfect for snacks, casual dinners, or party platters.
Ingredient Swap Ideas
Adjusting ingredients helps customize loaded nachos for different preferences or dietary needs without losing the original's essence. Consider these swaps to make the dish your own.
- Ground beef swap - Use ground turkey or shredded chicken for a leaner protein option.
- Beans swap - Substitute black beans with pinto beans or kidney beans depending on what you have on hand.
- Cheese swap - Choose pepper jack or mozzarella cheese for a different melt and flavor.
- Dairy alternatives - Use dairy-free sour cream or cheese to make the dish suitable for lactose intolerance or vegan diets.
Ingredients
- 6 cups tortilla chips, preferably a sturdy, thicker variety to hold toppings.
- 1 pound ground beef, lean or regular depending on preference.
- 2 medium jalapeños, sliced (adjust quantity based on heat tolerance).
- 1 cup canned black beans, rinsed and drained.
- 2 cups shredded cheddar cheese, sharp or mild according to taste.
- 1 cup salsa, fresh or store-bought.
- ½ cup sour cream for topping.
- 1 small onion, finely chopped.
- 2 cloves garlic, minced.
- 2 tablespoons taco seasoning, homemade or pre-packaged.
- 1 tablespoon olive oil for cooking.
- 2 tablespoons fresh cilantro, chopped, for garnish (optional).
- Salt and pepper to taste.
Instructions
- Heat olive oil in a large skillet over medium heat. Add chopped onion and sauté until translucent, about 3 to 4 minutes. Stir in minced garlic and cook 1 minute more until fragrant.
- Add ground beef to the skillet, breaking it apart with a spoon. Cook until browned and cooked through, about 7 to 8 minutes. Drain excess fat if necessary. Sprinkle taco seasoning over the beef and stir well to coat evenly.
- Preheat your oven to 375°F (190°C). On a large, ovenproof dish or baking sheet, spread half of the tortilla chips in an even layer. Top with half of the cooked ground beef, jalapeño slices, black beans, and shredded cheese. Repeat the layers with remaining chips and toppings.
- Place the assembled nachos in the oven and bake for 10 minutes or until the cheese melts and bubbles. Remove from the oven and spoon salsa evenly over the top.
- Finish by adding dollops of sour cream and a sprinkle of chopped cilantro if desired. Serve warm straight from the dish.
3. Stuffed Jalapeño Poppers
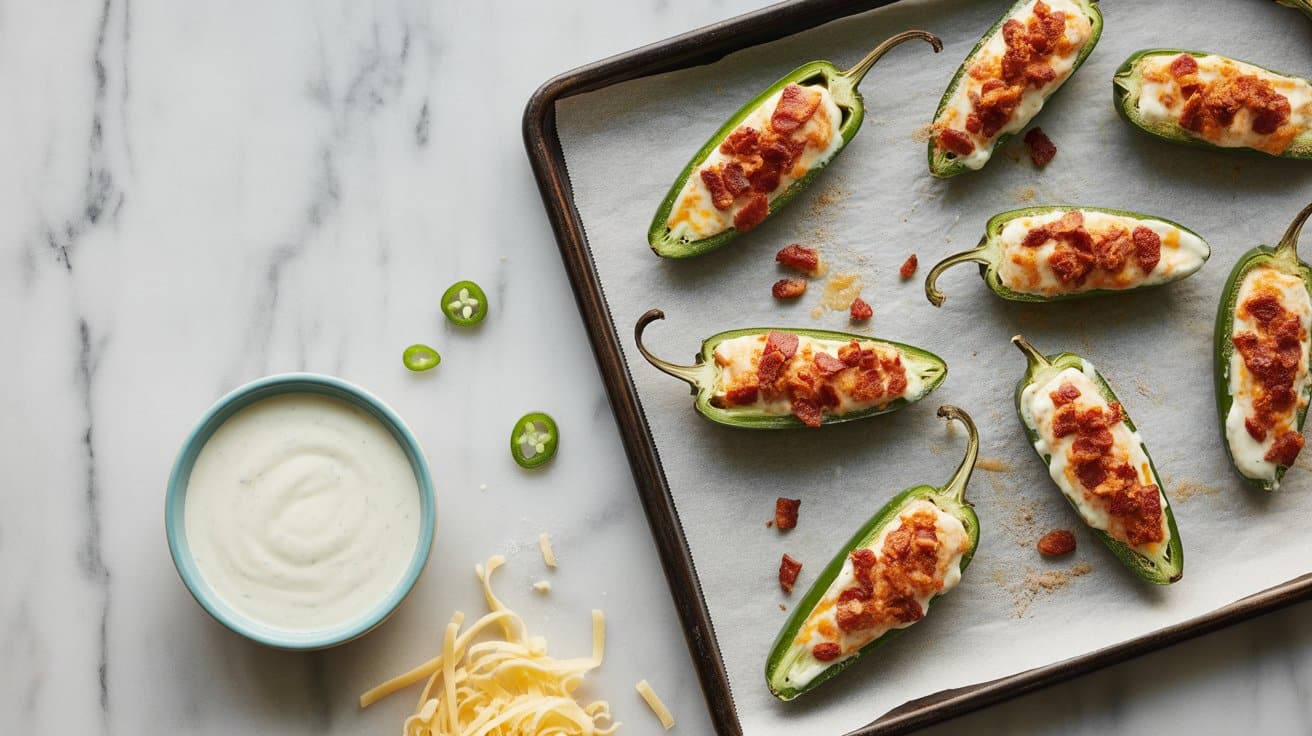
Stuffed jalapeño poppers offer a satisfying combination of creamy, cheesy filling, often using cream cheese and shredded cheddar, wrapped in smoky bacon with a little heat from the jalapeños. They're simple to make and bring a lovely balance of spicy and savory flavors that work well as appetizers, snacks, or party treats.
You'll appreciate how crisp the bacon gets while keeping the peppers tender and the cheese melty on the inside.
This recipe requires just a few basic ingredients and minimal prep time, making it manageable even on busy days; serve with easy crowd-pleasing side dishes to round the platter.
Why This Recipe Works
This recipe delivers a flavorful, crowd-pleasing snack that cooks quickly and looks inviting.
- Convenience - Needs just a handful of ingredients and bakes in under 30 minutes.
- Flavor balance - Combines spicy jalapeños, creamy cheese, and smoky bacon for a complementary taste.
- Texture - Crisp bacon contrasts with the softness of the filling and the slight bite of the pepper.
- Appeal - Works well for get-togethers, game day, or easy finger food for families.
Ingredient Swap Ideas
Swapping ingredients can help make this recipe fit your preferences or accommodate dietary needs without losing its essence.
- Cheese substitute - Use goat cheese or a dairy-free cream cheese for a different flavor or to make it lactose-free.
- Bacon alternative - Try turkey bacon or omit the bacon and bake with a drizzle of olive oil for a lighter option.
- Pepper options - Replace jalapeños with mini sweet peppers if you prefer less heat.
- Add-ins - Mix cooked sausage or chives into the cheese filling for extra flavor variety.
Ingredients
- 12 fresh jalapeño peppers, washed and halved lengthwise, seeds removed.
- 8 ounces cream cheese, softened to room temperature for easy spreading.
- 1 cup shredded cheddar cheese, adds sharpness and meltiness.
- 12 slices bacon, thin-cut works best for wrapping.
- ½ teaspoon garlic powder, to improve the filling's flavor.
- ¼ teaspoon salt, balances the taste.
- ¼ teaspoon black pepper, adds mild seasoning.
Instructions
- Preheat your oven to 400°F (200°C). Line a baking sheet with foil or parchment paper for easy cleanup.
- Prepare the jalapeños by slicing them in half lengthwise and removing all seeds and membranes to reduce the heat. Pat them dry with paper towels.
- In a medium bowl, mix softened cream cheese, shredded cheddar, garlic powder, salt, and pepper until well combined.
- Spoon the cheese mixture evenly into each jalapeño half. Wrap each stuffed pepper with one slice of bacon, securing with a toothpick if needed.
- Place the wrapped poppers on the prepared baking sheet and bake for 20 to 25 minutes, until the bacon is crispy and the cheese filling is bubbly. Serve warm.
4. Classic Sliders
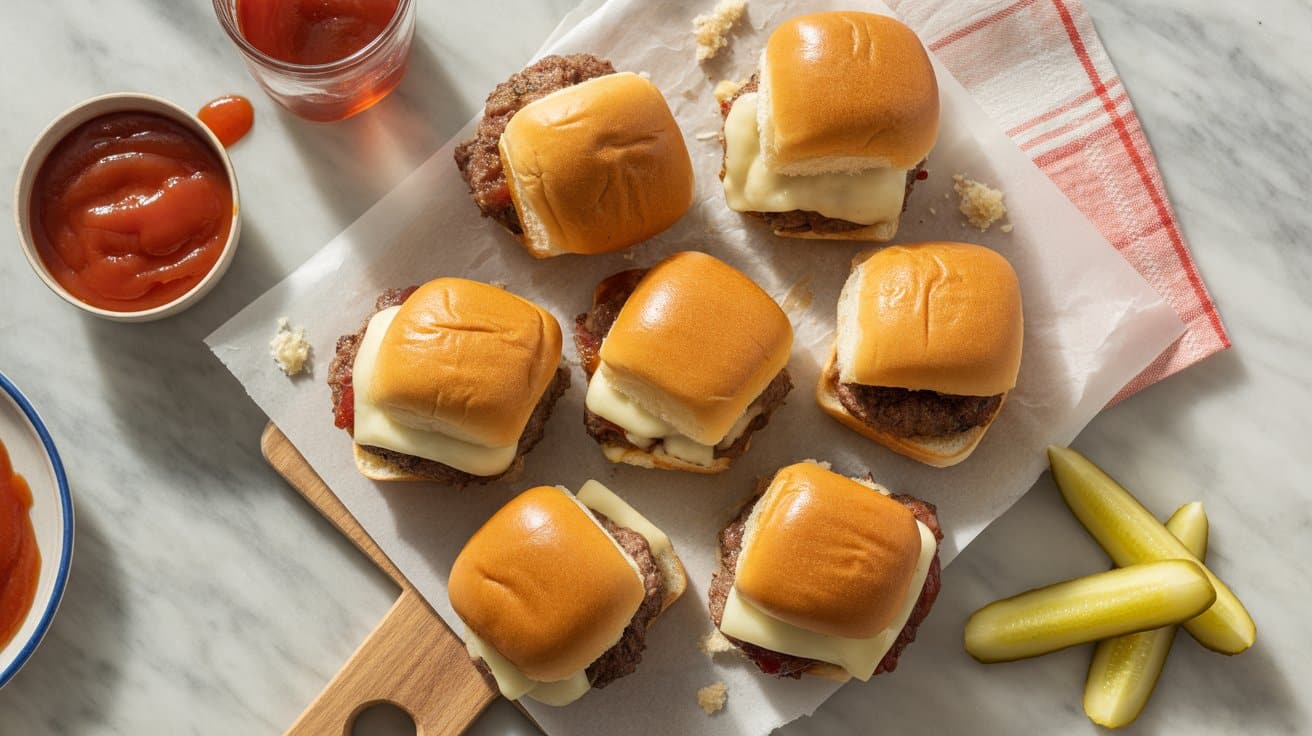
Classic sliders bring together simple flavors in a way that feels satisfying and familiar. These mini beef patties topped with melted cheese and crisp pickles on soft buns deliver a handheld meal that's both comforting and quick to prepare.
They're ideal for busy weeknights or casual gatherings, offering bite-sized portions that everyone can enjoy. The combination of juicy beef, gooey cheese, and tangy pickles creates a balance that keeps you coming back for more.
Why This Recipe Works
This recipe keeps things straightforward and satisfying, making it a reliable choice for any occasion. The sliders pack familiar flavors that are easy to customize and enjoy.
- Convenience - These sliders come together quickly with simple ingredients and minimal prep.
- Flavor balance - Juicy beef goes well with melty cheese and tangy pickles for a well-rounded flavor.
- Texture - Soft buns, tender patties, and crisp pickles provide contrast in every bite.
- Appeal - Miniature size makes these sliders great for family meals or casual entertaining.
Ingredient Swap Ideas
Sometimes changing a few ingredients can fit your preferences or dietary needs without losing the essence of the recipe. Consider these swaps to keep sliders versatile and approachable.
- Ground turkey or chicken - Use leaner poultry instead of beef for a lighter slider option.
- Dairy-free cheese - Opt for a plant-based cheese to make these sliders vegan-friendly.
- Gluten-free buns - Substitute regular buns with gluten-free rolls for those avoiding gluten.
- Add-ons like avocado or tomato - Swap pickles for other toppings if you prefer a different crunch or freshness.
Ingredients
- 1 pound ground beef, choose 80/20 lean-to-fat ratio for juicy patties.
- 8 small slider buns, soft, ideally slightly sweet, to go with the beef.
- 4 slices cheddar cheese, cut in half to top each patty.
- 8 dill pickle slices, for tangy crunch on each slider.
- 1 teaspoon salt, to season the beef.
- ½ teaspoon black pepper, for subtle seasoning.
- 1 tablespoon vegetable oil, for cooking the patties.
Instructions
- Preheat a large skillet or griddle over medium-high heat and add vegetable oil.
- In a bowl, combine ground beef with salt and black pepper. Divide the mixture into 8 equal portions and shape each into a small, flat patty.
- Cook the patties in the skillet for about 3 minutes per side or until they reach your desired doneness. During the last minute, place half a slice of cheese on each patty and cover the pan to melt the cheese.
- Lightly toast the slider buns in the same skillet or oven until golden.
- Assemble the sliders by placing each beef patty with melted cheese on the bottom bun, topping with a pickle slice, and finishing with the top bun. Serve immediately.
5. Spinach and Artichoke Dip

This spinach and artichoke dip is a classic crowd-pleaser with a creamy, cheesy texture that feels comforting and indulgent. It combines tender spinach and tender artichoke hearts with a blend of cheeses, creating a rich dip that's perfect for sharing.
It's simple to prepare and warms up beautifully, making it an ideal choice for appetizers or casual gatherings. Serving it with toasted bread or crunchy chips brings out the perfect balance of flavors and textures.
Why This Recipe Works
This recipe delivers a creamy, flavorful dip that comes together with minimum prep and pleasing results. The combination of spinach and artichokes gives it a mild, fresh taste balanced by the richness of cheese.
- Convenience - Uses mostly store-bought ingredients and comes together quickly.
- Flavor balance - Combines earthy spinach, tangy artichokes, and melty cheeses.
- Texture - Smooth, creamy dip with slight bite from artichoke pieces.
- Appeal - Great as an appetizer or party snack that everyone can enjoy.
Ingredient Swap Ideas
Swapping ingredients in this dip can help you customize it to fit different dietary preferences or available ingredients while keeping the essence of the recipe intact.
- Cheese alternatives - Substitute cream cheese with vegan cream cheese for a plant-based version.
- Greens substitute - Use kale or Swiss chard instead of spinach for a different leafy green flavor.
- Artichokes variant - Try using frozen chopped artichokes if fresh or canned are not accessible.
- Dairy-free option - Replace sour cream and cheese with coconut yogurt and cashew cheese.
Ingredients
- 10 ounces frozen chopped spinach, thawed and squeezed dry.
- 14 ounces canned artichoke hearts, drained and chopped.
- 8 ounces cream cheese, softened to room temperature.
- ½ cup sour cream, adds creaminess and tang.
- ¼ cup mayonnaise, for extra richness and smoothness.
- 1 cup shredded mozzarella cheese, melts well and binds the dip.
- ½ cup grated Parmesan cheese, adds sharp, savory flavor.
- 2 cloves garlic, minced for depth of flavor.
- ¼ teaspoon salt, to improve the flavors.
- ¼ teaspoon black pepper, for mild heat.
Instructions
- Preheat your oven to 375°F (190°C). Lightly grease a baking dish or use a small ovenproof dish for the dip.
- In a large bowl, combine the cream cheese, sour cream, and mayonnaise until smooth. Stir in the minced garlic, salt, and pepper.
- Fold in the chopped spinach, artichoke hearts, mozzarella, and Parmesan cheese. Mix everything together until evenly incorporated.
- Transfer the mixture to the prepared baking dish, spreading it out evenly. Bake in the preheated oven for 25 to 30 minutes until the top is golden and the dip is bubbling.
- Remove from the oven and let it cool slightly before serving with toasted bread, crackers, or chips.
6. Queso Dip with Chorizo

This queso dip with chorizo is a flavorful, warm cheese dip that brings a satisfying mix of spicy and savory notes to your table. It melts together creamy cheese and spicy sausage, making it a great choice for dipping tortilla chips, fresh veggies, or even warm bread.
Making this dip is straightforward and comes together quickly, which is great if you want a tasty appetizer or snack without spending much time in the kitchen. The rich texture of melted cheese combined with the boldness of the chorizo makes every bite inviting and comforting.
Why This Recipe Works
This dip combines bold flavors and easy preparation, creating a crowd-pleasing dish with minimal fuss. It's a satisfying snack that balances creamy, spicy, and savory elements.
- Convenience - Quick to prepare with simple ingredients and minimal cooking time.
- Flavor balance - Combines creamy melted cheese with richly spiced chorizo for depth and warmth.
- Texture - Smooth, gooey cheese blend contrasts with small, slightly crisp pieces of cooked sausage.
- Versatility - Great for serving at casual gatherings or as a flavorful snack to enjoy anytime.
Ingredient Swap Ideas
Swapping ingredients here can help tailor the dip to different dietary needs or flavor preferences without losing its character.
- Chorizo alternative - Use spicy sausage or ground turkey seasoned with smoked paprika and chili powder for a milder or leaner option.
- Cheese blend - Substitute pepper jack with Monterey Jack or mild cheddar for less heat but still gooey texture.
- Milk option - Switch whole milk with half-and-half or a non-dairy milk like oat milk to adjust creaminess and richness.
- Add-ins - Include diced green chilies or jalapeños if you want extra heat and complexity.
Ingredients
- 8 ounces chorizo sausage, casing removed, crumbled
- 1 cup diced onion, finely chopped
- 2 cloves garlic, minced
- 12 ounces processed cheese (Velveeta), cut into cubes
- 1 cup shredded pepper jack cheese, adds a mild spicy kick
- 1 cup whole milk, provides creaminess and helps melt the cheese smoothly
- 1 tablespoon butter, used for sautéing onion and garlic
- ¼ teaspoon ground cumin, adds warmth and depth to the flavor
- ¼ teaspoon black pepper, seasoning to taste
- Tortilla chips or fresh vegetables, for serving as dippers
Instructions
- In a large skillet over medium heat, melt butter and add crumbled chorizo. Cook for about 5 minutes until browned and cooked through, stirring occasionally. Remove chorizo with a slotted spoon and set aside, leaving the fat in the skillet.
- Add diced onion to the skillet and sauté for 3-4 minutes until soft and translucent. Stir in minced garlic and cook for another minute until fragrant.
- Lower heat to medium-low and add the cheese cubes, shredded pepper jack, and milk to the skillet. Stir continuously until all the cheese has melted into a smooth, creamy sauce.
- Stir in cooked chorizo along with ground cumin and black pepper. Mix well to combine all the flavors and heat through for another 2 minutes.
- Transfer the queso dip to a serving bowl and serve warm with tortilla chips or fresh cut vegetables for dipping.
7. Pretzel Bites with Beer Cheese Dip

Soft pretzel bites are a crowd-pleaser that bring warm, comforting flavors to any snack table. These little nuggets offer a chewy, golden crust with a tender inside, making them perfect for dipping.
Paired with a creamy, tangy beer cheese sauce, the combination creates a satisfying balance between salty and rich.
Making these pretzel bites at home is straightforward and rewarding. You can whip up the dough, shape the bites, and prepare the beer cheese dip while the oven preheats, which makes this a manageable recipe even on busy days.
Why This Recipe Works
This recipe balances ease and flavor in a way that fits well with everyday cooking and entertaining.
- Convenience - The dough is simple to prepare and requires minimal rising time.
- Flavor balance - The salty pretzel goes well with the sharp and creamy beer cheese dip.
- Texture - The pretzels have a crisp exterior and soft, chewy interior.
- Appeal - It's a family-friendly snack that also impresses guests for casual gatherings.
Ingredient Swap Ideas
Swapping ingredients allows you to adjust for preferences or dietary considerations without losing the core of this recipe. These changes help you customize the flavors and textures to suit your needs.
- Beer substitute - Use non-alcoholic beer or vegetable broth in the dip for a gentler flavor.
- Cheese alternatives - Substitute cheddar with gouda or a blend of sharp cheeses for different taste profiles.
- Dairy-free options - Replace butter with plant-based margarine and use dairy-free cheese for the dip.
- Pretzel dough variants - Use whole wheat flour for added fiber or gluten-free flour blends as needed.
Ingredients
- 1 ½ cups warm water, around 110°F to activate the yeast.
- 1 packet active dry yeast (2 ¼ teaspoons), for leavening the dough.
- 1 tablespoon sugar, feeds the yeast and adds slight sweetness.
- 4 cups all-purpose flour, provides structure to the pretzel dough.
- 2 teaspoons kosher salt, adds essential flavor to the dough.
- ⅔ cup baking soda, used in the boiling water bath to create the pretzel's characteristic crust.
- 1 large egg, beaten, for brushing the dough before baking to enhance browning.
- Coarse salt, to sprinkle on top before baking.
For the Beer Cheese Dip:
- 1 tablespoon unsalted butter, base for the sauce.
- 1 tablespoon all-purpose flour, thickens the dip.
- ½ cup beer, adds depth and slight bitterness to the cheese sauce.
- ½ cup whole milk, for creamy consistency.
- 1 ½ cups sharp cheddar cheese, shredded, primary flavor of the dip.
- 1 teaspoon Dijon mustard, adds tanginess and complexity.
- ¼ teaspoon garlic powder, enhances overall taste.
- Salt and black pepper to taste, seasoning for balance.
Instructions
- Prepare the dough: In a large bowl, combine warm water, yeast, and sugar. Stir gently and let it sit for about 5 minutes until it becomes foamy, indicating the yeast is active.
- Mix the dough: Add flour and kosher salt to the yeast mixture. Stir with a wooden spoon until the dough comes together, then knead on a floured surface for about 8-10 minutes until smooth and elastic.
- Shape the pretzel bites: Divide the dough into two portions. Roll each portion into a long rope about 1-inch thick. Cut the rope into 1-inch pieces to form the pretzel bites.
- Boil the bites: Preheat the oven to 450°F. Bring about 10 cups of water and the baking soda to a boil in a large pot. Carefully drop the pretzel bites into the boiling water, 15 at a time, and boil each batch for 30 seconds. Remove with a slotted spoon and place on a parchment-lined baking sheet.
- Bake the pretzels: Brush each bite with beaten egg and sprinkle with coarse salt. Bake for 12-15 minutes until golden brown.
- Make the beer cheese dip: While pretzels bake, melt butter in a saucepan over medium heat. Whisk in flour and cook for 1 minute. Gradually whisk in beer and milk until smooth. Cook, stirring constantly, until thickened. Remove from heat, add cheese, mustard, garlic powder, salt, and pepper. Stir until cheese melts completely.
- Serve: Transfer pretzel bites to a serving bowl or platter and serve warm alongside the beer cheese dip. Enjoy as a satisfying snack or appetizer.
8. Bacon-Wrapped Dates
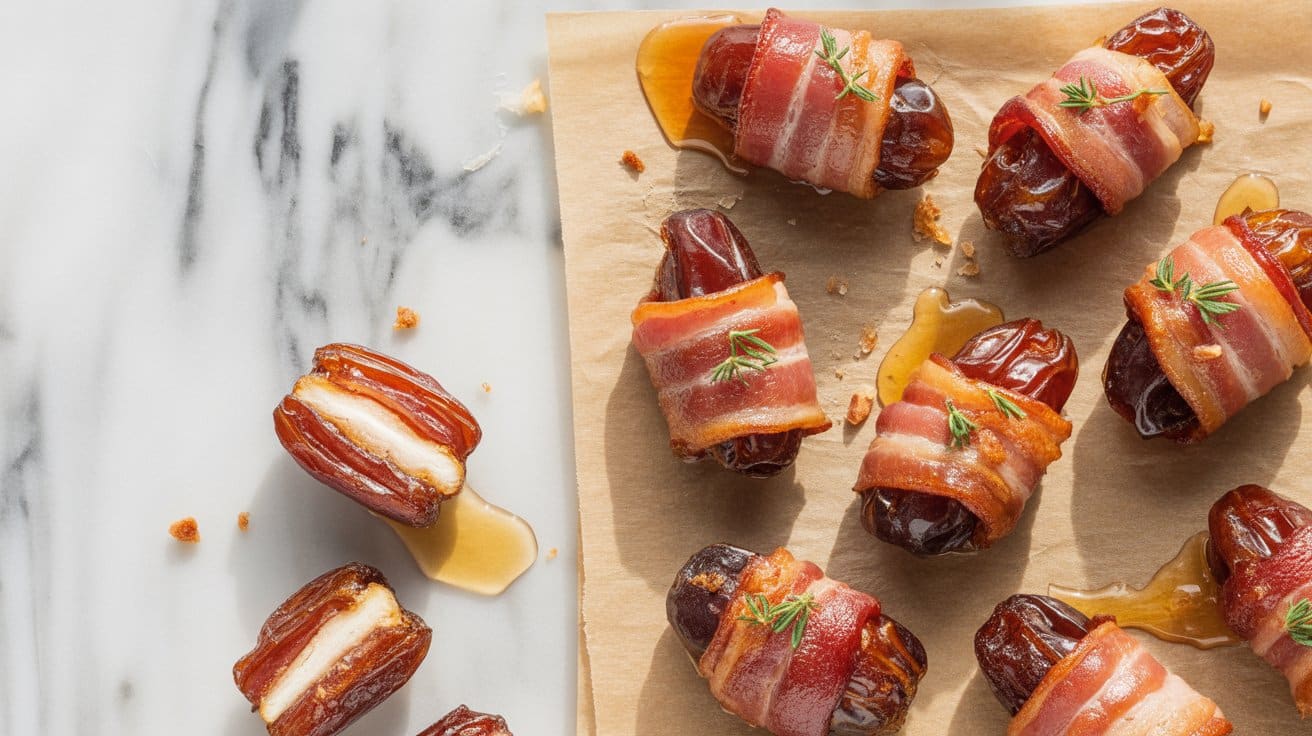
Bacon-wrapped dates combine sweet and salty flavors in a way that's simple and irresistible. The natural sweetness of the dates goes well with the smoky, crispy bacon, while a creamy cheese filling adds a smooth contrast to the chewy and crunchy textures.
This appetizer comes together quickly, making it ideal for busy evenings or parties. It's a reliable crowd-pleaser that feels a little special without needing much time or effort.
Why This Recipe Works
This recipe offers a great balance between ease and flavor, perfect for anyone looking for a quick yet tasty snack or appetizer.
- Convenience - Minimal prep with a short baking time makes these snacks easy to prepare.
- Flavor balance - The contrast between sweet dates, salty bacon, and creamy cheese creates a well-rounded taste.
- Texture - Soft, chewy dates meet crisp bacon for a pleasing bite.
- Appeal - Elegant in appearance but simple enough for casual gatherings or family treats.
Ingredient Swap Ideas
Swapping ingredients in this recipe can help tailor it to dietary preferences or make use of what you have on hand without losing the key flavor.
- Cheese swap - Use goat cheese or cream cheese instead of blue cheese for a milder, creamier filling.
- Bacon alternative - Try turkey bacon or prosciutto for a lighter or different smoky flavor.
- Date substitute - Medjool dates are ideal, but dried figs or apricots can work well if dates aren't available.
- Add nuts - Include a whole almond or pecan inside the date for added crunch and flavor.
Ingredients
- 20 Medjool dates, pitted, large size preferred for stuffing.
- 10 slices of bacon, cut in half to wrap each date.
- 4 ounces blue cheese, crumbled, for stuffing (can substitute with goat or cream cheese).
- Toothpicks, for securing the bacon around the dates.
Instructions
- Preheat the oven to 400°F (200°C). Line a baking sheet with parchment paper or aluminum foil for easy cleanup.
- Slice each date lengthwise on one side to create an opening, removing the pit if not already pitted. Fill each date with about a teaspoon of blue cheese.
- Wrap each stuffed date with a half slice of bacon, securing it with a toothpick through the center. Place the wrapped dates on the prepared baking sheet, spaced slightly apart.
- Bake for 15 to 20 minutes, turning once halfway through, until the bacon is crisp and golden.
- Remove from the oven and let cool briefly before serving warm. Discard toothpicks before eating or serve with them in place for easy handling.
9. Guacamole with Homemade Tortilla Chips
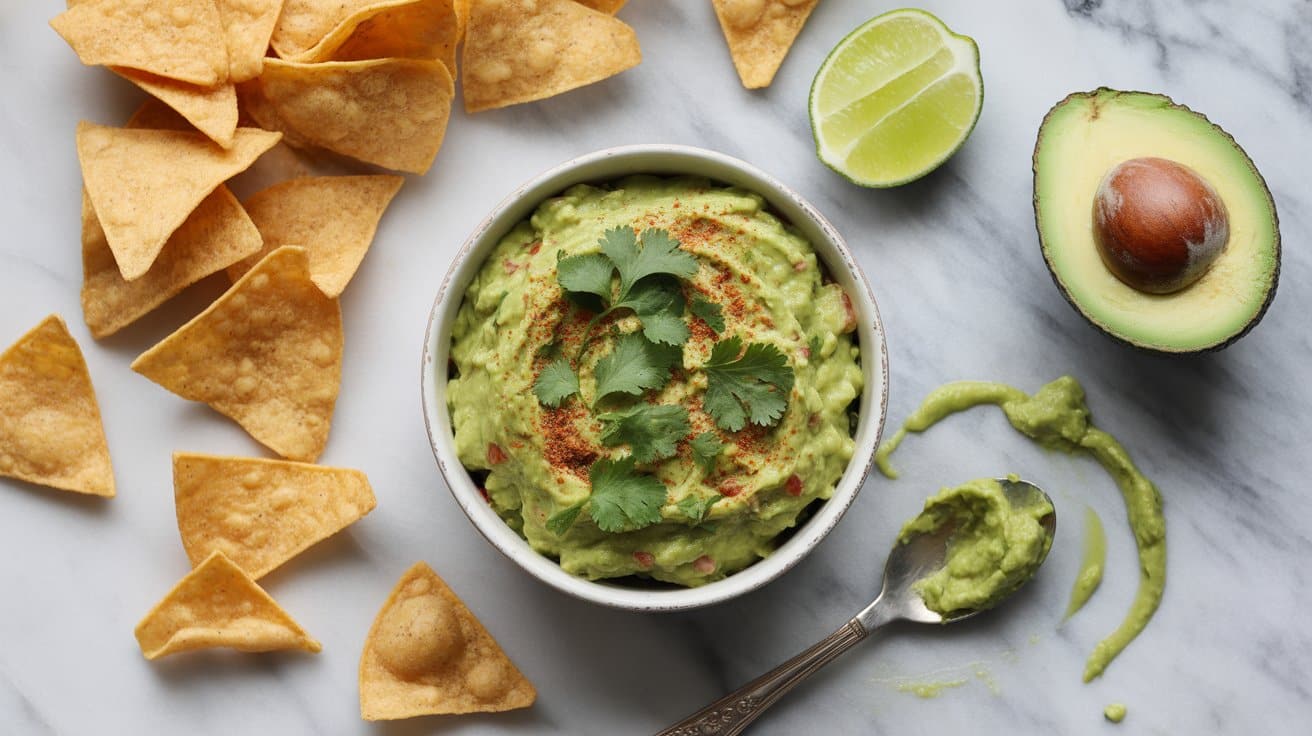
Guacamole is a classic with fresh avocado, lime, and a hint of cilantro that creates a creamy and zesty dip. Making it at home ensures it tastes bright and feels satisfying without any unnecessary additives.
Pairing it with homemade tortilla chips adds a crispy, salty contrast that brings out the best in the dip. These chips are simple to prepare, and they offer a fresh alternative to store-bought snacks.
Why This Recipe Works
This recipe combines fresh, wholesome ingredients into a snack that's quick to prepare and full of flavor. The creamy guacamole balances perfectly with crisp chips, making this dish a winner for gatherings or quick bites.
- Convenience - The guacamole comes together in minutes, and the chips only need a short bake, saving time in prep.
- Flavor balance - Creamy avocado meets sharp lime and fresh cilantro, creating a bright, well-rounded taste.
- Texture - Smooth, rich dip paired with crunchy chips makes every bite enjoyable.
- Appeal - This snack is approachable and loved across different age groups, making it family-friendly and crowd-pleasing.
Ingredient Swap Ideas
Adjusting ingredients can make this recipe suit dietary needs or simply change the flavor a bit while keeping the core of the dish intact.
- Avocado substitute - Use mashed green peas or edamame for a lower-fat, colorful twist.
- Cilantro alternative - Swap with fresh parsley or basil if cilantro isn't a favorite.
- Tortilla chips - Use whole wheat or corn tortillas for different texture and flavor.
- Spice level - Add diced jalapeño or a pinch of cayenne pepper to the guacamole for some heat.
Ingredients
- 3 ripe avocados, peeled, pitted, and mashed until smooth but still a bit chunky.
- 1 lime, juiced, for fresh acidity to brighten the dip.
- ¼ cup fresh cilantro, finely chopped, to add herbal brightness.
- 1 small red onion, finely diced, providing a mild sharpness.
- 1 medium tomato, seeded and finely chopped for freshness and color.
- ½ teaspoon salt, to enhance all the flavors.
- ¼ teaspoon black pepper, freshly ground adds subtle warmth.
- 6 corn tortillas, cut into wedges for the chips.
- 2 tablespoons olive oil, to brush on the chips for roasting.
- ½ teaspoon smoked paprika, optional, for a smoky flavor on the chips.
Instructions
- Preheat the oven to 350°F (175°C). Arrange tortilla wedges in a single layer on a baking sheet. Brush both sides lightly with olive oil and sprinkle with smoked paprika if using. Bake for 10 to 15 minutes until crisp and just golden. Remove and cool.
- In a medium bowl, mash the avocados with lime juice until mostly smooth but leaving some texture. Stir in the chopped cilantro, red onion, and tomato.
- Season the guacamole with salt and pepper, tasting and adjusting as needed to balance acidity and saltiness.
- Transfer the guacamole to a serving bowl and drizzle a little olive oil over the top if desired. Serve alongside the homemade tortilla chips immediately for best texture.
- Store any leftover guacamole in an airtight container with plastic wrap pressed directly on the surface to slow browning and refrigerate for up to one day.
10. Buffalo Cauliflower Bites
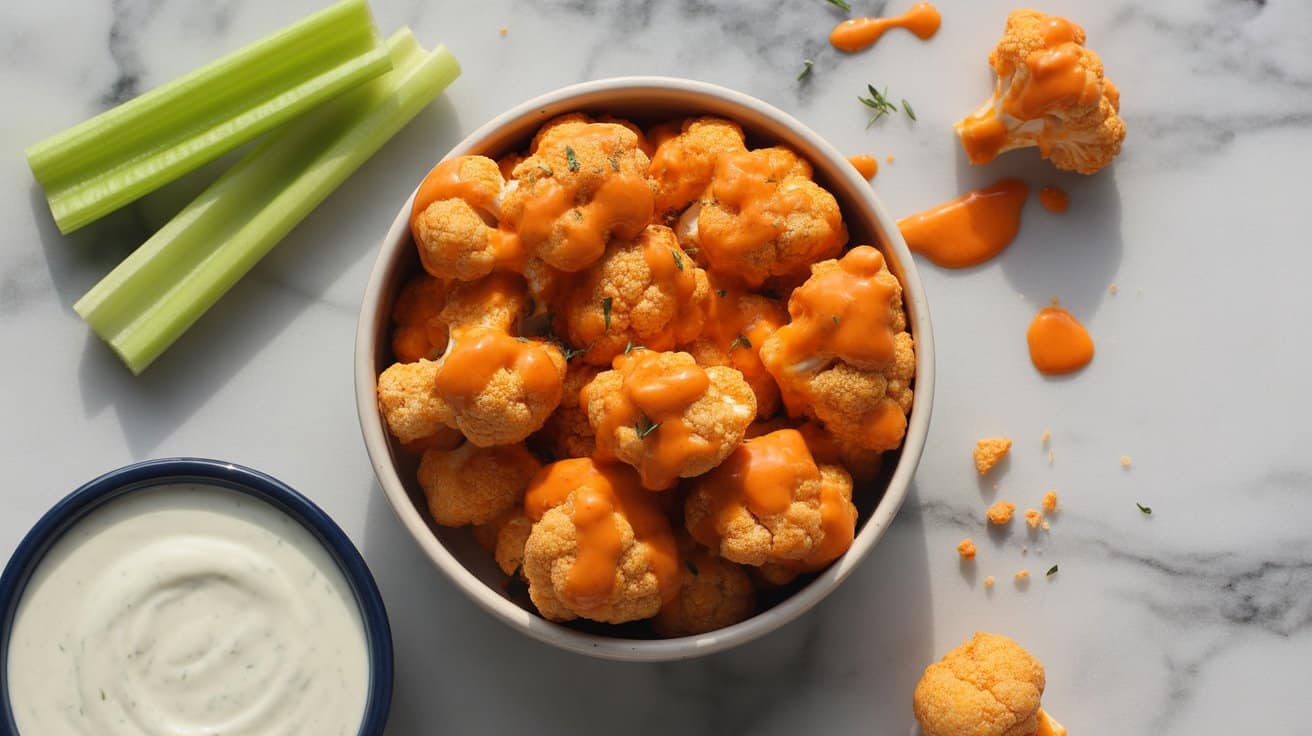
Buffalo Cauliflower Bites offer a flavorful, spicy alternative to traditional chicken wings. These crispy battered cauliflower pieces get coated in a tangy buffalo sauce, making them ideal for vegetarians or anyone looking to add more vegetables to their diet without compromising on bold taste.
They're simple to prepare and can be served as a snack, appetizer, or part of a main dish. The combination of crunchy texture and spicy sauce works well with cooling dips like ranch or blue cheese dressing.
Why This Recipe Works
This recipe delivers a tasty and plant-based twist on a classic snack that most people recognize and enjoy. It balances crispiness and heat, making it both satisfying and accessible.
- Convenience - Quick to prepare with basic ingredients and minimal hands-on time.
- Flavor balance - Combines spicy, tangy buffalo sauce with mild, tender cauliflower.
- Texture - Crispy exterior contrasts with soft, tender inside for great mouthfeel.
- Appeal - Vegetarian-friendly option that everyone can enjoy at gatherings or casual meals.
Ingredient Swap Ideas
Making small substitutions can help customize these bites for various dietary needs or flavor preferences while keeping the essence intact.
- Gluten-free flour blend - Use this instead of all-purpose flour to make the batter gluten-free.
- Hot sauce alternatives - Choose a milder sauce or use a smoky chipotle sauce for different heat levels.
- Baking instead of frying - Bake the bites for a lower-fat option without sacrificing too much crispiness.
- Dairy-free butter substitute - Use vegan butter or olive oil if avoiding dairy.
Ingredients
- 1 medium head cauliflower, cut into bite-sized florets for even cooking.
- ¾ cup all-purpose flour, creates a light, crispy batter coating.
- ¾ cup water, helps form the batter consistency.
- 1 teaspoon garlic powder, adds subtle savory flavor.
- ½ teaspoon smoked paprika, provides gentle smoky notes.
- ½ teaspoon salt, enhances overall taste.
- ¼ teaspoon black pepper, adds mild heat and depth.
- 1 cup buffalo sauce, classic spicy wing sauce for coating the bites.
- 2 tablespoons unsalted butter, melted, to mix into the buffalo sauce.
- Cooking oil, for frying, such as vegetable or canola oil.
Instructions
- Combine the flour, water, garlic powder, smoked paprika, salt, and pepper in a large bowl. Whisk until you get a smooth batter.
- Heat about 2 inches of oil in a deep pan to 350°F (175°C). Dip each cauliflower floret into the batter, making sure it's fully coated.
- Carefully place battered florets in the hot oil in batches. Fry for 3 to 4 minutes until golden brown and crisp. Remove with a slotted spoon and drain on paper towels.
- In a separate bowl, mix the melted butter with the buffalo sauce. Toss the fried cauliflower bites in this sauce until fully coated.
- Serve warm with ranch or blue cheese dressing and celery sticks for a classic pairing.
11. Cheesy Garlic Breadsticks

Cheesy garlic breadsticks make a comforting and tasty addition to any meal. They offer a soft, buttery bread base topped with garlic and plenty of melted mozzarella cheese.
This recipe is straightforward and rewarding, bringing out familiar flavors in a snack or side dish that's sure to please both kids and adults alike. The combination of garlic and gooey cheese on warm, tender bread sticks is satisfying and easy to prepare.
Why This Recipe Works
This recipe balances ease and flavor to create a side dish that complements many meals or stands on its own as a snack.
- Convenience - The breadsticks come together quickly using store-bought dough or homemade dough for flexibility.
- Flavor balance - The garlic butter and mozzarella topping combine savory and rich notes without overpowering.
- Texture - Soft bread with a golden crust and melted cheese creates a pleasing contrast.
- Family-friendly - These breadsticks appeal to a wide range of tastes, making them great for gatherings or casual dinners.
Ingredient Swap Ideas
You can adjust this recipe depending on your preferences or dietary needs without losing the signature flavor and texture.
- Cheese options - Use provolone or cheddar instead of mozzarella for a different but still melty and flavorful topping.
- Dough choices - Swap store-bought pizza dough for pre-made biscuit dough or homemade bread dough depending on time and convenience.
- Butter alternatives - Use olive oil mixed with garlic for a lighter topping or dairy-free buttery spread for a vegan option.
- Herb variations - Try adding fresh herbs like parsley, basil, or oregano to the garlic butter for extra aroma and color.
Ingredients
- 1 package pizza dough, about 13.8 ounces, store-bought or homemade dough works well.
- 3 tablespoons unsalted butter, melted, for brushing on top before baking.
- 2 cloves garlic, minced finely to distribute flavor evenly.
- 1 ½ cups shredded mozzarella cheese, for the melty, cheesy topping.
- 1 teaspoon dried Italian seasoning, or a mix of oregano, basil, and thyme.
- 1 tablespoon fresh parsley, chopped, for garnish after baking.
- ½ teaspoon salt, to season the dough topping.
Instructions
- Preheat your oven to 400°F (200°C). Lightly grease a baking sheet or line it with parchment paper.
- Roll out the pizza dough on a floured surface into a rectangle about 10x14 inches. Transfer it to the prepared baking sheet.
- In a small bowl, combine melted butter, minced garlic, salt, and dried Italian seasoning. Brush this mixture evenly over the dough surface.
- Sprinkle shredded mozzarella cheese all over the garlic butter-coated dough in an even layer.
- Bake the breadsticks for 12 to 15 minutes, or until the cheese is bubbly and golden and the crust is cooked through. Remove from the oven and sprinkle with fresh parsley.
- Let cool for a few minutes, then slice into sticks and serve warm.
12. Deviled Eggs with a Kick
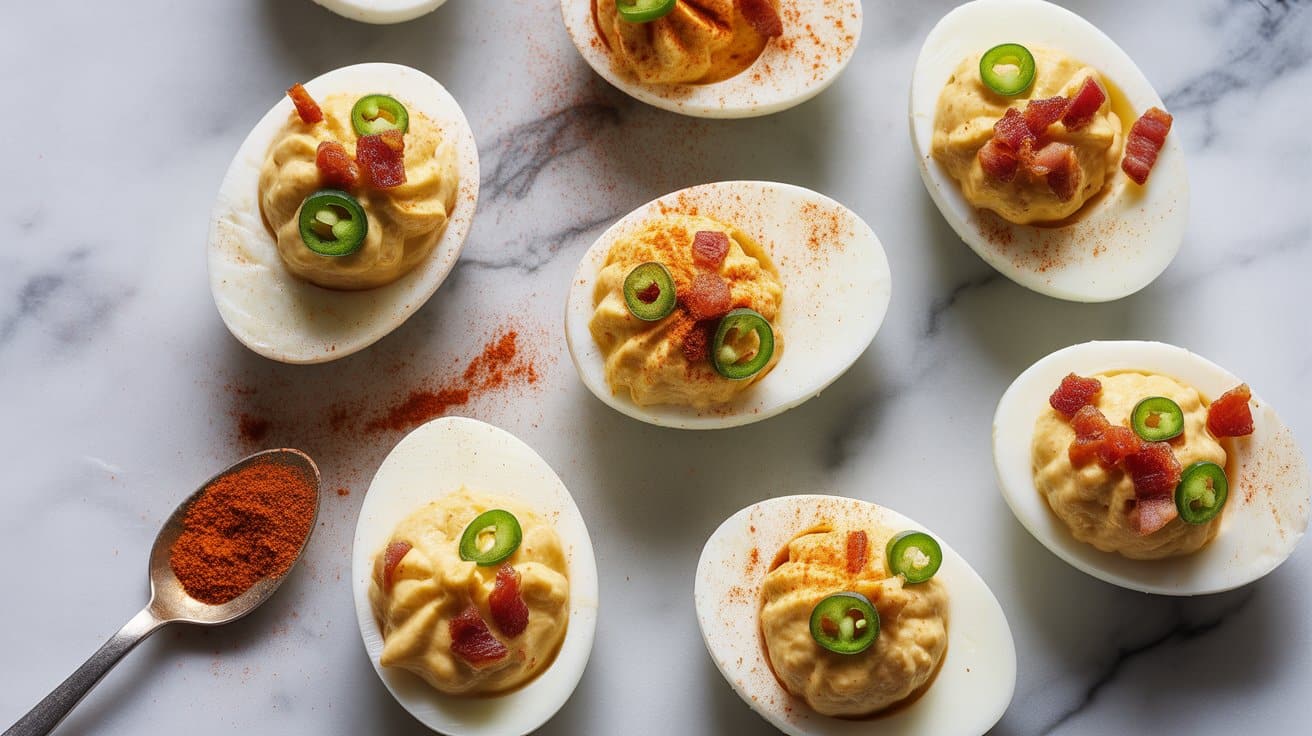
Deviled eggs are a classic appetizer that never goes out of style. This version adds a bit of heat and smoky flavor, making them a little more exciting without complicating the preparation.
The creamy yolk filling combines smooth richness with a subtle kick from hot sauce and a hint of smoked paprika.
These deviled eggs come together in no time and work great for gatherings, snacks, or even a simple side dish. With just a few ingredients and straightforward steps, you can enjoy a flavorful snack that's both familiar and a little bold.
Why This Recipe Works
This recipe delivers a flavorful twist on a much-loved classic, balancing creaminess with mild heat and smokiness. It offers a fresh take that's easy to prepare and sure to please a crowd.
- Convenience - Quick and easy prep, perfect for last-minute hosting or snacks.
- Flavor balance - Creamy yolk filling with a smoky undertone and a touch of heat.
- Texture - Smooth and velvety filling contrasts nicely with firm egg whites.
- Appeal - Crowd-pleasing appetizer that suits family meals and parties alike.
Ingredient Swap Ideas
Adjustments can make this recipe fit different preferences or dietary needs while keeping its signature flavor.
- Smoked paprika - Use regular paprika or a pinch of chipotle powder for more heat.
- Hot sauce - Substitute with sriracha, cayenne pepper, or omit for a milder version.
- Mayonnaise - Swap for Greek yogurt or avocado for a lighter, tangier filling.
- White vinegar - Use apple cider vinegar or lemon juice to change up the acidity.
Ingredients
- 6 large eggs, hard-boiled and peeled.
- 3 tablespoons mayonnaise, adds creaminess to the filling.
- 1 teaspoon Dijon mustard, provides subtle tang and depth.
- 1 teaspoon white vinegar, brightens the yolk mixture.
- ½ teaspoon smoked paprika, brings smoky flavor and color.
- ¼ teaspoon hot sauce, adds mild heat, adjust based on taste.
- Salt, to taste.
- Freshly ground black pepper, to taste.
- Additional smoked paprika, for garnish.
Instructions
- Cut the hard-boiled eggs in half lengthwise. Carefully remove the yolks and place them in a medium bowl. Set the egg whites on a serving plate.
- Mash the yolks with a fork until they're crumbly and smooth. Add mayonnaise, Dijon mustard, white vinegar, smoked paprika, hot sauce, salt, and pepper. Mix well to combine into a creamy filling.
- Spoon or pipe the yolk mixture back into the egg white halves, dividing it evenly.
- Sprinkle the filled eggs with a little extra smoked paprika for color and added flavor.
- Chill in the refrigerator for at least 15 minutes before serving to let the flavors meld and the filling set slightly.
13. Chicken Quesadillas

Chicken quesadillas are a great choice for a quick meal that feels both satisfying and simple. The combination of tender, seasoned chicken and melted cheese inside crispy tortillas offers a mix of textures that make every bite enjoyable.
This recipe comes together quickly and easily, making it a reliable option for busy evenings or casual gatherings. You can customize the filling to suit your taste, adding extras like peppers or onions if you want a little more flavor or texture.
Why This Recipe Works
Chicken quesadillas bring flavor and ease to your table with satisfying results. They balance gooey cheese with tender chicken wrapped in a crisp tortilla that is always a crowd-pleaser.
- Convenience - Quick prep and cooking time make it an ideal meal for busy days.
- Flavor balance - Savory chicken paired with melty cheese offers familiar, comforting flavors.
- Texture - Crispy tortilla exterior contrasts nicely with tender chicken and smooth cheese inside.
- Appeal - Suitable for family meals and customizable to suit different preferences.
Ingredient Swap Ideas
Adjusting ingredients lets you tailor this recipe for your dietary needs or flavor preferences without losing the essence of a great quesadilla.
- Chicken - Substitute grilled turkey or cooked tofu for a leaner or plant-based protein option.
- Cheese - Use a blend of cheddar and Monterey Jack for a sharper flavor, or mozzarella for milder melts.
- Tortillas - Swap regular flour tortillas with corn or whole wheat options for different textures or gluten-free varieties.
- Seasoning - Swap taco seasoning with smoked paprika and cumin for a homemade and adjustable spice profile.
Ingredients
- 2 cups cooked chicken, shredded or diced, seasoned with taco seasoning or your choice of spices.
- 1 cup shredded cheese, such as cheddar, Monterey Jack, or a combination.
- 4 large flour tortillas, 8-inch size works well for folding.
- 1 tablespoon olive oil, for cooking.
- Optional fillings - diced bell peppers, onions, or jalapeños for added flavor and crunch.
- Sour cream and salsa, for serving alongside.
Instructions
- Heat a large skillet over medium heat and add half the olive oil.
- Place one tortilla in the skillet and evenly spread half of the chicken and cheese mixture over half of the tortilla. Add any optional fillings if using.
- Fold the tortilla over to cover the filling. Cook for 3 to 4 minutes until the bottom is golden and crisp. Carefully flip the quesadilla and cook for another 3 to 4 minutes until the cheese melts and the other side is crisp.
- Remove the quesadilla from the skillet and let it cool for a minute before cutting into wedges. Repeat with remaining tortillas and filling.
- Serve warm with sour cream and salsa on the side for dipping.
14. BBQ Meatballs

BBQ meatballs are a go-to dish when you want something hearty, flavorful, and easy to serve. These juicy meatballs simmer in a tangy BBQ sauce that strikes a nice balance between sweet and smoky.
They come together quickly and make a fuss-free appetizer or a main dish that everyone can enjoy. The sauce coats each meatball perfectly, keeping them moist and packed with flavor.
Why This Recipe Works
This BBQ meatball recipe combines simplicity and taste without demanding a lot of time or complicated ingredients.
- Convenience - The meatballs can be prepared ahead and cooked in the sauce with minimal hands-on time.
- Flavor balance - Tangy BBQ sauce goes with the savoriness of the meat, adding just the right amount of sweetness.
- Texture - Tender and juicy meatballs create a satisfying bite, soaking up the sauce well.
- Appeal - This dish works well for casual get-togethers or weeknight dinners, appealing to kids and adults alike.
Ingredient Swap Ideas
Swapping a few ingredients helps adjust this recipe for different diets or preferences, without losing that classic BBQ meatball taste.
- Ground turkey or chicken - Use these instead of beef for a leaner, lighter version.
- Vegetarian meatballs - Try plant-based meatballs to keep the same easy prep but make it meat-free.
- Sugar-free BBQ sauce - Select a low-sugar or homemade BBQ sauce to reduce sweetness and sugar content.
- Add spices - Experiment by adding smoked paprika or cayenne pepper for extra smoky or spicy notes.
Ingredients
- 1 pound ground beef, use 80/20 lean-to-fat ratio for juicy meatballs.
- ¼ cup breadcrumbs, helps bind the meatballs and keep them tender.
- ¼ cup finely chopped onion, adds moisture and subtle sweetness.
- 1 large egg, binds the ingredients together.
- 2 cloves garlic, minced, brings aromatic depth.
- ½ teaspoon salt, enhances all the flavors.
- ¼ teaspoon black pepper, adds mild heat.
- 1 cup BBQ sauce, choose your favorite brand or homemade sauce.
- 2 tablespoons water, used to loosen the sauce slightly for simmering.
Instructions
- Preheat the oven to 400°F (200°C). Line a baking sheet with parchment paper or lightly grease it.
- In a large bowl, combine the ground beef, breadcrumbs, onion, egg, garlic, salt, and pepper. Mix gently until just combined; overmixing can make meatballs tough.
- Shape the mixture into 1-inch meatballs and place them evenly spaced on the prepared baking sheet.
- Bake meatballs for 15 minutes, or until they are cooked through and browned on the outside.
- While the meatballs bake, heat the BBQ sauce and water in a large skillet over medium heat. Add the baked meatballs to the skillet and gently stir to coat them in the sauce. Simmer for 5 minutes, allowing the sauce to thicken slightly and the meatballs to soak up the flavor.
Serve warm with extra sauce on the side or over rice, noodles, or a fresh salad. This dish is easy to make ahead and reheat without losing its juicy texture.
15. Caprese Skewers

Caprese skewers bring together the simple, fresh flavors of a classic Italian salad in a bite-sized, easy-to-serve form. Cherry tomatoes, soft mozzarella, and fragrant basil create a bright combination that's both colorful and satisfying.
Drizzled with a touch of balsamic glaze, these skewers offer a subtle sweet tang that goes with the creamy cheese and juicy tomatoes beautifully.
This recipe is great for casual get-togethers, quick appetizers, or a light snack. It requires minimal preparation but delivers impressive flavor and an inviting presentation.
Why This Recipe Works
Caprese skewers combine fresh ingredients that balance taste and texture perfectly while requiring very little prep time.
- Convenience - This recipe comes together quickly with no cooking needed, ideal for busy days or last-minute guests.
- Flavor balance - The creaminess of mozzarella pairs well with the acidity of tomatoes and the aromatic basil, all enhanced by the sweet balsamic drizzle.
- Texture - Juicy tomatoes, soft cheese, and tender basil leaves provide a variety of pleasant textures in every bite.
- Appeal - The colorful presentation makes these skewers an attractive option for parties or casual meals.
Ingredient Swap Ideas
Changing up the ingredients can adapt this recipe for different dietary needs or taste preferences without losing the essence of the dish.
- Cheese swap - Use vegan mozzarella or small cubes of firm tofu to make it dairy-free.
- Tomato variety - Try grape tomatoes or sun-dried tomatoes for a different flavor and texture experience.
- Herb alternatives - Substitute basil with fresh mint or oregano to vary the herbal notes.
- Balsamic glaze substitute - Use a light drizzle of aged sherry vinegar or lemon juice if balsamic glaze isn't available.
Ingredients
- 1 pint cherry tomatoes, washed and dried.
- 8 ounces fresh mozzarella balls (bocconcini), drained.
- About 24 small fresh basil leaves, washed and patted dry.
- 3 tablespoons balsamic glaze, store-bought or homemade.
- 2 tablespoons extra-virgin olive oil, optional for drizzling.
- A pinch of salt for seasoning.
- A pinch of freshly ground black pepper.
- About 24 wooden skewers or toothpicks, depending on size.
Instructions
- Thread one cherry tomato, followed by a basil leaf, then a mozzarella ball, and finish with another basil leaf onto each skewer. Repeat until all ingredients are used.
- Arrange the skewers on a serving platter in a single layer. Make sure they have some space between them for easy picking.
- Lightly drizzle the skewers with extra-virgin olive oil if using, then season with a pinch of salt and black pepper to improve the flavors.
- Generously drizzle balsamic glaze over the skewers just before serving to add a tangy sweetness that ties everything together.
- Serve immediately or refrigerate for up to 2 hours before serving to keep the ingredients fresh and bright. Avoid long storage to prevent the basil from wilting.
16. Buffalo Ranch Dip with Veggies
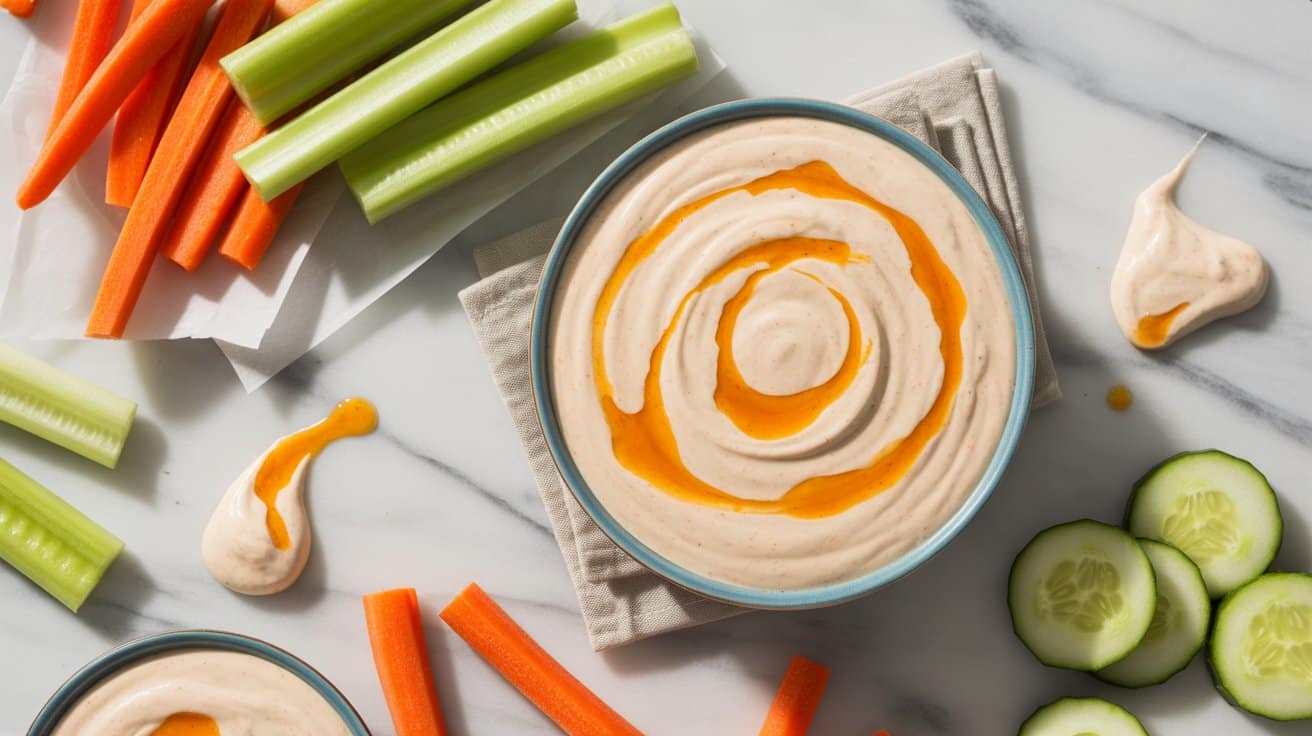
Buffalo Ranch Dip with Veggies is a great way to bring some bold, tangy flavor to your snack or appetizer spread. Combining the cool creaminess of ranch with the spicy kick of buffalo sauce makes for a dip that is both flavorful and refreshing alongside crunchy vegetable sticks.
This dip comes together quickly with simple ingredients, making it an excellent choice for busy days or casual get-togethers. The crisp veggies add a nice contrast in texture, keeping every bite interesting and satisfying.
Why This Recipe Works
This dip offers a satisfying combination of creamy and spicy flavors that pairs well with fresh vegetables. It's easy to prepare and enjoyable for a wide range of tastes.
- Convenience - Ready in minutes with simple mixing and no cooking required.
- Flavor balance - Combines creamy, tangy ranch with the heat of buffalo sauce for a well-rounded taste.
- Texture - The crisp vegetable sticks provide a refreshing crunch contrasting the smooth dip.
- Appeal - Works for family snacks, parties, or casual entertaining, pleasing both adults and kids.
Ingredient Swap Ideas
Adjusting the ingredients can help meet different dietary needs or flavor preferences without losing the dip's essential character.
- Dairy-free option - Use a plant-based ranch dressing and vegan sour cream to make it dairy-free.
- Heat level - Substitute regular buffalo sauce with a mild or extra spicy version based on your heat preference.
- Dip base - Replace sour cream with Greek yogurt for added protein and a lighter feel.
- Veggie variety - Swap traditional carrot and celery sticks for bell peppers, cucumber slices, or snap peas to keep it colorful and fresh.
Ingredients
- 1 cup ranch dressing, choose your favorite brand or homemade for creaminess and tang.
- ½ cup buffalo sauce, adds the signature spicy and tangy buffalo flavor.
- ½ cup sour cream, balances the heat with cool creaminess.
- 1 tablespoon fresh lemon juice, enhances freshness and brightens flavors.
- 2 teaspoons garlic powder, adds depth and savory notes.
- 1 teaspoon onion powder, goes with the garlic with mild sweetness.
- Salt and black pepper, to taste, for seasoning.
- 2 cups assorted fresh vegetables, such as carrot sticks, celery sticks, cucumber slices, and bell pepper strips for dipping.
Instructions
- In a medium bowl, combine the ranch dressing, buffalo sauce, and sour cream. Stir until smooth and well blended.
- Add lemon juice, garlic powder, and onion powder to the mixture. Stir again to incorporate all the flavors evenly.
- Taste the dip and season with salt and black pepper to your liking. Adjust buffalo sauce for more heat if desired.
- Transfer the dip to a serving bowl and chill for at least 15 minutes to let the flavors meld.
- Arrange your vegetable sticks on a plate alongside the dip and serve chilled for dipping.
This straightforward recipe is always a crowd-pleaser and easy to customize. Enjoy the fresh veggies paired with the bright, creamy, and spicy dip for a snack that feels indulgent yet wholesome.
Find a complete game-day appetizer roundup with easy, shareable recipes and make-ahead ideas. For sides that travel well and feed a crowd, See crowd-pleasing pasta salad ideas.

Andrew Gray is a seasoned food writer and blogger with a wealth of experience in the restaurant and catering industries. With a passion for all things delicious, Andrew has honed his culinary expertise through his work as a personal chef and caterer.
His love for food led him to venture into food writing, where he has contributed to various online publications, sharing his knowledge and insights on the culinary world. As the proud owner of CooksCrafter.com, Andrew covers a wide range of topics, including recipes, restaurant reviews, product recommendations, and culinary tips.
Through his website, he aims to inspire and educate fellow food enthusiasts, offering a comprehensive resource for all things food-related.