Discover a collection of 10 fruit-based desserts (desserts that feature fresh fruit as the primary ingredient) that go far beyond a simple fruit salad, showcasing baked, chilled, and assembled preparations that highlight seasonal produce. These recipes bring fresh fruit to the forefront in creative and delicious ways, suited for a variety of occasions.

This selection covers a range of styles, from baked crisps and tarts to chilled sorbets and layered parfaits. Each recipe features bright, seasonal fruit combined with complementary flavors and textures, offering something for every preference.
Many of these desserts are simple to prepare, require minimal ingredients, and can be customized with your favorite fruits.
Together, these recipes make it easy to serve satisfying, fresh desserts without fuss or long prep time. They balance wholesome ingredients with sweet touches, perfect for sharing with family or guests.
1. Peach and Berry Crisp
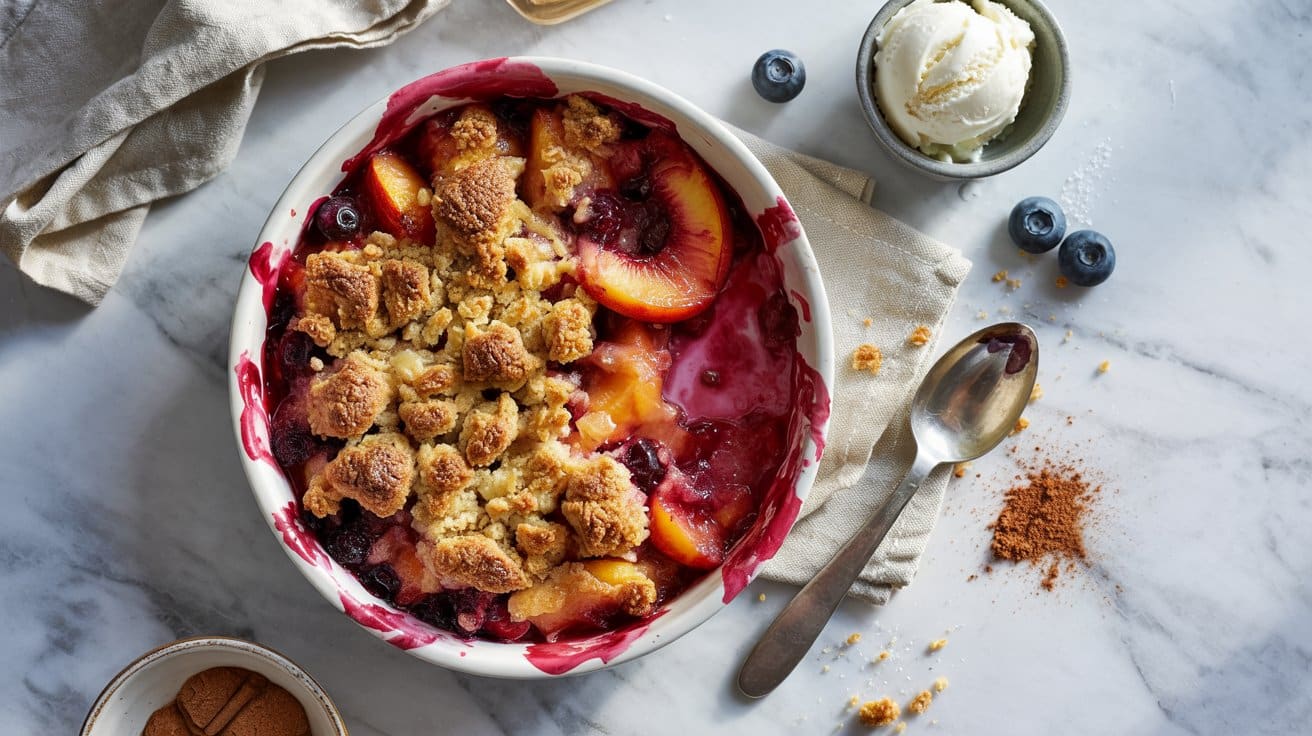
Peach and berry crisp, a classic American summer dessert, is a wonderful way to enjoy the fresh, juicy flavors of summer fruit baked under a crunchy, sweet topping; for more ideas see peach salsa side dish ideas.
This dessert brings warmth and comfort without being too heavy, making it an ideal choice for family gatherings or a simple treat after dinner, and typically bakes at 375°F for 35-40 minutes. It's easy enough to prepare on a weekday yet special enough for weekend entertaining.
Why This Recipe Works
This crisp combines fresh, seasonal fruit with a satisfying oat and nut topping that bakes up golden and crunchy, using roughly a 2:1 fruit-to-topping ratio. It balances fruit sweetness with a hint of tartness, creating a fresh, homemade dessert that feels wholesome.
- Convenience - Simple to assemble using fresh or frozen fruit, ready to bake in under 15 minutes.
- Flavor balance - Sweet peaches and tart berries mingle with a warm, cinnamon-spiced topping, and for honey-forward variations see honey-based desserts for summer.
- Texture - Crisp oats and chopped nuts add a nice crunch contrasting the tender, bubbling fruit.
- Appeal - Ideal family-friendly dessert that also works well for casual get-togethers or potlucks.
Ingredient Swap Ideas
Adjusting this recipe to suit what you have on hand or your dietary needs is straightforward, and the same approaches work well for small-batch baked treats; see small-batch cupcake ideas for two.
- Mixed nuts - Substitute walnuts or pecans for almonds in the streusel topping if preferred or to accommodate allergies.
- Fruit varieties - Use nectarines, plums, or exclusively berries such as blueberries or raspberries instead of peaches.
- Sweeteners - Replace granulated sugar with coconut sugar or maple syrup for a more natural sweetness option (use about ¾ cup maple syrup for every 1 cup granulated sugar).
- Gluten-free oats - Use certified gluten-free rolled oats to make this crisp gluten-free without sacrificing texture.
Ingredients
- 4 cups fresh peaches, peeled and sliced
- 2 cups mixed berries (such as blueberries, raspberries, and blackberries), fresh or frozen
- ¾ cup old-fashioned rolled oats
- ⅓ cup all-purpose flour
- ⅓ cup packed light brown sugar
- ¼ cup chopped mixed nuts (almonds, walnuts, or pecans)
- ½ teaspoon ground cinnamon
- ¼ teaspoon ground nutmeg
- ¼ teaspoon salt
- 6 tablespoons unsalted butter, melted
- 1 tablespoon fresh lemon juice
Instructions
- Preheat your oven to 350°F (175°C). Lightly grease a 9-inch square baking dish.
- In a large bowl, toss the sliced peaches and mixed berries with lemon juice and half of the brown sugar. Spread the fruit mixture evenly in the prepared dish.
- In a separate bowl, combine the rolled oats, flour, remaining brown sugar, chopped nuts, cinnamon, nutmeg, and salt. Pour in the melted butter and stir until the mixture looks crumbly and is evenly coated.
- Sprinkle the oat and nut topping evenly over the fruit layer.
- Bake for 40 to 45 minutes, or until the topping is golden brown and the fruit is bubbling around the edges. Allow to cool slightly before serving.
Enjoy this crisp warm on its own or paired with vanilla ice cream or whipped cream.
2. Strawberry Shortcake Parfait
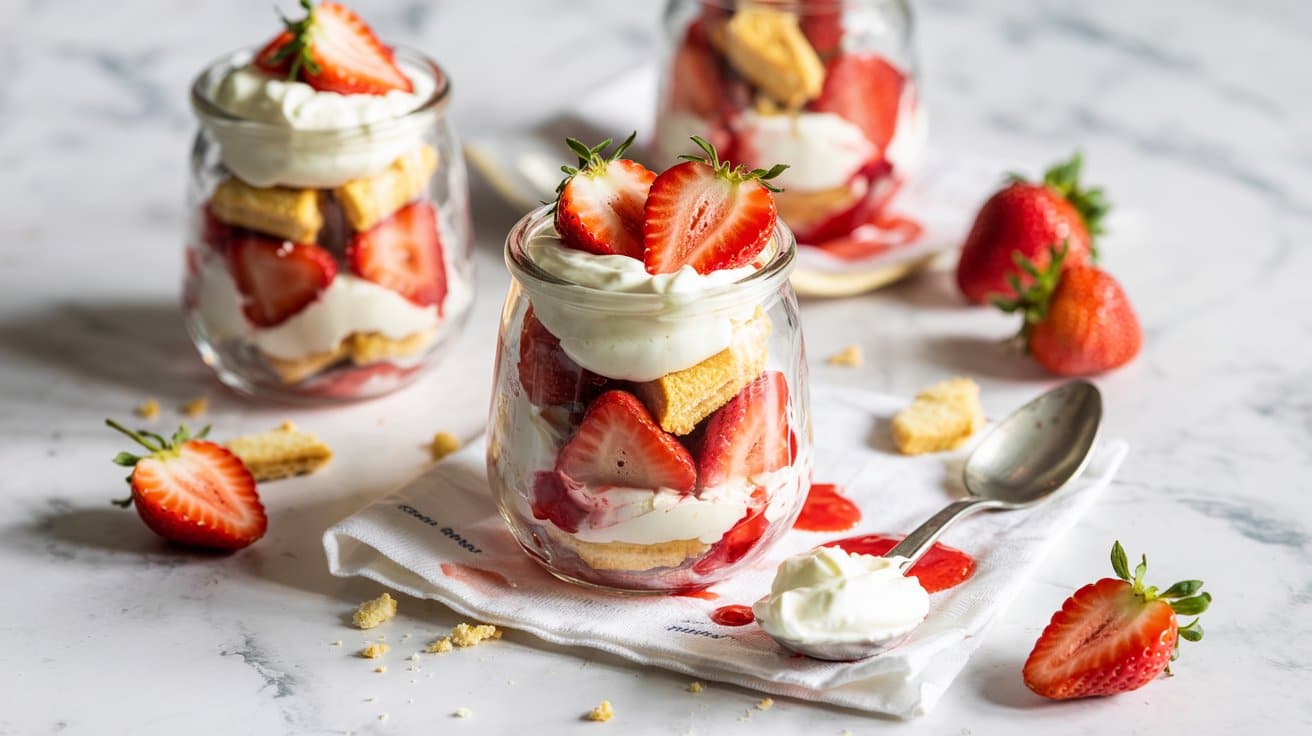
This Strawberry Shortcake Parfait, inspired by classic American shortcake, brings together the bright, sweet flavor of fresh strawberries with light, airy whipped cream and the satisfying crunch of biscuit crumbles; or try an air-fryer approach: air-fryer strawberry shortcake shortcut.
You can assemble this parfait in just a few minutes without turning on the oven, making it great for busy days or casual gatherings, usually in about 10 minutes. The layers create a pleasing contrast of textures and flavors, delivering something both simple and special.
Why This Recipe Works
This recipe combines ease and taste in a way that's hard to beat. It offers a fresh, homemade dessert with minimal prep and no baking needed.
- Convenience - Requires no baking and comes together quickly for easy assembly.
- Flavor balance - Combines fresh, juicy strawberries with lightly sweetened whipped cream and buttery biscuit crumbles.
- Texture - Features a satisfying mix of creamy, crunchy, and juicy elements layered in every bite.
- Appeal - Looks elegant enough for company but simple enough for everyday enjoyment.
Ingredient Swap Ideas
Swapping ingredients in this parfait can help adjust the recipe to fit dietary preferences or taste variations while keeping its core character.
- Whipped cream - Substitute with coconut whipped cream to make a dairy-free version.
- Biscuit crumbles - Use gluten-free biscuits or crushed graham crackers for different textures or dietary needs.
- Strawberries - Try fresh raspberries or blueberries as an alternative berry option.
- Sweetener - Add a drizzle of honey or maple syrup to the whipped cream for extra sweetness if preferred.
Ingredients
- 2 cups fresh strawberries - hulled and sliced for layering.
- 1 cup heavy whipping cream - chilled for making whipped cream.
- 2 tablespoons granulated sugar - to sweeten the whipped cream.
- 1 teaspoon vanilla extract - added to whipped cream for flavor.
- 1 cup biscuit crumbles - use store-bought or homemade biscuits broken into small pieces.
Instructions
- In a large bowl, whip the heavy cream with granulated sugar and vanilla extract until soft peaks form. Set aside in the fridge.
- Prepare the strawberries by washing, hulling, and slicing them evenly.
- Assemble the parfaits by layering a few spoonfuls of biscuit crumbles in the bottom of a glass or jar.
- Add a layer of whipped cream over the biscuit crumbles, followed by a layer of sliced strawberries. Repeat the layers until the container is full, ending with whipped cream and a few strawberry slices on top.
- Chill the parfaits in the fridge for at least 30 minutes before serving to let the flavors meld and the biscuit pieces soften slightly.
This parfait is a nice way to enjoy fresh strawberries with creamy and crunchy layers, all without needing to bake a thing.
3. Baked Apples with Cinnamon and Walnuts
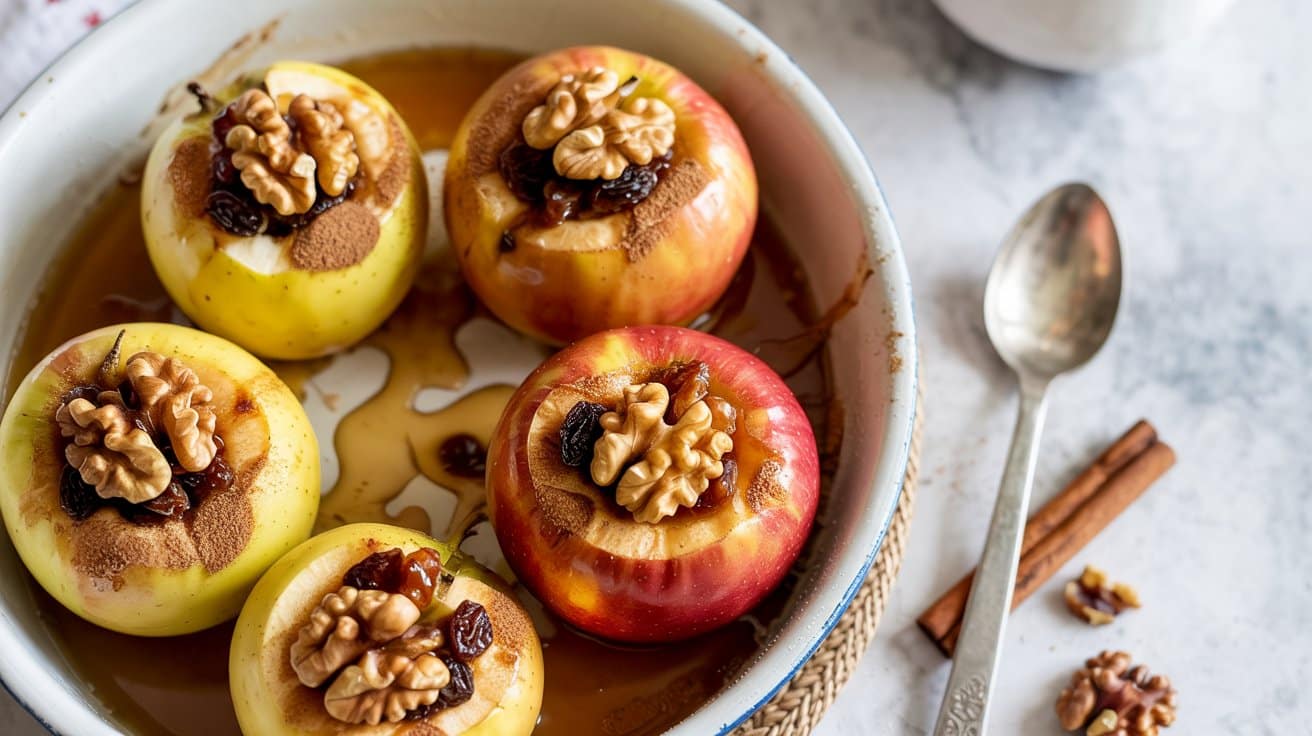
Baked apples with cinnamon and walnuts, a classic autumn dessert, make for a warm, comforting treat that's both simple and satisfying. The soft, tender apple goes well with the crunchy, spiced walnut filling, creating a lovely balance of textures and flavors.
This recipe takes just a few minutes to prepare, and then the oven does the work for you. It's an excellent dessert option for any day, offering natural sweetness with a cozy touch of spice.
For savory accompaniment ideas, explore best sides for baked beans.
Why This Recipe Works
This recipe combines straightforward preparation with pleasant flavors and textures that everyone can enjoy. The natural sweetness of the apples enhances the cinnamon and walnuts, making this a wholesome, inviting dish.
- Convenience - Minimal prep time and mostly hands-off baking.
- Flavor balance - Sweet apples with warm cinnamon and crunchy walnuts.
- Texture - Tender baked apples with a crisp, nutty filling.
- Appeal - A wholesome dessert suitable for family meals or casual gatherings.
Ingredient Swap Ideas
Adapting this recipe can help you fit different tastes or dietary needs without losing its essence. Making simple swaps keeps it fresh or suitable for anyone's preferences.
- Walnuts - Substitute with pecans or almonds for a different crunch and flavor.
- Cinnamon - Use pumpkin pie spice or nutmeg if you want a varied warm spice profile.
- Sweetener - Replace brown sugar with maple syrup or honey for a natural sweetener option.
- Apples - Try using Fuji, Gala, or Honeycrisp apples if you prefer a sweeter or firmer fruit.
Ingredients
- 4 medium apples - Firm varieties like Granny Smith or Braeburn work best.
- ½ cup walnuts - Chopped roughly to add texture.
- 2 tablespoons brown sugar - Light or dark variety, depending on your preference.
- 1 teaspoon ground cinnamon - Provides warmth and depth.
- ¼ teaspoon ground nutmeg - Optional, for extra spice.
- 2 tablespoons unsalted butter - Cut into small pieces for melting over the filling.
- ¼ cup water - To help soften the apples while baking.
Instructions
- Preheat your oven to 350°F (175°C). Prepare a baking dish by lightly greasing it or lining with parchment paper.
- Core each apple carefully, creating a cavity for the filling but leaving the bottom intact. Set aside.
- In a small bowl, mix the chopped walnuts, brown sugar, cinnamon, and nutmeg until combined.
- Stuff each apple with the walnut mixture, pressing it down gently, then top with a small piece of butter.
- Place the apples upright in the prepared baking dish. Pour the water into the dish around the apples to keep them moist while baking.
- Bake for 30 to 40 minutes, or until the apples are tender but still hold their shape and the filling is bubbly.
- Remove from the oven and allow to cool slightly before serving. These can be enjoyed on their own or paired with a scoop of vanilla ice cream or yogurt.
4. Mango Coconut Sorbet

This mango coconut sorbet is a refreshing treat that combines the tropical sweetness of ripe mangoes with the creamy richness of coconut milk. It offers a smooth, icy texture that's light on the palate, making it an ideal dessert for warm days or a simple way to cool off any time.
The recipe is straightforward and doesn't require an ice cream maker, which means it's accessible for busy home cooks. With minimal ingredients and easy steps, you can have a bright and flavorful sorbet ready to enjoy in no time.
Why This Recipe Works
This mango coconut sorbet balances fresh fruit flavor with creamy texture while being quick to prepare and naturally dairy-free.
- Convenience - Requires only a blender and freezer, no special equipment needed.
- Flavor balance - Combines the tropical tang of mango with smooth coconut for a subtle sweetness.
- Texture - Smooth and creamy sorbet that melts pleasantly on the tongue without being icy.
- Appeal - A dairy-free, vegan-friendly dessert that everyone can enjoy.
Ingredient Swap Ideas
Swapping ingredients allows this sorbet to suit personal preferences or dietary needs without losing its tropical feel.
- Coconut milk - Use full-fat or light coconut milk depending on the desired creaminess and calorie content.
- Sweetener - Substitute maple syrup with agave nectar, honey, or granulated sugar based on what you prefer or have on hand.
- Mango - Frozen mango chunks can replace fresh mango for year-round convenience and consistent texture.
- Citrus - Add lime juice instead of lemon for a slightly different tangy note.
Ingredients
- 3 cups ripe mango chunks - Fresh or frozen, peeled and diced.
- 1 cup full-fat coconut milk - Provides creaminess and a subtle coconut flavor.
- 3 tablespoons maple syrup - Adds natural sweetness to balance the fruit.
- 1 tablespoon fresh lemon juice - Brightens the sorbet with a touch of acidity.
- Pinch of salt - Enhances the overall flavors.
Instructions
- Place the mango chunks, coconut milk, maple syrup, lemon juice, and salt in a blender. Blend on high until smooth and creamy with no chunks remaining.
- Taste the mixture and adjust sweetness or acidity if needed by adding more maple syrup or lemon juice.
- Pour the blended mixture into a shallow, freezer-safe container. Smooth the top with a spatula.
- Freeze for at least 4 hours or until firm but scoopable. For best texture, stir the sorbet once or twice during the first 2 hours of freezing to prevent large ice crystals.
- Before serving, let the sorbet sit at room temperature for 5-10 minutes to soften slightly. Scoop into bowls and enjoy.
5. Grilled Pineapple with Honey Lime Glaze
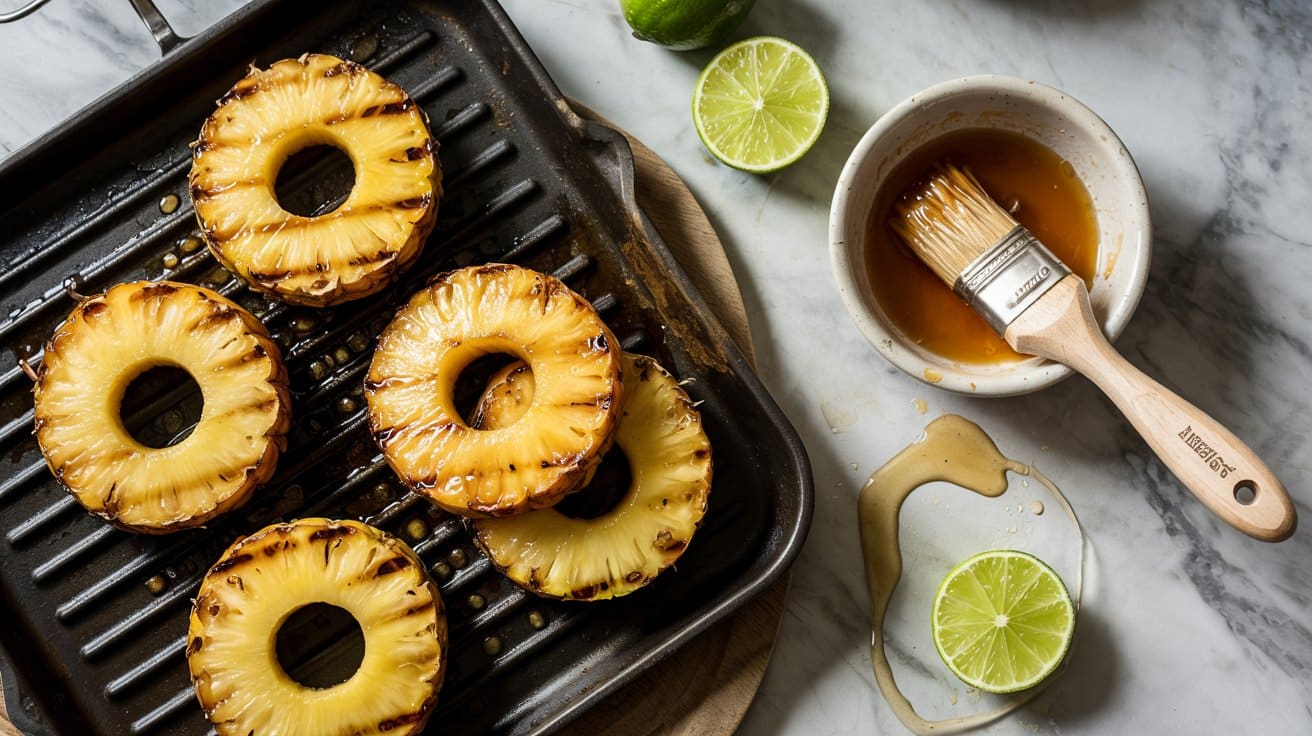
Grilled pineapple with honey lime glaze makes a wonderfully simple and fresh treat for any occasion. The natural sweetness of the pineapple intensifies on the grill, while the honey lime glaze adds a bright, tangy note that balances the caramelized fruit beautifully.
This recipe takes just minutes to prepare and cook, making it an easy choice for a light dessert or a flavorful side at barbecues. Its combination of juicy texture and bright flavor is refreshing and satisfying without feeling heavy.
Why This Recipe Works
This recipe offers a nice combination of sweet and tangy flavors with minimal prep and cook time.
- Convenience - Quick and easy to prepare with only a few ingredients.
- Flavor balance - The sweetness of grilled pineapple goes well with the zesty honey lime glaze.
- Texture - Caramelized edges and juicy, tender pineapple slices provide a pleasing contrast.
- Appeal - Versatile enough to serve as a dessert, side dish, or even a topping for salads and grilled meats.
Ingredient Swap Ideas
Swapping ingredients can adjust this recipe to fit different dietary preferences and enhance versatility.
- Honey substitute - Use maple syrup or agave nectar for a vegan-friendly glaze.
- Lime alternative - Replace fresh lime juice with lemon juice for a slightly different citrus flavor.
- Pineapple choice - Canned or frozen pineapple slices can be used if fresh isn't available, but fresh will give the best flavor.
- Add spices - Sprinkle ground cinnamon or chili powder on the pineapple before grilling to add warmth or a hint of heat.
Ingredients
- 1 whole fresh pineapple - peeled, cored, and sliced into ½-inch thick rings.
- 3 tablespoons honey - for a natural, sweet glaze.
- 2 tablespoons fresh lime juice - adds brightness and tang.
- 1 teaspoon lime zest - enhances the citrus flavor.
- 1 tablespoon unsalted butter - melted, to brush on pineapple before grilling.
- Pinch of salt - to balance the sweetness.
Instructions
- Preheat the grill to medium-high heat. While it heats, mix honey, lime juice, lime zest, and a pinch of salt in a small bowl to create the glaze.
- Brush both sides of the pineapple slices with melted butter to prevent sticking and enhance caramelization.
- Place pineapple slices directly on the grill. Cook for about 3 to 4 minutes per side until grill marks form and the fruit starts to caramelize.
- During the last minute of grilling, brush the pineapple generously with the honey lime glaze, turning once to coat both sides.
- Remove the pineapple from the grill and serve warm. Drizzle any remaining glaze over the top before serving for extra flavor.
6. Mixed Berry Clafoutis
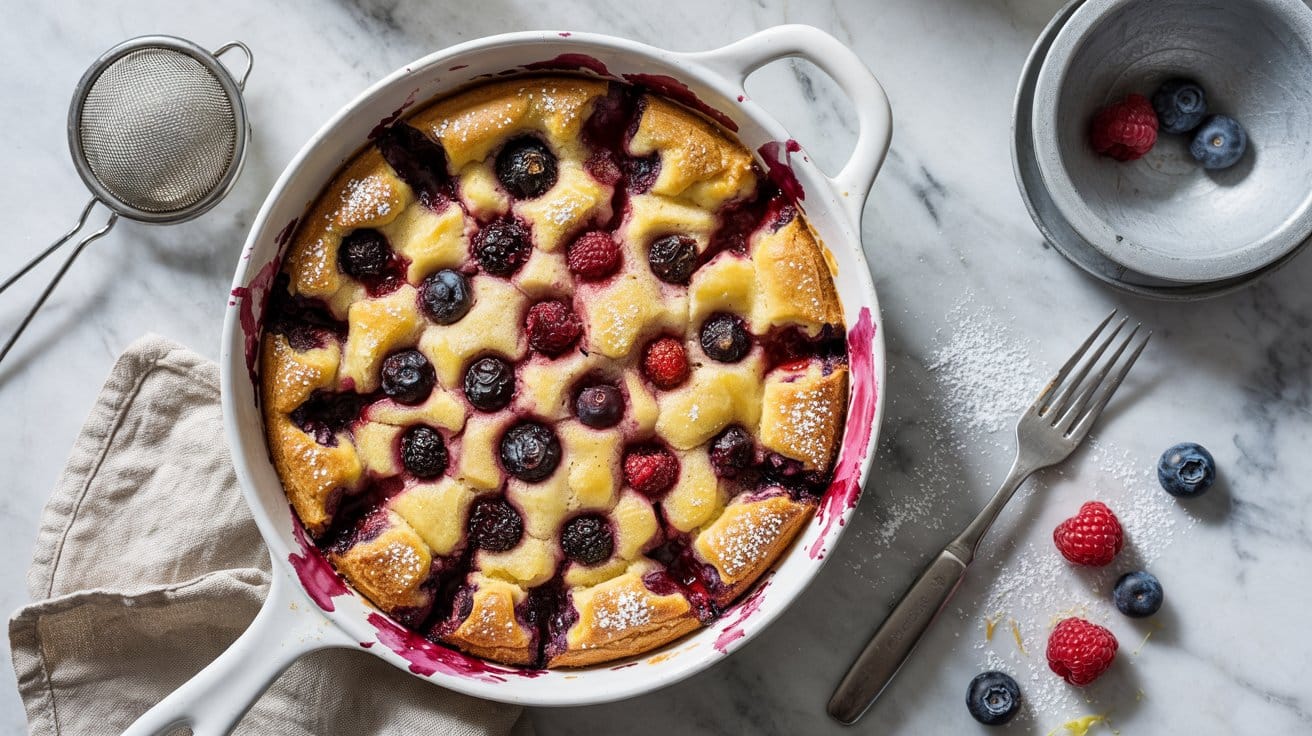
This Mixed Berry Clafoutis offers a wonderful way to show fresh berries in a light French-style baked custard. The custard sets around the fruit, creating a tender, slightly custardy texture with a delicate crisp edge that adds contrast in every bite.
You can prepare this dessert with minimal fuss, making it a great choice for a simple weekend treat or an impressive yet approachable dessert to share. The natural sweetness and slight tartness of the berries balance beautifully with the silky, eggy batter.
Why This Recipe Works
This Mixed Berry Clafoutis highlights fresh fruit in a straightforward custard that requires just a handful of everyday ingredients. The end result is an elegant dessert with balanced sweetness and a pleasing mix of textures.
- Convenience - Uses basic pantry staples and fresh berries with simple preparation.
- Flavor balance - Combines the natural tang of berries with a sweet, creamy batter.
- Texture - Offers a custardy interior with a gently crisped top edge.
- Appeal - Suitable for casual family meals or a refined dessert for guests.
Ingredient Swap Ideas
Adjusting this clafoutis to suit different preferences or dietary needs is easy with a few ingredient swaps. These variations keep the spirit of the recipe intact while allowing customization.
- Milk options - Use almond, oat, or coconut milk instead of whole milk to make it dairy-free.
- Sweetener alternatives - Substitute granulated sugar with maple syrup or honey for a different sweetness profile.
- Flour choices - Try gluten-free flour blends in place of all-purpose flour to accommodate gluten sensitivities.
- Berry variations - Replace mixed berries with cherries or stone fruits for seasonal changes.
Ingredients
- 1 cup mixed fresh berries - Such as blueberries, raspberries, blackberries, and strawberries, washed and patted dry.
- 3 large eggs - To create the custard base.
- ½ cup granulated sugar - Balances the tartness of the berries and sweetens the custard.
- 1 cup whole milk - Provides creaminess to the batter.
- ½ cup all-purpose flour - Helps set the custard with a tender crumb.
- 1 teaspoon pure vanilla extract - Adds gentle aromatic flavor.
- Pinch of salt - Enhances the overall taste.
- Butter, for greasing - To prevent sticking and add richness.
- Powdered sugar, for dusting (optional) - Adds a light finishing touch before serving.
Instructions
- Preheat the oven to 350°F (175°C). Butter a 9-inch (23 cm) round baking dish or pie plate thoroughly to prevent sticking.
- Scatter the mixed berries evenly over the bottom of the prepared dish. Set aside.
- In a mixing bowl, whisk together the eggs and granulated sugar until smooth and pale.
- Gradually add the flour, whisking to combine without lumps. Stir in the milk, vanilla extract, and a pinch of salt until the batter is smooth and uniform.
- Pour the batter gently over the berries, making sure they are evenly distributed. Bake in the preheated oven for about 35 to 40 minutes, or until the custard is set and the top has a light golden color.
- Remove from the oven and let cool slightly. Dust with powdered sugar if desired before serving warm or at room temperature.
7. Plum Upside-Down Cake
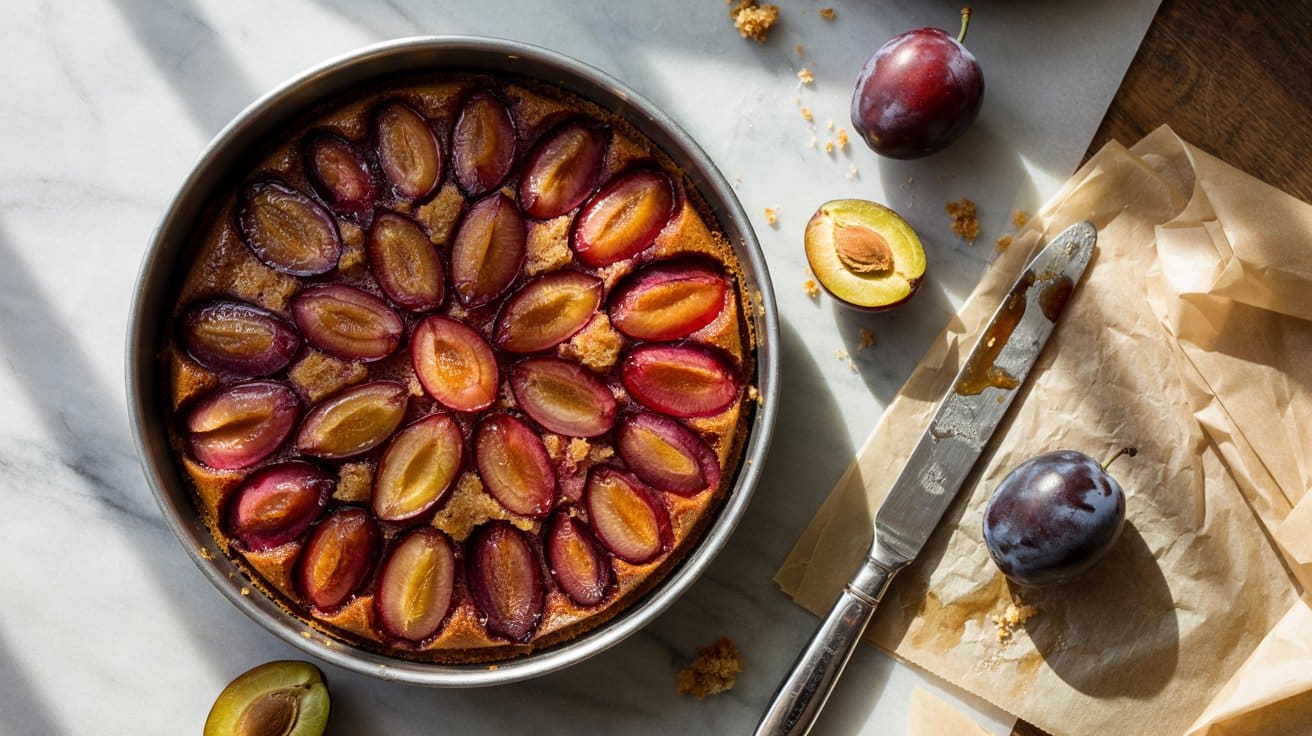
This Plum Upside-Down Cake is a lovely way to show juicy, ripe plums with a tender, buttery cake that bakes right over them. The fruit caramelizes on the bottom during baking, creating a beautiful glossy topping once flipped.
It's an inviting dessert that balances sweet and slightly tart flavors with a soft, moist crumb.
Making this cake is straightforward and rewarding, providing a beautiful presentation with minimal fuss. It's a great choice for a weekend treat or a dinner party dessert that draws compliments.
Why This Recipe Works
This cake combines fruit and cake in an easy bake that highlights plum's natural juices and flavor with an inviting, golden crust.
- Convenience - The cake bakes directly on the plums, reducing extra steps.
- Flavor balance - The rich buttery cake offsets the plums' sweetness and subtle tartness.
- Texture - The tender crumb and caramelized fruit topping add a contrast of smoothness and slight chew.
- Appeal - The dramatic flip reveals a glossy, colorful plum layer, perfect for sharing or guests.
Ingredient Swap Ideas
Swapping a few ingredients lets you tailor this cake to fit what's on hand or personal preferences without losing the basic charm.
- Fruit options - Substitute plums with peaches, nectarines, or apricots for a similar texture and sweetness.
- Flour - Use whole wheat pastry flour for a nuttier flavor and slightly denser crumb.
- Butter substitute - Replace butter with coconut oil for a dairy-free version that adds a subtle coconut aroma.
- Sweetener - Swap granulated sugar with maple syrup or honey to introduce a different sweetness profile.
Ingredients
- 4 to 5 ripe plums - Pitted and cut into halves or quarters, depending on size.
- ¼ cup unsalted butter - Melted, to coat the pan and mix into batter.
- ½ cup granulated sugar - For caramelizing with the plums.
- 1 cup all-purpose flour - Provides structure to the cake.
- 1 teaspoon baking powder - Helps the cake rise.
- ¼ teaspoon salt - Balances flavors.
- ½ cup milk - Adds moisture to the batter.
- 1 large egg - Binds the ingredients together.
- 1 teaspoon vanilla extract - Enhances the cake's flavor.
- Optional: powdered sugar - For dusting on the finished cake.
Instructions
- Preheat your oven to 350°F (175°C). Generously butter a 9-inch round cake pan, then sprinkle the ½ cup sugar evenly over the bottom. Arrange the plum halves cut side down on top of the sugar in a single layer.
- In a mixing bowl, whisk together the flour, baking powder, and salt. In a separate bowl, combine the melted butter, milk, egg, and vanilla extract.
- Gradually add the dry ingredients to the wet ingredients, stirring until just combined. Avoid overmixing to keep the cake tender.
- Pour the batter over the arranged plums, spreading it evenly to cover the fruit. Bake for 35 to 40 minutes or until a toothpick inserted into the center comes out clean and the cake is golden.
- Allow the cake to cool for about 10 minutes in the pan, then run a knife around the edges. Place a serving plate over the pan and carefully invert the cake onto the plate. Let it sit flipped for a moment so the plum topping can set. Dust with powdered sugar if desired and serve warm or at room temperature.
8. Banana Pudding Trifle
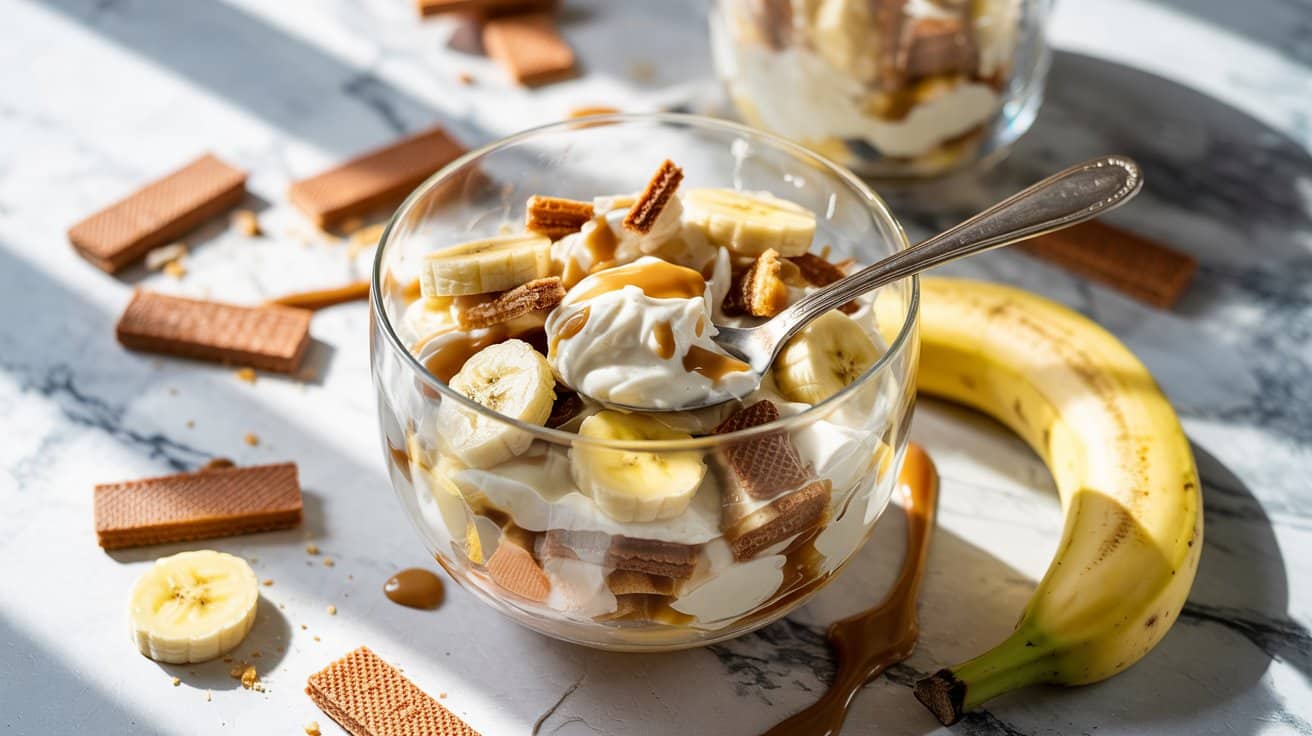
This Banana Pudding Trifle combines creamy vanilla pudding, fresh banana slices, and crunchy vanilla wafers into a nostalgic layered dessert. It's simple to put together, making it a great choice for family gatherings or casual treats.
The combination of soft pudding, ripe bananas, and crisp wafers creates a pleasing contrast in texture. A generous topping of whipped cream adds a light, airy finish that balances the sweetness perfectly.
Why This Recipe Works
This recipe brings classic flavors in a straightforward, crowd-pleasing format. It's easy to assemble ahead of time, and its layered presentation makes it visually appealing as well as tasty.
- Convenience - Requires no baking and can be made in under 30 minutes.
- Flavor balance - Sweet pudding and bananas pair with the mild crunch of vanilla wafers.
- Texture - Layers alternate between creamy, soft, and crisp elements for interest in every bite.
- Appeal - A familiar dessert that's approachable for all ages and occasions.
Ingredient Swap Ideas
Swapping ingredients here can accommodate dietary needs or simply freshen up the classic. Adjustments keep the recipe's core taste while making it your own.
- Wrappers - Use gluten-free vanilla wafers to make it suitable for gluten sensitivities.
- Dairy - Substitute dairy-free vanilla pudding and whipped topping for a lactose-free version.
- Fruit - Add or replace bananas with sliced strawberries or peaches for a fruity twist.
- Sweetener - Choose a sugar-free vanilla pudding mix to reduce sugar content if preferred.
Ingredients
- 4 cups vanilla pudding - Prepared according to package instructions or homemade.
- 3 large ripe bananas - Sliced into ¼-inch thick rounds.
- 3 cups vanilla wafer cookies - Whole or slightly broken for layering.
- 2 cups whipped cream - Store-bought or freshly whipped for topping.
Instructions
- In a large trifle bowl or individual serving glasses, start by spreading a layer of vanilla pudding at the bottom.
- Add a layer of vanilla wafers evenly over the pudding, then top with a layer of banana slices.
- Repeat these layers-pudding, wafers, bananas-until all ingredients are used, ending with a pudding layer on top.
- Spread whipped cream evenly over the top layer of pudding and garnish with a few vanilla wafers or banana slices for decoration.
- Chill in the refrigerator for at least 2 hours to let the flavors meld and the wafers soften slightly before serving.
9. Raspberry Almond Tart
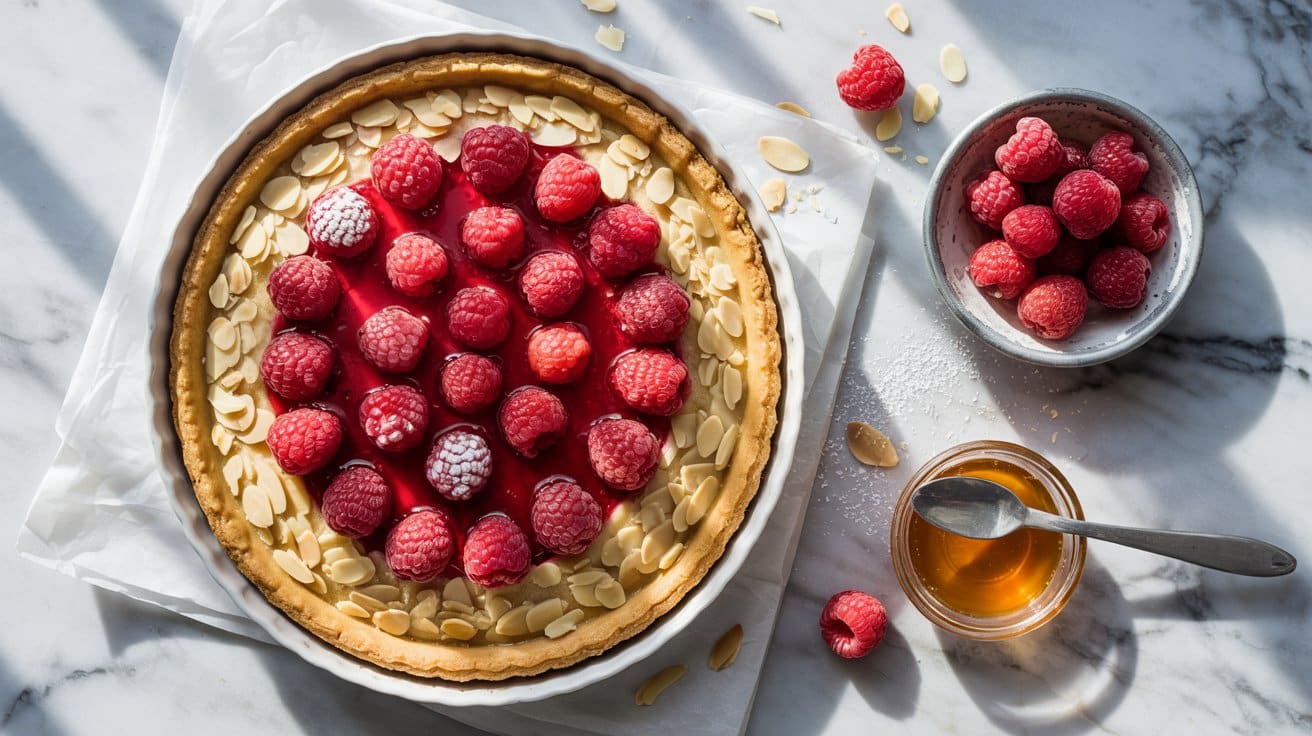
This Raspberry Almond Tart combines a crisp almond shortcrust with a creamy frangipane filling, topped with fresh raspberries that add a bright, tart contrast. The nutty sweetness of the almond base goes well with the juicy berries for a balanced and inviting dessert.
Making this tart is straightforward and rewarding, offering a lovely mix of textures and flavors that work well for casual family treats or more formal occasions. The fresh raspberries provide a fresh lift that keeps it light and fresh despite its rich ingredients.
Why This Recipe Works
This tart stands out thanks to its ease of preparation, bright flavor combination, and refined appearance. Key strengths include:
- Convenience - Uses a simple almond shortcrust and frangipane that you can prepare ahead.
- Flavor balance - Combines sweet almond with tart, juicy raspberries for a natural contrast.
- Texture - Features a crisp crust with creamy filling and juicy fruit on top.
- Appeal - Elegant enough for entertaining but approachable for everyday baking.
Ingredient Swap Ideas
Swapping ingredients in this tart can help accommodate dietary needs or introduce different flavor nuances while keeping the classic almond-berry essence intact. Consider these adjustments:
- Almond flour - Replace with all-purpose flour or gluten-free flour blend for gluten sensitivity.
- Butter - Use plant-based butter or coconut oil for a dairy-free version.
- Raspberries - Try blackberries or sliced strawberries if raspberries are out of season.
- Almond extract - Swap with vanilla extract for a softer flavor.
Ingredients
- 1 ¼ cups all-purpose flour - For the shortcrust pastry base.
- ½ cup almond flour - Adds a tender nutty texture to the crust.
- ½ cup unsalted butter, cold and cubed - Creates the crisp texture in the shortcrust.
- ¼ cup granulated sugar - Sweetens the crust lightly.
- 1 egg yolk - Binds the shortcrust dough together.
- 1 teaspoon almond extract - Enhances the nutty flavor in the filling.
- ½ cup unsalted butter, softened - Used in the frangipane filling.
- ½ cup granulated sugar - Sweetens the frangipane.
- 2 large eggs - Provides structure to the frangipane.
- 1 cup almond flour - Key ingredient for the filling's almond base.
- 2 tablespoons all-purpose flour - Helps set the frangipane.
- 1 cup fresh raspberries - Adds fresh, bright flavor and a juicy topping.
- Powdered sugar, for dusting - Optional finishing touch for presentation.
Instructions
- Preheat the oven to 350°F (175°C). In a bowl, combine all-purpose flour, almond flour, and sugar for the crust. Add cold butter cubes and rub them into the flour mixture until it resembles coarse crumbs. Mix in the egg yolk and a tablespoon of cold water to form a dough. Wrap in plastic and chill for 30 minutes.
- Roll out the chilled dough on a lightly floured surface to fit a 9-inch tart pan. Press it evenly into the pan, trimming excess edges. Prick the base with a fork and chill in the fridge for 15 minutes to prevent shrinking.
- To make the frangipane filling, beat softened butter with sugar until creamy. Add eggs one at a time, mixing well after each addition. Stir in almond flour, flour, and almond extract until smooth. Spread the filling evenly over the chilled crust.
- Arrange fresh raspberries evenly on top of the frangipane. Bake the tart for 35 to 40 minutes, or until the filling is set and the crust is golden. Let the tart cool completely in the pan on a wire rack.
- Once cool, dust the tart with powdered sugar if desired before slicing and serving. This tart is delicious eaten fresh or at room temperature.
10. Citrus Olive Oil Cake

This Citrus Olive Oil Cake is a wonderfully moist and fragrant treat that brings bright lemon and orange flavors to the forefront. The combination of fresh citrus zest and quality olive oil creates a rich, tender crumb that feels light and refreshing.
It's a straightforward recipe that fits easily into a busy week while still feeling special enough for gatherings or weekend baking.
The cake's texture is soft but substantial, with a slightly crisp top that adds a nice contrast. It pairs well with tea or coffee and can be enjoyed plain or with a simple glaze or dusting of powdered sugar.
This cake offers a balanced citrus flavor that isn't overpowering, making it a great choice for those who appreciate subtle yet bright desserts.
Why This Recipe Works
This olive oil cake stands out for its ease of preparation and bright, satisfying flavor. It combines wholesome ingredients with classic baking techniques for a reliable and crowd-pleasing dessert.
- Convenience - Requires minimal prep and uses straightforward pantry ingredients.
- Flavor balance - Combines the zestiness of lemon and orange with the richness of olive oil.
- Texture - The olive oil keeps the cake moist, while the crust offers just enough crispness.
- Versatility - Suitable for casual occasions or more elegant gatherings with a simple finishing touch.
Ingredient Swap Ideas
Swapping ingredients can help tailor this cake to your preferences or dietary needs without losing its fresh citrus character.
- Olive oil - Substitute with avocado oil or a neutral vegetable oil if you prefer a milder taste.
- Whole wheat flour - Use all-purpose flour for a lighter texture or a gluten-free flour blend for gluten intolerance.
- Honey or maple syrup - Replace sugar partially with these natural sweeteners to add depth and moisture.
- Citrus zest - Experiment with lime or grapefruit zest to vary the citrus notes while keeping the bright profile.
Ingredients
- 1 6 cups all-purpose flour - For structure and a tender crumb.
- 1 teaspoon baking powder - To help the cake rise evenly.
- ½ teaspoon baking soda - Adds additional lift and lightness.
- ½ teaspoon salt - Enhances all the flavors in the cake.
- ¾ cup granulated sugar - Sweetens the cake.
- 3 large eggs - Bind the ingredients and add richness.
- ¾ cup extra-virgin olive oil - Provides moisture and a subtle fruity flavor.
- ¾ cup plain Greek yogurt - Adds tenderness and a slight tang.
- Zest of 1 lemon - Brings bright citrus aroma and flavor.
- Zest of 1 orange - goes with the lemon zest with sweet orange notes.
- 2 tablespoons freshly squeezed lemon juice - Adds additional citrus acidity for balance.
- 2 tablespoons freshly squeezed orange juice - Enhances the citrus flavor and moisture.
- 1 teaspoon vanilla extract - Adds subtle depth to the flavor.
Instructions
- Preheat the oven to 350°F (175°C). Grease and flour a 9-inch round cake pan or line it with parchment paper.
- In a medium bowl, whisk together the flour, baking powder, baking soda, and salt. Set aside.
- In a large bowl, whisk the sugar and eggs until combined. Add the olive oil, Greek yogurt, lemon zest, orange zest, lemon juice, orange juice, and vanilla extract. Mix until smooth and well blended.
- Gradually add the dry ingredients to the wet mixture, folding gently until just combined. Avoid overmixing to keep the cake tender.
- Pour the batter into the prepared pan and smooth the top. Bake for 40 to 45 minutes, or until a toothpick inserted into the center comes out clean.
- Let the cake cool in the pan for 10 minutes, then turn out onto a wire rack to cool completely before serving.
This Citrus Olive Oil Cake is a reliable choice when you want a moist, flavorful treat that's easy to put together and offers a bright, fresh finish. Enjoy it with a dusting of powdered sugar or a light citrus glaze to highlight its natural flavors.
For more berry-forward treats, explore light berry dessert ideas. If you enjoyed the crisps here, find more crumble and crisp recipes at crumble and crisp fruit desserts.

Andrew Gray is a seasoned food writer and blogger with a wealth of experience in the restaurant and catering industries. With a passion for all things delicious, Andrew has honed his culinary expertise through his work as a personal chef and caterer.
His love for food led him to venture into food writing, where he has contributed to various online publications, sharing his knowledge and insights on the culinary world. As the proud owner of CooksCrafter.com, Andrew covers a wide range of topics, including recipes, restaurant reviews, product recommendations, and culinary tips.
Through his website, he aims to inspire and educate fellow food enthusiasts, offering a comprehensive resource for all things food-related.