Cold appetizers - small chilled starters often served as hors d'oeuvres or antipasti (commonly found in Italian antipasti and other European hors d'oeuvres traditions) - offer a refreshing and convenient way to start any gathering, and this collection of 13 recipes is designed to bring variety and ease to your table. These dishes require no reheating, making them ideal for casual get-togethers, busy weeknights, or festive occasions.

From fresh vegetable bites and creamy dips to seafood salads and bright spreads, the recipes here cover a range of flavors and textures. You'll find options that are light and crisp alongside satisfying, savory choices, all with straightforward preparation and familiar ingredients.
Whether you want something colorful and fresh or rich and flavorful, these appetizers offer something for every taste and event.
Together, these recipes save time while packing a flavorful punch, allowing for simple assembly without the need for hot equipment. They also make cleanup easier and support meal prepping, making entertaining feel manageable and enjoyable.
1. Caprese Skewers
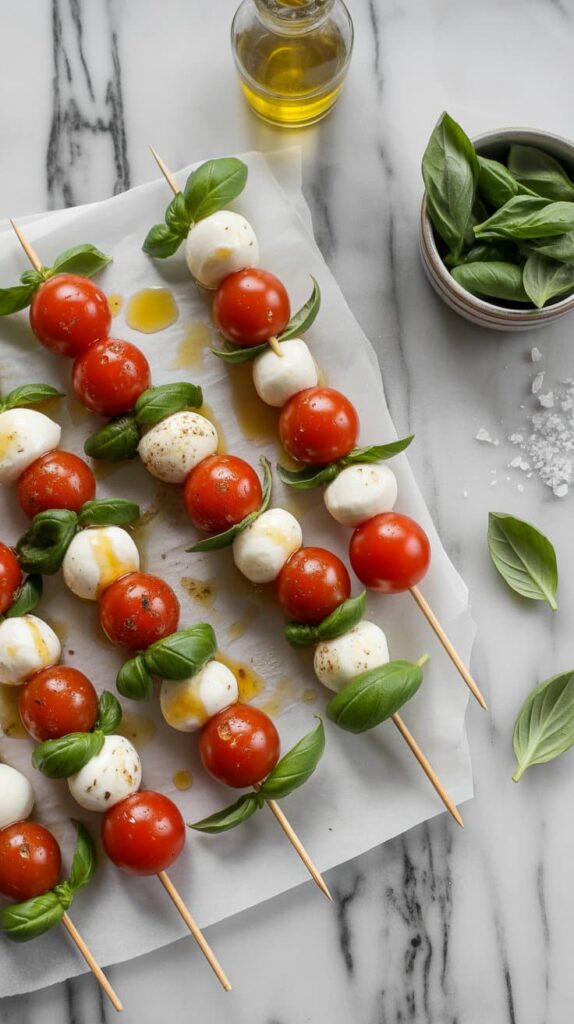
Caprese skewers bring the classic flavors of a Caprese salad (originally from the island of Capri, Italy) into a fun, bite-sized form that's perfect for snacking or serving at gatherings, and the same flavor profile makes a great Caprese-inspired pasta salad for potlucks and pairs well with side dishes for Caprese chicken.
They are simple to assemble and offer a nice mix of creamy, juicy, and herbaceous textures and flavors, often built with a roughly 1:1 ratio of mozzarella to tomato to keep each bite balanced. Because they're served on skewers, they're easy to handle, which makes them ideal for casual entertaining or quick healthy snacks.
Why This Recipe Works
This recipe offers a straightforward approach to a timeless flavor combination, making it easy to prepare and enjoy outdoors or at your next event, and it pairs well with lighter drinks like blended cocktails for summer gatherings.
- Convenience - Quick to assemble with no cooking required, making it a great last-minute option, often assembled in under 10 minutes.
- Flavor balance - Combines creamy mozzarella, sweet tomatoes, fresh basil, and tangy balsamic glaze.
- Texture - Offers a pleasing contrast between soft cheese and crisp tomatoes.
- Appeal - Attractive presentation and universally liked, suitable for all ages.
Ingredient Swap Ideas
Swapping ingredients can help customize these skewers to your taste preferences or dietary needs without losing the essence of the dish.
- Mozzarella - Use small bocconcini or marinated fresh mozzarella for added flavor; for other minimal-ingredient options, consider simple three-ingredient appetizer ideas.
- Tomatoes - Replace cherry tomatoes with grape tomatoes or heirloom tomato pieces for variety.
- Basil - Substitute fresh basil with fresh mint or oregano for a different herbal note, though basil is a hallmark of Italian and Mediterranean cuisines.
- Balsamic glaze - Swap with a mixture of balsamic vinegar and honey or a light vinaigrette if you prefer a lighter drizzle.
Ingredients
- 20 mini mozzarella balls - Fresh and soft for a creamy texture.
- 20 cherry tomatoes - Ripe and firm for sweetness and juiciness.
- 20 fresh basil leaves - Whole leaves for fresh herb flavor.
- ¼ cup balsamic glaze - Thick and tangy to drizzle over skewers.
- 20 wooden or bamboo skewers - About 4 inches long for easy handling.
Instructions
- Rinse the cherry tomatoes and fresh basil leaves under cool water, then pat them dry carefully.
- On each skewer, thread one cherry tomato, followed by a basil leaf, and then a mini mozzarella ball. Repeat until all skewers are assembled.
- Arrange the skewers on a serving platter, spacing them evenly so they look inviting.
- Drizzle the balsamic glaze evenly over the skewers just before serving.
- Serve immediately or cover and refrigerate for up to 2 hours to keep fresh before serving.
2. Smoked Salmon Cucumber Bites
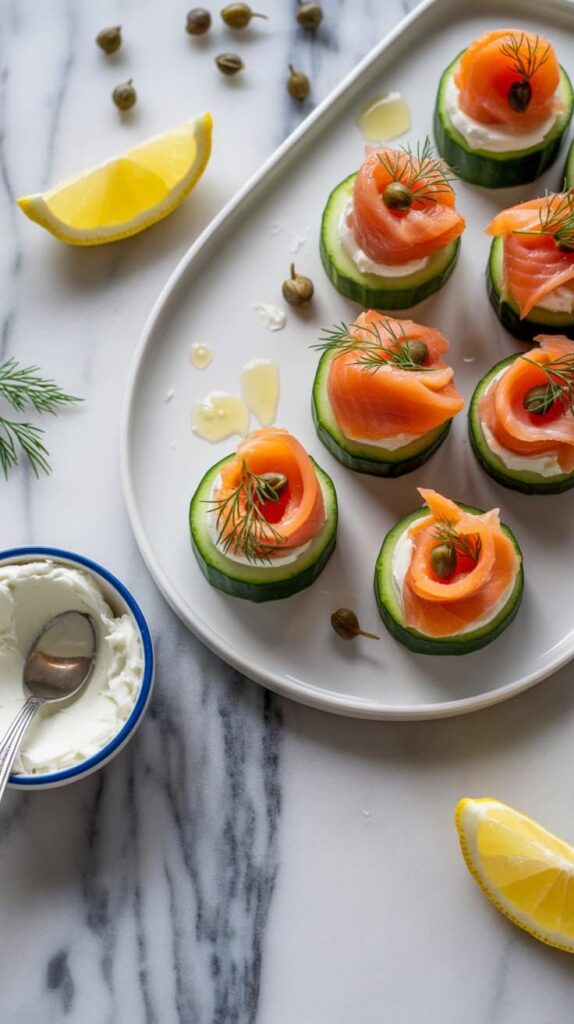
Smoked Salmon Cucumber Bites offer a nice combination of fresh, crisp cucumber rounds topped with smooth cream cheese and savory smoked salmon, frequently made with cold-smoked salmon (lox), which is salt-cured, for a silky texture, and they complement smoked salmon side dishes for meals.
The preparation is straightforward, requiring minimal time and effort, yet the result feels elegant and fresh, typically ready in about 10 minutes. They suit well for occasions where you want something refreshing and refined without spending too long cooking or assembling.
Why This Recipe Works
This recipe combines convenience, flavor, and presentation in a way that fits busy days and special gatherings alike.
- Quick preparation - Assembling these bites takes just a few minutes and no cooking.
- Balanced flavors - Cream cheese adds richness that goes with the smoky salmon and cool cucumber.
- Textural contrast - Crisp cucumber rounds contrast the soft cheese and tender fish perfectly.
- Elegant appeal - These bites look refined and colorful, great for guests or light lunches.
Ingredient Swap Ideas
Swapping a few ingredients can easily adjust this recipe for different preferences or dietary needs without sacrificing its essence.
- Cream cheese substitute - Use Greek yogurt or a plant-based cream cheese alternative to reduce fat or go dairy-free.
- Smoked salmon alternative - Try smoked trout or sliced deli turkey for a different, mild protein option.
- Cucumber varieties - English cucumber works well, but Persian cucumbers offer smaller, bite-sized rounds.
- Herb choices - Dill is classic, but fresh chives or tarragon deliver a fresh twist.
Ingredients
- 1 large cucumber - washed and sliced into ¼-inch thick rounds.
- 4 ounces cream cheese - softened for easy spreading.
- 4 ounces smoked salmon - thinly sliced.
- 1 tablespoon fresh dill - finely chopped, plus more for garnish.
- 1 teaspoon lemon juice - to brighten the flavors.
- Freshly ground black pepper - to taste.
Instructions
- Pat cucumber slices dry with a paper towel to prevent sogginess.
- In a small bowl, mix cream cheese with lemon juice and chopped dill until combined and smooth.
- Spread a small dollop of the cream cheese mixture evenly across each cucumber slice.
- Top each slice with a folded piece of smoked salmon.
- Garnish with a sprinkle of fresh dill and a grind of black pepper before serving.
These bites are best served fresh but can be chilled for up to an hour before enjoying.
3. Stuffed Mini Peppers with Herbed Goat Cheese
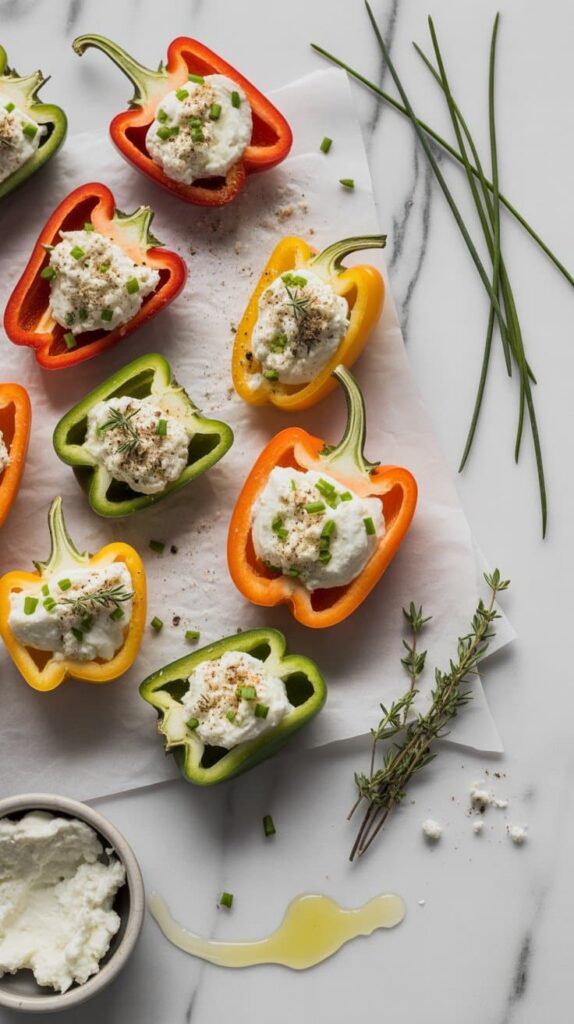
This recipe brings together sweet mini bell peppers filled with a creamy, tangy goat cheese blend seasoned with fresh herbs. The combination of the crisp, colorful peppers (mini bell peppers are sweeter and have thinner walls than full-sized bell peppers) and smooth, flavorful cheese makes for a simple appetizer or snack that feels fresh and satisfying.
Preparing these stuffed mini peppers takes just a few minutes, making them a great choice for busy days or last-minute gatherings. They're easy to customize with herbs you enjoy and stand out on any appetizer platter.
They also pair nicely with best side dishes for stuffed chicken when served as part of a larger dinner.
Why This Recipe Works
This dish offers a nice balance of texture and flavor, while requiring minimal preparation time. Stuffed Mini Peppers with Herbed Goat Cheese make a flavorful, visually appealing bite that suits many occasions.
- Convenience - Quick assembly with no cooking needed, ideal for easy entertaining.
- Flavor balance - Sweet peppers paired with tangy, creamy goat cheese and fresh herbs deliver a pleasing contrast.
- Texture - Crisp pepper shells hold soft, spreadable cheese for a satisfying bite.
- Appeal - Bright colors and fresh flavors make them attractive to a wide range of tastes.
Ingredient Swap Ideas
You can tailor this recipe to your dietary preferences or what's available by swapping a few key ingredients while keeping the main idea intact.
- Goat cheese - Replace with cream cheese or ricotta for a milder taste and creamy texture.
- Fresh herbs - Use basil, oregano, or cilantro instead of parsley and chives depending on your flavor preference.
- Mini peppers - Small cherry tomatoes or cucumber cups work as a crunchy filler alternative.
- Add-ons - Mix in chopped nuts or dried fruits like cranberries to introduce extra texture and sweetness.
Ingredients
- Mini sweet bell peppers - 12 whole, cleaned and halved lengthwise, seeds removed.
- Goat cheese - 8 ounces, softened for spreading.
- Fresh parsley - 2 tablespoons, finely chopped.
- Fresh chives - 1 tablespoon, finely chopped.
- Garlic powder - ¼ teaspoon for subtle flavor.
- Lemon zest - 1 teaspoon for brightness.
- Salt - ¼ teaspoon to enhance flavors.
- Black pepper - ⅛ teaspoon, freshly ground.
Instructions
- In a medium bowl, combine softened goat cheese, chopped parsley, chives, garlic powder, lemon zest, salt, and pepper. Mix until all ingredients are fully incorporated and the mixture is smooth.
- Cut the mini peppers in half lengthwise and remove seeds carefully, keeping the structure intact to hold the filling.
- Spoon the herbed goat cheese mixture into each pepper half, filling generously but without overflow.
- Arrange the stuffed peppers on a serving platter. Refrigerate for 15 minutes if desired to allow flavors to meld and the cheese to firm up slightly.
- Serve chilled or at room temperature as a fresh, flavorful appetizer or snack.
4. Classic Deviled Eggs
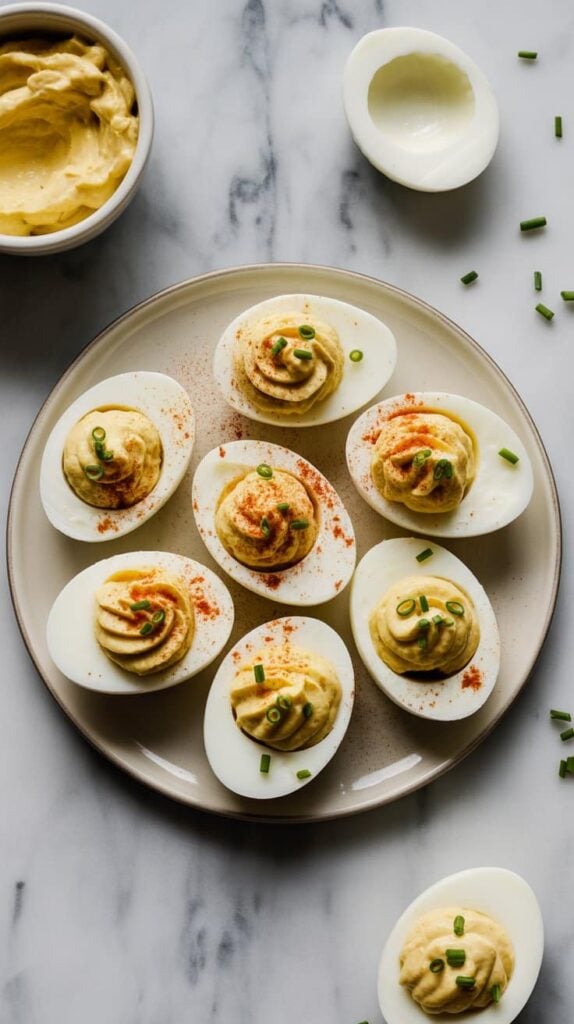
Classic deviled eggs are a go-to appetizer that combines simple ingredients into a creamy, tangy filling inside a tender, firm egg white. They bring a satisfying balance of flavors with just a touch of mustard and mayo for smoothness and a hint of vinegar for brightness.
These eggs come together quickly and are great for gatherings, family meals, or even a snack. Their straightforward preparation makes them accessible, while still delivering a satisfying flavor that appeals to many.
Why This Recipe Works
This deviled eggs recipe offers a handy way to transform everyday hard-boiled eggs into a flavorful treat that's quick to prepare.
- Convenience - Hard-boiled eggs require minimal hands-on time and the filling is simple to mix.
- Flavor balance - The creamy yolk mixture has tangy mustard and vinegar that brighten the taste without overpowering.
- Texture - Smooth filling contrasts perfectly with the tender, yet firm egg whites.
- Appeal - These deviled eggs feel familiar and are a crowd-pleaser for nearly any occasion.
Ingredient Swap Ideas
Adjusting ingredients can help customize the recipe to fit different dietary needs or flavor preferences without losing the classic feel.
- Mayonnaise swap - Use Greek yogurt instead of mayonnaise for a lighter, tangier filling.
- Mustard variation - Substitute Dijon mustard with whole-grain or yellow mustard for a milder or more textured bite.
- Vinegar alternative - Lemon juice can replace white vinegar for fresh acidity with a citrus twist.
- Toppings - Add chopped fresh herbs like chives or dill instead of paprika for a green, herbal note.
Ingredients
- 6 large eggs - Hard-boiled and peeled.
- 3 tablespoons mayonnaise - Adds creaminess to the filling.
- 1 teaspoon Dijon mustard - Provides a subtle tang and depth of flavor.
- 1 teaspoon white vinegar - Enhances brightness and balances richness.
- ⅛ teaspoon salt - To season the filling evenly.
- Freshly ground black pepper - To taste, for mild heat and flavor.
- Paprika - For garnish and a hint of smoky color.
Instructions
- Place the eggs in a single layer in a saucepan and cover with cold water by about an inch. Bring to a boil over medium-high heat. Once boiling, cover the pan and remove it from heat, letting the eggs sit for 12 minutes.
- Drain the hot water and transfer the eggs to an ice bath to cool completely, about 5 minutes. Peel the eggs carefully, rinse if needed, and pat dry.
- Slice each egg in half lengthwise and gently remove the yolks, placing them in a medium bowl. Set the egg whites aside on a serving plate.
- Mash the yolks with a fork, then stir in mayonnaise, mustard, vinegar, salt, and pepper until the mixture is smooth and creamy.
- Spoon or pipe the yolk filling back into the egg white halves evenly. Sprinkle with paprika for color and serve chilled or at room temperature.
5. Hummus and Veggie Cups
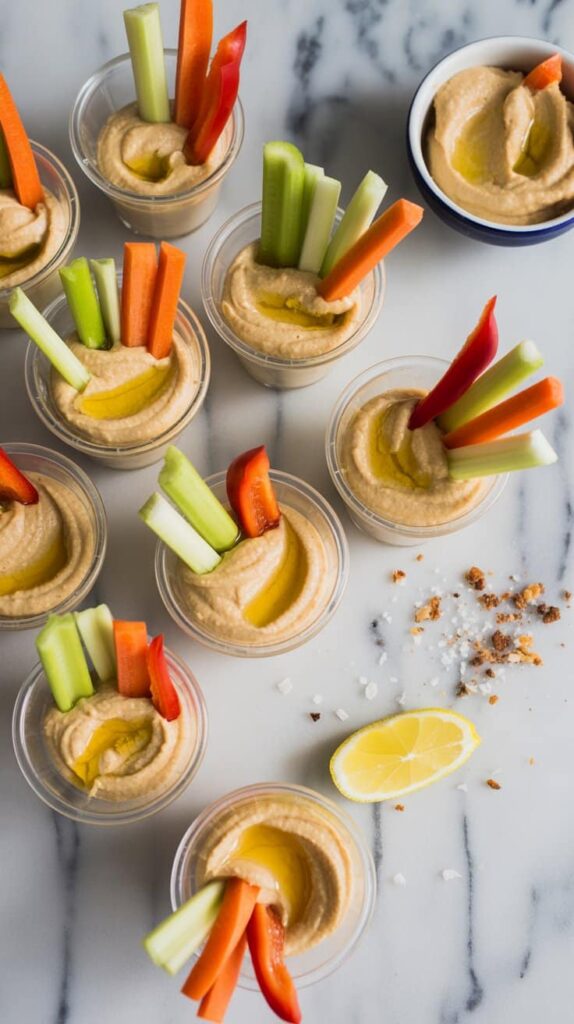
Hummus and veggie cups offer a simple, fresh snack that's just as handy for busy days as it is inviting at casual gatherings. The creamy, slightly nutty flavor of hummus goes well with crisp, crunchy vegetables, making each bite both satisfying and light.
These portioned cups are easy to prepare ahead and perfect for grabbing on the go or setting out for a crowd without fuss. From the sweet crunch of baby carrots to the refreshing crispness of celery and bell peppers, you get a colorful, nutritious combination every time.
Why This Recipe Works
This recipe brings convenience and taste together, making healthy snacking appealing and practical.
- Convenience - Pre-portioned cups let you prep in advance and grab a healthy snack whenever you want.
- Flavor balance - Creamy, savory hummus complements fresh, crisp veggies for a well-rounded taste.
- Texture - The smooth hummus contrasts nicely with crunchy carrots, celery sticks, and snap peppers.
- Appeal - These cups look inviting and are suitable for all ages, making them great for family snacks or parties.
Ingredient Swap Ideas
Changing things up can make this snack suit your preferences or dietary needs, without losing its charm.
- Hummus variety - Use flavored hummus like roasted red pepper or garlic to add a different twist.
- Veggie options - Swap carrots and celery with cucumber sticks, cherry tomatoes, or snap peas for variety.
- Dip alternatives - Try other dips like tzatziki or baba ganoush if you want a change from hummus.
- Allergy-friendly - Choose hummus made without tahini for those with sesame allergies or use sunflower seed butter-based dips.
Ingredients
- 1 cup hummus - store-bought or homemade, creamy with a smooth texture
- 12 baby carrots - washed and trimmed
- 12 celery sticks - cut to fit the size of your cups
- 1 bell pepper - sliced into thin strips, any color you prefer
- 6 clear plastic or glass cups - about 8-ounce size for individual portions
Instructions
- Spoon about 2 to 3 tablespoons of hummus into the bottom of each cup, spreading slightly to create an even layer.
- Arrange a mixture of baby carrots, celery sticks, and bell pepper strips standing upright into the hummus in each cup.
- Pack the veggies snugly so they stand up evenly and stay upright when served.
- Cover cups with lids or plastic wrap if preparing ahead and refrigerate until ready to serve.
- Serve chilled as a quick snack or part of a healthy appetizer spread.
6. Prosciutto-Wrapped Melon
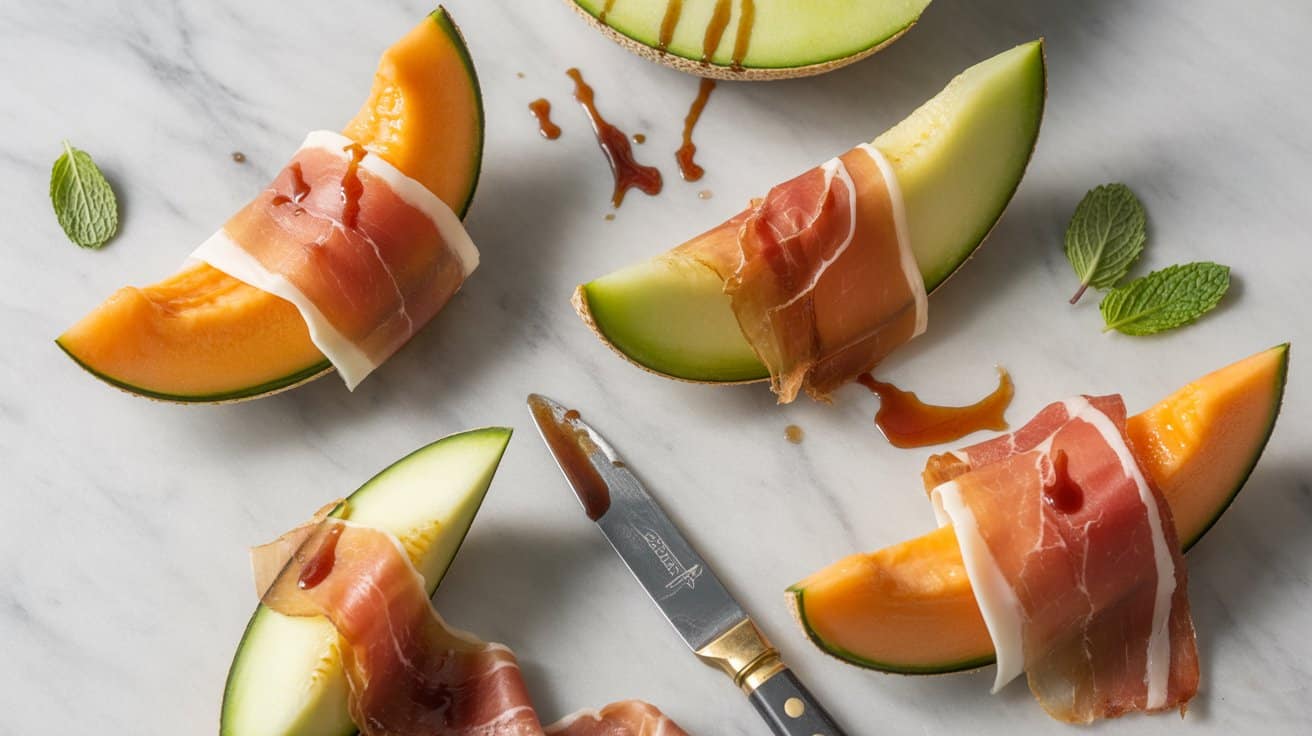
Prosciutto-wrapped melon is a simple yet satisfying dish that brings together sweet and salty flavors in an easy-to-prepare combo. The juicy, refreshing sweetness of cantaloupe or honeydew melon goes well with the savory, slightly salty taste of prosciutto.
This treat works well as an appetizer, snack, or light bite, requiring just a few ingredients and hardly any time. It's a great option if you want something fresh and flavorful without fuss.
Why This Recipe Works
This recipe shines because it balances contrasting flavors effortlessly and comes together quickly for handy use at gatherings or mealtime.
- Convenience - Requires minimal prep with only slicing and wrapping.
- Flavor balance - Combines the natural sweetness of melon with the salty richness of prosciutto.
- Texture contrast - Juicy melon meets tender, silky prosciutto.
- Appeal - Elegant and visually inviting, suitable for casual or special occasions.
Ingredient Swap Ideas
Swapping ingredients lets you adjust the recipe to better fit your preferences or dietary needs while keeping the straightforward appeal intact.
- Melon varieties - Use cantaloupe, honeydew, or even watermelon depending on sweetness and availability.
- Cured meat - Swap prosciutto with speck or thinly sliced serrano ham for variation.
- Additions - Include a small basil leaf or a drizzle of balsamic glaze for added flavor complexity.
- Dairy addition - Pair with fresh mozzarella or burrata for a more substantial appetizer.
Ingredients
- 1 ripe cantaloupe or honeydew melon - peeled, seeded, and cut into wedges or cubes.
- 8 ounces thinly sliced prosciutto - about 16 slices, depending on size.
- Fresh basil leaves (optional) - for added freshness and color.
- Balsamic glaze (optional) - a drizzle enhances the taste with subtle tang.
Instructions
- Cut the melon into wedges or bite-sized cubes, making sure the pieces are easy to handle and not too large.
- Take one slice of prosciutto and wrap it gently around each piece of melon, covering enough surface to hold it together.
- If using, tuck a fresh basil leaf between the melon and prosciutto before wrapping to add brightness.
- Arrange the wrapped melon pieces on a serving platter, spacing them evenly for an attractive display.
- Optionally, drizzle a small amount of balsamic glaze over the assembled melon for a touch of acidity that goes with the saltiness.
Serve chilled or at room temperature for the best flavor. This appetizer comes together quickly and always receives compliments for its simple yet appealing taste combination.
7. Greek Tzatziki Dip with Pita Chips
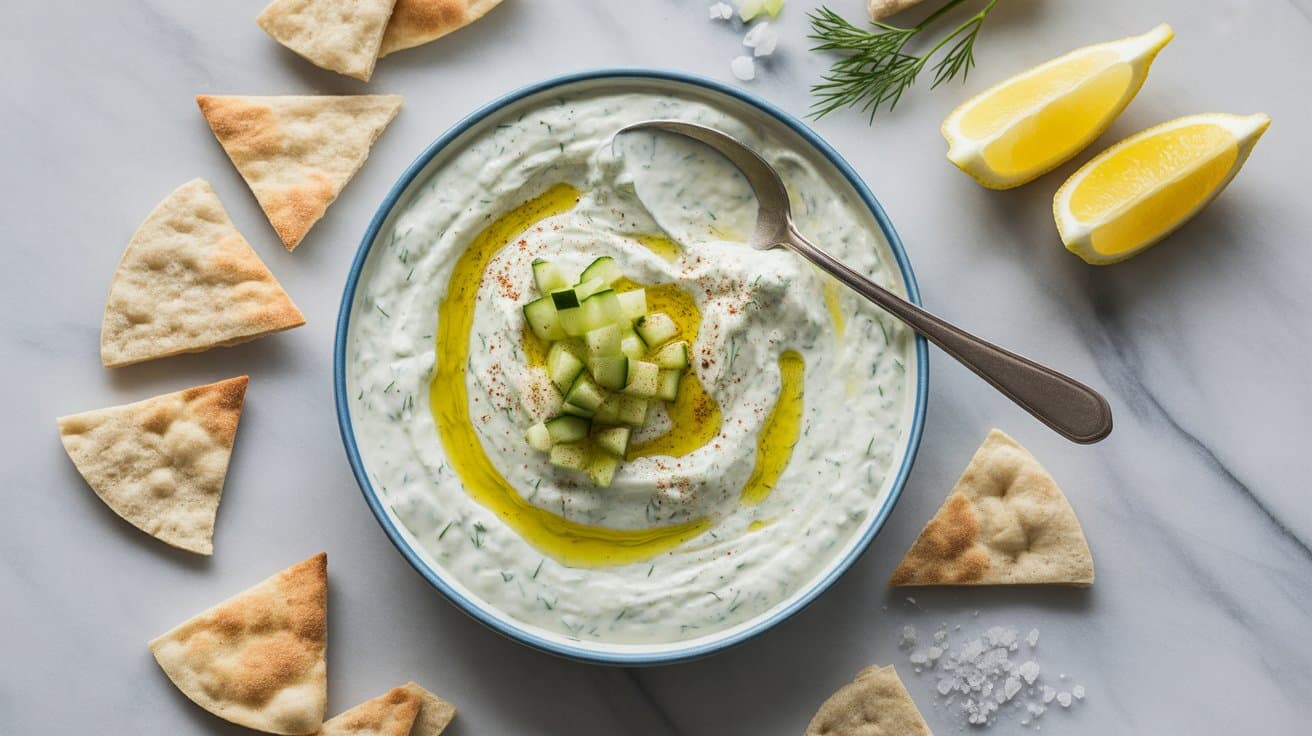
This Greek Tzatziki Dip brings a cool, refreshing touch to any snack spread. Creamy yogurt blends with crisp cucumber, garlic, and fresh herbs, creating a dip that's both light and flavorful.
Pairing it with crunchy pita chips adds a satisfying contrast in texture, making it a great treat for sharing at gatherings or enjoying as a simple snack. The recipe comes together quickly, using ingredients that are easy to find, so it fits well into any busy day.
Why This Recipe Works
This tzatziki dip is a fantastic balance of creamy, tangy, and fresh flavors that brighten up any meal or snack time. The combination of cool yogurt and crisp cucumber keeps the dip refreshing, while the garlic and herbs add depth.
- Convenience - Takes just minutes to prepare with simple ingredients.
- Balanced Flavor - Combines creamy yogurt with acidic lemon and fresh herbs.
- Texture Contrast - Smooth dip paired with crunchy homemade pita chips.
- Versatile Serving - Works as an appetizer, snack, or accompaniment to many dishes.
Ingredient Swap Ideas
Swapping ingredients can help adjust this dip to suit different dietary preferences or what you have on hand. Here are some ideas to keep the flavor fresh and the dip easy to make.
- Greek yogurt - Substitute with dairy-free coconut yogurt for a vegan option.
- Pita chips - Replace with toasted whole-grain crackers or sliced raw vegetables.
- Fresh dill - Use fresh mint or parsley instead for a slightly different herbal note.
- Cucumber - Try zucchini ribbons if you prefer a milder taste and softer texture.
Ingredients
- 1 cup Greek yogurt - Thick and creamy, forms the base of the dip.
- ½ large cucumber - Peeled and finely grated, adds crunch and freshness.
- 2 cloves garlic - Minced for a sharp, savory bite.
- 1 tablespoon fresh lemon juice - Provides acidity and brightness.
- 1 tablespoon extra-virgin olive oil - Adds richness and smooth texture.
- 1 tablespoon fresh dill, chopped - Offers a classic herbal flavor.
- ½ teaspoon salt - Enhances all the flavors.
- ¼ teaspoon black pepper - Adds subtle warmth.
- 4 pita breads - Cut into triangles for homemade chips.
- 1 tablespoon olive oil - For brushing pita before baking.
Instructions
- Grate the peeled cucumber and lightly squeeze it in a clean kitchen towel or paper towels to remove excess moisture. This keeps the dip from becoming watery.
- In a medium bowl, combine the Greek yogurt, grated cucumber, minced garlic, lemon juice, olive oil, chopped dill, salt, and pepper. Mix well until smooth.
- Preheat your oven to 375°F (190°C). Cut pita breads into triangles and place them on a baking sheet. Brush each piece lightly with olive oil.
- Bake the pita chips for 10-12 minutes or until crisp and golden, turning once halfway through to ensure even baking. Remove from oven and let cool.
- Serve the tzatziki dip chilled alongside the warm pita chips for dipping. Garnish with extra dill if desired.
This dip keeps well covered in the refrigerator for up to 2 days and is a fresh, wholesome option for snacking or entertaining.
8. Bruschetta with Tomato and Basil
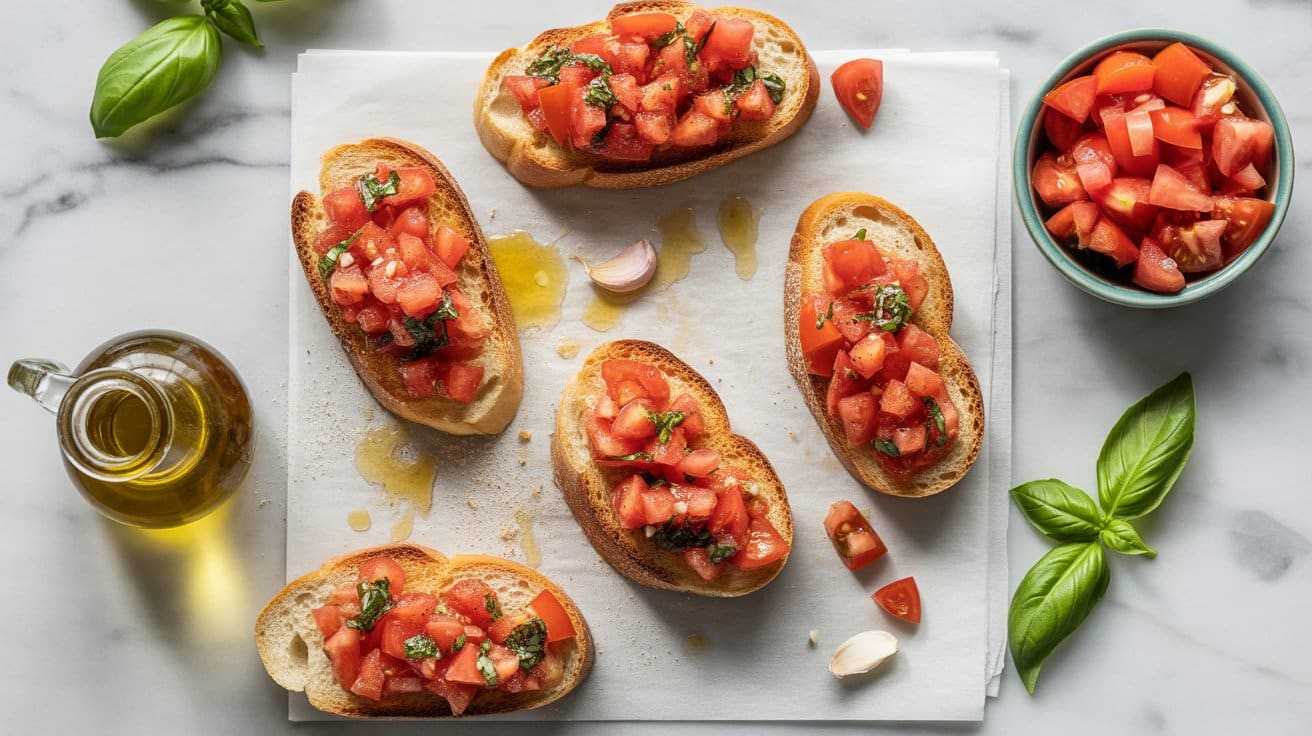
Bruschetta with tomato and basil is a simple and fresh appetizer that combines crisp toasted bread with juicy tomatoes and fragrant basil. The garlic and olive oil add essential aroma and richness, making each bite refreshing yet satisfying.
It's a great way to enjoy clean, bright flavors without spending much time in the kitchen.
This recipe is perfect for serving at casual gatherings, snack time, or as a light starter. You can toast the bread ahead of time and assemble just before serving.
Why This Recipe Works
This bruschetta recipe brings together fresh ingredients for a flavorful bite that's easy to prepare and serve cold.
- Convenience - The toasted bread can be made ahead and topped quickly at serving.
- Flavor balance - The acidity of ripe tomatoes meets the herbal brightness of basil with a hint of garlic.
- Texture - Crunchy baguette slices contrast nicely with juicy, chopped tomatoes.
- Appeal - It's a classic, crowd-pleasing appetizer suitable for many occasions.
Ingredient Swap Ideas
Adjusting bruschetta ingredients helps tailor it to dietary needs or personal preferences without losing the core experience.
- Bread alternatives - Use gluten-free baguette or toasted rye slices to suit gluten sensitivities.
- Cheese addition - Add crumbled fresh mozzarella or feta for a creamy element if you want extra richness.
- Herbs variation - Substitute basil with fresh parsley or oregano for a different but still aromatic twist.
- Oil options - Use avocado oil or a light-flavored vegetable oil if you prefer a milder taste than olive oil.
Ingredients
- 1 French baguette - sliced into ½-inch thick pieces for toasting.
- 4 medium ripe tomatoes - finely chopped, seeds removed for less moisture.
- 2 cloves garlic - minced, plus 1 whole clove for rubbing on toast.
- ¼ cup fresh basil leaves - chopped roughly.
- 3 tablespoons extra-virgin olive oil - plus extra for brushing the bread.
- ½ teaspoon salt - to taste for the tomato mixture.
- ¼ teaspoon black pepper - freshly ground, to taste.
Instructions
- Preheat the oven to 400°F (200°C). Arrange baguette slices on a baking sheet and brush lightly with olive oil. Toast for about 5 to 7 minutes until golden and crisp. Remove from the oven and while still warm, rub one side with the whole garlic clove for a subtle garlic flavor.
- In a medium bowl, combine chopped tomatoes, minced garlic, chopped basil, olive oil, salt, and pepper. Stir gently to mix all the flavors without breaking down the tomatoes too much.
- Allow the tomato mixture to sit for 5 to 10 minutes at room temperature to let the flavors meld.
- Spoon the tomato and basil topping generously over each toasted baguette slice. Arrange on a serving platter.
- Serve immediately or keep the tomato mixture covered in the fridge and assemble just before serving for best texture.
This bruschetta can be enjoyed chilled or at room temperature, making it a flexible and fresh appetizer option.
9. Avocado and Mango Salsa on Endive Leafs

This recipe brings together a fresh mix of creamy avocado and sweet mango, creating a salsa that's bursting with bright flavors. Served on crisp endive leaves, each bite offers a satisfying contrast between the silky salsa and the crunchy base.
It's an easy-to-put-together dish that works well as an appetizer, snack, or a light, healthy bite. The balance of sweet, tangy, and creamy elements makes it enjoyable for a variety of palates and occasions.
Why This Recipe Works
This recipe shines by combining simple ingredients for a refreshing and visually appealing dish. It comes together quickly and adds a healthy, flavorful option to any gathering or meal.
- Convenience - Requires minimal chopping and no cooking, making it quick to prepare.
- Flavor balance - Combines creamy avocado with sweet mango and zesty lime for bright, fresh taste.
- Texture - Crisp endive leaves provide a satisfying crunch that contrasts with the smooth salsa.
- Appeal - Offers an elegant, portion-controlled presentation perfect for entertaining or light snacks.
Ingredient Swap Ideas
Adjusting ingredients in this recipe helps cater to different dietary preferences or what's available in your kitchen. These swaps keep the original spirit of the dish intact while providing variety or accommodating restrictions.
- Endive leaves - Substitute with romaine lettuce or butter lettuce for a softer leaf option.
- Mango - Use pineapple or peach to maintain the sweet and tropical flavor.
- Avocado - Swap with diced cucumber or jicama for a lighter, crunchier filling.
- Cilantro - Replace with fresh basil or parsley if you prefer milder herb flavors.
Ingredients
- 2 ripe avocados - peeled, pitted, and diced.
- 1 ripe mango - peeled and diced.
- ¼ cup red onion - finely chopped.
- 1 small jalapeño - seeded and minced (optional for heat).
- 1 tablespoon fresh cilantro - chopped.
- 1 lime - juiced.
- Salt - to taste.
- 12 to 15 endive leaves - carefully separated and washed.
Instructions
- In a medium bowl, combine the diced avocado, mango, red onion, jalapeño (if using), and cilantro.
- Drizzle lime juice over the mixture and gently toss to combine, taking care not to mash the avocado.
- Season the salsa with salt to taste, adjusting the lime juice or cilantro as preferred.
- Arrange the endive leaves on a serving platter, spooning a small amount of the avocado and mango salsa onto each leaf.
- Serve immediately to ensure the leaves stay crisp, or chill the salsa separately and assemble just before serving.
10. Cheese and Charcuterie Board with Nuts and Fruit

A cheese and charcuterie board is an easy way to create a beautiful spread that offers something for everyone. Combining a variety of cheeses, cured meats, nuts, and fresh fruit creates a mix of flavors and textures that work well together.
It's perfect for entertaining or simply enjoying a relaxed evening with minimal prep.
This kind of board lets you customize the ingredients based on what you have on hand or prefer. The contrast between creamy cheeses, savory meats, crisp nuts, and sweet fruit makes every bite interesting without needing to cook anything.
Why This Recipe Works
This recipe brings together a range of tastes and textures that complement each other well, making it an appealing and versatile option for any occasion. It's simple to assemble and offers plenty of room to adapt based on your preferences.
- Convenience - Requires no cooking, just arranging ingredients for a quick setup.
- Flavor balance - Combines creamy, salty, sweet, and nutty elements for a satisfying bite.
- Texture - Offers a mix of soft cheeses, firm meats, crunchy nuts, and juicy fruit.
- Appeal - Works well for casual gatherings or more formal occasions with an elegant look.
Ingredient Swap Ideas
Swapping ingredients on a cheese and charcuterie board helps you cater to different tastes, dietary restrictions, or seasonal availability while keeping the combination enjoyable and well-rounded.
- Cheese - Use dairy-free or plant-based cheeses for a vegan-friendly board.
- Meats - Replace cured meats with smoked tofu or marinated vegetables for a vegetarian option.
- Nuts - Substitute almonds or pecans if you prefer a different crunch or have allergies.
- Fruit - Swap grapes with sliced apples, figs, or dried apricots depending on the season.
Ingredients
- Assorted cheeses - about 6 ounces each of varieties like cheddar, brie, and gouda, cut into bite-sized pieces.
- Cured meats - 6 ounces total, such as prosciutto, salami, and chorizo, sliced thin.
- Nuts - ½ cup mixed, like almonds, walnuts, or pecans, toasted for extra flavor.
- Fresh fruit - 1 cup grapes or a mix of berries and sliced apples.
- Olives - ¼ cup pitted, preferably a mix of green and black.
- Crackers or sliced baguette - about 2 cups for serving alongside the board.
Instructions
- Start by arranging the cheeses evenly across your serving board or platter. Leave some space around each cheese for other ingredients.
- Fold or loosely roll the slices of cured meats and place them near the cheeses, distributing variety around the board.
- Scatter the toasted nuts and olives in small clusters to add texture and visual appeal.
- Add fresh fruit in bunches, such as grapes still on the stem or small piles of berries, to bring brightness and sweetness.
- Finally, tuck in crackers or baguette slices around the edges or in any open spots to complete the presentation. Serve immediately or cover and refrigerate briefly until ready to enjoy.
11. Ceviche-Style Shrimp Salad
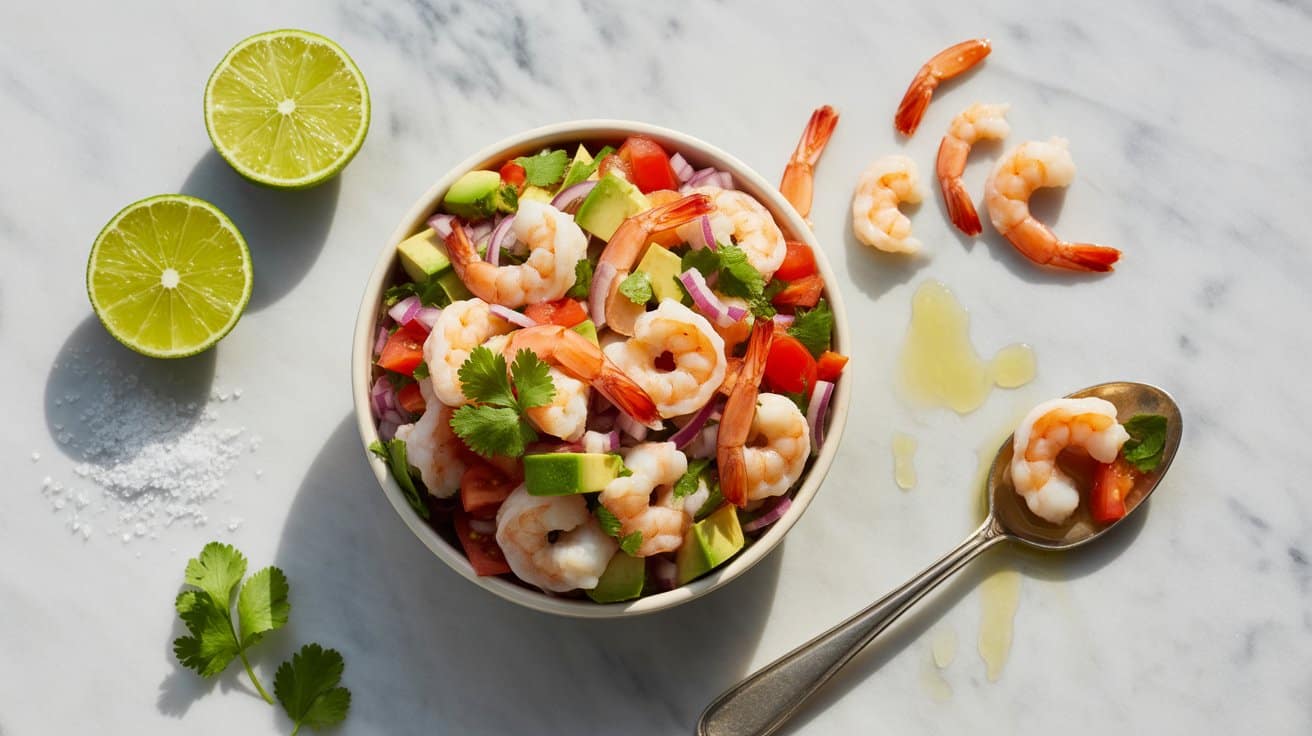
This ceviche-style shrimp salad is a refreshing dish that brightens up any meal with its lively citrus flavors and crisp textures. It combines tender shrimp marinated in lime juice with fresh onions, cilantro, and creamy avocado, making it a light yet satisfying option for a quick lunch or a summery dinner.
The salad is served cold, which enhances its zestiness and makes it especially appealing on warm days. It's a simple recipe that comes together quickly, requiring no cooking besides a brief poaching of the shrimp, allowing the citrus to do most of the "cooking."
Why This Recipe Works
This shrimp salad offers a bright, fresh taste with minimal preparation time, making it ideal for busy cooks. The combination of citrus marinade and creamy avocado creates a balanced, appealing dish that feels light but fulfilling.
- Convenience - Ready in under 30 minutes with minimal cooking, perfect for a quick, healthy meal.
- Flavor balance - The tangy lime juice goes with the sweetness of shrimp and richness of avocado.
- Texture - The crisp onion and creamy avocado add contrast to the tender shrimp.
- Versatility - Works well as a light main dish or as a side or appetizer for gatherings.
Ingredient Swap Ideas
Adapting this recipe is easy if you want to adjust flavors or meet dietary needs. Swapping certain ingredients can help customize it without losing the fresh, bright character.
- Shrimp - Use cooked crab meat or firm white fish like halibut if you prefer a different seafood option.
- Citrus - Substitute lime juice with lemon or grapefruit juice for a variation in acidity and flavor.
- Herbs - Replace cilantro with fresh parsley or basil for a milder, different herbal note.
- Avocado - Swap avocado for diced cucumber or jicama to reduce richness and boost crunch.
Ingredients
- 1 pound raw shrimp - peeled and deveined, tails removed.
- 1 cup fresh lime juice - enough to cover the shrimp fully for marinating.
- ½ cup red onion - thinly sliced.
- ½ cup fresh cilantro - chopped.
- 1 large avocado - diced.
- 1 small jalapeño - seeded and finely chopped (optional for mild heat).
- ½ teaspoon salt - adjust to taste.
- ¼ teaspoon black pepper - freshly ground.
- 1 tablespoon olive oil - for drizzling.
- Tortilla chips or tostadas - for serving (optional).
Instructions
- Place the shrimp in a glass or ceramic bowl and pour the lime juice over it, making sure the shrimp are fully submerged. Cover and refrigerate for 15 to 20 minutes, until shrimp turn opaque and are "cooked" by the citrus.
- Drain the shrimp, reserving a small amount of the lime juice. Add the thinly sliced red onion, chopped cilantro, diced avocado, and jalapeño if using, to the shrimp.
- Toss gently to combine, then season with salt, pepper, and drizzle olive oil over the salad. Add a little reserved lime juice if you want it more tangy.
- Chill the ceviche-style shrimp salad for 5 to 10 minutes before serving to let the flavors mingle. Serve cold on its own or with tortilla chips or tostadas for a crunchy accompaniment.
12. Deviled Ham Salad Stuffed Celery
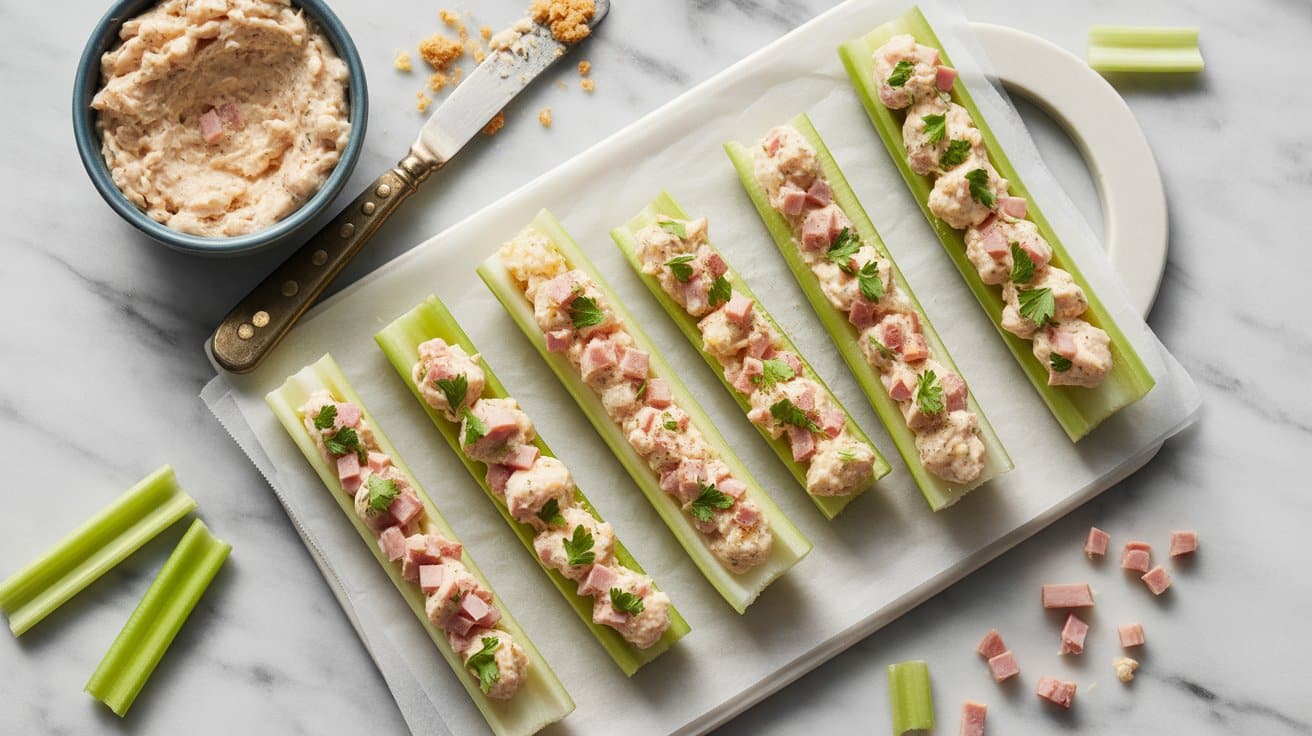
Deviled ham salad stuffed into celery sticks makes for a simple yet flavorful appetizer or snack. The creamy, spiced ham filling goes well with the crisp, refreshing crunch of celery, creating a balance of textures that feels satisfying with every bite.
This recipe comes together quickly, requiring minimal prep work, making it ideal when you want a savory treat without spending much time in the kitchen. It's a great choice for gatherings, lunchboxes, or a quick nibble that feels homemade.
Why This Recipe Works
This dish combines convenience with classic flavors, delivering a creamy and tangy bite suspended in a crisp vegetable base.
- Convenience - Ready in just minutes using common pantry ingredients and no cooking.
- Flavor balance - Savory deviled ham salad with a slight kick contrasts nicely with mild, crisp celery.
- Texture - Creamy, smooth filling meets crunchy celery for an enjoyable mouthfeel.
- Appeal - A classic appetizer that works well for casual snacks or party platters.
Ingredient Swap Ideas
Swapping ingredients can help accommodate dietary preferences or add a twist without losing the core appeal of this recipe.
- Ham substitution - Use cooked, finely chopped turkey or chicken for a milder, leaner option.
- Creaminess alternative - Replace mayonnaise with Greek yogurt for a tangier and lower-fat filling.
- Celery alternative - Try hollowed cucumber sticks or bell pepper strips if celery isn't preferred.
- Seasoning variations - Add a dash of Dijon mustard or hot sauce to boost flavor complexity if desired.
Ingredients
- 6 large celery stalks - washed and cut into 3-inch pieces.
- 1 cup finely chopped cooked ham - choose deli-style or leftover cooked ham.
- ¼ cup mayonnaise - provides creaminess and binds the salad.
- 1 tablespoon yellow mustard - adds tang and subtle heat.
- 1 tablespoon sweet pickle relish - for a touch of sweetness and texture.
- ½ teaspoon Worcestershire sauce - enhances savory depth.
- ¼ teaspoon garlic powder - adds mild flavor without overpowering.
- Freshly ground black pepper - to taste.
- Optional garnish: chopped fresh parsley or paprika - for color and mild flavor.
Instructions
- In a medium bowl, combine chopped ham, mayonnaise, mustard, pickle relish, Worcestershire sauce, and garlic powder. Mix until well blended. Season with black pepper to taste.
- Spoon the ham salad mixture into the celery pieces, dividing it evenly so each celery stick is generously filled. Use a small spoon or your fingers for easy stuffing.
- Arrange the stuffed celery on a serving platter. Sprinkle with chopped parsley or a light dusting of paprika if desired, for a pop of color.
- Chill in the refrigerator for at least 15 minutes before serving to allow flavors to meld and filling to firm up slightly.
- Serve cold as a snack or appetizer. These hold well for a few hours, making them suitable for parties or packed lunches.
13. Mediterranean Chickpea Salad Lettuce Cups
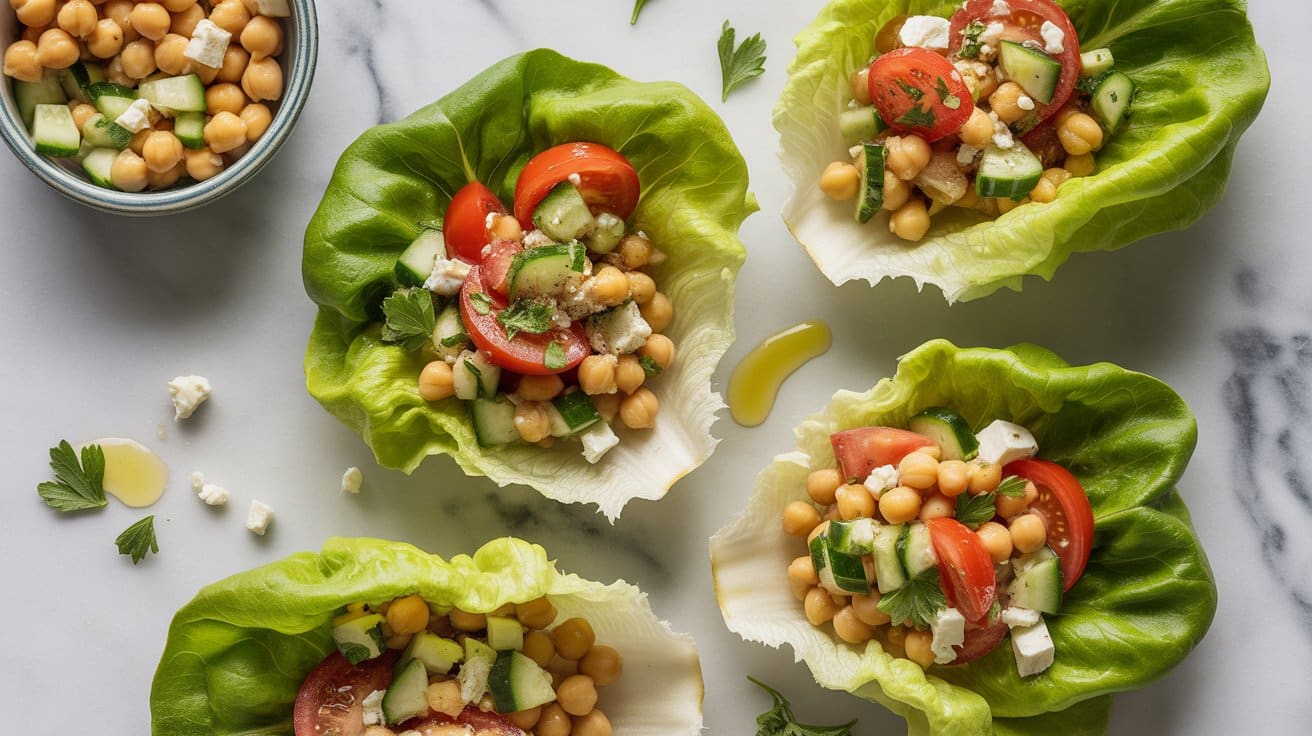
This Mediterranean Chickpea Salad served in crisp lettuce cups makes a fresh and bright meal that's easy to prepare. The combination of chickpeas, cucumber, tomato, red onion, and feta cheese tossed in a bright lemon vinaigrette brings together a lively mix of textures and flavors.
It's a great option when you want something light but filling, with plenty of crunch and a hint of tang from the dressing. These lettuce cups are perfect for a quick lunch or a casual dinner that feels wholesome and satisfying.
Why This Recipe Works
This recipe balances simplicity and flavor, making a healthy and refreshing dish you can put together with minimal prep. It offers a tasty mix of creamy, crisp, and tangy elements served in a fun, handheld format.
- Convenience - Quick to assemble with no cooking required, great for busy days.
- Flavor balance - Combines fresh vegetables, creamy feta, and zesty lemon dressing for a lively taste.
- Texture - The crunch from lettuce and cucumber contrasts with the tender chickpeas and soft cheese.
- Appeal - An inviting presentation in lettuce cups adds charm and cuts down on plates or bowls.
Ingredient Swap Ideas
Swapping ingredients can help tailor this recipe to fit different dietary preferences or what you have on hand, while keeping the Mediterranean spirit. Here are some flexible swaps to consider.
- Chickpeas - Use white beans or lentils if you prefer a different legume but want a similar texture.
- Feta cheese - Replace with crumbled goat cheese or omit for a dairy-free option.
- Lettuce - Substitute butter lettuce with romaine or iceberg for a sturdier cup or different crunch.
- Lemon vinaigrette - Try red wine vinegar or balsamic vinegar in place of lemon juice for a different tang.
Ingredients
- 1 can (15 oz) chickpeas - drained and rinsed thoroughly.
- 1 cup cucumber - diced, seeds removed if preferred.
- 1 cup cherry tomatoes - halved.
- ¼ cup red onion - finely chopped.
- ½ cup feta cheese - crumbled.
- 1 tablespoon fresh parsley - chopped.
- 3 tablespoons extra-virgin olive oil - for dressing.
- 2 tablespoons fresh lemon juice - for dressing.
- ½ teaspoon dried oregano - for dressing.
- Salt and black pepper - to taste.
- 8 large butter lettuce leaves - rinsed and patted dry for cups.
Instructions
- In a large bowl, combine the chickpeas, cucumber, cherry tomatoes, red onion, feta cheese, and parsley. Mix gently to distribute evenly.
- In a small bowl, whisk together the olive oil, lemon juice, dried oregano, salt, and pepper until well combined.
- Pour the dressing over the salad mixture and toss lightly to coat all the ingredients. Adjust seasoning with more salt or lemon juice if needed.
- Arrange the butter lettuce leaves on a serving platter. Spoon generous portions of the chickpea salad into each leaf, creating individual lettuce cups.
- Serve immediately to enjoy the crispness of the lettuce, or chill the salad separately and assemble just before serving for optimal texture.
If you want chilled noodle accompaniments, try pairing buckwheat soba with quick pickles or steamed greens and explore cold soba noodle side dishes for inspiration. For more no-cook starters, browse a selection of easy cold appetizers for parties to expand your menu.

Andrew Gray is a seasoned food writer and blogger with a wealth of experience in the restaurant and catering industries. With a passion for all things delicious, Andrew has honed his culinary expertise through his work as a personal chef and caterer.
His love for food led him to venture into food writing, where he has contributed to various online publications, sharing his knowledge and insights on the culinary world. As the proud owner of CooksCrafter.com, Andrew covers a wide range of topics, including recipes, restaurant reviews, product recommendations, and culinary tips.
Through his website, he aims to inspire and educate fellow food enthusiasts, offering a comprehensive resource for all things food-related.