Cheese appetizers hold a special place in any gathering, offering a warm and inviting start to a meal or a tasty snack to nibble on, often featuring spreadable or bite-sized cheeses like Brie, goat cheese, or fresh mozzarella. This collection of 14 cheese appetizers you can serve year-round brings together a variety of crowd-pleasing options that suit any occasion, ranging from warm baked dips and finger-friendly skewers to stuffed bites and crisp crackers that showcase spreadable and bite-sized cheeses.

From simple skewers and crispy parmesan rounds to baked dips and stuffed mushrooms, these recipes cover a wide range of flavors and textures. They include wholesome, protein-rich choices and lighter options, making it easy to find something for everyone.
Whether you're planning a casual get-together or a more refined event, these appetizers provide straightforward, approachable dishes that balance comfort and sophistication.
All these recipes share common strengths-they are reliable, quick to prepare, and require minimal cleanup. With clear instructions and accessible ingredients, they make it simple to deliver flavorful, visually appealing snacks that serve well any time of the year.
1. Baked Brie with Honey and Almonds
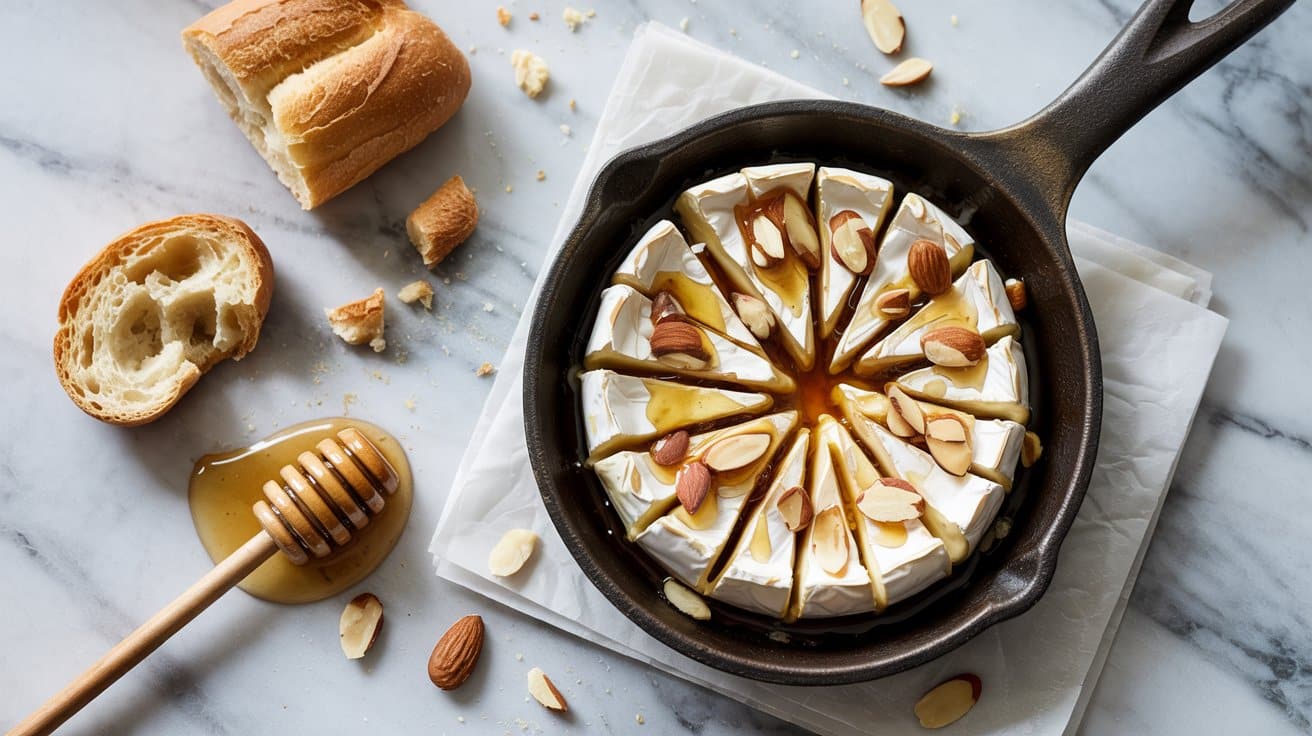
Baked Brie with honey and almonds makes a wonderful appetizer that combines creamy, melted cheese with sweet and crunchy toppings; for a walnut variation see baked brie with walnuts in 3 steps.
The warmth from baking softens the Brie into a gooey center, and Brie is a soft-ripened French cow's milk cheese with an edible bloomy rind, which goes well with the natural sweetness of honey and the toasted nuts' crisp texture, traditionally baked at 350°F (175°C) for about 10-15 minutes until the center is just gooey. This combination creates a dish that you can assemble quickly yet impressively.
Serve the baked Brie alongside crowd-pleasing accompaniments, such as baked beans side dishes for gatherings, for a casual, shareable spread.
Why This Recipe Works
This recipe balances rich creaminess with a touch of sweetness and texture, offering a flavorful bite that's easy to make and serve, and briefly baking until the rind softens yields a warm, pourable center.
- Convenience - Only a few ingredients and minimal prep time make this ideal for last-minute entertaining or quick snacks.
- Flavor balance - The smooth, mild Brie contrasts delightfully with the sweet honey and nutty almonds.
- Texture - The contrast between the melty cheese and crunchy toasted almonds adds a satisfying mouthfeel.
- Appeal - Elegant enough for guests but simple enough for everyday enjoyment by the whole family.
Ingredient Swap Ideas
Swapping a few ingredients can help tailor this baked Brie to your preferences or dietary needs without losing its essential qualities.
- Cheese swap - Use Camembert instead of Brie for a similar texture with a slightly stronger flavor.
- Nut alternatives - Replace almonds with walnuts or pecans for a different nutty crunch.
- Sweetener options - Substitute honey with maple syrup or agave nectar if you prefer a vegan-friendly choice, with maple adding a caramel-like depth and agave providing a milder, more neutral sweetness.
- Add fruit - Top with fresh figs or sliced pears alongside the honey to add a fresh, fruity element.
Ingredients
- 1 wheel Brie cheese - About 8 ounces, at room temperature for even melting.
- 2 tablespoons honey - For drizzling on top, adding sweetness.
- ¼ cup sliced almonds - Toasted to bring out their flavor and crunch.
- Optional - Fresh thyme or rosemary sprigs for garnish, adding an herbal note.
Instructions
- Preheat your oven to 350°F (175°C). Place the Brie wheel on a small, ovenproof dish or baking sheet lined with parchment paper.
- Sprinkle the sliced almonds evenly over the top of the Brie. This will toast slightly while baking, improving their flavor.
- Bake the Brie in the oven for about 10 to 12 minutes until it is soft and starting to melt but not fully collapsed.
- Remove the Brie from the oven and immediately drizzle the honey over the warm cheese and almonds.
- Garnish with fresh herbs if using, then serve warm with crackers, sliced baguette, or fresh fruit for dipping.
This recipe makes a straightforward and delicious appetizer that shows the creamy richness of Brie with a natural touch of sweetness and crunch.
2. Caprese Skewers
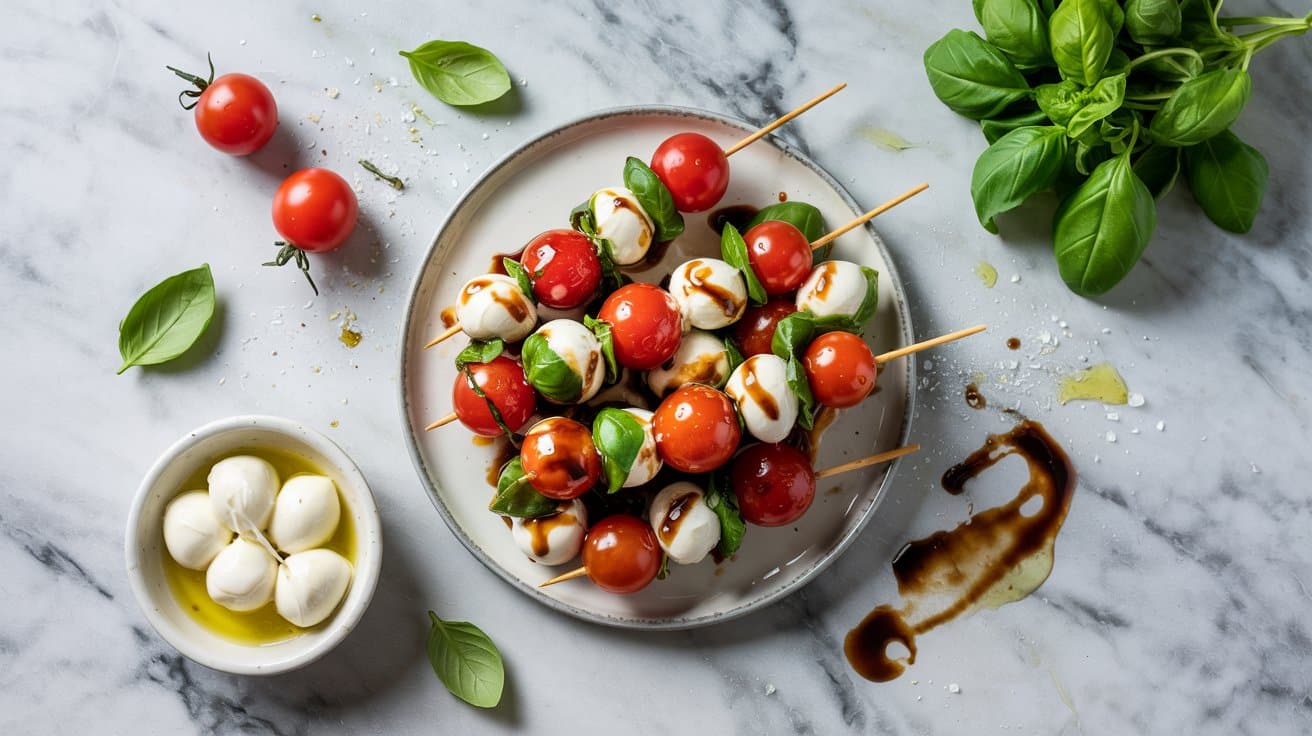
Caprese skewers offer a fresh, colorful way to enjoy the classic combination of tomatoes, mozzarella, and basil, a simple Italian antipasto. These bite-sized treats combine juicy cherry tomatoes with creamy mozzarella balls and fragrant basil leaves for a simple appetizer that comes together quickly.
The addition of a balsamic glaze drizzle (a reduced, syrupy balsamic vinegar) adds a tangy sweetness that perfectly balances the fresh ingredients, typically made by simmering balsamic until it reduces and thickens (about 10-15 minutes). These skewers are easy to serve at gatherings or as a light snack, making them a versatile choice for any occasion.
They also pair nicely with simple sides used for Caprese-style mains, such as Caprese chicken side dishes for weeknight dinners.
Why This Recipe Works
This recipe brings together fresh flavors and simple assembly for a crowd-pleasing dish that's ready in minutes. The combination of savory, creamy, and sweet elements keeps every bite interesting and satisfying.
- Convenience - Assembles quickly with minimal preparation and no cooking required.
- Flavor balance - Combines juicy tomatoes, mild mozzarella, aromatic basil, and tangy balsamic glaze.
- Texture - Offers a pleasing contrast between soft cheese and crisp tomatoes.
- Appeal - Visually attractive and easy to serve in individual portions.
Ingredient Swap Ideas
Swapping ingredients in this recipe can help accommodate dietary preferences or add new flavor twists without losing the essence of the classic Caprese.
- Cherry tomatoes - Use grape tomatoes or halved regular tomatoes if cherries aren't available.
- Mozzarella balls - Replace fresh mozzarella with small cubes of feta or vegan cheese for different textures and flavors.
- Basil leaves - Substitute with fresh mint or arugula for a peppery or refreshing note.
- Balsamic glaze - Use a simple balsamic vinegar reduction or a drizzle of honey for a sweet finish.
Ingredients
- 20 cherry tomatoes - washed and dried.
- 20 fresh mozzarella balls - small bocconcini or ciliegine, drained.
- 20 fresh basil leaves - whole and washed.
- 2 tablespoons balsamic glaze - for drizzling.
- 1 tablespoon extra virgin olive oil - for optional drizzle.
- A pinch salt and freshly ground black pepper - to taste.
- Wooden toothpicks or small skewers - enough to assemble all ingredients.
Instructions
- Rinse the cherry tomatoes and pat them dry. Drain the mozzarella balls thoroughly to prevent excess moisture.
- On each toothpick, thread one cherry tomato, followed by a fresh basil leaf, and finish with a mozzarella ball. Repeat until all ingredients are used.
- Arrange the skewers neatly on a serving platter. Lightly drizzle extra virgin olive oil over the skewers if desired.
- Drizzle the balsamic glaze evenly over the assembled skewers for a balanced sweet and tangy finish.
- Sprinkle a pinch of salt and freshly ground black pepper over the skewers. Serve immediately or keep chilled until serving.
3. Cheese-Stuffed Jalapeño Poppers

Cheese-stuffed jalapeño poppers bring together a tasty mix of creamy and spicy in a bite-sized snack. The combination of smooth cream cheese and sharp cheddar melted inside slightly roasted jalapeños makes for a flavorful appetizer that's simple to prepare, and choosing medium jalapeños (roughly 2,500-8,000 Scoville units) gives a balanced heat for most palates.
These poppers offer a satisfying blend of heat balanced with rich, cheesy goodness. They bake quickly, making them an excellent option for casual get-togethers or a quick snack to enjoy anytime.
Why This Recipe Works
This recipe combines ease and bold flavor in a crowd-pleasing finger food that cooks fast and tastes rich and fresh.
- Convenience - Minimal prep and bake time, perfect for busy days or last-minute hosting.
- Flavor balance - Creamy cheese offsets the spice from the jalapeños just right.
- Texture - Soft, melty cheese inside with a tender, slightly crisp pepper exterior.
- Appeal - Highly versatile snack that works well for family snacks or social gatherings.
Ingredient Swap Ideas
Adjusting ingredients allows you to fine-tune the poppers for dietary preferences or to customize flavors without losing their charm.
- Cream cheese substitute - Use goat cheese or a dairy-free cream cheese to change the texture and taste.
- Cheddar replacement - Swap sharp cheddar with Monterey Jack or mozzarella for a milder or stretchier filling.
- Jalapeños alternative - Use mini sweet peppers for less heat or habaneros for more intense spice.
- Add-ins - Mix cooked bacon bits or finely chopped green onions into the cheese for extra flavor.
Ingredients
- 12 fresh jalapeños - medium-sized, washed and halved lengthwise, seeds removed for less heat.
- 8 ounces cream cheese - softened for easy mixing and filling.
- 1 cup shredded cheddar cheese - sharp or mild, based on your preference.
- ½ teaspoon garlic powder - adds subtle savory depth.
- ¼ teaspoon smoked paprika - for a touch of smoky flavor.
- Salt - to taste, balances the flavors.
- Optional garnish - chopped fresh cilantro or sliced green onions.
Instructions
- Preheat your oven to 400°F (200°C). Line a baking sheet with parchment paper or lightly grease it.
- Prepare the jalapeños by cutting them in half lengthwise and removing the seeds and membranes to reduce the heat level.
- In a mixing bowl, combine softened cream cheese, shredded cheddar, garlic powder, smoked paprika, and salt. Stir until smooth and well blended.
- Spoon the cheese mixture into each jalapeño half, filling them generously. Arrange the stuffed halves on the prepared baking sheet with the cheese side up.
- Bake in the preheated oven for about 15 to 20 minutes, or until the cheese is melted and starting to turn golden. Remove from the oven and let cool slightly before serving, garnished with cilantro or green onions if you like.
4. Spinach and Artichoke Cheese Dip
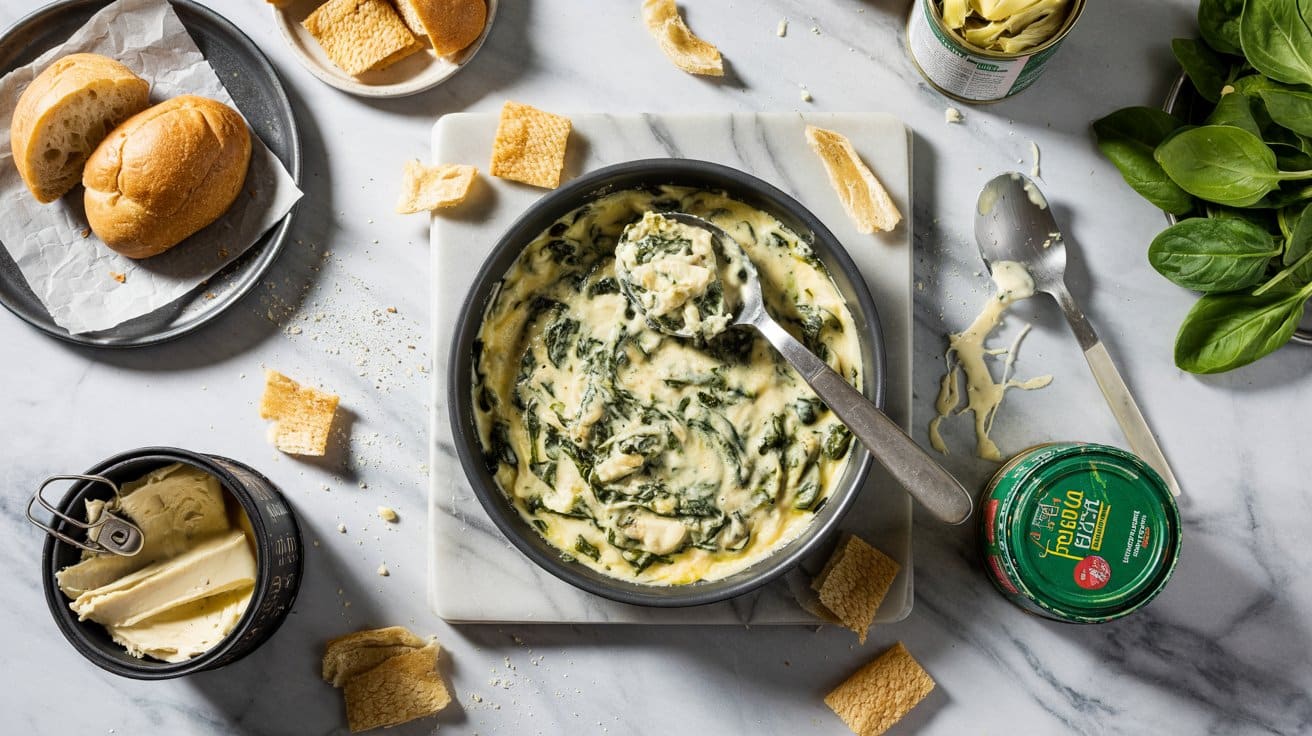
Spinach and artichoke cheese dip is a classic appetizer that brings warmth and comfort to any gathering. It combines creamy cheeses with tender spinach and slightly tangy artichokes, creating a balanced and inviting flavor that's easy to enjoy.
This dip is simple to prepare and can be served with crackers, bread, or fresh vegetables for dipping. It's a reliable choice for parties, casual get-togethers, or even a cozy night at home.
Why This Recipe Works
This recipe delivers a creamy, flavorful dip that's easy to make and always welcomes a crowd. It balances richness with fresh greens and tangy artichokes, making every bite satisfying.
- Convenience - Quick assembly and baking, plus it can be reheated without losing texture.
- Flavor balance - Creamy cheeses paired with savory spinach and artichokes provide a delicious mix.
- Texture - Smooth and cheesy dip with tender bits of vegetable throughout.
- Appeal - Works well as an appetizer or snack, pleasing many tastes and dietary preferences with simple swaps.
Ingredient Swap Ideas
Adjusting ingredients can help make this dip suit your dietary needs or flavor preferences while keeping its character intact.
- Cheese alternatives - Use a dairy-free cream cheese and mozzarella substitute for a vegan version.
- Greens - Replace spinach with kale or Swiss chard for a different leafy green texture.
- Artichoke type - Use fresh artichoke hearts steamed and chopped if you prefer less processed ingredients.
- Add some heat - Incorporate a pinch of red pepper flakes or finely chopped jalapeño to add mild spiciness.
Ingredients
- 10 ounces frozen chopped spinach, thawed and drained well.
- 14 ounces canned artichoke hearts, drained and chopped.
- 8 ounces cream cheese, softened to room temperature.
- ½ cup sour cream or Greek yogurt for a lighter option.
- 1 cup shredded mozzarella cheese.
- ½ cup grated Parmesan cheese.
- 2 cloves garlic, minced.
- ¼ teaspoon salt.
- ¼ teaspoon freshly ground black pepper.
- Optional garnish: chopped fresh parsley or extra Parmesan cheese.
Instructions
- Preheat your oven to 375°F (190°C). Lightly grease a small baking dish or oven-safe skillet.
- In a medium mixing bowl, combine the softened cream cheese, sour cream, and minced garlic. Stir until smooth.
- Fold in the drained spinach, chopped artichokes, mozzarella, Parmesan, salt, and black pepper. Mix thoroughly to combine all ingredients evenly.
- Transfer the mixture into the prepared dish, smoothing the top with a spatula. Bake for 25 to 30 minutes, until the edges are bubbly and the top is lightly golden.
- Remove from the oven and allow it to cool slightly before serving. Garnish with fresh parsley or extra Parmesan if desired. Serve warm with crackers, sliced baguette, or fresh vegetables.
5. Mozzarella Garlic Knots

Mozzarella Garlic Knots bring together soft, pillow-like dough and stringy melted cheese in every bite. Coated with a rich garlic butter, these knots are simple to prepare and deliver a comforting flavor that complements almost any meal.
Their golden crust contrasts beautifully with the gooey mozzarella inside, making them an ideal appetizer or snack. You can enjoy them fresh from the oven or serve them alongside soups, salads, or pasta dishes.
Why This Recipe Works
This recipe offers a straightforward way to create soft, cheesy knots with a pop of garlic flavor that appeals to all ages.
- Convenience - Uses basic dough ingredients and comes together quickly with simple shaping.
- Flavor balance - Combines savory garlic butter and mild mozzarella for warmth and richness.
- Texture - Delivers a tender, airy interior with a slightly crisp exterior.
- Appeal - A crowd-pleasing appetizer suitable for family dinners or casual parties.
Ingredient Swap Ideas
Swapping ingredients can help customize this recipe to suit dietary preferences or adjust flavors while keeping the essential character of the knots intact.
- Cheese - Substitute mozzarella with provolone or fontina for a different melt and taste.
- Butter - Use olive oil or vegan butter in place of regular butter for a dairy-free option.
- Garlic - Replace fresh garlic with garlic powder for a milder, less pungent flavor.
- Herbs - Add Italian seasoning or fresh parsley to the garlic butter for an herbal lift.
Ingredients
- 1 ½ cups warm water - About 110°F to activate the yeast.
- 2 ¼ teaspoons active dry yeast - One packet to leaven the dough.
- 1 tablespoon sugar - Feeds the yeast for rising.
- 4 cups all-purpose flour - Provides structure to the dough.
- 1 teaspoon salt - Enhances overall flavor.
- 4 tablespoons unsalted butter - Melted and used for garlic butter topping.
- 3 cloves garlic - Minced, to mix with the butter for a strong garlic flavor.
- 1 cup shredded mozzarella cheese - For stuffing inside each knot.
- 2 tablespoons chopped fresh parsley - Optional, for garnish and freshness.
Instructions
- In a large bowl, combine warm water, sugar, and yeast. Stir gently and let sit for 5 to 10 minutes until foamy.
- Add flour and salt to the yeast mixture. Stir until a dough forms, then knead on a floured surface for about 8 minutes until soft and elastic.
- Place the dough in a greased bowl, cover, and let rise in a warm spot for 1 hour or until doubled in size.
- Preheat the oven to 375°F (190°C). Punch down the dough and divide it into 12 equal pieces. Flatten each piece, place a small handful of mozzarella in the center, and roll the dough around it, tying into a loose knot.
- Arrange the knots on a baking sheet lined with parchment paper. Bake 15 to 18 minutes until golden brown. While still warm, brush each knot generously with melted butter mixed with minced garlic. Garnish with parsley if desired and serve warm.
6. Goat Cheese and Fig Crostini
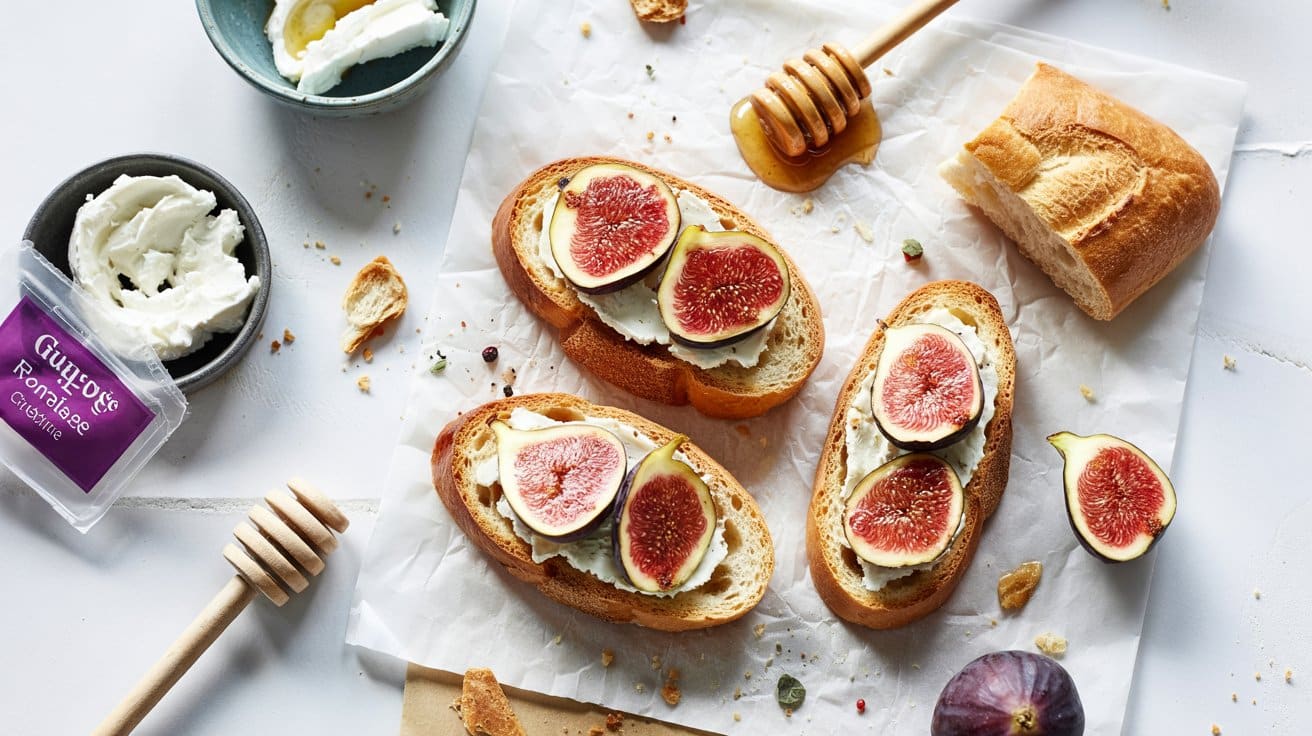
This Goat Cheese and Fig Crostini recipe offers a simple, yet elegant option for appetizers or light snacks. The combination of creamy, tangy goat cheese paired with sweet fig preserves on toasted baguette slices creates an inviting blend of flavors and textures that feels special without requiring much time.
The crispy crostini base contrasts nicely with the smooth cheese and luscious fig topping, making these bites a great choice for gatherings or a quick treat.
Why This Recipe Works
This recipe shines because it combines easy preparation with sophisticated flavors everyone enjoys. Goat Cheese and Fig Crostini balances creaminess and sweetness in a way that feels both fresh and indulgent.
- Convenience - Toasting baguette slices and spreading toppings takes just a few minutes.
- Flavor balance - The tangy cheese goes well with the sweet fig preserves.
- Texture - Crunchy bread adds a satisfying crisp contrast to the smooth toppings.
- Appeal - Elegant yet approachable, ideal for entertaining or casual nibbling.
Ingredient Swap Ideas
Swapping ingredients here can help you adjust taste, cater to dietary restrictions, or use what's available in your pantry. These changes keep the essence of the recipe intact while providing flexible options.
- Goat cheese - Substitute cream cheese or ricotta for a milder flavor and creamier texture.
- Fig preserves - Use apricot or raspberry preserves to bring a different fruit note.
- Baguette - Try a gluten-free bread or crostini for a gluten-free version.
- Optional toppings - Add chopped fresh herbs like thyme or a drizzle of honey for extra flavor layers.
Ingredients
- 1 baguette - sliced into ¼-inch rounds for toasting.
- 4 ounces goat cheese - softened for easy spreading.
- ⅓ cup fig preserves - store-bought or homemade for topping.
- 1 tablespoon olive oil - to brush on baguette slices before toasting.
- Fresh thyme leaves - optional, for garnish.
- Freshly ground black pepper - optional, to taste.
Instructions
- Preheat your oven to 375°F (190°C). Arrange the baguette slices on a baking sheet in a single layer.
- Brush each slice lightly with olive oil. Toast in the oven for about 8 to 10 minutes until golden and crisp. Remove and let cool slightly.
- Spread a generous layer of softened goat cheese over each toasted slice.
- Top the cheese with a small dollop of fig preserves. Add a few fresh thyme leaves if using.
- Season with freshly ground black pepper if you like, and serve immediately for best texture.
These crostini hold up well for a short time at room temperature, making them suitable for serving at gatherings.
7. Cheddar and Chive Mini Scones

These cheddar and chive mini scones bring together sharp, tangy cheese with the subtle fresh onion flavor of chives. They have a tender crumb with a slightly crisp exterior, making them a good addition to brunch spreads or as a satisfying snack any time of day.
The small size means they're easy to share or serve alongside soup or salad.
They come together with a quick mix-and-bake method that fits well into a busy day. Plus, the combination of cheddar and chives adds both richness and brightness, so each bite feels balanced and flavorful without needing many ingredients.
Why This Recipe Works
This recipe stands out because of its simplicity and the bold flavors packed into every bite. You'll appreciate how quick it is to prepare and the way these scones complement a variety of meals.
- Convenience - Minimal hands-on time and fast baking make these ideal for last-minute gatherings or everyday treats.
- Flavor balance - Sharp cheddar melts into the dough while fresh chives add a bright contrast.
- Texture - The scones have a tender, flaky interior with a lightly crisp top that adds pleasant bite.
- Versatility - These mini scones suit snacks, brunches, or as a side for soups and salads.
Ingredient Swap Ideas
Swapping ingredients helps tailor these scones to your preferences or dietary needs without losing their character. Here are some ideas to customize the recipe.
- Cheddar cheese - Use Gruyère or a mild mozzarella for a different cheese flavor and melt.
- Chives - Substitute finely chopped green onions or fresh parsley if you want a milder or different herb note.
- Butter - Replace with a plant-based spread for a dairy-free option that still delivers richness.
- Flour - Use a gluten-free all-purpose blend to make these suitable for gluten-sensitive diets while keeping texture similar.
Ingredients
- 2 cups all-purpose flour - Provides the base and structure for the scones.
- 1 tablespoon baking powder - Helps the scones rise and become light.
- ½ teaspoon salt - Balances the flavors in the dough.
- ¼ teaspoon black pepper - Adds a subtle hint of spice.
- 6 tablespoons cold unsalted butter - Cuts into the flour to create flakiness.
- 1 cup sharp cheddar cheese, grated - Offers a bold, cheesy flavor.
- 2 tablespoons fresh chives, finely chopped - Adds fresh herbiness.
- ¾ cup whole milk - Moistens the dough for tenderness.
- 1 large egg - Binds ingredients and enriches the dough.
Instructions
- Preheat your oven to 400°F (200°C). Line a baking sheet with parchment paper or a silicone mat.
- In a large bowl, whisk together the flour, baking powder, salt, and black pepper until evenly combined.
- Cut the cold butter into small pieces and use a pastry cutter or your fingers to mix it into the dry ingredients until the mixture resembles coarse crumbs.
- Stir in the grated cheddar cheese and chopped chives to evenly distribute throughout the flour mixture.
- In a separate bowl, beat the egg with the milk. Pour this wet mixture into the dry ingredients and gently stir until just combined into a soft dough. Avoid overworking.
- Turn the dough onto a floured surface and gently pat it into a 1-inch thick rectangle. Use a small round cutter to cut out mini scones, then place them spaced apart on the prepared baking sheet.
- Bake in the preheated oven for 12 to 15 minutes, or until the scones are golden brown and cooked through.
- Remove from the oven and transfer to a wire rack to cool slightly before serving warm or at room temperature.
8. Parmesan Crisps
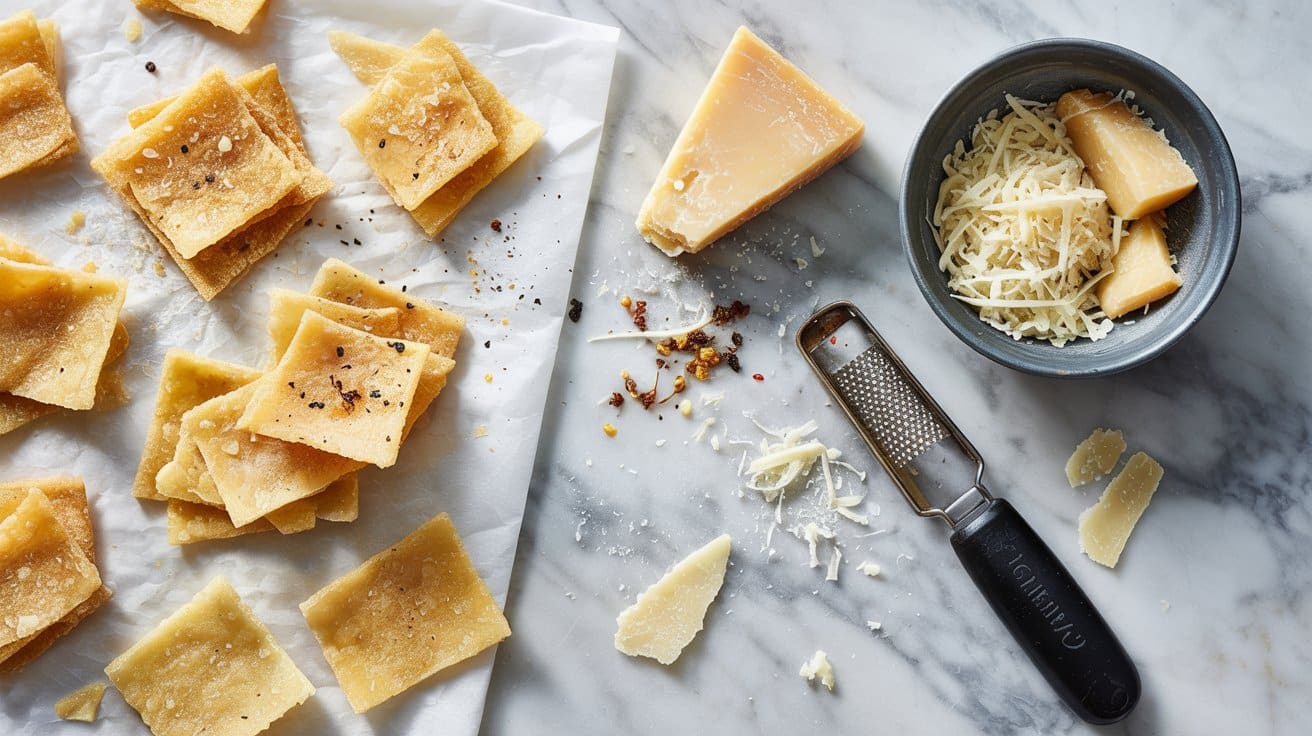
Parmesan crisps are a simple, tasty snack that brings a bold, savory flavor with a satisfying crunch. These baked rounds of Parmesan cheese are easy to make, requiring minimal ingredients and time, yet deliver a delicious, low-carb option perfect for nibbling on their own or serving alongside dips and salads.
The crispy texture and rich, nutty flavor of Parmesan combine beautifully, making these crisps a versatile addition to any snack lineup or appetizer spread. They hold up well, making them great for prepping ahead and storing for when hunger strikes.
Why This Recipe Works
This recipe offers a quick and straightforward way to enjoy a crunchy, cheese-based snack with minimal ingredients and fuss.
- Convenience - Requires just one ingredient and a few minutes of baking with no special prep.
- Flavor balance - Brings the rich, salty, umami notes of Parmesan in a crispy, toasted bite.
- Texture - Delivers a satisfying crunch that works well alone or with dips like hummus or guacamole.
- Appeal - A low-carb, gluten-free option that fits well into many eating plans and snack cravings.
Ingredient Swap Ideas
You can easily adjust this recipe to suit different tastes or dietary needs by swapping the cheese or adding seasonings.
- Cheese - Use Pecorino Romano for a sharper, saltier flavor or Asiago for a milder note.
- Seasonings - Add a pinch of garlic powder, smoked paprika, or Italian herbs before baking for extra flavor.
- Dairy-free option - Try vegan Parmesan-style cheese made from nuts or nutritional yeast blends to mimic the flavor without dairy.
- Add-ins - Mix in finely chopped herbs like rosemary or thyme to give the crisps a fresh twist.
Ingredients
- 1 cup grated Parmesan cheese - Freshly grated for best melting and crisping results.
Instructions
- Preheat your oven to 400°F (200°C). Line a baking sheet with parchment paper or a silicone baking mat.
- Using a tablespoon, scoop small mounds of grated Parmesan onto the baking sheet. Flatten each mound slightly into a thin, even circle about 2 inches wide.
- Bake in the preheated oven for 5 to 7 minutes until the cheese has melted fully and turns a golden, crispy brown.
- Remove the baking sheet from the oven and let the crisps cool on the pan for a few minutes. They will firm up as they cool.
- Carefully transfer the cooled Parmesan crisps to a wire rack to cool completely before serving or storing in an airtight container.
Enjoy these crisps as a crunchy snack or a flavorful way to scoop up your favorite dips or salads.
9. Halloumi Skewers with Lemon and Herbs
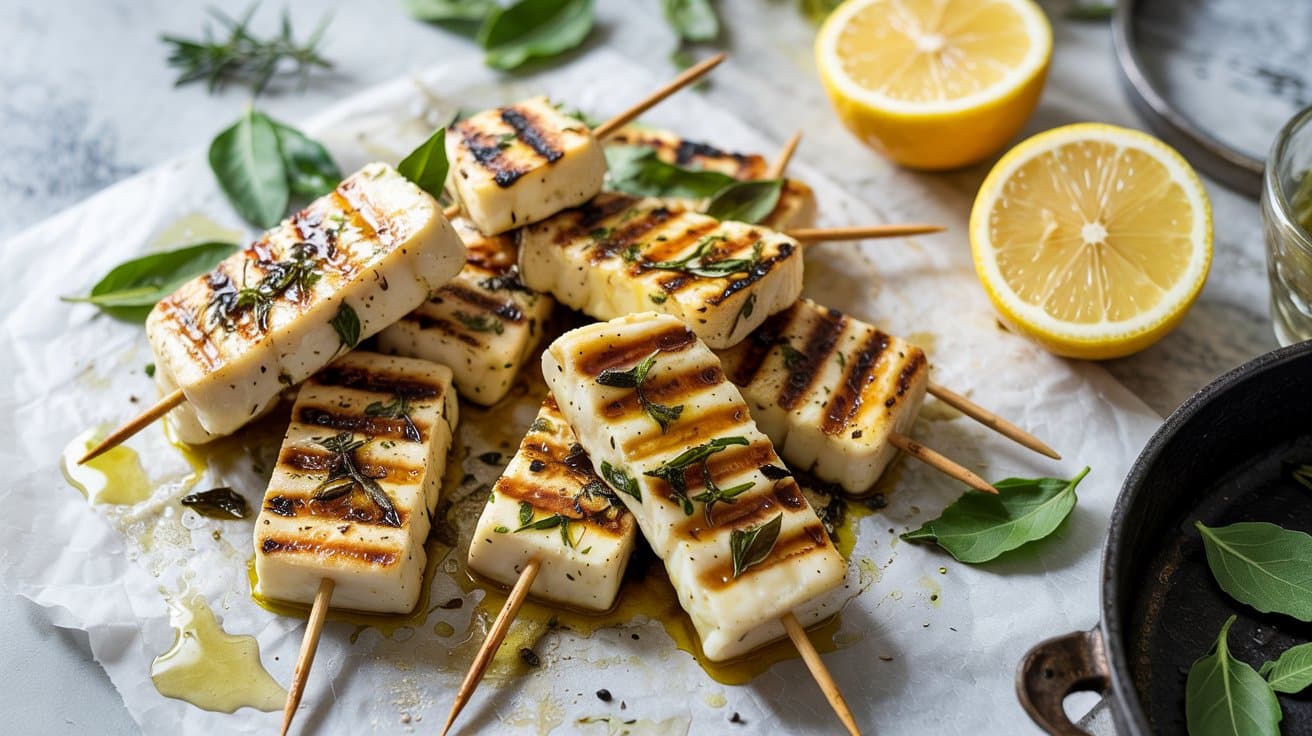
Halloumi skewers bring a wonderful combination of textures and flavors that make a great dish for any occasion. The cheese's unique chewy yet slightly crispy texture goes well with fresh vegetables, while the lemon and herb dressing adds a bright, zesty finish.
This recipe is straightforward and quick to prepare, making it suitable for busy weeknight meals or casual gatherings. You'll enjoy the balance of salty, tangy, and fresh notes in every bite.
Why This Recipe Works
This recipe offers a simple way to enjoy halloumi in a lively and flavorful way that is both satisfying and fresh.
- Convenience - Quick to assemble and grill, perfect for a fast meal or entertaining guests.
- Flavor balance - Combines salty, fresh, and citrusy flavors for a well-rounded taste.
- Texture - Halloumi gives a chewy, slightly crispy bite that contrasts with tender grilled vegetables.
- Appeal - Colorful, attractive skewers that work well as appetizers or a main course.
Ingredient Swap Ideas
Swapping ingredients allows you to adapt this recipe to suit dietary needs or different flavor preferences without losing its core appeal.
- Cheese substitute - Use paneer or firm tofu for a vegetarian version without halloumi.
- Vegetable variations - Replace bell peppers with zucchini or cherry tomatoes for variety and color.
- Herbs adjustment - Swap parsley with fresh mint or basil to change the herb profile.
- Citrus twist - Use lime juice instead of lemon for a slightly different citrus flavor.
Ingredients
- 8 ounces halloumi cheese - Cut into 1-inch cubes for even grilling.
- 1 red bell pepper - Cut into 1-inch pieces.
- 1 zucchini - Sliced into thick rounds or half-moons.
- 1 small red onion - Cut into wedges.
- 2 tablespoons extra-virgin olive oil - For the lemon herb dressing.
- 1 tablespoon fresh lemon juice - Adds brightness to the dressing.
- 1 teaspoon dried oregano - Gives a classic Mediterranean flavor.
- 2 tablespoons fresh parsley - Chopped, for freshness and garnish.
- ½ teaspoon salt - To season the cheese and vegetables.
- ¼ teaspoon black pepper - Adds mild warmth.
- Wooden or metal skewers - For assembling the halloumi and vegetables.
Instructions
- Preheat your grill or grill pan to medium-high heat. Soak wooden skewers in water for 10 minutes if using to prevent burning.
- Thread the halloumi, bell pepper, zucchini, and red onion alternately onto the skewers, distributing the ingredients evenly.
- In a small bowl, whisk together the olive oil, lemon juice, dried oregano, salt, and black pepper until combined.
- Brush the skewers with a light coat of the lemon herb dressing, reserving some for serving.
- Grill the skewers for about 3 to 4 minutes on each side, turning carefully until the halloumi is golden and the vegetables are tender with grill marks. Remove from heat.
- Drizzle with remaining dressing and sprinkle with fresh parsley before serving. These skewers go well with a simple salad or crusty bread.
10. Smoked Gouda and Bacon Stuffed Mushrooms

Stuffed mushrooms always make a wonderful appetizer or snack, and this version with smoked Gouda and bacon improves the flavor to something truly satisfying. The smoky richness of the cheese blends beautifully with crispy bacon bits, improving the tender, earthy button mushrooms.
This recipe is straightforward to prepare, making it a great option when you need a quick, tasty dish that feels a bit special. The combination of creamy, smoky, and savory notes works well whether you're serving guests or treating yourself.
Why This Recipe Works
This recipe offers a simple yet flavorful bite that combines rich and smoky elements with satisfying textures. It's a great way to enjoy mushrooms packed with personality without complicated steps.
- Convenience - Quick to assemble and bakes in a short time.
- Flavor balance - Smoky, creamy cheese goes well with salty bacon.
- Texture - Tender mushrooms filled with gooey cheese and crisp bacon.
- Appeal - Works well as a crowd-pleasing appetizer or hearty snack.
Ingredient Swap Ideas
Swapping ingredients here lets you adjust the recipe to match dietary preferences or what's on hand while keeping the core flavors intact.
- Cheese substitution - Use sharp cheddar or fontina instead of smoked Gouda for a different but complementary flavor.
- Bacon alternatives - Turkey bacon or smoked tempeh can replace pork bacon for a lighter or vegetarian-friendly option.
- Mushroom choice - Portobello or cremini mushrooms can be used for a meatier texture.
- Add herbs - Fresh thyme or rosemary can be mixed into the filling to add aromatic notes.
Ingredients
- 20 button mushrooms - stems removed and cleaned
- 4 ounces smoked Gouda cheese - shredded or finely chopped
- 4 slices bacon - cooked until crispy and crumbled
- 2 tablespoons cream cheese - for added creaminess
- 2 cloves garlic - minced
- 1 tablespoon fresh parsley - chopped
- ¼ teaspoon black pepper - freshly ground
- ¼ teaspoon salt - or to taste
Instructions
- Preheat your oven to 375°F (190°C). Line a baking sheet with parchment paper or lightly grease it.
- Remove stems from the mushrooms and finely chop the stems; set aside.
- In a skillet over medium heat, sauté the chopped mushroom stems and minced garlic until soft and fragrant, about 3-4 minutes. Remove from heat.
- In a bowl, combine the cooked mushroom stems, smoked Gouda, cream cheese, crumbled bacon, parsley, salt, and pepper. Mix thoroughly.
- Spoon the filling evenly into the hollow mushroom caps and place them on the prepared baking sheet. Bake for 15-18 minutes until the mushrooms are tender and the filling is melted and slightly golden on top. Serve warm.
11. Blue Cheese and Walnut Endive Boats
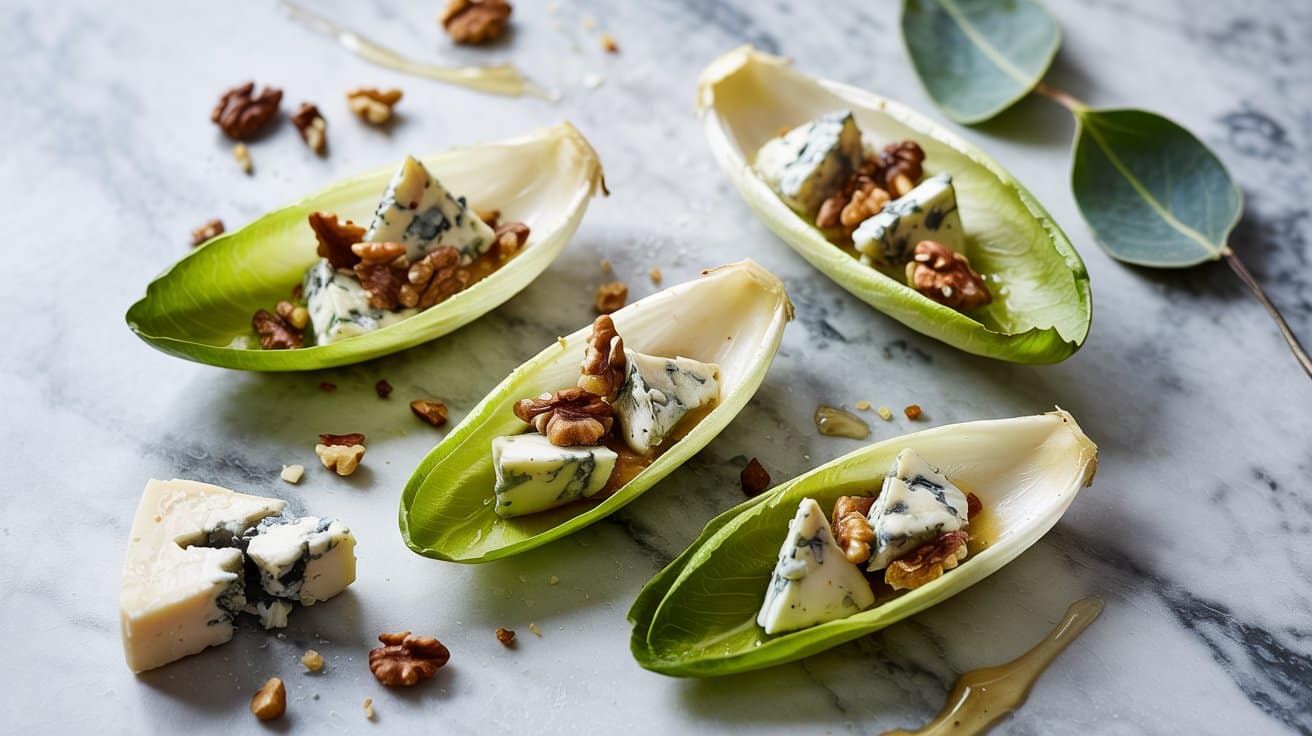
These Blue Cheese and Walnut Endive Boats make a crisp, creamy snack or appetizer that's both refreshing and satisfying. The crunch of the endive leaves goes well with the tangy richness of blue cheese, while toasted walnuts add a pleasant bite and earthy depth.
They come together quickly with just a few simple ingredients, making them a great pick for busy evenings or last-minute gatherings. You'll appreciate how this light option keeps things interesting without being heavy.
Why This Recipe Works
This recipe offers a balanced mix of refreshing crunch and bold flavors with minimal prep time, making it a smart choice for anyone seeking an elegant yet straightforward appetizer.
- Convenience - Ready in minutes using simple, fresh ingredients requiring no cooking.
- Flavor balance - Combines the sharpness of blue cheese with mellow walnuts and crisp endive.
- Texture - Crunchy endive leaves contrast nicely with creamy cheese and crunchy nuts.
- Appeal - Eye-catching presentation and bite-sized portions perfect for entertaining.
Ingredient Swap Ideas
Swapping ingredients can help tailor this dish to your taste preferences or dietary needs without losing its defining qualities.
- Blue cheese - Use a milder goat cheese or cream cheese if you prefer less pungency.
- Walnuts - Substitute toasted pecans or almonds to adjust nutty flavor and texture.
- Endive - Try radicchio or butter lettuce leaves for a slightly different crunch or bitterness.
- Add-ins - Drizzle honey or sprinkle fresh herbs like chives or parsley for extra freshness.
Ingredients
- 1 head of Belgian endive - Leaves separated and washed, to provide crisp edible boats.
- 4 ounces blue cheese - Crumbled, for creamy, tangy filling.
- ½ cup walnuts - Toasted and roughly chopped, adding crunch and warmth.
- 2 tablespoons cream cheese - To soften and bind the filling.
- 1 tablespoon lemon juice - Brightens the flavors and cuts richness.
- Freshly ground black pepper - To taste, improving the filling's depth.
Instructions
- Toast walnuts in a dry skillet over medium heat for 3 to 5 minutes, stirring frequently until fragrant and lightly browned. Remove and let cool.
- In a bowl, combine crumbled blue cheese, cream cheese, and lemon juice. Stir well until smooth but still slightly chunky. Season with pepper to taste.
- Gently separate the endive leaves and arrange them on a serving platter with the wider ends facing up.
- Spoon a small amount of the cheese mixture into the base of each endive leaf followed by a sprinkle of toasted walnuts.
- Serve immediately for best texture, or refrigerate up to one hour before serving to keep the leaves crisp.
This simple assembly shows the natural crunch of endive with the rich, tangy filling, making these blue cheese and walnut boats an easy and appealing appetizer option.
12. Cream Cheese and Smoked Salmon Cucumber Bites
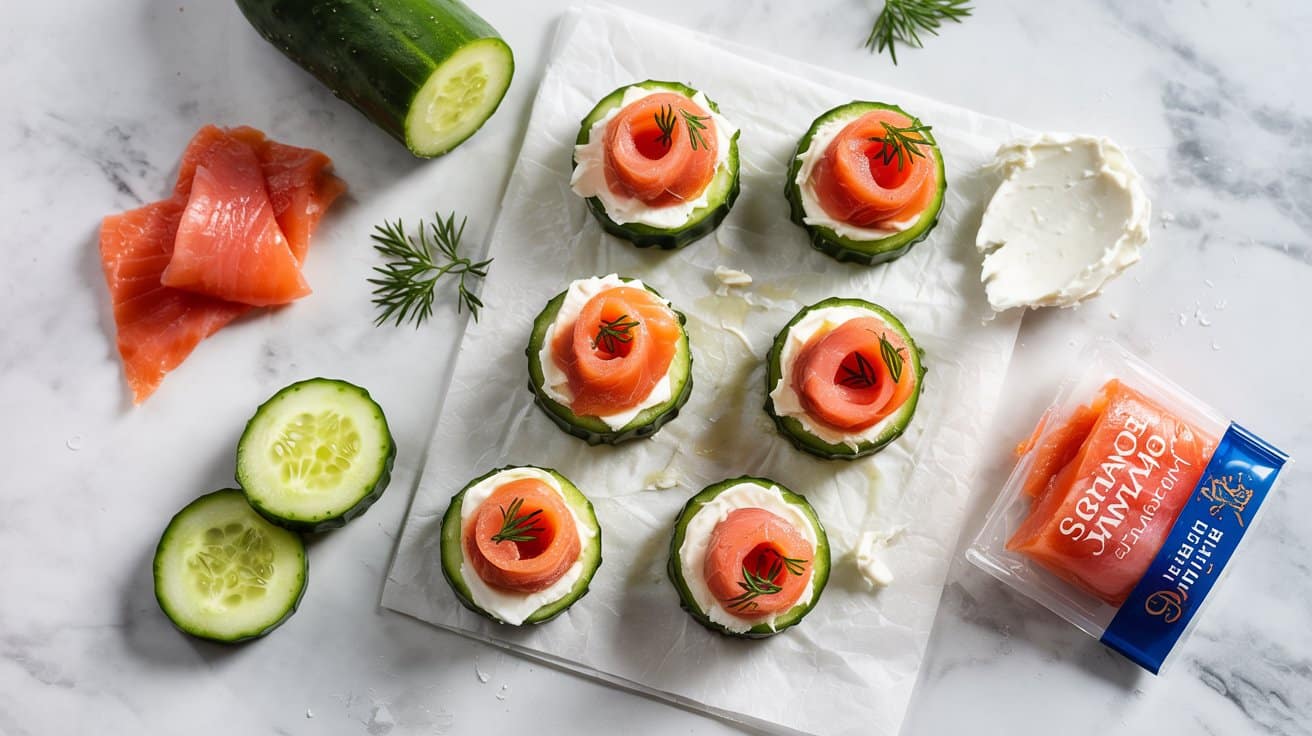
These Cream Cheese and Smoked Salmon Cucumber Bites are a fresh and light appetizer that combines creamy, tangy cheese with savory smoked salmon. The crisp cucumber adds a refreshing crunch, making each bite feel clean and satisfying without being heavy.
They come together quickly with minimal prep, making them ideal for busy days or when you want to serve something simple yet elegant to guests. You can prepare the components ahead of time and assemble just before serving, which saves time and keeps everything crisp.
Why This Recipe Works
This recipe offers a nice balance of flavors and textures in a small, easy-to-handle bite. It's both visually appealing and practical for gatherings or a nutritious snack.
- Convenience - Requires no cooking and comes together in just minutes.
- Flavor balance - Combines creamy, salty, and fresh notes in every bite.
- Texture - Crisp cucumber rounds contrast with smooth cream cheese and tender smoked salmon.
- Appeal - Low-carb, gluten-free, and suitable for a variety of occasions.
Ingredient Swap Ideas
Swapping ingredients can help tailor this recipe to different tastes or dietary restrictions without losing what makes it enjoyable. Here are some options to try:
- Cream cheese - Use a dairy-free or vegan cream cheese alternative if avoiding dairy.
- Smoked salmon - Substitute with smoked trout or cooked shrimp for a different seafood flavor.
- Cucumber - Try zucchini rounds for a slightly different texture or use seedless cucumbers for less moisture.
- Herbs - Swap fresh dill with chives or parsley depending on your flavor preference.
Ingredients
- 1 large cucumber - washed and sliced into ¼-inch thick rounds.
- 4 ounces cream cheese - softened to room temperature for easy spreading.
- 4 ounces smoked salmon - sliced into small pieces or strips.
- 1 tablespoon fresh dill - finely chopped, plus extra for garnish.
- 1 teaspoon lemon juice - freshly squeezed to add brightness.
- ¼ teaspoon black pepper - freshly ground for seasoning.
- Capers (optional) - for garnish and added briny flavor.
Instructions
- In a small bowl, mix the softened cream cheese with chopped dill, lemon juice, and black pepper until well combined. This will add subtle herbiness and acidity to the creamy base.
- Spread about a teaspoon of the cream cheese mixture evenly over each cucumber slice. Using softened cream cheese helps it spread smoothly without tearing the cucumber.
- Top each cucumber round with a small piece or strip of smoked salmon, gently pressing it onto the cream cheese to keep it in place.
- Garnish each bite with a few capers if using, and a small sprig of dill for color and flavor.
- Arrange the bites on a serving platter and refrigerate until ready to serve. These are best enjoyed within a few hours to maintain the crispness of the cucumber.
13. Pimento Cheese Dip
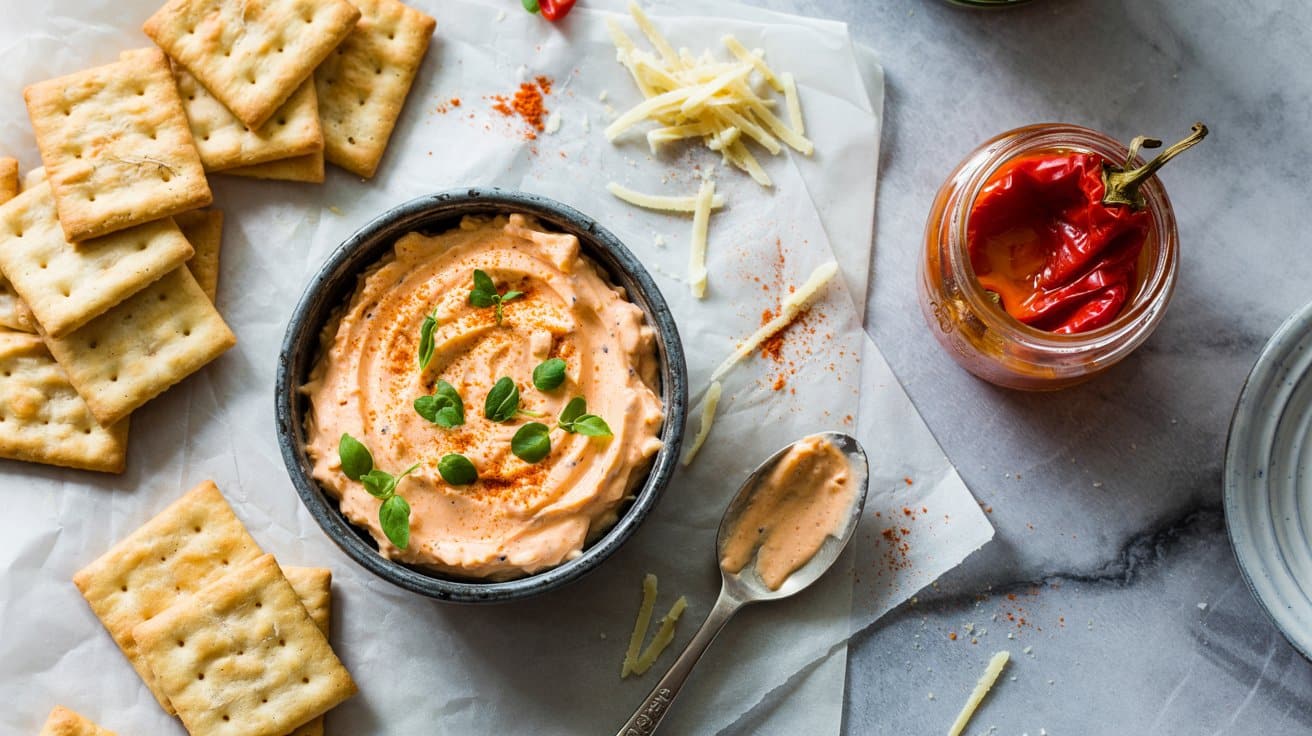
Pimento cheese dip is a classic Southern spread that blends sharp cheddar cheese, tangy pimentos, and creamy mayonnaise. This recipe is straightforward and comes together quickly, making it a reliable choice for a snack, appetizer, or sandwich filling.
The combination of creamy and mildly spicy textures gives this dip a satisfying depth without requiring complicated steps. You can serve it as a dip with crackers or fresh veggies, or spread it on bread for a flavorful twist on a sandwich.
Why This Recipe Works
This pimento cheese dip is a versatile and flavorful option that works well in various settings, from casual snacking to family gatherings.
- Convenience - Comes together quickly with simple mixing, no cooking needed.
- Flavor balance - Sharp cheddar and mild pimentos create a tangy, cheesy blend.
- Texture - Creamy and smooth with the occasional pimento bite for interest.
- Appeal - A crowd-pleasing Southern classic that suits many occasions.
Ingredient Swap Ideas
Swapping ingredients can help you tailor the dip to your taste preferences or dietary requirements without losing its essential character.
- Cheese swap - Use Colby jack or Monterey Jack for a milder flavor.
- Mayo substitute - Try Greek yogurt to reduce calories and add tang.
- Add spice - Include a dash of hot sauce or cayenne for heat.
- Pimento alternative - Roast red bell peppers as a fresh substitute for jarred pimentos.
Ingredients
- 2 cups sharp cheddar cheese - shredded for easy mixing and good melt.
- ½ cup mayonnaise - adds creaminess and richness.
- ¼ cup pimentos - drained and chopped, providing mild pepper flavor.
- 1 teaspoon Dijon mustard - gives a subtle tang and depth.
- ¼ teaspoon garlic powder - enhances overall flavor without overpowering.
- Salt - to taste, balances the flavors.
- Freshly ground black pepper - a pinch for mild heat and seasoning.
Instructions
- Combine the shredded sharp cheddar cheese, mayonnaise, and drained pimentos in a medium bowl. Mix well to evenly distribute ingredients.
- Add Dijon mustard and garlic powder to the bowl. Stir to incorporate all flavors evenly throughout the cheese mixture.
- Season with salt and freshly ground black pepper, adjusting to your taste preferences. Mix thoroughly.
- Cover the bowl with plastic wrap and refrigerate for at least 30 minutes to allow flavors to meld.
- Serve chilled or at room temperature with crackers, sliced vegetables, or spread on sandwiches.
This pimento cheese dip holds well in the fridge for several days, making it easy to prepare in advance and enjoy throughout the week.
14. Cheese-Stuffed Mini Meatballs

Cheese-stuffed mini meatballs are an easy and satisfying appetizer or snack that brings together juicy ground meat and melted cheese in every bite. The combination of savory meat and gooey cheese creates a rich, comforting flavor that works great for gatherings, casual dinners, or just a quick treat.
These bite-sized meatballs are simple to prepare and can be enjoyed warm or at room temperature. They offer a versatile way to incorporate your favorite cheeses and seasonings without taking much time.
Why This Recipe Works
This recipe delivers flavorful, melty meatballs that balance juiciness with a satisfying cheese center.
- Convenience - Small size makes them quick to cook and serve, ideal for parties or meal prepping.
- Flavor balance - Rich meat and melting cheese create a savory, comforting combination.
- Texture - Tender outside with a gooey, cheesy core provides a nice contrast.
- Appeal - Great for both kid-friendly snacks and elegant appetizers.
Ingredient Swap Ideas
Swapping ingredients can help tailor these meatballs to dietary needs or personal preferences without losing their signature taste.
- Swap ground beef with ground turkey or chicken to reduce fat content.
- Use mozzarella or provolone cheese for a mild, creamy filling, or try sharp cheddar for a stronger flavor.
- Replace breadcrumbs with gluten-free crumbs or crushed nuts for a gluten-free option.
- Add fresh herbs like parsley or basil to vary the flavor and freshen the dish.
Ingredients
- 1 pound ground beef - Choose lean or regular depending on your preference.
- 1 cup shredded mozzarella cheese - For the melty cheese center.
- ½ cup breadcrumbs - Helps bind the meatballs.
- ¼ cup grated Parmesan cheese - Adds savory depth.
- 1 large egg - Binds ingredients together.
- 2 cloves garlic, minced - For aromatic flavor.
- 2 tablespoons fresh parsley, chopped - Adds freshness.
- 1 teaspoon salt - Enhances overall flavor.
- ½ teaspoon black pepper - Provides subtle heat.
- ½ teaspoon dried oregano - Adds a hint of earthiness.
- 2 tablespoons olive oil - For cooking the meatballs.
Instructions
- Preheat oven to 375°F (190°C). Line a baking sheet with parchment paper or lightly grease it.
- In a large bowl, combine ground beef, breadcrumbs, Parmesan cheese, egg, garlic, parsley, salt, pepper, and oregano. Mix until just combined, taking care not to overwork the meat.
- Take a small amount of meat mixture (about 1 tablespoon), flatten it in your palm, place a small pinch of shredded mozzarella in the center, then fold the meat around the cheese to form a mini meatball. Repeat until all mixture is used.
- Heat olive oil in a large skillet over medium heat. Brown the meatballs on all sides, about 2 minutes per side, then transfer them to the prepared baking sheet.
- Bake the meatballs in the oven for 10 to 12 minutes until cooked through and cheese inside is melted. Serve warm or at room temperature.
Enjoy these cheese-stuffed mini meatballs as a tasty snack or appetizer your family and guests will appreciate.
Flaky puff pastry offers a light, buttery base ideal for handheld savory or sweet appetizers; find versatile ideas at versatile puff pastry appetizer ideas. Single-serve mug cakes are a fast way to make moist, portion-controlled desserts in minutes; explore moist mug cake recipes for quick desserts.

Andrew Gray is a seasoned food writer and blogger with a wealth of experience in the restaurant and catering industries. With a passion for all things delicious, Andrew has honed his culinary expertise through his work as a personal chef and caterer.
His love for food led him to venture into food writing, where he has contributed to various online publications, sharing his knowledge and insights on the culinary world. As the proud owner of CooksCrafter.com, Andrew covers a wide range of topics, including recipes, restaurant reviews, product recommendations, and culinary tips.
Through his website, he aims to inspire and educate fellow food enthusiasts, offering a comprehensive resource for all things food-related.