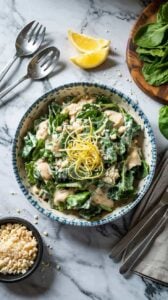
Tuna pasta salad is the kind of dish that delivers big on comfort with little effort, a cold pasta salad made with canned tuna, a mayo-based dressing, and crisp vegetables -a pantry-friendly staple at American potlucks. It's cold, creamy, and loaded with flavor from flaky tuna, tender pasta, and crunchy vegetables-all brought together in a tangy, seasoned dressing.
I grew up with this being the star of potlucks, and now it's my go-to when I need something filling that doesn't take forever to make.

This version of tuna pasta salad is everything you want in a make-ahead dish: satisfying, quick to put together, and easy to customize. Whether you're prepping lunches, serving it at a picnic, or pairing it with grilled meats, it's a reliable, delicious staple that only gets better with time.
Why You Should Make This Tuna Pasta Salad
Tuna pasta salad is more than just an easy lunch-it's a flavor-packed side or light meal that works for almost any occasion, similar to a tuna macaroni salad for potlucks.
- Fast and Fuss-Free - It comes together in under 30 minutes with minimal cooking involved.
- Make-Ahead Friendly - It tastes even better after a few hours in the fridge.
- Balanced Texture and Flavor - Creamy dressing, chewy pasta, flaky tuna, and crunchy celery give every bite some contrast.
- Pantry + Fresh Combo - Uses easy-to-find pantry staples like canned tuna (usually skipjack or albacore) and pasta, but brightens it with fresh ingredients, with tasty tuna substitutes for pantry swaps if you need alternatives.
Key Ingredients That Make It Work
This salad keeps it simple, using a short list of ingredients that bring out the best in one another.

- Short Pasta (Rotini or Elbow) - Holds onto the dressing well and gives structure to the salad.
- Canned Tuna (in Water or Oil) - Flaked into the salad for rich, savory protein.
- Celery & Red Onion - Adds crunch and sharpness that balances the creamy base.
- Mayonnaise & Dijon Mustard - The creamy, tangy dressing that pulls everything together.
- Lemon Juice & Pickle Brine - Adds brightness and a little zing to cut through the richness.
- Chopped Herbs (Parsley or Dill) - Optional but gives a fresh lift at the end.
How to Make Tuna Pasta Salad
This recipe is straightforward and hard to mess up, making it perfect for quick meals and weekday prep.

- Boil the Pasta - Cook until al dente, then drain and rinse with cold water to stop the cooking and cool it down.
- Make the Dressing - In a large bowl, whisk together mayo, mustard, lemon juice, and pickle brine until smooth. Season with salt and pepper to taste.
- Add Tuna and Veggies - Flake the tuna into the bowl and mix with diced celery and red onion. Stir to coat everything in the dressing.
- Mix in the Pasta - Fold the cooled pasta into the mixture until well combined. Taste and adjust seasoning as needed.
- Chill and Serve - Refrigerate for at least 30 minutes to let the flavors develop. Garnish with herbs before serving if you like.
It's the kind of salad that holds up well in the fridge and doesn't get soggy-perfect for leftovers or serving ahead of time.
Great Pairings for Tuna Pasta Salad
This dish plays well with others and works as a side or main, and pairs nicely with tuna patties (made with canned tuna and breadcrumbs) as a hearty option, sharing many versatile sides for seared ahi tuna.

| Side or Main | Why It Works |
|---|---|
| Grilled Chicken Thighs | The smoky flavor balances the creamy salad. |
| Garlic Bread | Adds crunch and a garlicky finish to your plate. |
| Fresh Fruit Salad | A juicy and sweet contrast to the savory salad. |
| Roasted Vegetables | Earthy, caramelized flavors that pair beautifully. |
| Tomato Basil Soup | Adds warmth and depth to a chilled pasta plate. |
| Deviled Eggs | A fun, rich side that matches the creamy profile. |
How to Store Leftovers Properly
This salad holds up well for days, making it a great meal prep choice (up to 4 days refrigerated when kept at 40°F (4°C) or below).
- Refrigerator Storage - Store in an airtight container for up to 4 days.
- Stir Before Serving - Give it a good mix if it sits overnight, and add a touch of mayo or lemon juice if it seems dry.
- Do Not Freeze - Mayo-based dressings tend to separate when thawed, affecting texture.
Tips for Making the Best Tuna Pasta Salad
A few extra steps make a noticeable difference in flavor and texture.
If you're serving larger mains, try simple sides for beef tips to round out the plate.
- Salt your pasta water generously - It adds flavor right from the start (about 1-2 tablespoons kosher salt per 4 quarts of water).
- Rinse pasta after boiling - Stops the cooking and helps it stay firm.
- Flake tuna gently - So you get tender pieces without mashing them, ideal for tuna Niçoise-style salads (a French salad from Nice).
- Balance creaminess - Too much mayo can overpower; use lemon juice or brine to lighten it up.
- Let it rest - Chilling it for at least 30 minutes enhances every bite.
FAQs About Tuna Pasta Salad
1. Can I use Greek yogurt instead of mayo?
Yes. You can replace some or all of the mayo with Greek yogurt for a lighter option.
It changes the flavor slightly but still works well.
2. What kind of tuna should I use?
Chunk light tuna or albacore tuna, either in water or oil, both work. Oil-packed tuna gives a richer flavor.
3. Can I add other veggies?
Definitely. Try peas, diced bell peppers, or shredded carrots for added texture and color.
4. How far in advance can I make this?
You can make it up to 24 hours in advance. Just stir it well before serving and check the seasoning.
5. Is this dish good for picnics?
Yes, but make sure to keep it chilled in a cooler, especially on hot days. It's best served cold.
This creamy tuna pasta salad is quick, tasty, and dependable. Whether you're meal-prepping or bringing a dish to share, it's one of those recipes that always shows up and always gets finished.

Tuna Pasta Salad
Equipment
- Large pot For boiling pasta
- Mixing bowl For combining ingredients
- Wooden Spoon For stirring salad
Ingredients
- 8 ounces rotini pasta or elbow pasta
- 2 cans tuna drained and flaked
- 1 cup celery diced
- ⅓ cup red onion finely chopped
- ½ cup mayonnaise plus more if needed
- 1 tablespoon Dijon mustard
- 1 tablespoon lemon juice freshly squeezed
- 1 tablespoon pickle brine optional, for added tang
- 2 tablespoons parsley chopped, for garnish
Instructions
- Cook the pasta in salted water until al dente. Drain and rinse under cold water to cool completely.
- In a large mixing bowl, whisk together mayonnaise, Dijon mustard, lemon juice, pickle brine, salt, and pepper.
- Add the flaked tuna, diced celery, and chopped red onion. Mix until evenly coated.
- Stir in the cooled pasta and toss until well combined. Adjust seasoning or add extra mayo if needed.
- Cover and refrigerate for at least 30 minutes. Garnish with chopped parsley before serving.
Notes
- For extra crunch, add diced pickles or bell peppers.
- This salad is great served cold and holds well in the fridge for up to 4 days.
- Use Greek yogurt instead of mayo for a lighter twist.
Serve it alongside hearty choices like favorite sides for tuna sandwiches to round out a picnic or lunchbox. For a seafood-forward option with contrasting textures, pair the salad with a composed seared ahi tuna salad with bright citrus.

Andrew Gray is a seasoned food writer and blogger with a wealth of experience in the restaurant and catering industries. With a passion for all things delicious, Andrew has honed his culinary expertise through his work as a personal chef and caterer.
His love for food led him to venture into food writing, where he has contributed to various online publications, sharing his knowledge and insights on the culinary world. As the proud owner of CooksCrafter.com, Andrew covers a wide range of topics, including recipes, restaurant reviews, product recommendations, and culinary tips.
Through his website, he aims to inspire and educate fellow food enthusiasts, offering a comprehensive resource for all things food-related.