Finding reliable cookie recipes that yield soft, chewy results can be challenging, which is why this collection of 12 Soft and Chewy Cookie Recipes That Never Fail is so valuable, as "soft and chewy" cookies are typically defined by a higher moisture content and a greater brown-to-white sugar ratio (often about 2:1) that helps preserve a tender, chewy crumb. These recipes have been carefully selected to ensure consistent success and delicious outcomes, chosen for techniques like dough-chilling and a higher brown-to-white sugar ratio that favor chewiness.

This assortment includes a range of classic favorites and creative variations, from chocolate chip and oatmeal raisin to pumpkin spice and salted caramel pretzel cookies. Each recipe focuses on delivering tender textures and rich flavors, making them excellent choices for sharing with family, gift-giving, or simply enjoying a comforting treat.
What ties these recipes together is their straightforward approach and dependable techniques that require no complicated ingredients or steps. They offer a great balance of ease and taste, so you can bake with confidence and minimal clean-up.
1. Classic Soft and Chewy Chocolate Chip Cookies

Soft and chewy chocolate chip cookies are a timeless treat that almost everyone enjoys, tracing their roots to the Toll House recipe popularized in the 1930s. Their tender centers and slightly crisp edges create a balanced texture that makes every bite satisfying, which is often achieved by chilling the dough 30 minutes and baking at 350°F for 10-12 minutes to set the edges while keeping the center soft.
These cookies offer a gentle sweetness paired with rich chocolate chunks that melt deliciously as the cookies cool, and if you're out of chocolate chips try chocolate chip substitutes to enrich your bakes, and they pair nicely with air fryer chocolate bark for melting chips.
Whether you need a reliable batch for after-school snacks or a simple dessert to share, these classic cookies consistently deliver on both flavor and texture.
Why This Recipe Works
This recipe offers a reliable way to make soft, chewy cookies with perfectly crisp edges, giving you a crowd-pleasing dessert every time-a result helped by using a higher proportion of brown sugar and slightly underbaking to retain moisture.
- Convenience - Uses simple pantry staples and requires minimal prep time, and the cookie's warm flavors also pair well with honey-based desserts for light sweetness.
- Texture - Achieves a soft center combined with just enough crunch around the edges.
- Flavor Balance - Sweet dough balanced with rich, melty chocolate chips throughout.
- Family-Friendly - Appeals to kids and adults alike with a classic, familiar taste.
- Versatile - Easy to double or halve depending on your needs and freezes well.
Ingredient Swap Ideas
Adjusting this recipe can make it suitable for different dietary preferences or to add variety without losing its classic appeal.
- Butter - Substitute with vegan butter or margarine for a dairy-free option, but expect slightly different texture; plant-based spreads can contain more water, so reduce bake time by 1-2 minutes if needed to avoid over-spreading.
- All-purpose flour - Use a gluten-free flour blend to accommodate gluten sensitivities while maintaining softness.
- Chocolate chips - Swap semi-sweet chocolate chips for dark chocolate or white chocolate chips depending on your preference.
- Brown sugar - Replace with coconut sugar to add a subtle caramel note and a less processed sweetener, and for compact dessert ideas consider small-batch cupcake ideas for two.
- Egg - Use a flax egg (1 tablespoon ground flaxseed mixed with 3 tablespoons water) as a vegan alternative.
Ingredients
- 1 cup (2 sticks) unsalted butter - softened to room temperature for easy mixing.
- ¾ cup granulated sugar - provides sweetness and contributes to cookie structure.
- ¾ cup packed brown sugar - adds moisture and a caramel flavor.
- 2 large eggs - binds the ingredients and adds moisture.
- 2 teaspoons pure vanilla extract - enhances the flavors throughout the dough.
- 2 ¼ cups all-purpose flour - forms the base of the cookie dough.
- 1 teaspoon baking soda - helps the cookies rise and spread evenly.
- ½ teaspoon salt - balances the sweetness and enhances flavor.
- 2 cups semi-sweet chocolate chips - classic choice for melty chocolate pockets.
Instructions
- Preheat your oven to 375°F (190°C). Line two baking sheets with parchment paper.
- In a large bowl, beat the softened butter with granulated sugar and brown sugar until creamy and smooth.
- Add eggs one at a time, mixing well after each addition, then stir in vanilla extract.
- In a separate bowl, whisk together flour, baking soda, and salt. Gradually add the dry ingredients to the wet mixture, stirring until just combined.
- Fold in the chocolate chips evenly throughout the dough.
- Drop rounded tablespoons of dough onto the prepared baking sheets, spacing them about 2 inches apart. Bake for 9 to 11 minutes, or until edges are golden but centers remain soft.
- Remove cookies from the oven and allow them to cool on the baking sheet for 5 minutes before transferring to a wire rack to cool completely.
These cookies taste best slightly warm, with chocolate still soft and tender centers inviting you back for another bite.
2. Brown Butter Snickerdoodles
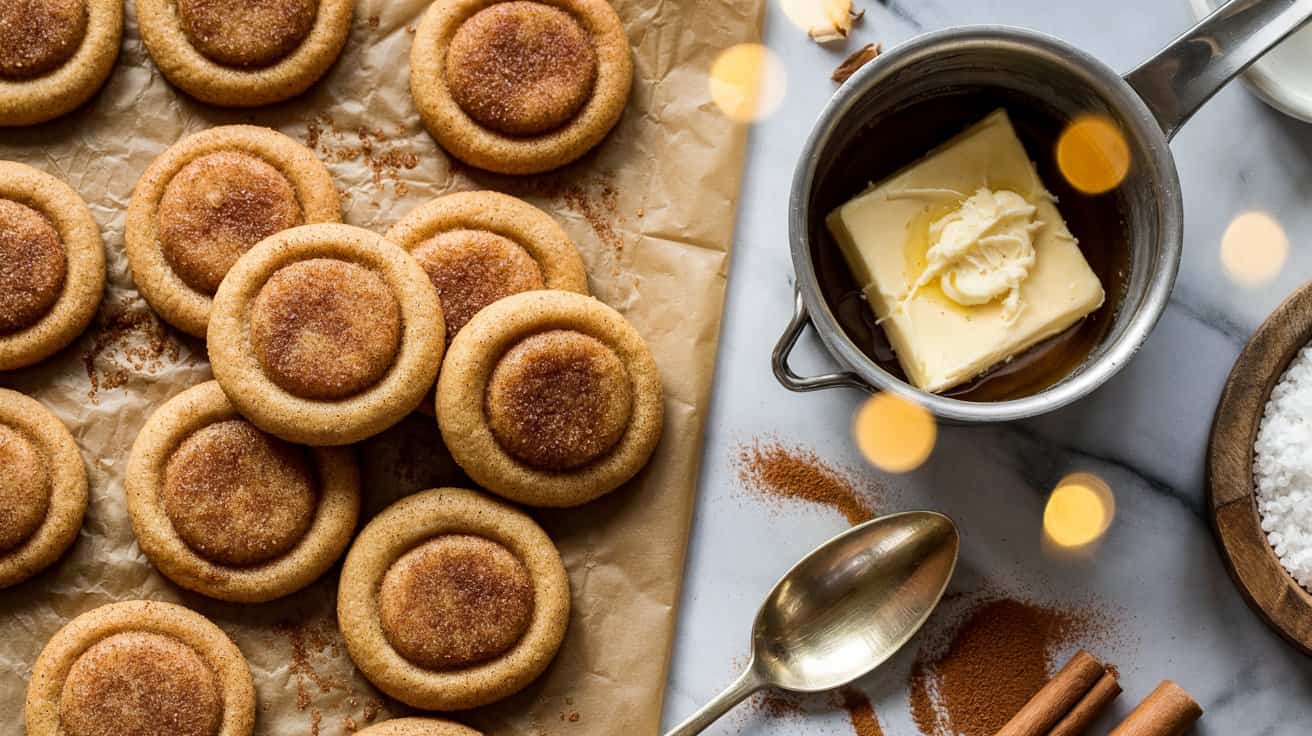
Brown butter adds a rich, nutty depth to traditional snickerdoodles that makes these cookies stand out from the usual batch, created by cooking the butter until the milk solids turn golden and a toasted aroma develops. The toasty aroma of browned butter combined with the classic cinnamon sugar coating brings a warm, comforting flavor that feels both familiar and a bit elevated, a technique often called beurre noisette in French.
These cookies have the signature soft and chewy texture everyone loves, with a lightly crisp edge that gives that satisfying snap with every bite. They are straightforward to prepare, making them a great choice for busy days when you want something homemade without a complicated process.
If you enjoy classic desserts with a subtle twist, brown butter snickerdoodles offer a delicious way to bring a small change that makes a noticeable difference, and they pair well alongside air fryer peanut butter cookies for quick nutty treats.
If you need alternatives to brown rice syrup in glazes or doughs, try brown rice syrup substitutes for sweetening.
Why This Recipe Works
This recipe blends ease of preparation with rich, nostalgic flavors, resulting in a crowd-pleasing treat with a buttery twist.
- Convenience - Simple steps with common ingredients allow for quick baking sessions.
- Flavor balance - Brown butter deepens the flavor without overpowering the cinnamon sugar coating.
- Texture - Soft, chewy centers with lightly crisp edges for comforting bites.
- Appeal - A classic cookie everyone knows, made with an inviting nutty aroma.
- Serving ease - These cookies keep well and are perfect for sharing or storing for later.
Ingredient Swap Ideas
Swapping a few ingredients can help adjust this recipe for dietary preferences or to change flavors without losing the cookie's beloved character.
- Butter substitute - Use vegan butter or margarine to make a dairy-free version while still getting a similar texture.
- Flour replacement - Swap all-purpose flour for a gluten-free blend to accommodate gluten sensitivities.
- Sugar option - Replace granulated sugar with coconut sugar for a hint of caramel flavor and lower glycemic impact.
- Cinnamon tweak - Mix in a little nutmeg or cardamom with the cinnamon for a unique spice twist.
- Egg alternative - Use a flax egg to make the recipe vegan-friendly without compromising on binding.
Ingredients
- 1 cup unsalted butter - for browning and adding rich, nutty flavor.
- 1 ½ cups granulated sugar - divided, for sweetness and cinnamon-sugar coating.
- 2 large eggs - to bind the dough and add moisture.
- 2 ¾ cups all-purpose flour - the base for the cookie structure.
- 2 teaspoons cream of tartar - provides that signature snickerdoodle tang and chewiness.
- 1 teaspoon baking soda - helps the cookies rise and spread properly.
- ½ teaspoon salt - balances sweetness and enhances flavor.
- 2 teaspoons ground cinnamon - for the classic cinnamon sugar coating on top.
Instructions
- Brown the butter: In a medium saucepan over medium heat, melt the butter, swirling frequently. Continue cooking until it turns golden brown and releases a nutty aroma, about 5 to 6 minutes. Remove from heat and let cool slightly.
- Mix wet ingredients: In a large bowl, whisk together the browned butter and 1 cup of granulated sugar until well combined. Add eggs one at a time, beating well after each addition.
- Combine dry ingredients: In a separate bowl, sift together the flour, cream of tartar, baking soda, salt, and cinnamon. Gradually stir the dry ingredients into the wet mixture until a smooth dough forms.
- Prepare the cinnamon sugar coating: In a small bowl, mix the remaining ½ cup sugar with 2 teaspoons of cinnamon.
- Form and coat cookies: Preheat the oven to 375°F (190°C). Scoop tablespoon-sized portions of dough and roll each into a ball. Roll the balls in the cinnamon sugar mixture until fully coated, then place them on a baking sheet lined with parchment paper, spaced about 2 inches apart.
- Bake: Bake for 10 to 12 minutes, until the edges are lightly golden but the centers still look soft. Remove from oven and let the cookies cool on the baking sheet for 5 minutes before transferring to a wire rack to cool completely.
3. Chewy Oatmeal Raisin Cookies
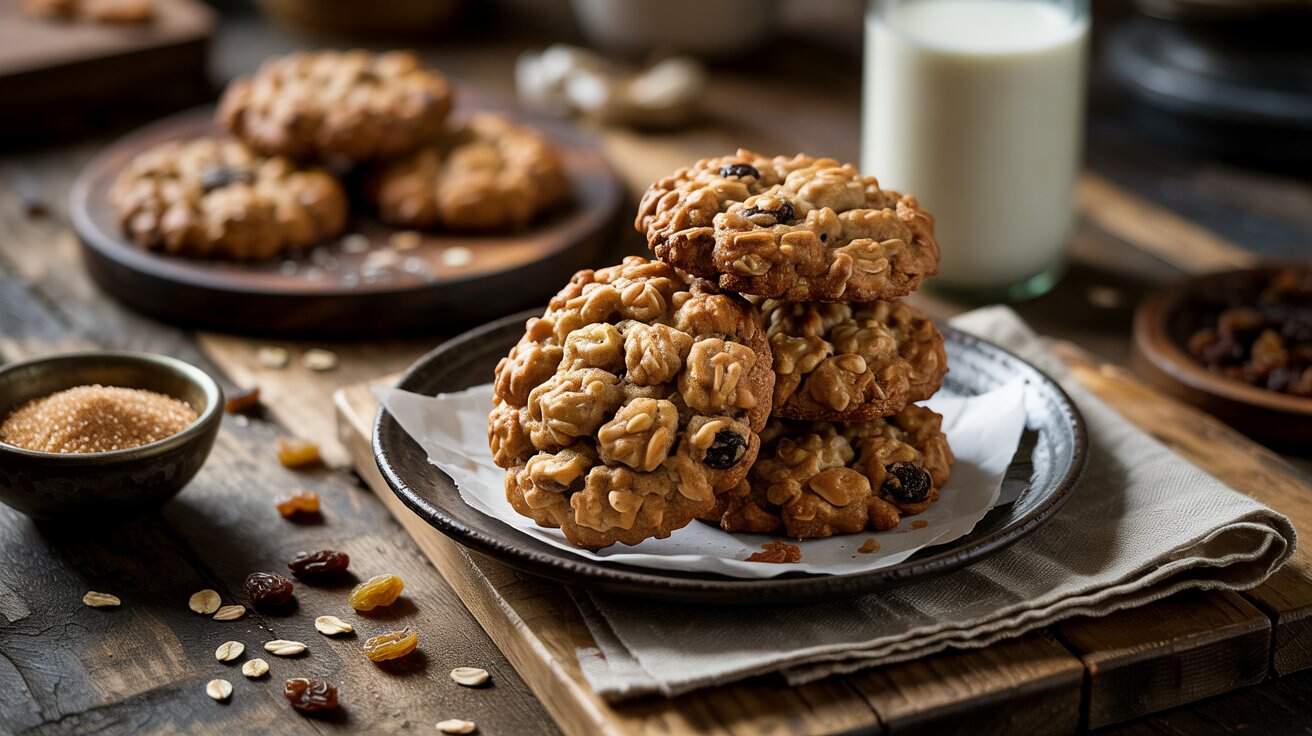
These cookies combine hearty oats and plump raisins, or explore oatmeal swaps for chewy cookies, resulting in a satisfying texture and a naturally sweet flavor.
They're straightforward to prepare and come together quickly, making them a reliable choice for busy weeknights or a sweet treat to share. This classic cookie recipe fits perfectly into a casual snack lineup or as a comforting homemade dessert.
With a tender crumb and just the right amount of chew, these cookies offer a familiar taste that feels both wholesome and indulgent.
Why This Recipe Works
This recipe delivers a tasty, chewy cookie that's easy to make and appeals to a wide range of tastes. It balances wholesome ingredients with a comforting sweetness.
- Convenience - Simple ingredients and quick preparation allow you to bake these cookies any time.
- Flavor balance - The oats and raisins provide natural sweetness and a subtle chew, enhanced by warm spices.
- Texture - Chewy and tender crumb keeps these cookies satisfying rather than dry or crumbly.
- Appeal - Kid-friendly and classic, perfect for family treats or lunchbox snacks.
- Serving ease - Individual cookies are pre-portioned for grab-and-go enjoyment or easy sharing.
Ingredient Swap Ideas
Adjusting ingredients can help tailor these cookies for dietary needs or flavor preferences without sacrificing that signature chew and sweetness.
- Oats - Use gluten-free rolled oats to make the cookies safe for gluten-sensitive diets.
- Raisins - Swap raisins for dried cranberries or chopped dates for a different fruity sweetness.
- Butter - Substitute with coconut oil or vegan butter for a dairy-free version.
- Sugar - Replace brown sugar with coconut sugar for a lower-glycemic alternative.
- Flour - Use whole wheat flour instead of all-purpose to add more fiber and a slightly nuttier taste.
Ingredients
- 1 cup (2 sticks) unsalted butter - softened for easy mixing.
- 1 cup packed brown sugar - adds moisture and caramel notes.
- ½ cup granulated sugar - balances the sweetness and helps with texture.
- 2 large eggs - bind the ingredients and provide structure.
- 1 teaspoon vanilla extract - enhances the overall flavor.
- 1 ½ cups all-purpose flour - forms the base of the cookie dough.
- 1 teaspoon baking soda - leavens the dough for lightness.
- ½ teaspoon salt - balances sweetness and enhances flavor.
- 1 teaspoon ground cinnamon - adds warmth and a subtle spice.
- 3 cups old-fashioned rolled oats - gives heartiness and chewiness.
- 1 cup raisins - provide plump bursts of natural sweetness.
Instructions
- Preheat your oven to 350°F (175°C). Line two baking sheets with parchment paper or silicone mats.
- In a large bowl, cream together the softened butter, brown sugar, and granulated sugar until light and fluffy. Beat in the eggs one at a time, then stir in the vanilla extract.
- In a separate bowl, whisk together the flour, baking soda, salt, and cinnamon. Gradually add the dry ingredients to the butter mixture, mixing just until combined.
- Stir in the rolled oats and raisins until evenly distributed throughout the dough.
- Drop rounded tablespoons of dough onto the prepared baking sheets, spacing them about 2 inches apart. Flatten each cookie slightly with the back of a spoon.
- Bake for 10 to 12 minutes or until the edges are golden but the centers still look a bit soft. Let the cookies cool on the baking sheets for 5 minutes, then transfer to a wire rack to cool completely.
4. Peanut Butter Soft and Chewy Cookies
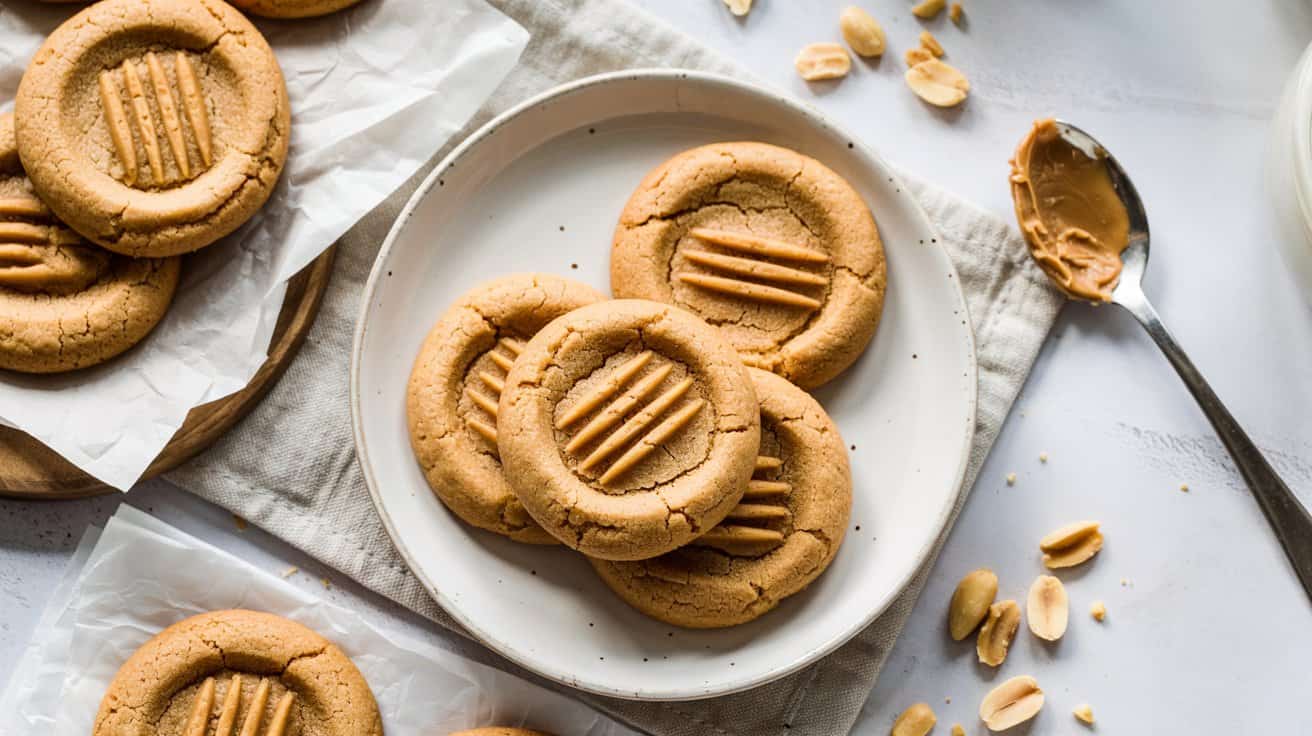
These peanut butter cookies strike a great balance between soft and chewy textures, offering a tender bite that stays moist without feeling dense. They develop a slightly crisp outer layer that adds a nice contrast to the silky interior.
Making these cookies is straightforward and fits well with busy schedules. The ingredients are simple and familiar, and the mixing process is quick, giving you fresh, homemade cookies in no time.
They carry the classic flavor of peanut butter without being overly sweet, which makes them a satisfying snack for both kids and adults. The subtle saltiness and natural richness bring a comforting warmth to each bite.
Why This Recipe Works
This recipe delivers soft, chewy, and flavorful peanut butter cookies with a straightforward method that anyone can follow.
- Convenience - Uses pantry staples and comes together quickly without complicated steps.
- Texture - Combines a tender crumb with a lightly crisp edge for an enjoyable bite.
- Flavor balance - Silky peanut butter flavor without excessive sweetness or heaviness.
- Appeal - Suitable for kids' lunchboxes, family snacks, or casual gatherings.
- Serving ease - Bakes evenly and can be portioned easily, making sharing simple.
Ingredient Swap Ideas
Swapping ingredients can tailor this recipe to different dietary preferences or what you have on hand, all while keeping the core flavor intact.
- Peanut Butter - Use almond or cashew butter for a nutty twist or to cater to specific tastes.
- Sugar - Replace part or all of the granulated sugar with coconut sugar or maple syrup for a different sweetness profile.
- Flour - Use whole wheat flour or a gluten-free blend to suit dietary needs without changing texture too much.
- Egg - For an egg-free version, substitute with a flax egg (1 tablespoon ground flaxseed mixed with 3 tablespoons water).
- Butter - Swap butter with coconut oil or vegan margarine for a dairy-free option.
Ingredients
- 1 cup creamy peanut butter - Provides the main flavor and silky texture.
- ¾ cup granulated sugar - Adds sweetness and helps with browning.
- 1 large egg - Binds the ingredients and contributes to softness.
- 1 teaspoon baking soda - Leavens the cookies slightly for a tender texture.
- ½ teaspoon vanilla extract - Enhances flavor depth.
- ¼ teaspoon salt - Balances sweetness and intensifies peanut flavor.
Instructions
- Preheat your oven to 350°F (175°C) and line a baking sheet with parchment paper.
- In a large bowl, combine peanut butter, sugar, and egg. Mix until smooth and fully incorporated.
- Add baking soda, vanilla extract, and salt, then stir until evenly blended into the batter.
- Scoop tablespoon-sized portions onto the prepared baking sheet, spacing them about 2 inches apart. Press each ball gently with a fork in a crisscross pattern.
- Bake for 8 to 10 minutes, or until the edges are lightly golden but the centers remain soft.
- Let the cookies cool on the baking sheet for 5 minutes before transferring them to a wire rack to cool completely.
Enjoy these peanut butter cookies fresh or store them in an airtight container for several days to keep their soft and chewy texture.
5. Soft Molasses Ginger Cookies
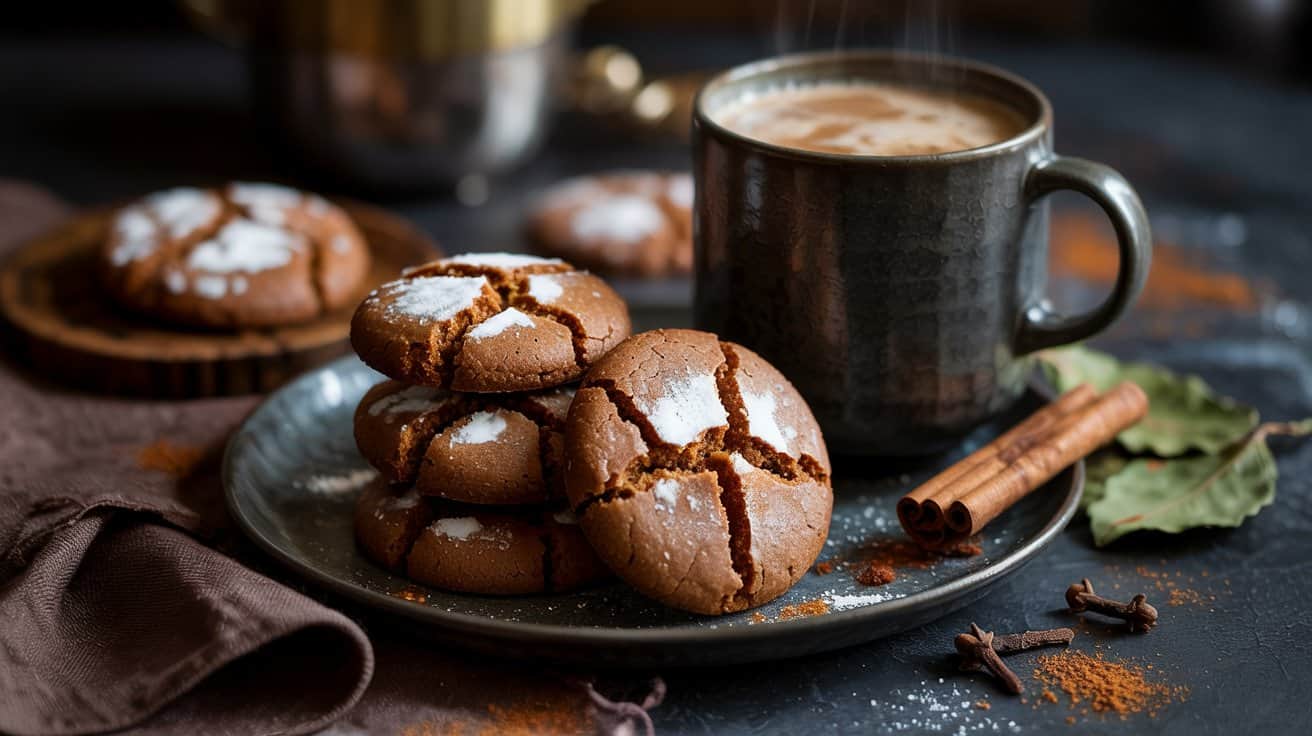
These Soft Molasses Ginger Cookies bring together warm spices and a rich molasses flavor with a wonderfully chewy texture. They're the kind of treat that feels comforting and satisfying without being too heavy.
Baking these cookies fills your home with a cozy, inviting aroma that instantly lifts the mood.
The dough is quick to prepare, making it a practical choice for busy days when you want something sweet and special without a complicated process. After baking, the cookies stay soft and tender, even a day or two later, making them perfect for sharing or keeping as a simple snack.
Why This Recipe Works
This recipe combines easy preparation with a classic flavor that appeals to many. The soft, chewy texture and warm spices make these cookies comforting and enjoyable every time.
- Convenience - Simple ingredients and quick mixing make this recipe suitable for weeknight baking.
- Flavor balance - The deep molasses and spicy ginger blend to create a rich, balanced taste.
- Texture - Tender and chewy cookies that stay soft after baking.
- Appeal - Family-friendly flavors that adults and kids alike enjoy.
- Make-ahead - Dough can be chilled or cookies stored for several days without losing softness.
Ingredient Swap Ideas
Adjusting certain ingredients can help customize these cookies for dietary needs or flavor preferences without losing their character.
- Molasses - Use blackstrap molasses for a stronger, more strong flavor, or mild molasses for a lighter taste.
- Flour - Substitute all-purpose flour with a gluten-free blend to accommodate gluten sensitivities.
- Spices - Replace ground ginger with fresh grated ginger for a sharper, fresher note.
- Egg - Use a flax egg as a vegan alternative.
- Sweetener - Swap granulated sugar with coconut sugar for a deeper, caramel-like sweetness.
Ingredients
- 2 ¼ cups all-purpose flour - For the cookie base providing structure.
- 2 teaspoons ground ginger - Adds warmth and signature spice flavor.
- 1 teaspoon ground cinnamon - Brings a sweet, fragrant spice to balance ginger.
- ½ teaspoon ground cloves - Offers a subtle hint of pungency.
- ¼ teaspoon salt - Enhances all the flavors.
- ¾ teaspoon baking soda - Helps cookies rise and spread properly.
- ¾ cup unsalted butter, softened - Adds richness and moisture.
- 1 cup brown sugar, packed - Provides sweetness and depth with molasses notes.
- 1 large egg - Binds ingredients while contributing to tenderness.
- ¼ cup molasses - Gives a deep, slightly smoky sweetness and chewy texture.
- Granulated sugar for rolling - Coats cookie dough to add a slight crunch and sparkle.
Instructions
- Preheat your oven to 350°F (175°C) and line two baking sheets with parchment paper. This helps cookies bake evenly and prevents sticking.
- In a medium bowl, whisk together the flour, ground ginger, cinnamon, cloves, salt, and baking soda. Set this dry mix aside.
- In a large bowl, beat the softened butter and brown sugar until creamy and well combined. Add the egg and molasses, stirring until smooth.
- Gradually mix the dry ingredients into the wet mixture. Stir just until combined; avoid overmixing to keep cookies tender.
- Scoop dough by tablespoonfuls and roll each into a ball. Roll these balls in granulated sugar to coat the outside, then place them about 2 inches apart on the baking sheets.
- Bake for 8 to 10 minutes, or until the cookies look set but are still soft. Remove from the oven and allow them to cool on the baking sheets for 5 minutes before transferring to a wire rack to cool completely.
These cookies go well with a cup of tea or coffee and make a thoughtful homemade gift. Store any leftovers in an airtight container to maintain their soft texture.
6. Double Chocolate Chunk Soft Cookies

These double chocolate chunk soft cookies bring a rich, intense chocolate experience that's hard to resist. We combine cocoa powder with generous chunks of chocolate to achieve a deep, fudgy flavor throughout each bite.
The texture is soft and chewy, giving the cookies a comforting feel that stays tender even after cooling.
Making these cookies feels straightforward, yet the results impress with their velvety center and slightly crisp edges. They are ideal for a quick dessert, an afternoon treat, or to share with family and friends.
The recipe balances simple ingredients and a no-fuss approach so you can enjoy baking without complexity.
Why This Recipe Works
This recipe stands out because it delivers intense chocolate flavor paired with a soft, chewy texture that many cookie lovers crave. It's accessible enough for home bakers while providing delicious results every time.
- Convenience - Simple, straightforward mixing and baking process ideal for busy schedules.
- Flavor balance - Deep cocoa powder richness complemented by melty chocolate chunks.
- Texture - Soft and fudgy center with slightly crisp edges for a satisfying bite.
- Appeal - A crowd-pleasing treat suitable for all ages and occasions.
- Cleanup ease - Basic mixing requires minimal utensils and no special equipment.
Ingredient Swap Ideas
Swapping ingredients can tailor these cookies to your dietary needs or preferences without sacrificing the rich chocolate taste. These swaps keep the recipe flexible and approachable for different kitchens.
- All-purpose flour - Replace with gluten-free flour blend to make the cookies gluten-free.
- Butter - Substitute with coconut oil or plant-based margarine for a dairy-free version.
- Granulated sugar - Use coconut sugar or maple syrup to add subtle natural sweetness variations.
- Chocolate chunks - Swap for chopped nuts or dried fruit for different textures and flavors.
- Eggs - Use flax eggs or applesauce as egg replacers for egg-free baking.
Ingredients
- 1 cup (2 sticks) unsalted butter, softened
- 1 cup granulated sugar
- 1 cup packed light brown sugar
- 2 large eggs
- 2 teaspoons pure vanilla extract
- 2 cups all-purpose flour
- ¾ cup unsweetened cocoa powder
- 1 teaspoon baking soda
- ½ teaspoon salt
- 2 cups semisweet or bittersweet chocolate chunks
Instructions
- Preheat your oven to 350°F (175°C). Line baking sheets with parchment paper or silicone mats.
- In a large bowl, cream together the softened butter, granulated sugar, and brown sugar until the mixture is light and fluffy.
- Beat in the eggs one at a time, then add vanilla extract, mixing well after each addition.
- In a separate bowl, whisk the flour, cocoa powder, baking soda, and salt together. Gradually add this dry mixture into the wet ingredients, stirring until just combined.
- Fold in the chocolate chunks evenly throughout the dough.
- Scoop tablespoon-sized portions of dough onto the prepared baking sheets, spacing them about 2 inches apart. Bake for 10 to 12 minutes until the cookies set but remain soft in the center.
- Allow the cookies to cool on the baking sheet for 5 minutes before transferring to wire racks to cool completely. Enjoy once cooled or slightly warm for a soft, fudgy bite.
7. Salted Caramel Pretzel Cookies

Salted caramel and pretzels come together beautifully in this cookie recipe to create a sweet and salty treat. These cookies are chewy with little bursts of salty crunch from the pretzels, while the caramel melts in your mouth, adding a gooey richness that is hard to resist.
They are straightforward to prepare and don't require any complicated steps or unusual ingredients, making them a great option for a quick baking project. Once baked, the combination of flavors creates a well-rounded cookie that's both comforting and indulgent.
These cookies are perfect for sharing with family or packing for a snack on the go. They balance sweetness and savory notes in a way that appeals to all ages, making them a versatile addition to any baking collection.
Why This Recipe Works
This recipe offers a simple way to enjoy a dessert that combines chewy texture with crunchy surprise and luscious caramel flavor, all balanced with a touch of salt.
- Convenience - The dough comes together quickly with common ingredients and requires minimal prep time.
- Flavor balance - The sweetness of caramel is perfectly offset by the salty crunch of pretzels.
- Texture - Soft, chewy cookies with a satisfying crispy element from the pretzels.
- Appeal - These cookies work well for both everyday treats and special occasions where unique flavors impress.
- Serving ease - Individually portioned cookies are easy to store and serve at gatherings or as snacks.
Ingredient Swap Ideas
Adjusting ingredients can help tailor this recipe to your preferences or dietary needs while keeping the core flavors intact.
- Butter - Use dairy-free margarine or coconut oil to make the recipe vegan-friendly.
- Pretzels - Swap for gluten-free pretzel sticks or crunchy salted nuts if you prefer a nutty twist.
- Caramel - Substitute store-bought caramel chips with chopped caramel candy pieces or even use soft toffee bits.
- Flour - Use gluten-free all-purpose flour blend to accommodate gluten intolerance without changing the texture much.
- Salt - If you want milder saltiness, reduce or omit the sprinkle of flaky sea salt on top.
Ingredients
- 1 cup (2 sticks) unsalted butter - softened to room temperature for easy mixing.
- 1 cup packed light brown sugar - adds moisture and caramel notes.
- ½ cup granulated sugar - balances sweetness and helps with crisp edges.
- 2 large eggs - bind the ingredients and add moisture.
- 1 teaspoon pure vanilla extract - enhances the overall flavor.
- 2 ½ cups all-purpose flour - provides structure for the cookies.
- 1 teaspoon baking soda - helps the cookies rise slightly.
- ½ teaspoon salt - balances the sweetness in the dough.
- 1 cup crushed pretzels - adds salty crunch throughout the cookies.
- 1 cup caramel bits or chopped caramel candies - create gooey pockets of caramel inside the cookies.
- Flaky sea salt, for sprinkling - adds a finishing touch of saltiness on top.
Instructions
- Preheat your oven to 350°F (175°C). Line two baking sheets with parchment paper or silicone baking mats.
- In a large bowl, cream together the softened butter, brown sugar, and granulated sugar until light and fluffy. Beat in the eggs one at a time, then stir in the vanilla extract.
- In a separate bowl, whisk together the all-purpose flour, baking soda, and salt. Gradually add the dry ingredients to the wet ingredients, mixing just until combined. Avoid over-mixing to keep the cookies tender.
- Fold in the crushed pretzels and caramel bits, distributing them evenly through the dough.
- Scoop tablespoon-sized balls of dough onto the prepared baking sheets, spacing them about 2 inches apart. Lightly press the tops and sprinkle each with a pinch of flaky sea salt.
- Bake for 10 to 12 minutes until the edges are set and just beginning to brown but the centers still look soft. Remove from the oven and allow the cookies to cool on the baking sheet for 5 minutes before transferring to a wire rack to cool completely.
8. Soft Lemon Sugar Cookies
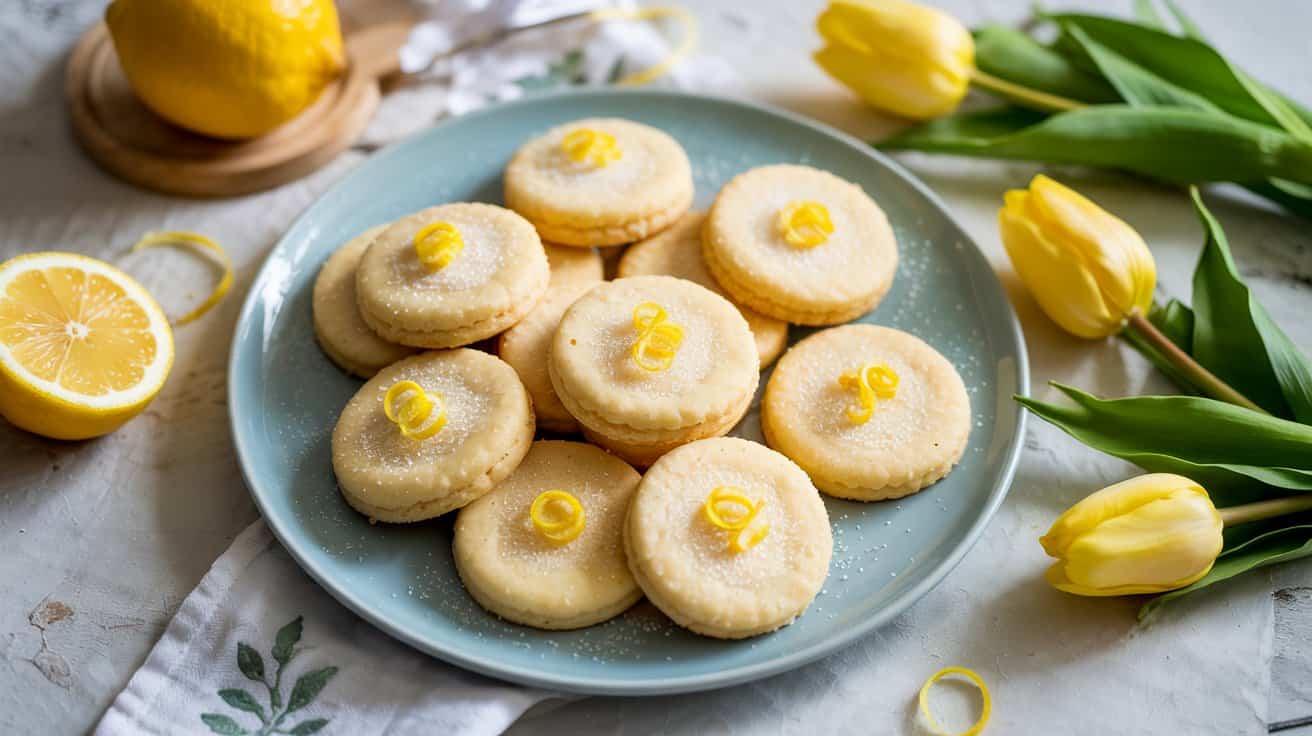
These soft lemon sugar cookies offer a bright, citrusy flavor that feels refreshing without being overpowering. The texture is tender and melt-in-your-mouth, making them a lovely alternative to traditional sugar cookies.
They're simple to prepare, perfect for busy days when you want something pleasant but don't want to spend hours baking.
Because they hold their shape well and maintain softness, these cookies work nicely for sharing with family or friends. The subtle lemon tang adds a light twist that feels seasonal yet approachable any time of year.
Why This Recipe Works
This recipe balances ease and flavor beautifully, making it an accessible treat with a fresh taste. It's a great way to enjoy classic sugar cookies with a citrus upgrade.
- Convenience - The dough comes together quickly with common pantry ingredients.
- Flavor balance - The lemon adds a bright, tangy note without overpowering sweetness.
- Texture - Soft and tender with a slightly crisp edge for contrast.
- Appeal - Family-friendly and suitable for casual gatherings or everyday treats.
- Serving ease - These cookies keep well and are easy to portion for sharing.
Ingredient Swap Ideas
Swapping a few ingredients can help adapt these lemon sugar cookies for different preferences or dietary needs without losing their signature qualities. Here are a few practical options to consider.
- Butter - Use a plant-based margarine or coconut oil to make these dairy-free.
- All-purpose flour - Substitute with a gluten-free flour blend for gluten sensitivity.
- Granulated sugar - Try coconut sugar or a natural sweetener for a lower glycemic index.
- Lemon juice - Use fresh lime juice for a slightly different citrus twist.
- Egg - Replace with a flax egg (1 tablespoon flaxseed meal + 3 tablespoons water) for a vegan version.
Ingredients
- 2 ½ cups all-purpose flour - For the cookie base and structure.
- 1 teaspoon baking powder - Helps cookies rise slightly and stay tender.
- ½ teaspoon salt - Balances the sweetness and enhances flavor.
- ¾ cup unsalted butter, softened - Provides richness and softness.
- 1 ¼ cups granulated sugar - Sweetens and helps create a slightly crisp exterior.
- 2 large eggs - Bind the dough and add moisture.
- 2 tablespoons fresh lemon juice - Adds bright, natural citrus flavor.
- 1 tablespoon lemon zest - Intensifies the lemon aroma and taste.
- 1 teaspoon vanilla extract - Adds warmth and depth to the flavor.
- Additional granulated sugar - For rolling the dough balls before baking.
Instructions
- Preheat your oven to 350°F (175°C). Line two baking sheets with parchment paper or silicone mats for easy cleanup.
- In a medium bowl, whisk together the flour, baking powder, and salt. Set aside.
- In a large bowl, beat the softened butter and granulated sugar together until the mixture is fluffy and light in color.
- Add the eggs one at a time, mixing well after each addition. Stir in the lemon juice, lemon zest, and vanilla extract until evenly combined.
- Gradually add the dry ingredients to the wet mixture, stirring just until the dough comes together without overmixing.
- Scoop tablespoon-sized portions of dough and roll each into a ball. Roll the balls in granulated sugar to coat lightly, then place them about 2 inches apart on the prepared baking sheets.
- Bake for 9 to 11 minutes, or until the edges are set but the centers still look soft. Avoid overbaking to keep the cookies tender.
- Let the cookies cool on the baking sheets for 5 minutes before transferring them to a wire rack to cool completely. Store in an airtight container to maintain softness.
9. White Chocolate Macadamia Nut Cookies
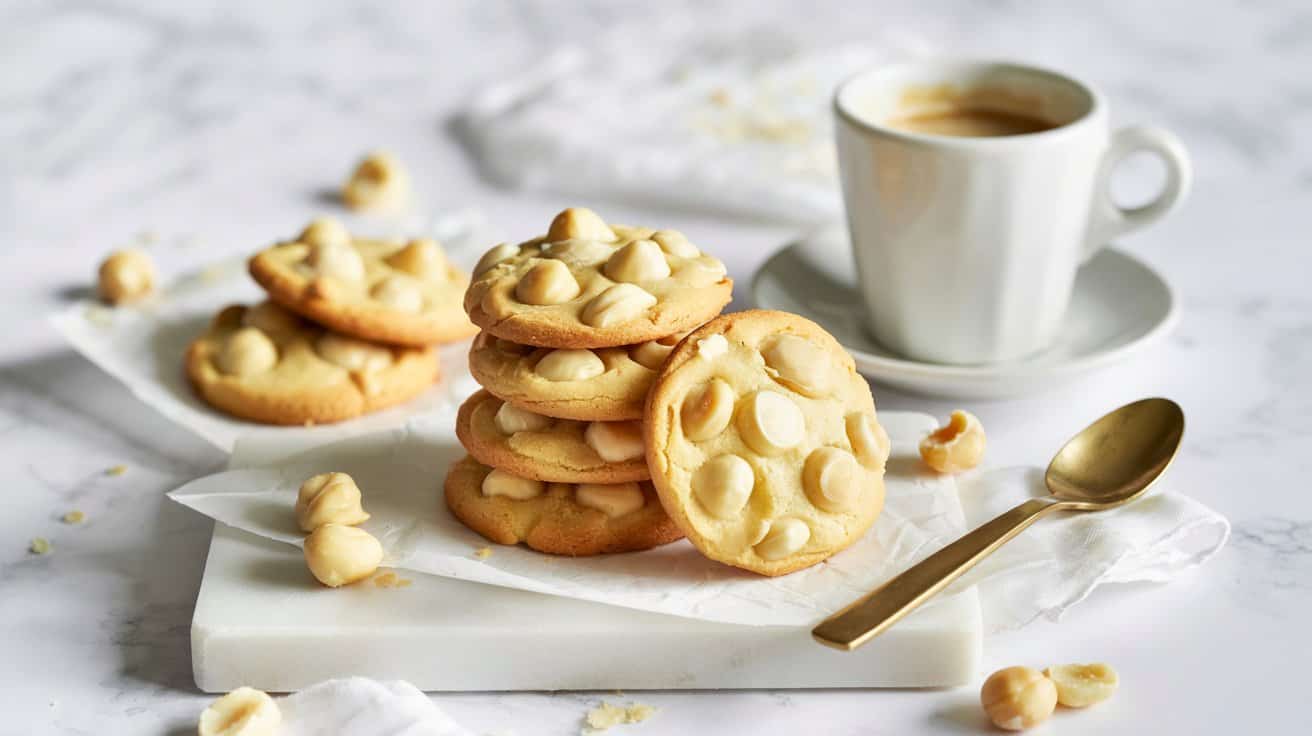
White chocolate macadamia nut cookies offer a lovely, buttery texture combined with the rich, smooth sweetness of white chocolate and the satisfying crunch of macadamia nuts. These cookies have a tender interior and a slightly crisp edge, making them a favorite treat for any time of day.
They are straightforward to prepare, needing just a handful of everyday ingredients and minimal mixing. Whether for a snack, dessert, or to share at gatherings, these cookies deliver a pleasant balance of flavors and texture that feels special without requiring extra time in the kitchen.
Why This Recipe Works
This recipe stands out for its simple preparation and delicious contrast between creamy white chocolate and crunchy nuts. It's a reliable choice for anyone wanting a sweet, textured cookie that feels a little luxurious without being complicated.
- Convenience - Uses common pantry ingredients with quick assembly and short baking time.
- Flavor balance - Combines smooth, sweet white chocolate with buttery, slightly salty macadamia nuts.
- Texture - Crispy edges with a soft, chewy center create a pleasing mouthfeel.
- Appeal - A crowd-pleasing cookie that suits both casual snacking and special occasions.
- Storage - Holds well in an airtight container for several days, making advance preparation easy.
Ingredient Swap Ideas
You can adjust this recipe easily to suit your dietary preferences or what you have on hand, keeping the core flavor and texture intact.
- White chocolate - Substitute with milk or dark chocolate chips for a different chocolate flavor.
- Macadamia nuts - Use pecans, walnuts, or almonds instead to change the nutty character.
- Butter - Swap with coconut oil for a dairy-free option, noting the slight coconut flavor.
- Flour - Replace all-purpose flour with a gluten-free blend to make these cookies gluten-free.
- Sugar - Try brown sugar only or coconut sugar for a deeper, caramel-like sweetness.
Ingredients
- 1 cup unsalted butter - softened to room temperature.
- ¾ cup granulated sugar - for sweetness and crispness.
- ¾ cup packed light brown sugar - adds moisture and depth.
- 2 large eggs - help bind the dough.
- 1 teaspoon vanilla extract - for flavor enhancement.
- 2 ½ cups all-purpose flour - provides structure.
- 1 teaspoon baking soda - helps cookies rise.
- ½ teaspoon salt - balances sweetness.
- 1 ½ cups white chocolate chips - adds sweet, creamy bites.
- 1 cup macadamia nuts - roughly chopped, provides crunch.
Instructions
- Preheat your oven to 350°F (175°C). Line two baking sheets with parchment paper to prevent sticking.
- In a large bowl, cream together the softened butter, granulated sugar, and brown sugar until the mixture is light and fluffy. Beat in the eggs one at a time, followed by the vanilla extract.
- In a separate bowl, whisk together the flour, baking soda, and salt. Gradually add the dry ingredients to the wet ingredients, mixing until just combined.
- Fold in the white chocolate chips and chopped macadamia nuts evenly through the dough.
- Drop rounded tablespoons of dough onto the prepared baking sheets, spacing them about 2 inches apart to allow for spreading.
- Bake for 10 to 12 minutes or until the edges turn a light golden brown but the centers remain soft. Remove from oven and let the cookies cool on the baking sheets for 5 minutes before transferring to a wire rack to cool completely.
10. Soft Pumpkin Spice Cookies

These soft pumpkin spice cookies bring all the cozy flavors of fall into a simple, tender treat. With pumpkin puree and warming spices like cinnamon, nutmeg, and cloves, they offer moist, chewy bites that feel like a hug in cookie form.
They are straightforward to make, requiring just a few pantry staples alongside the pumpkin. Once baked, the cookies stay soft for days, making them a great option for enjoying throughout the week or sharing with friends and family.
This recipe strikes a nice balance between sweetness and spice without being overly rich, so it's easy to enjoy with a cup of tea or coffee. The texture is pleasantly tender, thanks to the pumpkin puree, and the spiced aroma fills your kitchen as they bake.
Why This Recipe Works
This recipe is a reliable pick for the fall season, combining comfort and ease with balanced flavor and texture. Soft Pumpkin Spice Cookies stand out for their moist chew and approachable spice blend.
- Convenience - Uses common ingredients and comes together quickly with simple mixing steps.
- Flavor balance - Warm spices go with the natural pumpkin sweetness without overpowering.
- Texture - Moist and tender throughout, avoiding dryness common in pumpkin treats.
- Appeal - Family-friendly and suitable for holiday gatherings or everyday snacking.
- Make-ahead - Keeps softness for multiple days, making advance prep easy for busy schedules.
Ingredient Swap Ideas
Swapping a few ingredients here and there can help suit dietary preferences or ingredient availability without altering the cookie's essence.
- Pumpkin puree - Use canned sweet potato puree for a slightly different flavor and similar texture.
- All-purpose flour - Substitute with a gluten-free flour blend for a gluten-free version.
- Butter - Replace with coconut oil or a dairy-free margarine to make these vegan-friendly.
- Spices - Adjust the spices based on your preference; ginger or allspice can add a new twist.
- Sweetener - Use maple syrup or honey instead of granulated sugar for natural sweetness and moisture.
Ingredients
- 1 cup pumpkin puree - Use canned or homemade pumpkin puree, well stirred.
- ½ cup unsalted butter - Softened to room temperature for easy mixing.
- 1 cup granulated sugar - Provides sweetness and helps with texture.
- 1 large egg - Binds the ingredients together and adds richness.
- 1 ½ cups all-purpose flour - The base of the cookie, providing structure.
- 1 teaspoon baking soda - Helps the cookies rise and stay tender.
- ½ teaspoon salt - Balances sweetness and enhances flavor.
- 1 teaspoon ground cinnamon - Offers classic warm pumpkin spice flavor.
- ½ teaspoon ground nutmeg - Adds subtle depth and warmth.
- ¼ teaspoon ground cloves - Gives a hint of spicy aromatic character.
- ½ teaspoon vanilla extract - Rounds out the flavor with sweet floral notes.
Instructions
- Preheat your oven to 350°F (175°C) and line a baking sheet with parchment paper.
- In a large mixing bowl, beat the softened butter and sugar together until creamy and smooth.
- Add the egg, pumpkin puree, and vanilla extract to the butter mixture, stirring well to combine.
- In a separate bowl, whisk together the flour, baking soda, salt, and spices. Gradually add the dry ingredients to the wet ingredients, mixing until just combined.
- Scoop tablespoons of dough onto the prepared baking sheet, spacing them about 2 inches apart. Flatten each cookie slightly with your fingers or a spoon.
- Bake for 12 to 15 minutes, or until the edges are set but the centers still look soft. Let the cookies cool on the baking sheet for a few minutes before transferring to a wire rack to cool completely.
11. Chewy Mint Chocolate Chip Cookies

Chewy mint chocolate chip cookies offer a refreshing twist on the classic chocolate chip cookie we all enjoy. These cookies combine the familiar soft texture and sweet chocolate chips with a cool, minty flavor that brightens each bite.
This recipe is straightforward and comforting, making it a great choice for a homemade treat. The mint essence blends beautifully with the richness of the chocolate, while the chewy texture keeps the cookies pleasant and satisfying.
You'll find these cookies easy to bake and even easier to enjoy with family or friends.
Why This Recipe Works
This recipe balances sweet chocolate and fresh mint in a chewy, soft cookie that feels both classic and a little unexpected. It delivers reliable results with simple ingredients.
- Convenience - Uses standard baking ingredients and a straightforward mixing method.
- Flavor balance - Combines sweet chocolate with a subtle, cooling mint note for a refreshing taste.
- Texture - Soft and chewy, providing a pleasant bite without being too cakey or crisp.
- Appeal - Attracts both mint lovers and chocolate chip cookie fans, making it a versatile treat.
- Serving ease - Holds shape well, making it easy to portion and share.
Ingredient Swap Ideas
Swapping ingredients can help adapt this recipe if you have dietary restrictions or want to try new variations while keeping the core flavor intact.
- Butter - Replace with coconut oil for a dairy-free option with a mild coconut flavor.
- All-purpose flour - Use a gluten-free flour blend to make the cookies gluten-free.
- Mint extract - Substitute with peppermint extract for a stronger mint flavor, or omit for classic chocolate chip cookies.
- Chocolate chips - Swap semi-sweet chips for dark or white chocolate, depending on your preference.
- Brown sugar - Use coconut sugar for a more natural, less processed option with a rich taste.
Ingredients
- 1 cup unsalted butter - softened to room temperature for easy mixing.
- ¾ cup brown sugar - packed, adds moisture and chewiness.
- ¼ cup granulated sugar - balances sweetness and helps create a crisp edge.
- 1 large egg - binds ingredients and adds moisture.
- 1 teaspoon pure vanilla extract - enhances flavor depth.
- ½ teaspoon peppermint extract - provides the minty cooling note.
- 2 ¼ cups all-purpose flour - forms the cookie structure.
- 1 teaspoon baking soda - helps cookies rise and spread properly.
- ½ teaspoon salt - balances sweetness and enhances flavor.
- 1 ½ cups semi-sweet chocolate chips - melt in pockets of sweetness throughout.
Instructions
- Preheat your oven to 350°F (175°C) and line two baking sheets with parchment paper.
- In a large mixing bowl, cream the softened butter with brown sugar and granulated sugar until smooth and fluffy.
- Beat in the egg, vanilla extract, and peppermint extract until everything is fully combined.
- In a separate bowl, whisk together the all-purpose flour, baking soda, and salt. Gradually add the dry ingredients to the wet mixture, stirring until just mixed.
- Fold in the chocolate chips evenly throughout the dough.
- Scoop heaping tablespoons of dough onto the prepared baking sheets, spacing them 2 inches apart. Bake for 9 to 11 minutes, or until the edges are set but the centers remain soft.
- Remove cookies from the oven and allow them to cool on the baking sheet for 5 minutes before transferring to a wire rack to cool completely.
These cookies will have a soft, chewy texture with a refreshing hint of mint in every bite. Store them in an airtight container at room temperature for up to a week or freeze to keep them fresh longer.
12. Soft Coconut Macaroons
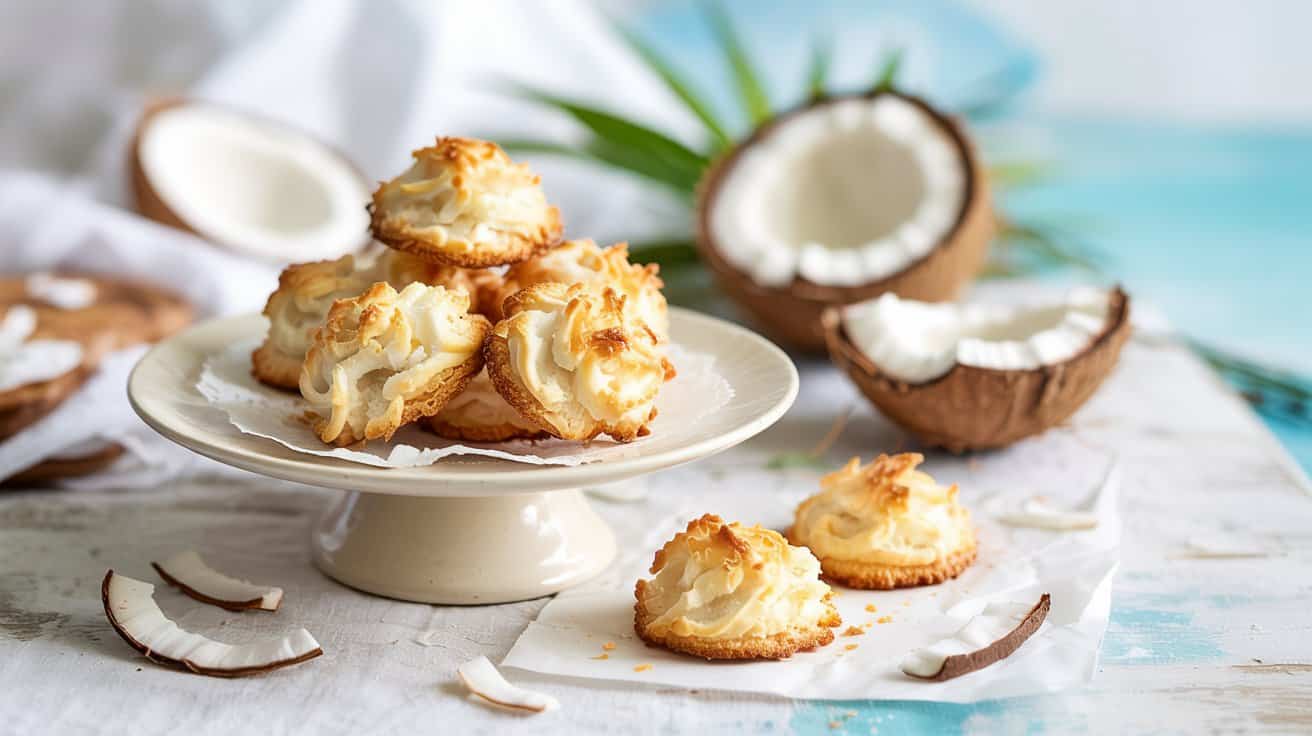
Soft coconut macaroons bring together the rich sweetness of shredded coconut with a tender, chewy center. These cookies develop a lightly crisp exterior while remaining moist inside, making each bite satisfying without being overly dense.
They are straightforward to prepare, requiring just a handful of ingredients and minimal hands-on time. Whether you're looking for a simple treat to enjoy with tea or a homemade gift to share at gatherings, these macaroons fit the bill perfectly.
The natural coconut flavor shines through without being overwhelming, and they don't need any fancy decorations or complicated techniques to taste great. Each cookie holds together well, making them easy to handle and enjoy anytime you want a sweet snack.
Why This Recipe Works
This recipe balances simplicity with delicious texture and flavor to give you a reliable cookie that almost anyone can make and enjoy.
- Convenience - Requires just a few common ingredients and minimal preparation time.
- Texture - Crisp on the outside with a tender, chewy middle that coconut lovers appreciate.
- Flavor balance - Sweetness is moderate, letting the natural coconut shine without overpowering.
- Family-friendly - Mildly sweet and naturally gluten-free, appealing to a broad audience.
- Easy serving - Bite-sized cookies that store well and travel nicely for sharing.
Ingredient Swap Ideas
Adjusting a few ingredients can help meet dietary needs or offer flavor variations while still keeping the essence of these soft coconut treats.
- Sweetened shredded coconut - Use unsweetened if you prefer less sugar or want to add your own sweetener.
- Egg whites - Replace with aquafaba to make the recipe vegan-friendly without sacrificing texture.
- Sweetener - Swap granulated sugar for coconut sugar or maple syrup for a different sweetness profile.
- Vanilla extract - Use almond extract for a subtle nutty twist instead of classic vanilla.
- Add-ins - Fold in mini chocolate chips or chopped nuts for extra flavor and crunch.
Ingredients
- 14 ounces sweetened shredded coconut - Provides the characteristic coconut flavor and chewy texture.
- ¾ cup granulated sugar - Adds sweetness and helps form the cookie exterior.
- ¼ teaspoon salt - Balances sweetness and enhances flavor depth.
- 3 large egg whites - Bind the ingredients to create a tender but stable cookie.
- 1 teaspoon vanilla extract - Adds mild aromatic warmth to go with the coconut.
Instructions
- Preheat the oven to 325°F (165°C) and line a baking sheet with parchment paper for easy cleanup.
- In a large bowl, combine the shredded coconut, granulated sugar, and salt. Stir until the dry ingredients are evenly mixed.
- In a separate bowl, whisk the egg whites until just frothy, then add the vanilla extract. Pour the egg mixture over the coconut mixture.
- Mix thoroughly until everything is well combined and the coconut is evenly coated. The mixture will be sticky but should hold together when pressed.
- Using a tablespoon or small cookie scoop, drop rounded mounds onto the prepared baking sheet, spacing them about 1 inch apart.
- Bake for 18 to 20 minutes, or until the edges and tops turn lightly golden brown but the centers remain soft. Let cool completely on the baking sheet before serving or storing.
For chocolate lovers who want even more indulgence, try our collection of decadent triple chocolate cookie ideas. If you prefer oat-forward treats, browse versatile oatmeal cookie recipes for any taste.

Andrew Gray is a seasoned food writer and blogger with a wealth of experience in the restaurant and catering industries. With a passion for all things delicious, Andrew has honed his culinary expertise through his work as a personal chef and caterer.
His love for food led him to venture into food writing, where he has contributed to various online publications, sharing his knowledge and insights on the culinary world. As the proud owner of CooksCrafter.com, Andrew covers a wide range of topics, including recipes, restaurant reviews, product recommendations, and culinary tips.
Through his website, he aims to inspire and educate fellow food enthusiasts, offering a comprehensive resource for all things food-related.