Crisp coleslaw, garlic parmesan fries, and tangy pickle salads are the fastest way to upgrade a burger plate, classic American burger accompaniments. This collection of 20 sides balances juicy patties (grilled beef or plant-based patties served on buns) with fresh crunch, charred vegetables, creamy potatoes, and bright, acidic flavors.

These dishes are straightforward, requiring minimal ingredients and simple techniques, making them ideal for busy weeknights or relaxed cookouts. They complement burgers by adding texture and brightness without creating extra mess or fuss.
1. Grilled Corn on the Cob with Chili Lime Butter
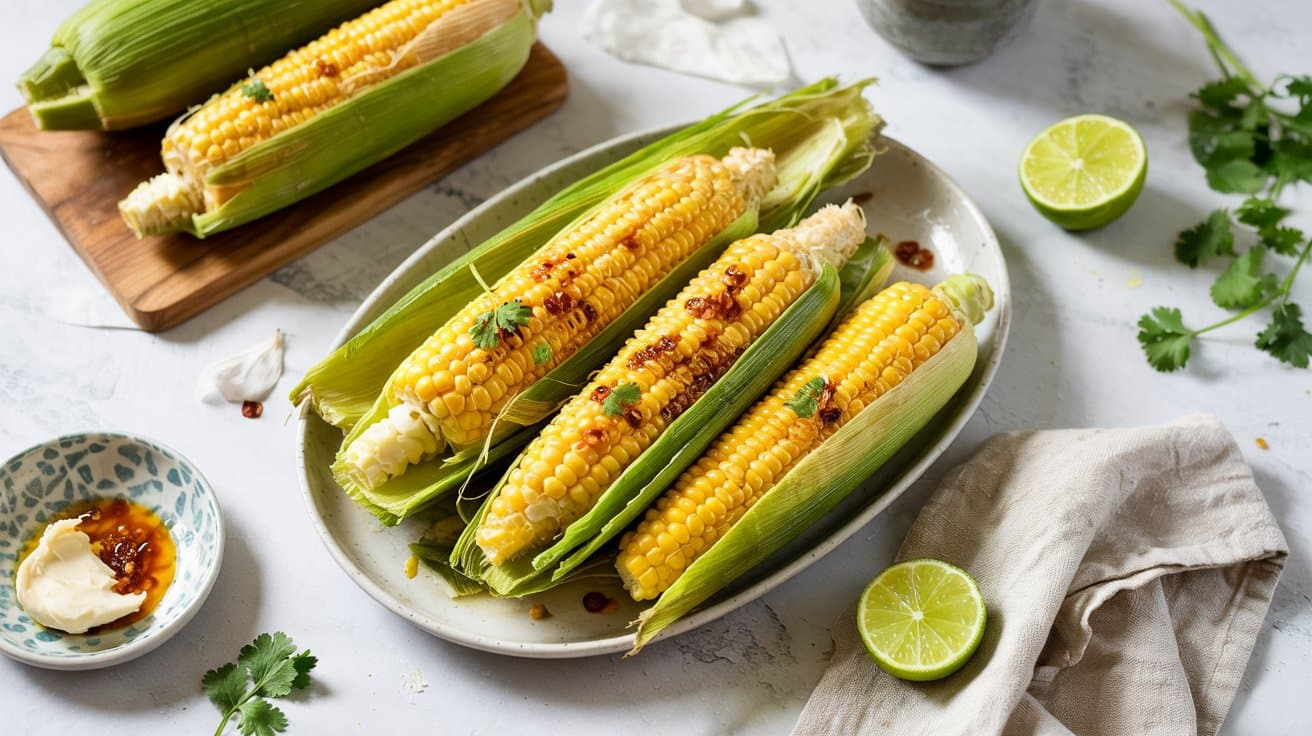
Grilled corn on the cob is a classic summer side that brings out the natural sweetness of fresh corn (best cooked over direct medium-high heat, about 400-450°F). Adding a chili lime butter gives it a lively twist with a balance of smoky, tangy, and spicy notes that brighten up any meal.
It goes well with grilled meats, especially with grilled burgers and chicken, or stands alone as a satisfying snack, and also complements sides that pair with grilled salmon.
Why This Recipe Works
This grilled corn recipe is a go-to for adding bold flavor and easy preparation to your meals. The chili lime butter goes with the natural sweetness of the corn while adding a fresh zing that makes every bite interesting.
- Convenience - Quick grilling and simple butter preparation keep this recipe manageable even on busy days.
- Flavor balance - The spicy chili flakes and bright lime juice improve the sweet, smoky corn perfectly.
- Texture - Charred kernels provide a slightly crisp bite alongside tender corn.
- Appeal - A bright and colorful side that works well for family meals or casual gatherings.
Ingredient Swap Ideas
Adjusting the ingredients can make this recipe fit different preferences or dietary needs, while keeping its signature taste and character.
- Butter substitute - Use dairy-free or vegan butter to make this dish suitable for those avoiding dairy.
- Spice level - Swap chili flakes for smoked paprika for a milder smoky flavor without heat.
- Citrus variation - Replace lime juice with lemon juice to introduce a different zesty brightness.
- Herb addition - Add chopped fresh cilantro or parsley for an extra layer of fresh herb flavor.
Ingredients
- 4 ears fresh corn on the cob - husked and cleaned.
- ½ cup unsalted butter - softened to room temperature for easy spreading.
- 1 tablespoon chili powder - adds smoky heat to the butter.
- 1 teaspoon lime zest - provides bright citrus aroma and flavor.
- 1 tablespoon fresh lime juice - gives a tangy and fresh note.
- ½ teaspoon salt - enhances flavor throughout.
- ¼ teaspoon black pepper - adds mild seasoning and depth.
Instructions
- Preheat your grill to medium-high heat. Place the husked corn directly on the grill grates and cook for about 10-12 minutes, turning every 2-3 minutes until the kernels are lightly charred and tender.
- While the corn grills, combine softened butter, chili powder, lime zest, lime juice, salt, and pepper in a bowl. Mix well until everything is evenly incorporated.
- Remove the corn from the grill and spread the chili lime butter generously over each ear while the corn is still hot. The butter will melt, soaking into the kernels.
- Serve the grilled corn immediately, garnished with an extra sprinkle of chili powder or lime zest if desired. This can be enjoyed as a flavorful side or a snack.
2. Classic Coleslaw with Creamy Dressing
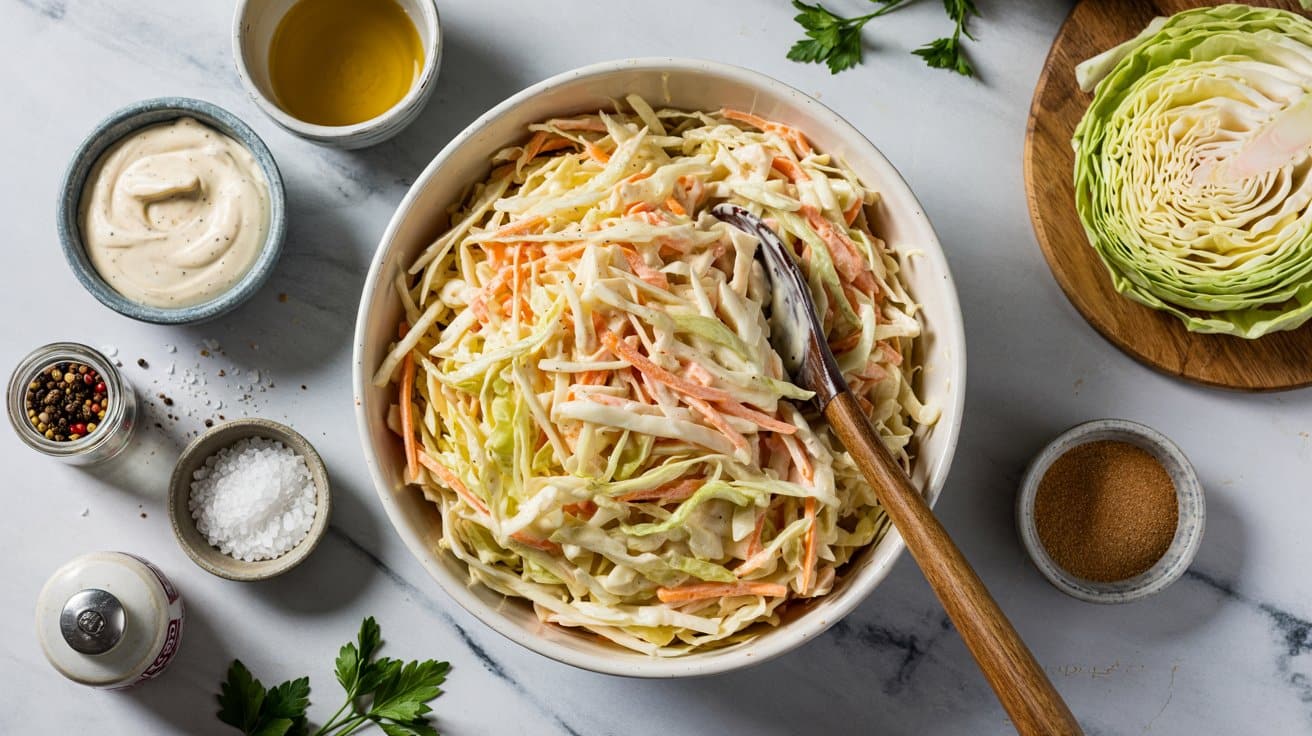
Classic coleslaw offers a refreshing crunch that balances richer dishes like burgers and fried chicken beautifully, a staple at American barbecues, and it also pairs well with side dishes for creamy mushroom chicken.
This salad comes together quickly, making it a reliable side dish option for busy weeknights or gatherings. Its simple ingredients keep it approachable, while the flavors stay bright and inviting.
Why This Recipe Works
This coleslaw recipe combines simplicity with a tasty balance of textures and flavors, making it a versatile addition to many meals. It delivers a creamy yet crisp side that complements a wide variety of main dishes.
- Convenience - Quick to prepare with straightforward chopping and mixing.
- Flavor balance - Tangy dressing cuts through the natural sweetness of cabbage and carrots.
- Texture - Crisp vegetables provide a refreshing contrast to creamy dressing.
- Appeal - Classic and familiar, appealing to all ages and easy to pair with diverse menus.
Ingredient Swap Ideas
Swapping certain ingredients keeps this recipe flexible for different diets and taste preferences without losing its signature crunch and creaminess.
- Mayonnaise - Substitute with Greek yogurt to reduce fat and add protein.
- Cabbage - Use finely chopped kale or Brussels sprouts for a green twist.
- Vinegar - Swap apple cider vinegar with white wine vinegar or lemon juice for varied acidity.
- Sugar - Replace with honey or maple syrup for a natural sweetener alternative.
Ingredients
- 4 cups shredded green cabbage - Freshly shredded for best crispness.
- 1 cup shredded carrots - Adds color and natural sweetness.
- ½ cup mayonnaise - Forms the creamy base for the dressing.
- 2 tablespoons apple cider vinegar - Provides tang and brightness.
- 1 tablespoon sugar - Balances acidity with subtle sweetness.
- ½ teaspoon salt - Enhances overall flavor.
- ¼ teaspoon black pepper - Adds mild spice and depth.
Instructions
- In a large mixing bowl, combine the shredded cabbage and carrots evenly.
- In a smaller bowl, whisk together mayonnaise, apple cider vinegar, sugar, salt, and black pepper until smooth and well blended.
- Pour the dressing over the cabbage mixture and toss thoroughly to coat all the vegetables.
- Cover the bowl with plastic wrap and refrigerate for at least 30 minutes to allow flavors to meld.
- Give the coleslaw a final toss before serving and adjust seasoning if needed. Serve chilled or at room temperature.
3. Balsamic Roasted Brussels Sprouts
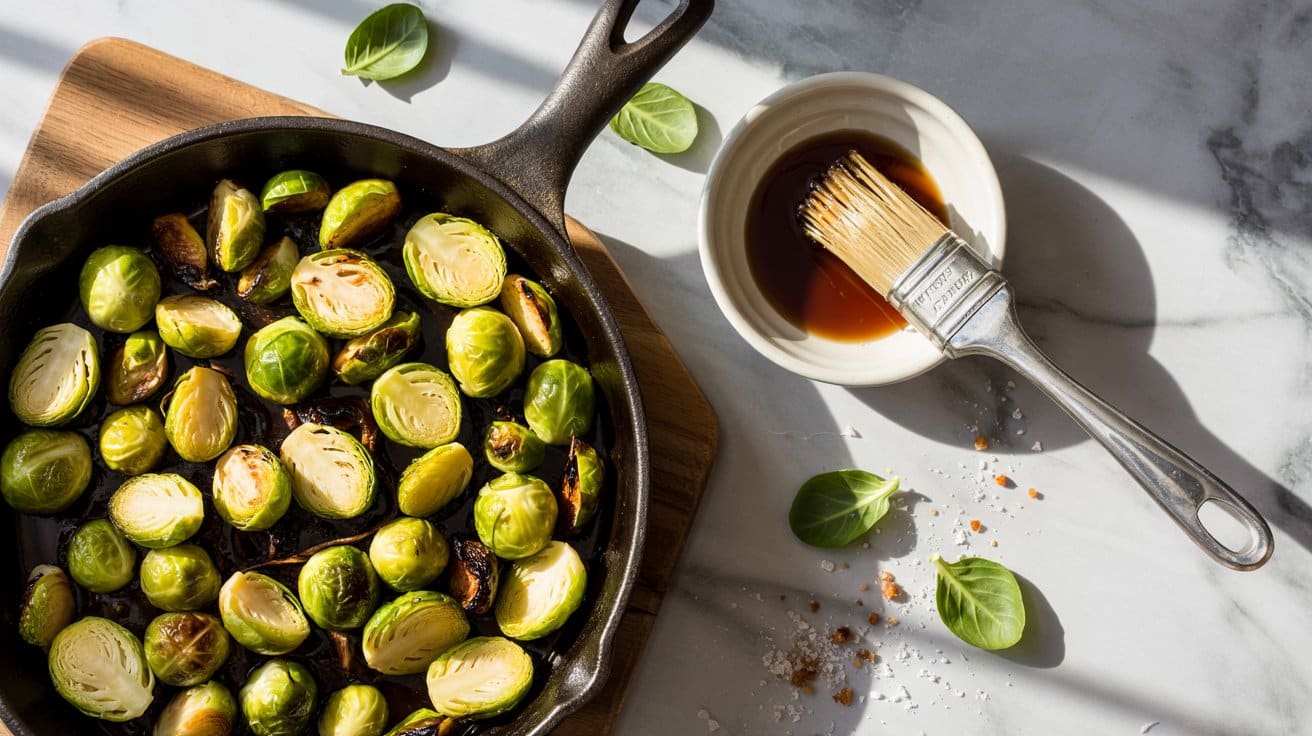
Brussels sprouts can sometimes get a bad rap, but roasting them with balsamic vinegar brings out a rich, caramelized sweetness that changes everything, especially when roasted at 400°F for 20-25 minutes. This simple side dish offers a great mix of tender interiors and crispy edges, with a touch of tang from the balsamic that enhances their natural flavor.
It's a way to enjoy Brussels sprouts that balances savory and sweet notes, creating a cozy complement to many main dishes; try a maple bacon Brussels sprouts flavor twist for a sweet‑savory variation.
Why This Recipe Works
This balsamic roasted Brussels sprouts recipe delivers a satisfying combination of texture and flavor with very little fuss.
- Convenience - Requires just a handful of ingredients and about 25 minutes to roast in the oven.
- Flavor balance - The balsamic vinegar adds a subtle tang and sweetness that contrasts well with the earthy sprouts.
- Texture - Roasting creates crispy outer leaves while keeping the insides tender and pleasant.
- Appeal - Suitable for most meals and adds a gourmet touch to everyday dishes or special occasions.
Ingredient Swap Ideas
Adapting this recipe to your preferences or dietary needs is easy with a few simple substitutions.
- Balsamic vinegar - Use apple cider vinegar or red wine vinegar if you prefer a lighter acidity.
- Olive oil - Substitute with avocado oil or another neutral oil to vary flavor or suit dietary restrictions.
- Brussels sprouts - Try using broccolini or green beans for a different vegetable with a similar roasting method.
- Sweetener - Add a drizzle of maple syrup or honey beforehand if you want a deeper caramelization and sweetness boost.
Ingredients
- 1 pound Brussels sprouts - trimmed and halved to ensure even roasting.
- 2 tablespoons balsamic vinegar - for that signature sweet and tangy finish.
- 2 tablespoons extra-virgin olive oil - to coat the sprouts and help with roasting.
- ½ teaspoon salt - enhances the natural flavors.
- ¼ teaspoon black pepper - for a mild hint of spice.
Instructions
- Preheat your oven to 400°F (200°C). Line a baking sheet with parchment paper or a silicone mat for easy cleanup.
- In a large bowl, toss the halved Brussels sprouts with olive oil, balsamic vinegar, salt, and black pepper until they are evenly coated.
- Spread the sprouts out in a single layer on the prepared baking sheet, making sure they have some space to roast rather than steam.
- Roast for 20 to 25 minutes, stirring halfway through, until the sprouts are caramelized and crispy on the edges but tender inside.
- Remove from the oven, transfer to a serving dish, and enjoy warm as a flavorful, wholesome side.
4. Cucumber and Tomato Salad with Dill Vinaigrette
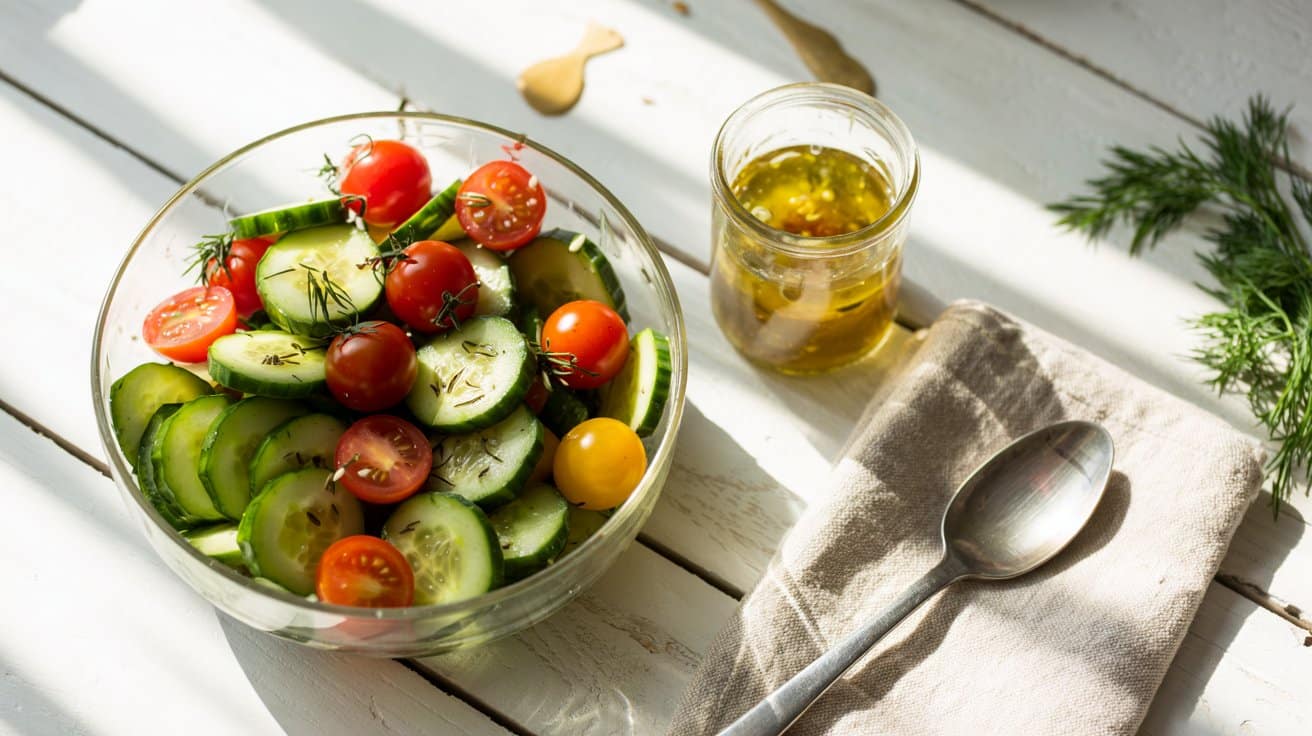
This cucumber and tomato salad offers a fresh, crisp contrast to heavier meals like burgers or grilled dishes. The juicy tomatoes and cool cucumbers bring natural brightness, while the dill vinaigrette adds a subtle herbal note that pulls everything together.
It's a light and straightforward salad that comes together quickly, making it a great choice for quick lunches, side dishes, or potluck contributions without any fuss.
Why This Recipe Works
This salad combines simple ingredients to create a fresh, bright side that balances rich mains. It's easy to make and flexible enough to suit busy schedules or last-minute meal plans.
- Convenience - Requires minimal prep time and can be assembled in minutes.
- Flavor balance - Tangy vinaigrette goes with the natural sweetness of tomatoes and crispness of cucumbers.
- Texture - Combines crunchy veggies and a smooth, herbaceous dressing for a pleasing mouthfeel.
- Appeal - A colorful, light option that appeals to a wide range of tastes and dietary preferences.
Ingredient Swap Ideas
Swapping ingredients can tailor this salad to fit different diets or flavor preferences without losing its fresh character.
- Cucumber swap - Use English cucumbers for a milder taste and fewer seeds.
- Herb variations - Replace dill with fresh basil or parsley for a different herbal accent.
- Tomato options - Cherry or grape tomatoes work well if larger slicing tomatoes aren't available.
- Vinaigrette adjustment - Use lemon juice instead of vinegar for a brighter, citrusy touch.
Ingredients
- 2 medium cucumbers - peeled and sliced into thin rounds.
- 2 cups cherry tomatoes - halved for bite-sized pieces.
- ¼ cup red onion - thinly sliced for a subtle sharpness.
- 3 tablespoons fresh dill - chopped finely for a fresh herbal flavor.
- 3 tablespoons extra-virgin olive oil - for a smooth, fruity base.
- 2 tablespoons white wine vinegar - adds mild acidity and brightness.
- 1 teaspoon honey - balances vinegar with gentle sweetness.
- ½ teaspoon salt - enhances all flavors naturally.
- ¼ teaspoon black pepper - for a touch of mild heat.
Instructions
- Combine the sliced cucumbers, halved cherry tomatoes, and thinly sliced red onion in a large bowl. Toss gently to mix.
- In a small bowl, whisk together the olive oil, white wine vinegar, honey, salt, and black pepper until the dressing is fully blended.
- Pour the dressing over the vegetables and toss to coat evenly. Sprinkle the chopped fresh dill on top and give the salad one more gentle toss.
- Let the salad sit for 10 to 15 minutes at room temperature to allow the flavors to marry before serving.
- Serve chilled or at room temperature as a crisp, refreshing side dish alongside grilled meats or sandwiches.
5. Sweet Potato Wedges with Smoked Paprika
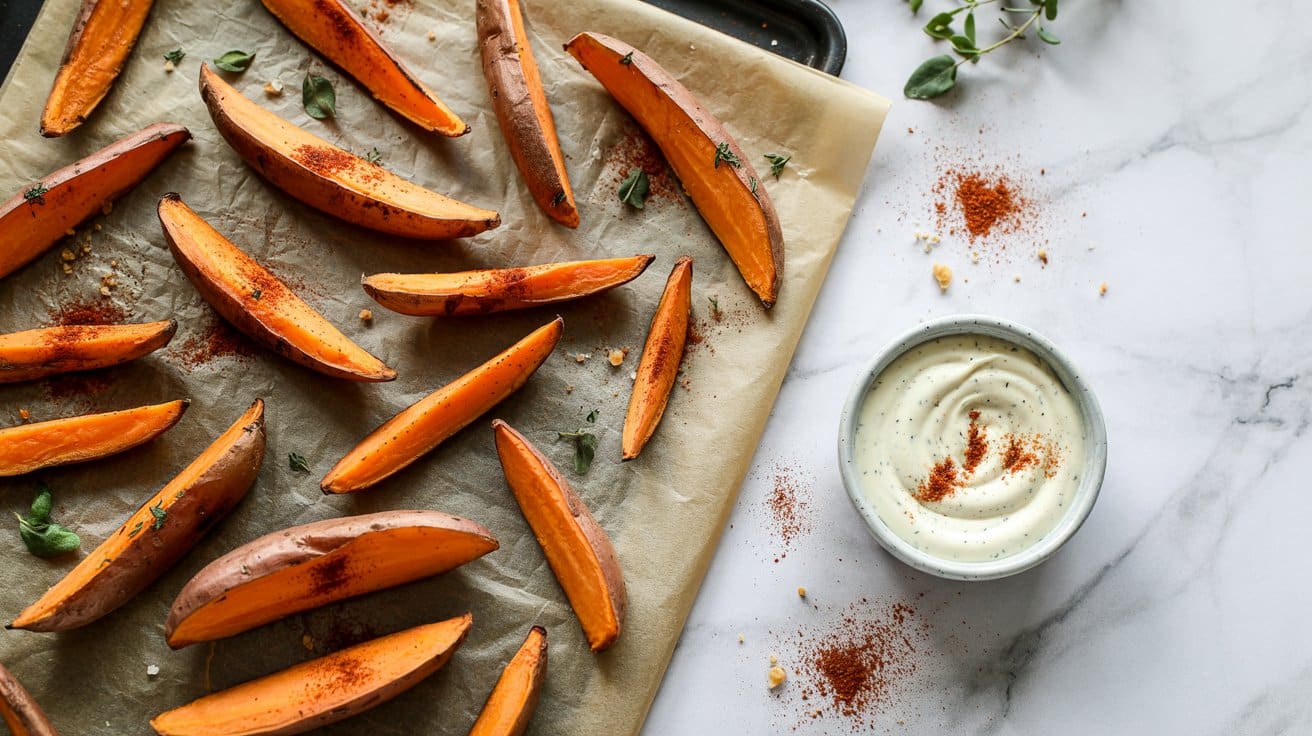
Sweet potato wedges seasoned with smoky paprika offer a bright and tasty alternative to traditional fries. These wedges come out crispy on the outside while staying tender inside, making them a delicious side dish or snack that's both colorful and nutritious.
You can easily customize the seasoning to suit your mood, and the simple preparation means you can have them ready in under 40 minutes. They pair well with a wide range of main dishes or stand alone with a dipping sauce.
Why This Recipe Works
This recipe combines convenience and rich flavor with healthful ingredients for a crowd-pleasing side. Sweet potato wedges with smoked paprika bring a smoky depth that's balanced by the natural sweetness of the potatoes, resulting in a satisfying and wholesome dish.
- Convenience - Simple prep with basic ingredients and a straightforward oven bake method.
- Flavor balance - The smoky paprika adds warmth while the natural sweetness of sweet potatoes shines through.
- Texture - Wedges crisp on the outside while remaining soft and creamy inside.
- Family-friendly appeal - A versatile side that kids and adults alike will enjoy alongside many meals.
Ingredient Swap Ideas
Swapping a few ingredients can adapt this recipe for dietary needs or different flavors without losing the core qualities of the wedges. Here are some swaps to consider:
- Potato variety swap - Use regular orange-fleshed sweet potatoes or try purple sweet potatoes for a different color and slightly earthier flavor.
- Oil substitute - Swap olive oil with avocado oil or sunflower oil for a neutral flavor and high smoke point.
- Seasoning adjustment - Replace smoked paprika with chili powder or cayenne pepper for a spicier kick.
- Herb additions - Toss in dried rosemary or thyme alongside the paprika for an herby note.
Ingredients
- 2 large sweet potatoes - peeled and cut into evenly sized wedges for uniform cooking.
- 2 tablespoons olive oil - to coat the wedges and help crisp the exterior.
- 1 teaspoon smoked paprika - adds a warm smoky flavor.
- ½ teaspoon garlic powder - for subtle savory depth.
- ½ teaspoon salt - enhances all the flavors.
- ¼ teaspoon black pepper - adds mild heat and balance.
- Optional garnish: fresh parsley - chopped for a fresh, bright finish.
Instructions
- Preheat your oven to 425°F (220°C). Line a baking sheet with parchment paper for easy cleanup.
- In a large bowl, toss the sweet potato wedges with olive oil, smoked paprika, garlic powder, salt, and pepper until they are evenly coated.
- Arrange the wedges in a single layer on the prepared baking sheet, making sure they are not touching to allow maximum crisping.
- Bake for 25 to 30 minutes, flipping halfway through, until the wedges are golden brown and crisp on the edges but tender inside.
- Remove from the oven, sprinkle with fresh parsley if using, and serve warm as a flavorful side or snack.
6. Mediterranean Chickpea Salad
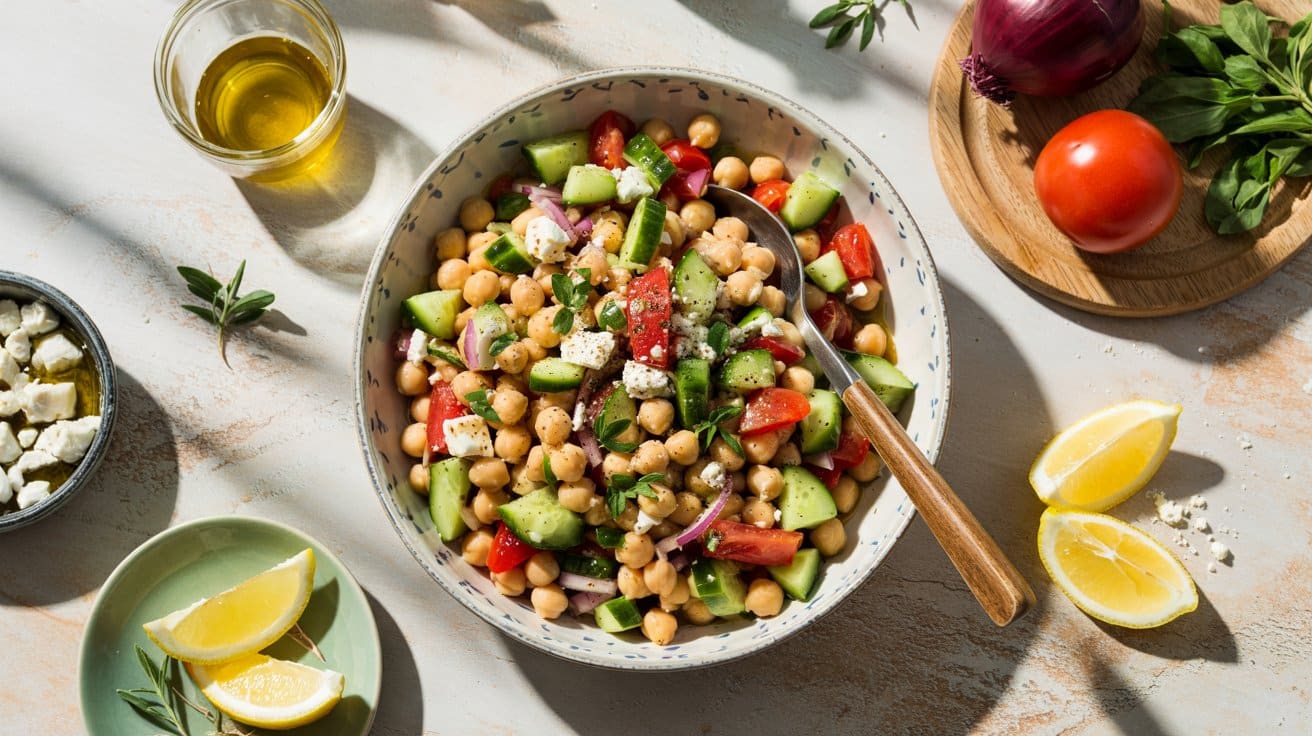
This Mediterranean Chickpea Salad brings together fresh, bright flavors that are both nourishing and satisfying. It combines crisp cucumbers, briny olives, and creamy feta with the hearty texture of chickpeas, all tossed in a bright lemon dressing.
It's a great choice for a quick lunch or a light dinner that still feels substantial. The ingredients are simple, yet the mix of textures and tangy notes makes every bite interesting.
Why This Recipe Works
This salad is a smart way to pack protein and vegetables into one dish, delivering balanced flavors and easy preparation.
- Convenience - Uses mostly pantry staples and fresh produce that require minimal prep.
- Flavor balance - Combines tangy lemon, salty olives, and creamy feta for a pleasing mix.
- Texture - Offers a satisfying contrast between tender chickpeas and crisp cucumbers.
- Appeal - Fits well in casual meals or as a colorful side dish for gatherings.
Ingredient Swap Ideas
Adjusting ingredients can help tailor this salad to your preferences or dietary needs without losing its essential character.
- Chickpeas - Use canned or cooked from dry; white beans or lentils can be alternatives.
- Feta cheese - Substitute with goat cheese or omit for a vegan version.
- Olives - Use Kalamata, green, or black olives depending on flavor preference.
- Lemon dressing - Replace lemon juice with red wine vinegar or a splash of balsamic for a different acidity.
Ingredients
- 1 can (15 oz) chickpeas - drained and rinsed
- 1 medium cucumber - diced
- ½ cup Kalamata olives - pitted and halved
- ½ cup feta cheese - crumbled
- ¼ cup red onion - finely chopped
- ¼ cup fresh parsley - chopped
- 3 tablespoons extra-virgin olive oil - for dressing
- 2 tablespoons fresh lemon juice - adds bright acidity
- 1 garlic clove - minced
- ½ teaspoon dried oregano - for seasoning
- Salt and black pepper - to taste
Instructions
- In a large bowl, combine the chickpeas, diced cucumber, olives, red onion, parsley, and crumbled feta.
- In a small bowl, whisk together the olive oil, lemon juice, minced garlic, dried oregano, salt, and pepper until fully blended.
- Pour the dressing over the salad mixture and toss gently to coat all the ingredients evenly.
- Let the salad sit for 10 to 15 minutes to allow the flavors to meld together.
- Taste and adjust seasoning with more salt, pepper, or lemon juice if needed before serving.
This salad tastes fresh on its own or alongside grilled meats or warm pita bread.
7. Creamy Avocado and Corn Salsa
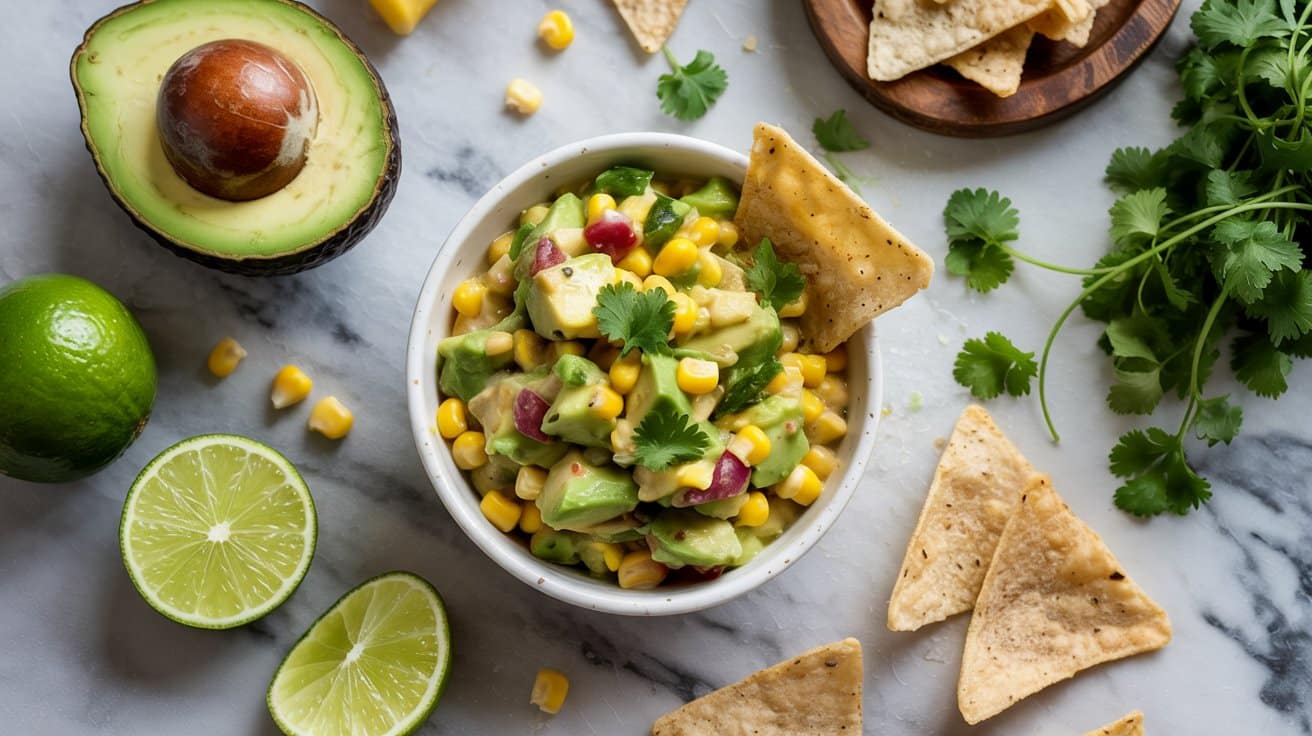
This creamy avocado and corn salsa brings a fresh, bright touch to your mealtime spread. Combining the rich creaminess of ripe avocado with the sweet crunch of fresh corn gives the salsa a balanced texture that's both satisfying and refreshing.
It's a straightforward recipe that comes together quickly, making it ideal for busy days or last-minute gatherings. This salsa works well as a side, dip, or topping, adding a lively twist to your favorite dishes without much fuss.
Why This Recipe Works
This salsa stands out for its appealing mix of creamy and crunchy textures, enhanced by bright citrus notes. It's versatile enough to suit various meals, providing a fresh component that improves simple dishes.
- Convenience - Quick and easy to prepare with minimal ingredients and no cooking required.
- Flavor balance - Combines creamy avocado with sweet corn and zesty lime for a lively taste.
- Texture - Smooth avocado contrasts nicely with crisp corn kernels, adding interest.
- Appeal - Works great as a side dish, dip, or topping, accommodating different meal styles.
Ingredient Swap Ideas
Swapping some ingredients can help tailor the salsa to dietary preferences or ingredient availability while keeping its core flavor intact.
- Avocado substitute - Use mashed peas or a creamy hummus for a dairy-free, lower-fat creamy base.
- Corn choice - Swap fresh corn for frozen or grilled corn to add a smoky dimension.
- Citrus option - Replace lime juice with lemon or orange juice for a slightly different tang.
- Herbs - Use fresh cilantro or chopped basil instead of parsley for varied herbal notes.
Ingredients
- 2 ripe avocados - peeled, pitted, and diced.
- 1 cup fresh corn kernels - from about 2 ears of corn, or use thawed frozen corn.
- 1 small red onion - finely chopped.
- 1 jalapeño - seeded and finely diced (optional for mild heat).
- ¼ cup fresh cilantro - chopped, plus extra for garnish.
- 2 tablespoons fresh lime juice - to brighten the flavors.
- ⅓ cup sour cream or Greek yogurt - for a creamy texture.
- ½ teaspoon ground cumin - adds subtle warmth.
- Salt and black pepper - to taste.
Instructions
- In a medium bowl, combine the diced avocado, fresh corn kernels, chopped red onion, jalapeño (if using), and chopped cilantro.
- Add the lime juice and sour cream (or Greek yogurt) to the bowl. Stir gently to combine everything without mashing the avocado too much.
- Sprinkle in the ground cumin, then season with salt and black pepper to taste. Mix lightly to distribute the seasoning evenly.
- Cover and chill the salsa for at least 15 minutes to allow the flavors to meld.
- Before serving, give the salsa a gentle stir, garnish with extra cilantro if desired, and enjoy as a side, dip, or fresh topping.
8. Garlic Parmesan Roasted Green Beans
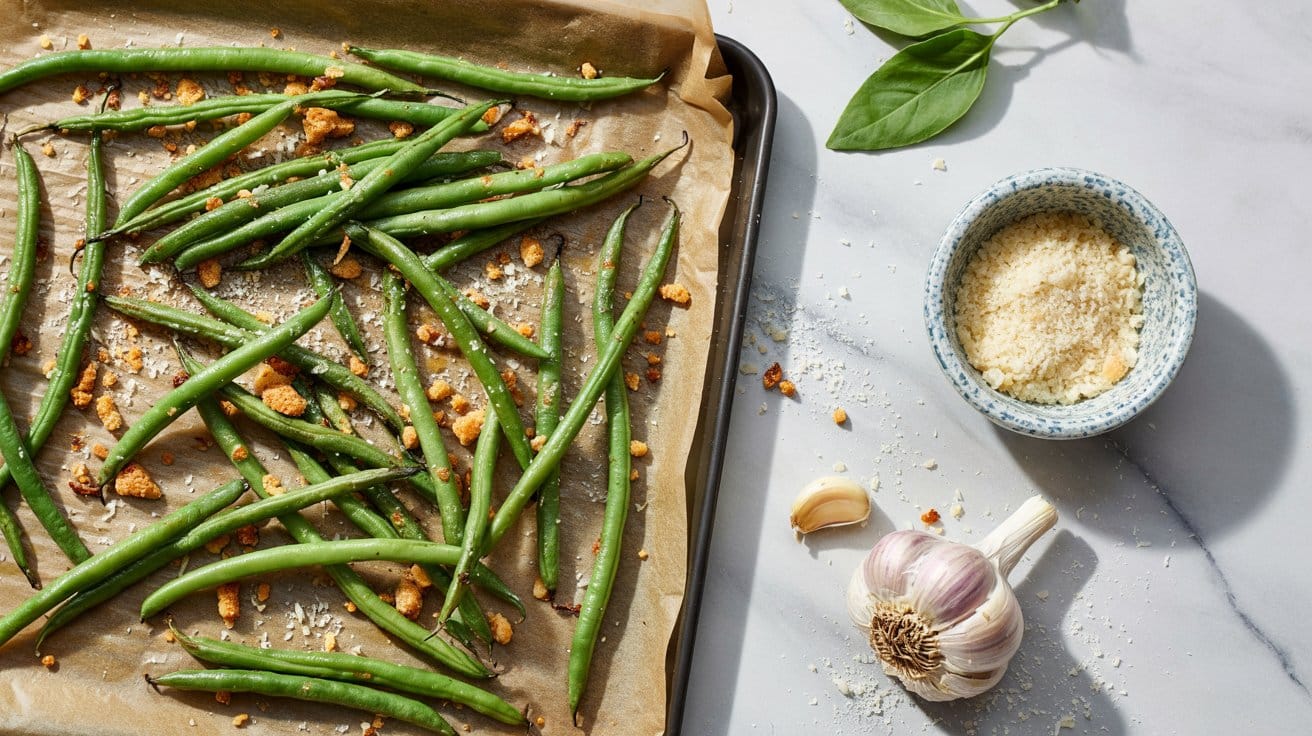
Garlic Parmesan Roasted Green Beans make a simple side dish that adds a flavorful twist to your usual vegetable routine. The green beans roast to a tender-crisp texture with a slight caramelized edge, while the garlic and Parmesan bring a bold, savory finish.
This recipe is quick to prepare and fits well alongside a variety of main courses, giving your meal a fresh, cheesy, and lightly crispy boost without much hassle.
Why This Recipe Works
This dish combines convenience, great taste, and a satisfying texture to complement any meal.
- Convenience - Minimal prep and a straightforward roasting method get this dish on your table quickly.
- Flavor balance - Roasted garlic and nutty Parmesan add depth without overwhelming the natural freshness of the green beans.
- Texture - Tender green beans with slightly crispy edges create an inviting contrast.
- Appeal - A family-friendly side that feels a little special but is easy enough for weeknight dinners.
Ingredient Swap Ideas
Swapping some ingredients can help customize this recipe for different dietary preferences or available pantry items.
- Parmesan cheese - Use nutritional yeast for a plant-based, vegan-friendly alternative that still delivers a cheesy flavor.
- Garlic - Substitute garlic powder if fresh garlic isn't on hand; it still provides the essential savory note.
- Green beans - Try fresh asparagus or broccolini roasted the same way for a similar effect with a new vegetable.
- Olive oil - Use avocado oil for a higher smoke point and mild flavor if preferred.
Ingredients
- 1 pound fresh green beans - trimmed and rinsed.
- 2 tablespoons olive oil - to coat the green beans evenly.
- 3 cloves garlic - minced for a strong, fresh flavor.
- ¼ cup grated Parmesan cheese - finely grated for even melting and coverage.
- ½ teaspoon salt - adjust to taste.
- ¼ teaspoon black pepper - freshly ground for mild heat and depth.
- Optional - a pinch of red pepper flakes for a subtle kick.
Instructions
- Preheat your oven to 425°F (220°C). Line a baking sheet with parchment paper or a silicone mat for easy cleanup.
- In a large bowl, toss the green beans with olive oil, minced garlic, salt, and black pepper until they are evenly coated.
- Spread the green beans in a single layer on the prepared baking sheet. Roast for 12 to 15 minutes, stirring halfway through to ensure even cooking.
- Remove the baking sheet and sprinkle the grated Parmesan evenly over the green beans. Return to the oven and roast for an additional 2 to 3 minutes until the cheese melts and starts to brown slightly.
- Take the green beans out of the oven and transfer to a serving dish. If you like a bit of heat, sprinkle with red pepper flakes before serving.
This roast makes a flavorful, easy side that pairs well with grilled meats, roasted chicken, or pasta dishes.
9. Quinoa Salad with Roasted Vegetables and Herb Dressing
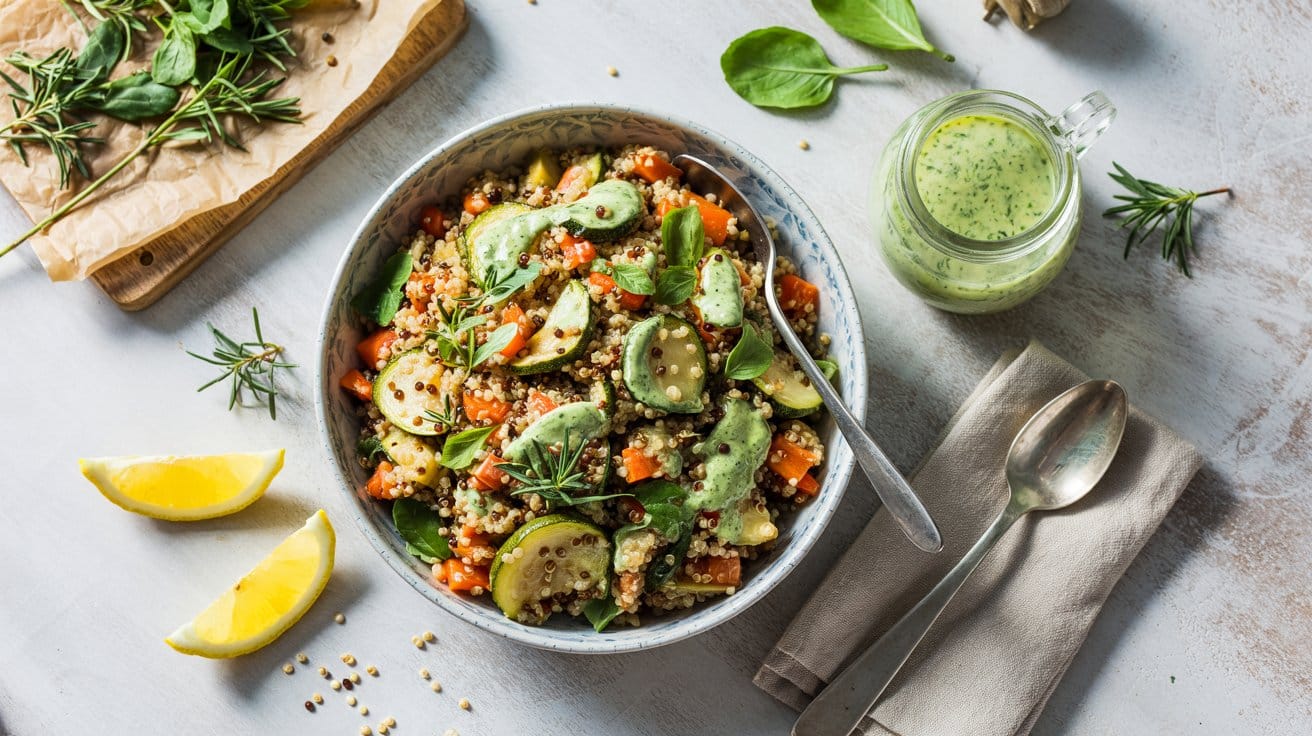
This quinoa salad brings together hearty roasted vegetables with a fresh, bright herb dressing that brightens every bite. The mix of textures-from the tender veggies to the fluffy quinoa-creates a satisfying dish that's both nutritious and filling.
It's a straightforward recipe you can prepare ahead of time, making it an excellent option for busy days or casual gatherings.
The flavors are well-rounded, with the roasting process adding a caramelized sweetness to the vegetables, balanced by herby, tangy notes in the dressing. This salad works well as a main or a side, offering something wholesome and colorful on your plate.
Why This Recipe Works
This quinoa salad balances convenience and flavor while providing a nutritious and colorful option for any meal.
- Convenience - Quinoa cooks quickly, and roasting vegetables requires minimal hands-on time, making it easy to prepare in advance.
- Flavor balance - Sweet roasted vegetables paired with a bright, herbaceous dressing create a nice contrast.
- Texture - The combination of fluffy quinoa and soft, caramelized vegetables keeps every bite interesting.
- Versatility - This salad suits various dietary preferences and can be served warm or chilled, making it family-friendly and adaptable.
Ingredient Swap Ideas
Adjusting ingredients in this salad can accommodate dietary needs or introduce new flavors without losing its core appeal.
- Quinoa substitute - Use couscous, bulgur, or farro as alternatives for varied textures and grains.
- Vegetable swap - Try sweet potatoes, bell peppers, or Brussels sprouts instead of the traditional mix to suit seasonal availability.
- Herb dressing change - Experiment with basil, dill, or oregano for different aromatic notes.
- Vegan option - If using any honey in the dressing, substitute it with maple syrup or agave nectar to keep it vegan-friendly.
Ingredients
- 1 cup quinoa - rinsed well to remove bitterness.
- 2 cups water or vegetable broth - for cooking quinoa to add extra flavor.
- 2 cups mixed vegetables - such as diced zucchini, red bell peppers, and cherry tomatoes, washed and chopped evenly.
- 2 tablespoons olive oil - divided, for roasting vegetables and making dressing.
- 1 teaspoon salt - to season vegetables and quinoa.
- ½ teaspoon black pepper - freshly ground, for light spicing.
- ¼ cup fresh parsley - finely chopped for the dressing and garnish.
- 2 tablespoons fresh lemon juice - adds brightness and acidity to the dressing.
- 1 tablespoon Dijon mustard - helps emulsify the dressing and adds a subtle tang.
- 1 garlic clove - minced finely, incorporated into the dressing.
Instructions
- Preheat your oven to 425°F (220°C). Toss the diced vegetables with 1 tablespoon of olive oil, salt, and pepper. Spread them on a baking sheet in a single layer and roast for 20-25 minutes, stirring halfway through, until vegetables are tender and caramelized.
- While the vegetables roast, combine quinoa and water or broth in a medium saucepan. Bring to a boil, then cover and reduce heat to low. Let it simmer for about 15 minutes until the quinoa is fluffy and all the liquid is absorbed. Fluff with a fork and set aside to cool slightly.
- Prepare the herb dressing by whisking together the remaining olive oil, lemon juice, Dijon mustard, minced garlic, chopped parsley, and a pinch of salt and pepper. Adjust seasoning to taste.
- In a large bowl, combine the cooked quinoa and roasted vegetables. Pour the dressing over and toss gently until everything is evenly coated.
- Serve the salad warm, at room temperature, or chilled. Garnish with extra parsley if desired. This salad pairs well with grilled meats or as a filling vegetarian option on its own.
10. Pickled Red Onions and Jalapeños
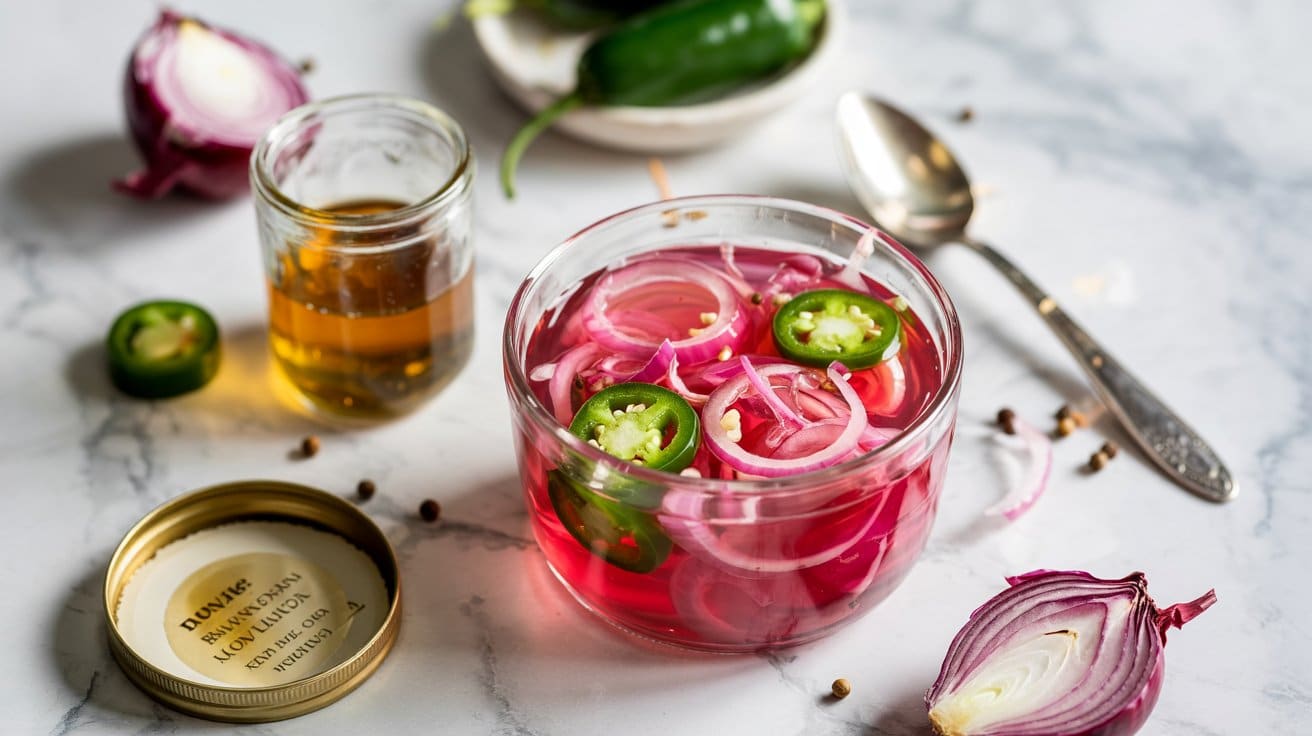
Pickled red onions and jalapeños add a bright touch of acidity and heat to many dishes. Their bright, tangy flavor contrasts well with rich or fatty foods, making them a good addition to tacos, sandwiches, salads, or grilled meats.
This recipe is quick to make, and you can keep the pickles stored in your fridge for weeks. They bring both color and a sharp bite that livens up everyday meals without much fuss.
Why This Recipe Works
This pickled combination offers a simple way to add bold flavor and texture to your meals with minimal prep.
- Convenience - Ready in just 20 minutes and perfect for making ahead of time.
- Flavor balance - Sharp acidity offsets the heat from jalapeños with the sweetness of red onions.
- Texture - Crisp, crunchy vegetables add an enjoyable contrast to soft dishes.
- Versatility - Suitable for a variety of meals, from Mexican to Mediterranean-inspired plates.
Ingredient Swap Ideas
Swapping ingredients can help tailor the pickles to your spice preference or pantry staples.
- Jalapeños - Use milder peppers like banana peppers or fresno chilies if you want less heat.
- Red onions - Swap with shallots or white onions for a different but still sharp flavor.
- Vinegar types - Apple cider vinegar or white wine vinegar can replace white vinegar for a more subtle tartness.
- Sweeteners - Honey or coconut sugar can be used instead of granulated sugar for added depth.
Ingredients
- 2 medium red onions, thinly sliced - Adds a mild sweetness and bright color.
- 2 jalapeño peppers, thinly sliced - Provides a spicy kick to balance the acidity.
- 1 cup white vinegar - Delivers the sharp, tangy base for pickling.
- 1 cup water - Dilutes the vinegar to balance acidity.
- 1 tablespoon granulated sugar - Softens the sharpness and adds slight sweetness.
- 1 ½ teaspoons salt - Enhances flavors and preserves the pickles.
- 1 teaspoon black peppercorns - Adds subtle spice and aroma.
- 1 garlic clove, smashed - Infuses a mild garlic undertone.
Instructions
- In a small saucepan, combine the white vinegar, water, sugar, salt, and peppercorns. Heat over medium heat, stirring until the sugar and salt dissolve completely. Remove from heat once it begins to simmer.
- Place the sliced red onions, jalapeños, and garlic clove into a clean glass jar or heatproof container.
- Pour the hot vinegar mixture over the vegetables, making sure they are fully submerged. Let the liquid cool to room temperature.
- Once cooled, cover the jar with a lid and refrigerate for at least 1 hour before using. The flavors deepen after a day and keep well for up to 3 weeks.
- Use the pickled onions and jalapeños to brighten tacos, burgers, grilled meats, salads, or as a zesty topping on bowls.
This simple recipe adds a punch of acidity and spice that refreshes many dishes without extra effort. Keep some on hand to quickly upgrade your meals any time.
11. Caprese Skewers with Balsamic Glaze
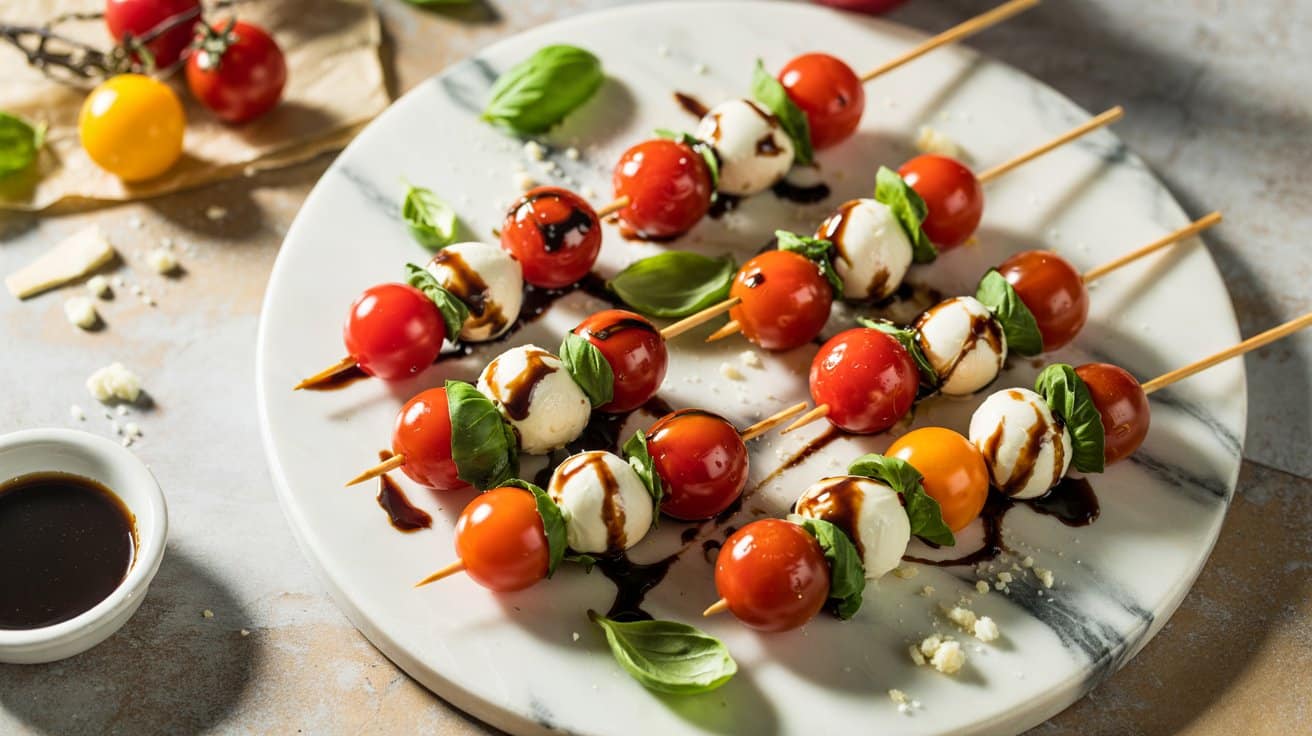
Caprese skewers offer all the fresh flavor of a classic Caprese salad in bite-sized form. These little skewers combine juicy cherry tomatoes, creamy mozzarella, and fragrant basil for a simple snack or appetizer that feels both light and satisfying.
They're easy to assemble, which makes them ideal for busy days or last-minute gatherings. Drizzled with a sweet balsamic glaze, these skewers bring a perfect balance of creamy, acidic, and herbal notes that work beautifully together.
Why This Recipe Works
This recipe strikes a great balance between flavor, ease, and presentation, making it a versatile choice for many occasions.
- Convenience - Simple assembly means you can have them ready in minutes with minimal prep.
- Flavor balance - The tart cherry tomatoes, fresh basil, and smooth mozzarella combine with the sweet balsamic glaze for a layered taste.
- Texture - Creamy cheese paired with the juicy tomato and tender basil leaves creates a pleasing mouthfeel.
- Appeal - These skewers offer an elegant yet approachable presentation, perfect for families or guests.
Ingredient Swap Ideas
Swapping a few ingredients can help tailor this recipe to different diets or flavor preferences without losing its essential character.
- Cheese options - Replace mozzarella balls with vegan mozzarella or marinated tofu cubes for dairy-free versions.
- Tomato varieties - Use grape tomatoes or small heirloom tomatoes to vary the flavor and color.
- Herb swaps - Substitute basil with fresh mint or oregano for a different herbal note.
- Glaze alternatives - Use a reduced balsamic vinegar or a simple glaze made from honey and lemon juice if preferred.
Ingredients
- 1 pint cherry tomatoes - Rinse and pat dry to keep them fresh.
- 8 ounces bite-sized fresh mozzarella balls - Also called bocconcini, drained well.
- 1 cup fresh basil leaves - Whole leaves, rinsed and dried.
- ½ cup balsamic glaze - Store-bought or homemade, for drizzling.
- Wooden skewers or toothpicks - To assemble the skewers.
Instructions
- Thread one cherry tomato onto a skewer, followed by a basil leaf folded if large, then one mozzarella ball. Repeat until all ingredients are used.
- Arrange the skewers on a serving platter in a single layer for easy picking.
- Drizzle balsamic glaze evenly over the assembled skewers just before serving.
- Serve immediately to enjoy fresh textures and flavors, or cover and refrigerate for up to 2 hours before serving.
- Optionally, sprinkle a pinch of salt or cracked black pepper over the skewers to improve the flavor.
12. Zucchini Ribbon Salad with Lemon and Mint
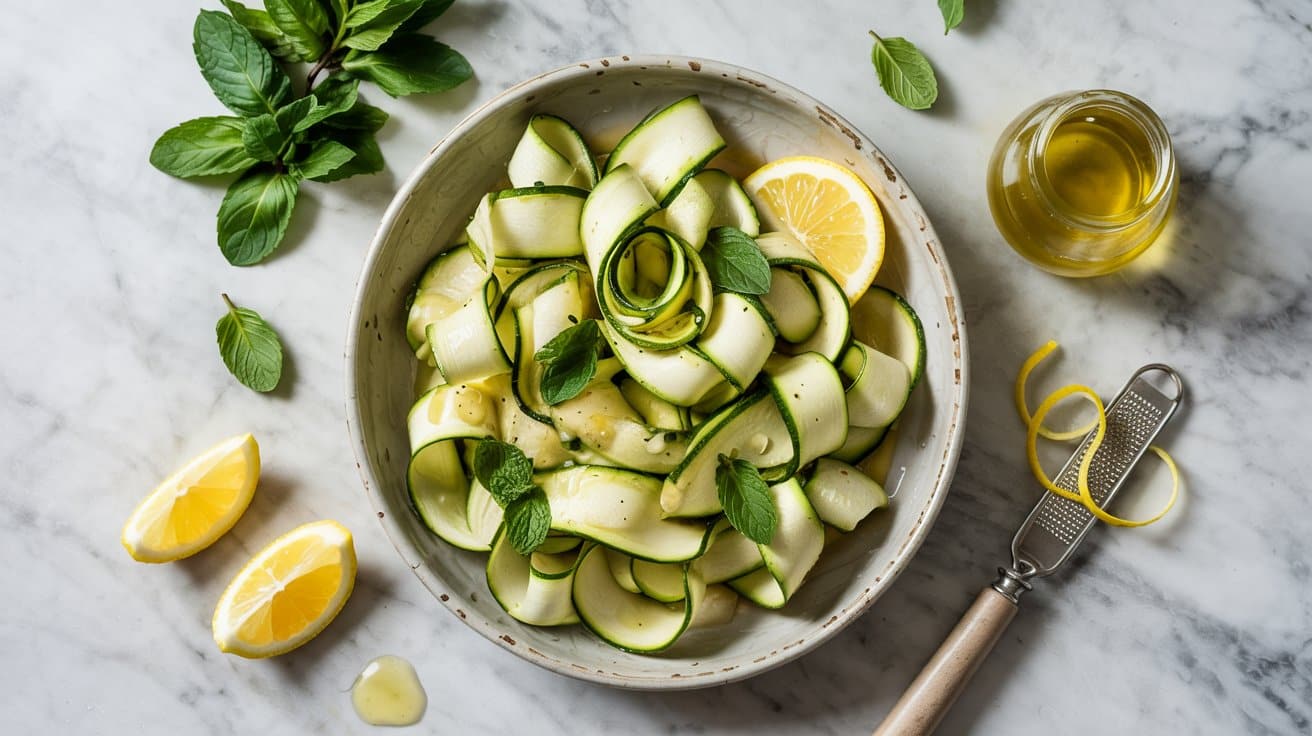
This zucchini ribbon salad offers a fresh and light way to enjoy summer vegetables. The thin ribbons of zucchini create a delicate texture that goes well with the bright, zesty flavor of lemon and the aromatic touch of fresh mint.
It's a quick salad to prepare, easy enough for busy weeknights but elegant enough for a gathering. The crispness of the zucchini combined with the simple herb dressing makes it an appealing side for grilled dishes or a refreshing starter.
Why This Recipe Works
This salad brings together simple ingredients in a way that highlights freshness and ease. Its bright flavors and textures make it a versatile addition to many meals.
- Convenience - Requires minimal prep time and no cooking, making it ideal for quick assembly.
- Flavor balance - Combines tart lemon with cool mint to brighten the mild zucchini.
- Texture - Thin, tender vegetable ribbons add a pleasing bite without heaviness.
- Appeal - Light and healthy, suitable for a wide range of meals and diets.
Ingredient Swap Ideas
Adjusting ingredients allows this salad to fit various preferences or dietary needs without losing its fresh character.
- Zucchini swap - Use cucumber or summer squash for a similar crisp texture and mild flavor.
- Herb variations - Substitute mint with basil or parsley for a different herbal note.
- Acid choice - Replace fresh lemon juice with lime juice or a splash of white wine vinegar for a variation in tanginess.
- Oil options - Use avocado oil or a light nut oil instead of olive oil for a subtle flavor change.
Ingredients
- 2 medium zucchinis - thinly sliced into ribbons using a vegetable peeler.
- 2 tablespoons fresh lemon juice - freshly squeezed for bright acidity.
- 2 teaspoons extra-virgin olive oil - adds a smooth, fruity undertone.
- 1 tablespoon fresh mint leaves - finely chopped for a refreshing herbal note.
- ¼ teaspoon salt - enhances natural flavors.
- ⅛ teaspoon black pepper - freshly ground to taste.
- Optional: 2 tablespoons toasted pine nuts - for added crunch and richness.
Instructions
- Use a vegetable peeler to slice the zucchinis lengthwise into thin ribbons. Place the ribbons in a large bowl.
- In a small bowl, whisk together the lemon juice, olive oil, salt, and black pepper until emulsified.
- Pour the dressing over the zucchini ribbons and toss gently to coat everything evenly.
- Add the chopped mint leaves and toss again to distribute the herbs throughout the salad.
- If desired, sprinkle toasted pine nuts over the salad before serving for extra texture and flavor.
Serve immediately to enjoy the crisp freshness or let it rest a few minutes to allow flavors to meld. This salad pairs well with grilled meats, seafood, or as a light side alongside grain dishes.
13. Sweet and Spicy Baked Chickpeas
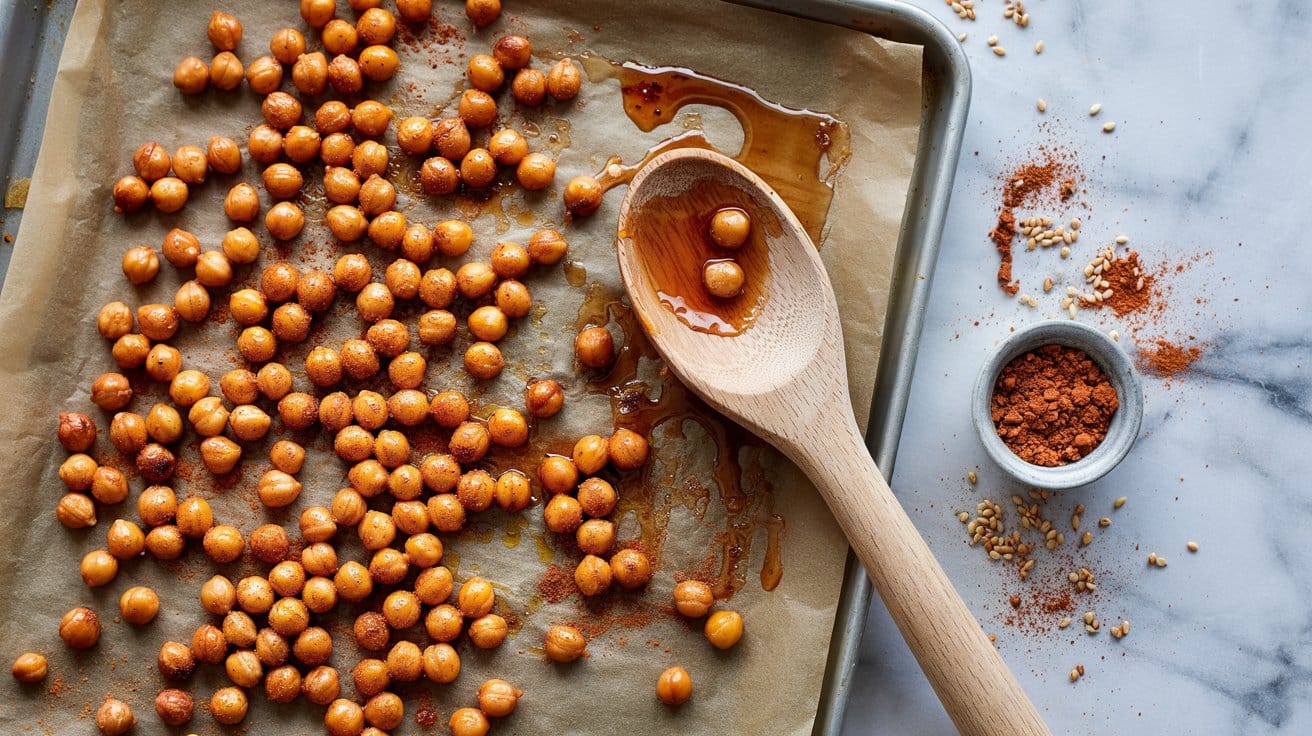
This Sweet and Spicy Baked Chickpeas recipe offers a crunchy snack with a punch of flavor. The chickpeas turn golden and crisp in the oven, coated in a blend of sweetness and heat that makes them addictively tasty.
They're incredibly easy to prepare and perfect for adding a textured contrast to your snack options. Plus, you can enjoy them as a midday treat or toss them into salads and bowls for extra crunch.
Why This Recipe Works
This recipe delivers a simple way to enjoy a healthy snack with balanced flavors and satisfying crunch. It stands out because it combines easy prep with a flavor that keeps you coming back.
- Convenience - Quick to prepare and bakes in the oven with minimal hands-on time.
- Flavor balance - A lively mix of sweet and spicy notes that complement each other well.
- Texture - Crispy exterior that holds up for snacking, providing a pleasant crunch.
- Versatility - Great as a standalone snack or an addition to salads and grain bowls.
Ingredient Swap Ideas
Changing up ingredients can help tailor the flavors or accommodate specific dietary preferences without losing the snack's crunchy appeal. These swaps keep the recipe approachable and customizable.
- Sweetener - Replace honey or maple syrup with agave nectar for a vegan-friendly option.
- Spice - Use smoked paprika instead of cayenne for a milder, smoky flavor.
- Oil - Swap olive oil with avocado oil for a subtle, buttery richness.
- Chickpeas - Try using white beans or edamame for variation while maintaining that satisfying crunch.
Ingredients
- 2 cups cooked chickpeas (canned, drained, and rinsed)
- 1 tablespoon olive oil
- 2 teaspoons honey or maple syrup for a vegan option
- 1 teaspoon smoked paprika
- ½ teaspoon cayenne pepper (adjust for heat preference)
- ½ teaspoon ground cumin
- ½ teaspoon salt
- ¼ teaspoon ground black pepper
Instructions
- Preheat your oven to 400°F (200°C). Line a baking sheet with parchment paper or a silicone mat to prevent sticking.
- Pat the chickpeas dry thoroughly using a clean kitchen towel or paper towels to ensure they crisp up well during baking.
- In a large bowl, toss the chickpeas with olive oil, honey or maple syrup, smoked paprika, cayenne pepper, ground cumin, salt, and black pepper until evenly coated.
- Spread the chickpeas in a single layer on the prepared baking sheet, making sure they aren't crowded. Bake for 25 to 30 minutes, shaking the pan or stirring every 10 minutes to promote even crisping.
- Remove from the oven when chickpeas are golden and crunchy. Let them cool completely on the baking sheet to firm up before serving. Store leftovers in an airtight container for up to one week.
14. Roasted Cauliflower “Wings” with Buffalo Sauce
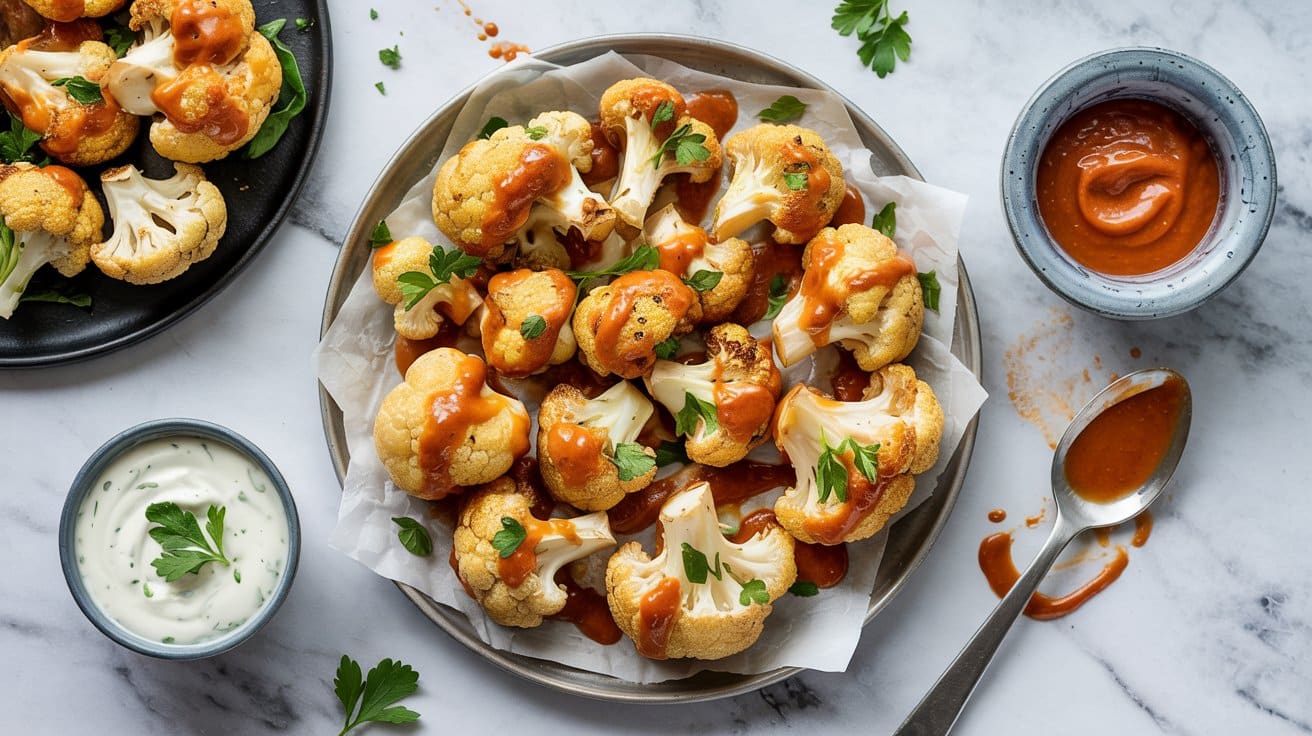
Roasted cauliflower wings offer a satisfying vegetarian alternative to classic chicken wings. The cauliflower becomes tender on the inside while developing a crispy outer layer that holds up beautifully to the spicy buffalo sauce.
This recipe brings a great balance of heat, tang, and crunch with less fuss and fewer calories than traditional wings. It's an easy way to please a crowd or enjoy a flavorful snack any day of the week.
Why This Recipe Works
This dish combines convenience and bright flavor in a way that works well for busy cooks and snack lovers alike.
- Convenience - Simple prep with roasting and a quick toss in sauce make these wings weeknight-friendly.
- Flavor balance - The spicy buffalo sauce goes with the mellow roasted cauliflower perfectly.
- Texture - Crispy edges with a tender interior deliver satisfying bite.
- Appeal - A vegetarian option that feels indulgent and crowd-pleasing.
Ingredient Swap Ideas
Swapping ingredients here lets you tailor the dish to fit different preferences and dietary needs without losing the essence of buffalo wings.
- Buffalo sauce - Use a milder barbecue sauce if you prefer less heat.
- Cauliflower - Try broccoli florets for a slightly different texture and flavor.
- Dairy - Substitute butter in the sauce with vegan margarine or olive oil for a dairy-free version.
- Spice - Adjust cayenne or hot sauce quantities to control the spiciness level.
Ingredients
- 1 large head cauliflower - cut into bite-sized florets.
- 2 tablespoons olive oil - for roasting the cauliflower.
- ½ teaspoon salt - to season the cauliflower.
- ¼ teaspoon black pepper - adds a subtle kick.
- ½ cup buffalo sauce - use your favorite brand or homemade recipe.
- 2 tablespoons unsalted butter - melted, to mix with buffalo sauce.
- Ranch dressing or blue cheese dressing - for serving, optional.
- Chopped fresh parsley or chives - for garnish.
Instructions
- Preheat your oven to 450°F (230°C). Line a baking sheet with parchment paper for easier cleanup.
- Toss cauliflower florets with olive oil, salt, and black pepper. Spread them in a single layer on the prepared baking sheet.
- Roast for 20-25 minutes, turning once halfway through, until the florets are golden and slightly crisp at the edges.
- While the cauliflower roasts, mix buffalo sauce with melted butter in a large bowl. Once the cauliflower is done, immediately toss it in the buffalo sauce until well coated.
- Return the coated cauliflower to the baking sheet and roast for an additional 10 minutes to set the sauce and crisp up the wings a bit more.
- Remove from the oven and garnish with chopped parsley or chives. Serve warm with ranch or blue cheese dressing for dipping, if you like.
15. Greek Tzatziki Dip with Pita Chips
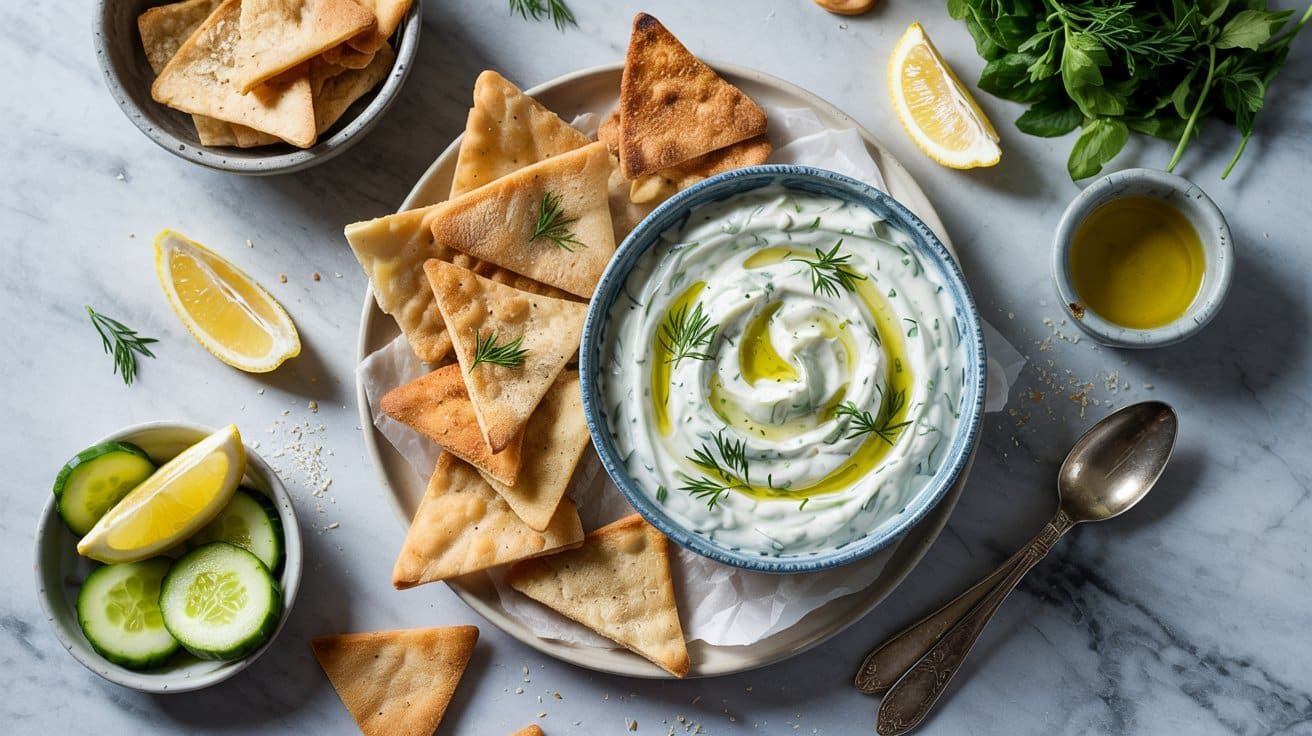
Tzatziki is a refreshing and creamy Greek dip that combines cool yogurt with crisp cucumber and fragrant garlic. It's wonderfully easy to prepare and offers a bright, tangy flavor that goes well with warm, crunchy pita chips.
This dip works well as a snack, appetizer, or even a sauce to complement grilled meats or veggies. The contrast between the creamy dip and crispy chips makes every bite enjoyable and satisfying without any fuss.
Why This Recipe Works
This Greek Tzatziki dip with pita chips is a simple, flavorful dish that brings a fresh and healthy option to your table instantly.
- Convenience - Requires just a few minutes to prepare, with easy-to-find ingredients.
- Flavor balance - Combines cool creaminess from yogurt with zesty garlic and fresh cucumber.
- Texture - Offers a creamy dip alongside crunchy, golden pita chips for a perfect bite.
- Appeal - Works well for casual gatherings or as a healthy snack during the day.
Ingredient Swap Ideas
Adjusting ingredients in this recipe can suit different dietary needs or personal preferences without losing its essential freshness.
- Yogurt - Use coconut or almond yogurt to make it dairy-free and vegan-friendly.
- Cucumber - Try replacing with grated zucchini when cucumber isn't available or to change the flavor slightly.
- Garlic - Substitute fresh garlic with garlic powder for a milder taste or if garlic is too strong.
- Pita chips - Swap for gluten-free crackers or veggie sticks for a low-carb or gluten-free option.
Ingredients
- 1 cup Greek yogurt - Thick and creamy for the base of the dip.
- ½ cup cucumber - Peeled, seeded, and finely grated to add crunch and freshness.
- 2 cloves garlic - Minced finely for a pungent, savory note.
- 1 tablespoon fresh lemon juice - Adds bright acidity to balance the richness.
- 1 tablespoon olive oil - Enhances flavor and smoothness.
- 1 tablespoon fresh dill - Chopped for an herbal, slightly tangy taste.
- ½ teaspoon salt - Enhances all the flavors.
- ¼ teaspoon black pepper - Provides subtle warmth.
- 4 pita breads - Cut into triangles for making chips.
- 2 tablespoons olive oil - For brushing the pita before baking.
Instructions
- Start by grating the cucumber. Place the grated cucumber in a clean kitchen towel and squeeze out excess moisture to avoid a watery dip.
- In a medium bowl, combine Greek yogurt, grated cucumber, minced garlic, lemon juice, olive oil, chopped dill, salt, and black pepper. Stir well until all ingredients are evenly mixed.
- Preheat your oven to 375°F (190°C). Cut pita breads into triangular chips. Spread them evenly on a baking sheet, brush lightly with olive oil on both sides.
- Bake the pita chips for about 10 to 12 minutes until they turn golden and crisp. Keep an eye on them to prevent burning.
- Serve the tzatziki dip chilled alongside the warm, crispy pita chips. This makes an ideal snack or appetizer to enjoy anytime.
16. Watermelon and Feta Salad with Mint
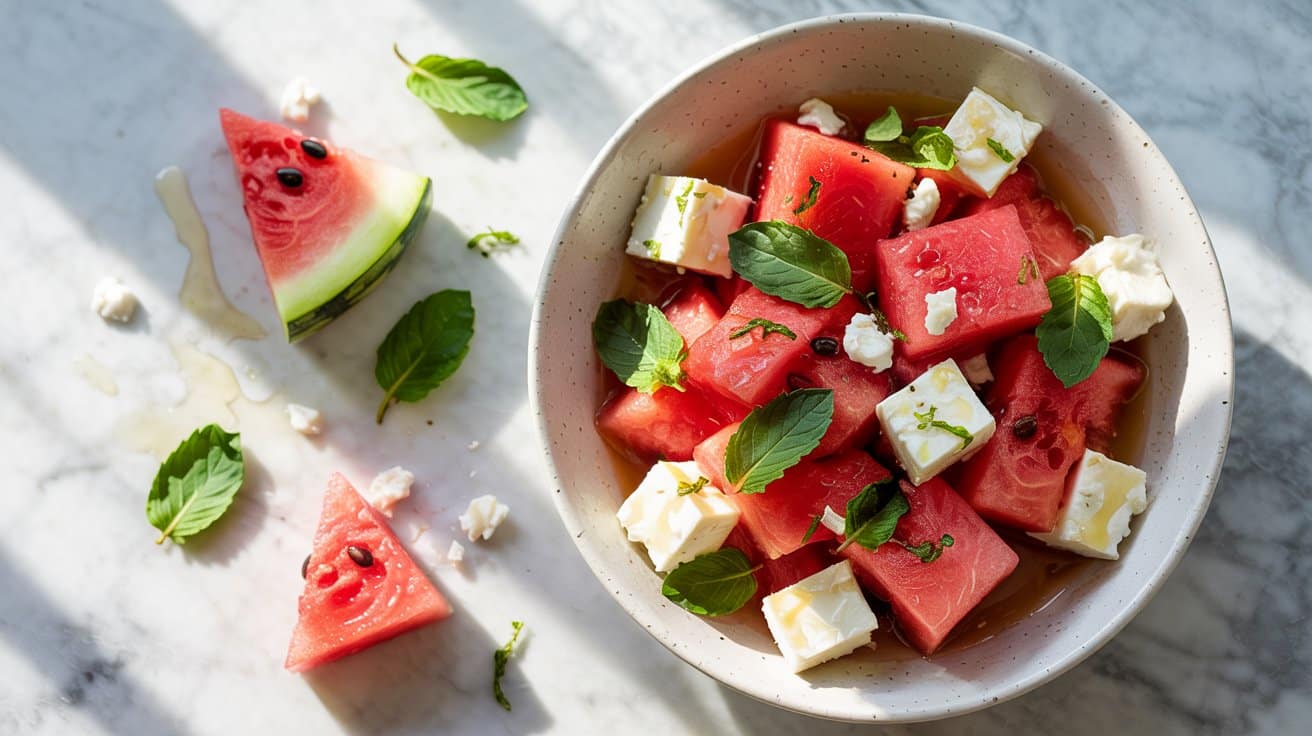
This watermelon and feta salad brings together a bright, refreshing mix of sweet and savory flavors that's ideal for warm weather. The juicy watermelon contrasts nicely with the salty, creamy feta, while fresh mint adds a cooling touch that lifts the whole dish.
It's a simple recipe that comes together quickly, making it a great side dish for summer gatherings or a light lunch that feels both fresh and satisfying.
Why This Recipe Works
This salad offers a wonderful combination of flavors and textures with minimal effort. It's a refreshing complement to grilled foods or a stand-alone treat on hot days.
- Convenience - Requires just a few fresh ingredients and takes minutes to prepare.
- Flavor balance - Combines sweet watermelon, salty feta, and aromatic mint for a bright taste.
- Texture - Features juicy, crisp watermelon and crumbly cheese for variety in each bite.
- Appeal - Suited for casual meals and celebrations, pleasing a broad audience with its fresh profile.
Ingredient Swap Ideas
Adjusting ingredients can tailor the salad to your preferences or dietary needs without losing its essence.
- Cheese swap - Use goat cheese or halloumi instead of feta for a different creamy or grilled cheese texture.
- Herb substitution - Replace mint with basil or cilantro for varied herbal notes.
- Add crunch - Toss in toasted almonds or pepitas for extra texture and nuttiness.
- Vegan option - Substitute feta with a plant-based cheese or simply omit the cheese and boost herbs.
Ingredients
- 4 cups watermelon - Cut into bite-sized cubes, seeds removed if preferred.
- 1 cup feta cheese - Crumbled for easy mixing and a creamy texture.
- ¼ cup fresh mint leaves - Chopped finely for fragrant freshness.
- 2 tablespoons extra-virgin olive oil - Adds a smooth richness without overpowering.
- 1 tablespoon fresh lime juice - Provides a tangy brightness to balance sweetness.
- ¼ teaspoon salt - Enhances overall flavor without oversalting.
- ¼ teaspoon black pepper - Adds a mild background spice.
Instructions
- Place the watermelon cubes in a large bowl. Add the crumbled feta and gently toss to combine without breaking up the cheese too much.
- Sprinkle the chopped mint over the salad to distribute the fresh herb flavor evenly.
- In a small bowl, whisk together the olive oil, lime juice, salt, and black pepper until well combined.
- Pour the dressing over the watermelon mixture and toss lightly once more to coat all the ingredients.
- Serve immediately for the freshest taste or chill in the fridge for 10 to 15 minutes to let the flavors meld slightly before serving.
17. Smashed Baby Potatoes with Herb Oil
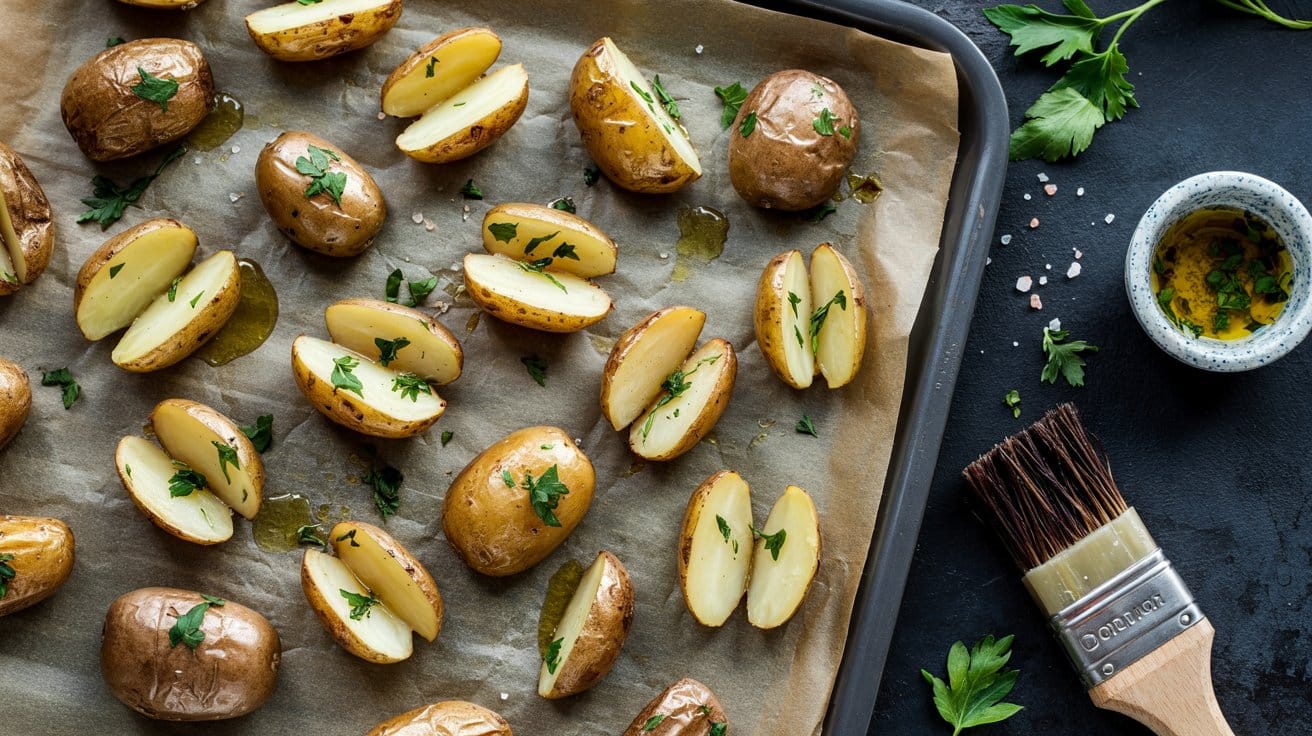
Smashed baby potatoes offer a simple way to turn humble potatoes into a standout side dish. Crispy on the outside and tender inside, they bring a satisfying texture you can count on with every bite.
This recipe highlights fresh herb oil that brightens the earthy flavors of the potatoes, adding a fragrant and fresh note without overwhelming their natural taste. You can prepare them quickly, making them ideal for busy evenings or weekend meals.
Why This Recipe Works
This dish combines ease of preparation with strong flavor and enjoyable textures to make a reliable crowd-pleaser. The herb oil adds freshness while improving the crispy edges of the potatoes.
- Convenience - Boiled and smashed, these potatoes cook quickly for a fast side.
- Flavor balance - Crispy edges contrast with a creamy interior and aromatic herbs.
- Texture - The smashing creates uneven surfaces that crisp beautifully in the oven.
- Versatility - Pairs well with a variety of mains from roasted meats to grilled vegetables.
Ingredient Swap Ideas
Swapping ingredients can tailor this recipe to suit different preferences or dietary needs without losing its core appeal. Here are some easy changes to consider.
- Potatoes - Use fingerling or small Yukon Gold potatoes instead of baby potatoes for a different texture.
- Herb oil - Substitute fresh rosemary or parsley for thyme to create a new herb profile.
- Oil type - Olive oil can be exchanged for avocado oil for a lighter, more neutral flavor.
- Seasoning - Add a pinch of smoked paprika or garlic powder for extra depth in the seasoning mix.
Ingredients
- 1½ pounds baby potatoes - washed and cooked until just tender.
- 3 tablespoons extra-virgin olive oil - plus more for drizzling.
- 2 tablespoons fresh thyme leaves - finely chopped for herb oil.
- 1 garlic clove - minced for the herb oil.
- Salt - to taste.
- Freshly ground black pepper - to taste.
- Optional: 1 tablespoon lemon juice - for a bright finish in the herb oil.
Instructions
- Preheat your oven to 425°F (220°C). Line a baking sheet with parchment paper or lightly grease it.
- Place the cooked baby potatoes on the baking sheet. Use a sturdy glass or small plate to gently press down each potato until it's about half its original thickness.
- In a small bowl, mix the olive oil, minced garlic, chopped thyme, salt, and pepper. If using, stir in lemon juice for added brightness.
- Brush or drizzle the herb oil evenly over each smashed potato, making sure to coat every piece well.
- Roast the potatoes in the oven for 20-25 minutes or until they are golden and crispy around the edges. Serve warm as a flavorful side to your main dish.
18. Kale Caesar Salad with Homemade Croutons
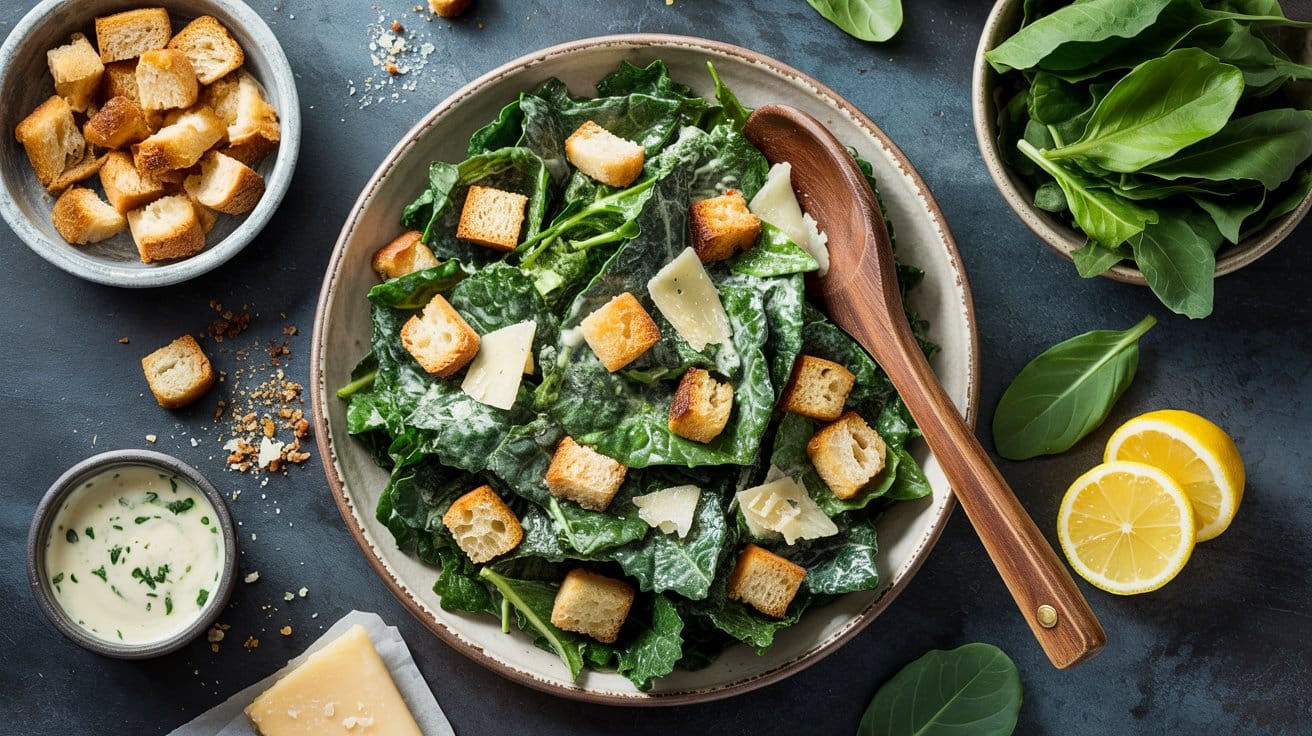
Kale Caesar Salad with Homemade Croutons offers a fresh twist on a classic favorite. The hearty, slightly bitter kale goes well with a creamy, tangy Caesar dressing, while crisp homemade croutons add a satisfying crunch.
This salad is easy to prepare and makes a nutritious side dish or light main course with a boost of flavor and texture.
The combination of strong greens and crunchy croutons makes each bite interesting and full of contrast. You can have this salad ready in about 20 minutes, making it a great choice for busy weeknights or weekend meals alike.
Why This Recipe Works
This Kale Caesar Salad stands out for its balance of flavors and textures, plus its simple preparation. It brings a nourishing way to enjoy Caesar salad with a bit more substance.
- Convenience - Prepping kale and making croutons from pantry bread means you can whip this up quickly.
- Flavor balance - The creamy Caesar dressing melds perfectly with the slightly bitter kale and sharp Parmesan.
- Texture - Crunchy croutons and tender kale leaves combine for a nice mouthfeel.
- Appeal - A fresh, wholesome salad that works well as a side or a light meal.
Ingredient Swap Ideas
Swapping ingredients can help you adjust this salad to your tastes or dietary needs without losing what makes it special.
- Kale with spinach or romaine - Use these milder greens if you prefer a less bitter salad base.
- Parmesan with nutritional yeast - Try this for a vegan-friendly option with a cheesy flavor.
- Bread for croutons with gluten-free bread - Keeps the crunch while accommodating gluten sensitivity.
- Anchovy paste replaced with Worcestershire sauce - Offers a similar umami depth without fish.
Ingredients
- 1 large bunch kale - washed, stems removed, and torn into bite-sized pieces.
- 3 cups bread cubes - preferably day-old bread, cut into ½-inch pieces for croutons.
- 2 tablespoons olive oil - divided for croutons and salad.
- ⅓ cup grated Parmesan cheese - for salad and garnish.
- 1 garlic clove - minced.
- 2 anchovy fillets or 1 teaspoon anchovy paste - finely chopped or dissolved.
- 2 tablespoons fresh lemon juice - adds brightness to dressing.
- 1 teaspoon Dijon mustard - for slight tang and emulsification.
- ¼ cup mayonnaise - creamy base for Caesar dressing.
- Salt and freshly ground black pepper - to taste.
Instructions
- Make the croutons: Preheat oven to 375°F (190°C). Toss bread cubes with 1 tablespoon olive oil and a pinch of salt. Spread on a baking sheet and bake for about 10 to 12 minutes until golden and crisp, stirring once halfway through. Set aside to cool.
- Prepare the dressing: In a bowl, whisk together minced garlic, anchovy paste, lemon juice, Dijon mustard, and mayonnaise until smooth. Slowly drizzle in the remaining tablespoon of olive oil while whisking to combine. Season with salt and pepper to taste.
- Prepare the kale: Place torn kale in a large bowl. Drizzle with a small amount of dressing and massage the leaves gently with your hands for about 2 minutes until the kale softens and darkens slightly.
- Assemble the salad: Add remaining dressing to the kale and toss well to coat evenly. Stir in grated Parmesan and the homemade croutons just before serving.
- Serve: Transfer to a serving bowl or plate, garnish with extra Parmesan if desired, and enjoy promptly to keep the croutons crisp.
19. Roasted Beet and Goat Cheese Salad
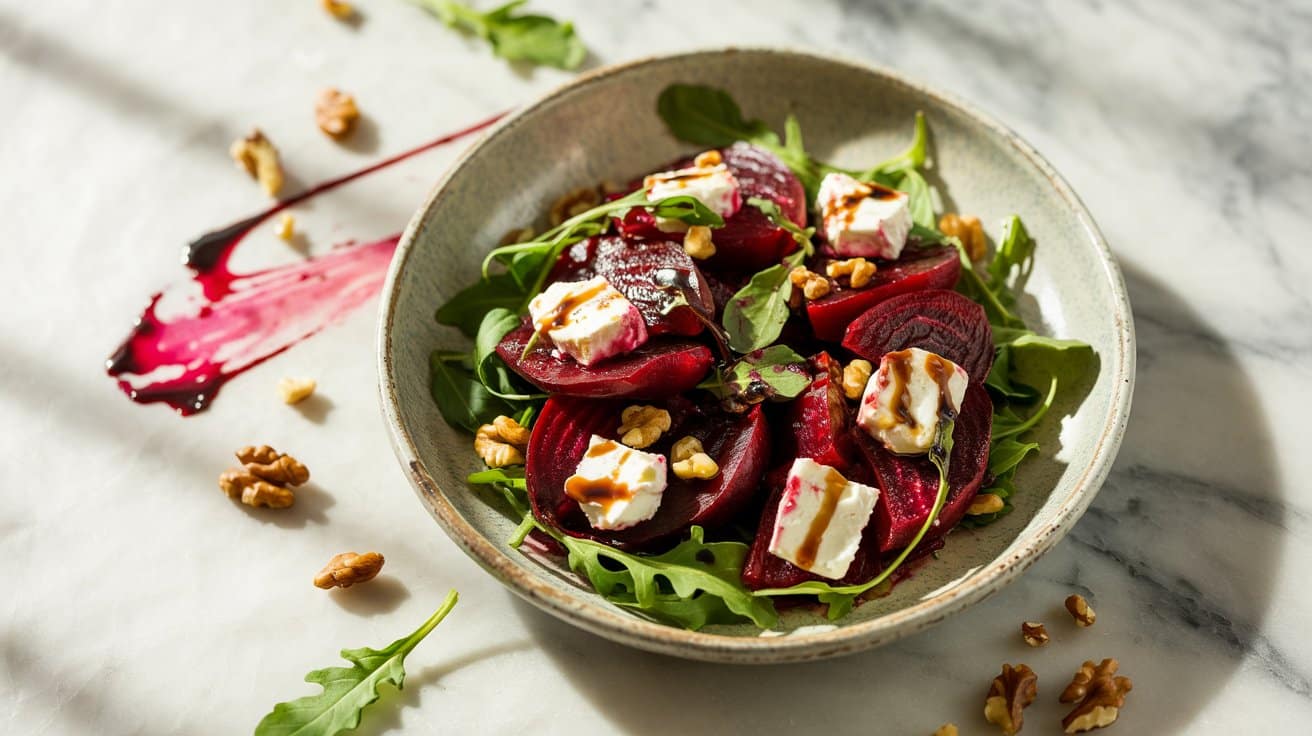
Roasted beets bring a warm, earthy sweetness to this salad that goes well with the creamy tang of goat cheese. The combination offers a fresh yet rich flavor that complements a variety of meals, especially alongside burgers or grilled dishes.
This salad is simple to make and shows the natural textures of each ingredient-the tender beets, crisp greens, crunchy nuts, and creamy cheese all come together for a satisfying plate. It's a great way to add color and nutrients with minimal fuss.
Why This Recipe Works
This salad blends bold flavors and varied textures that enhance many main dishes while being quick to prepare. The balance of sweet beets and tangy cheese makes it an appealing side or light meal.
- Convenience - Roasting beets ahead of time simplifies assembly and shortens preparation.
- Flavor balance - Earthy, sweet beets complement creamy and tangy goat cheese perfectly.
- Texture - Tender roasted root vegetables meet fresh greens and crunchy toasted walnuts.
- Appeal - Visually bright and suitable for casual or elegant dining settings.
Ingredient Swap Ideas
Sometimes ingredient swaps help cater to preferences or dietary needs while maintaining the dish's spirit. Here are a few ways to customize this salad without losing its essence.
- Goat cheese - Substitute ricotta salata or feta for a different tangy, creamy cheese option.
- Walnuts - Use pecans, almonds, or pumpkin seeds for an alternative crunch and nutty flavor.
- Mixed greens - Replace arugula or spinach with baby kale or watercress for a peppery bite.
- Honey - Switch to maple syrup or agave nectar to keep the sweetness vegan-friendly.
Ingredients
- 4 fresh beets - whole, scrubbed and trimmed for roasting.
- 4 ounces goat cheese - crumbled or torn into bite-sized pieces.
- 4 cups mixed greens - such as arugula, baby spinach, or spring mix.
- ½ cup toasted walnuts - roughly chopped for texture.
- 3 tablespoons balsamic vinegar - to add acidity and brightness.
- ¼ cup extra-virgin olive oil - for the dressing.
- 1 tablespoon honey - or maple syrup for a vegan option, to balance the vinegar.
- ½ teaspoon salt - to enhance all flavors.
- ¼ teaspoon black pepper - freshly ground for seasoning.
- 1 tablespoon fresh herbs - such as thyme or mint, chopped for garnish.
Instructions
- Preheat the oven to 400°F (200°C). Wrap each beet in foil and roast for about 45 to 60 minutes until tender when pierced with a fork. Let them cool, then peel and cut into wedges.
- In a small bowl, whisk together balsamic vinegar, olive oil, honey, salt, and pepper to make the dressing. Adjust seasoning as needed.
- Arrange mixed greens on a large serving platter or bowl. Place roasted beet wedges on top. Sprinkle with toasted walnuts and crumbled goat cheese.
- Drizzle the dressing evenly over the salad, then gently toss or serve as is for a composed look.
- Garnish with fresh herbs just before serving to add a bright, herbal note.
This salad works well as a side or light meal and brings fresh, seasonal flavors to the table with minimal preparation.
20. Carrot and Apple Slaw with Ginger Dressing
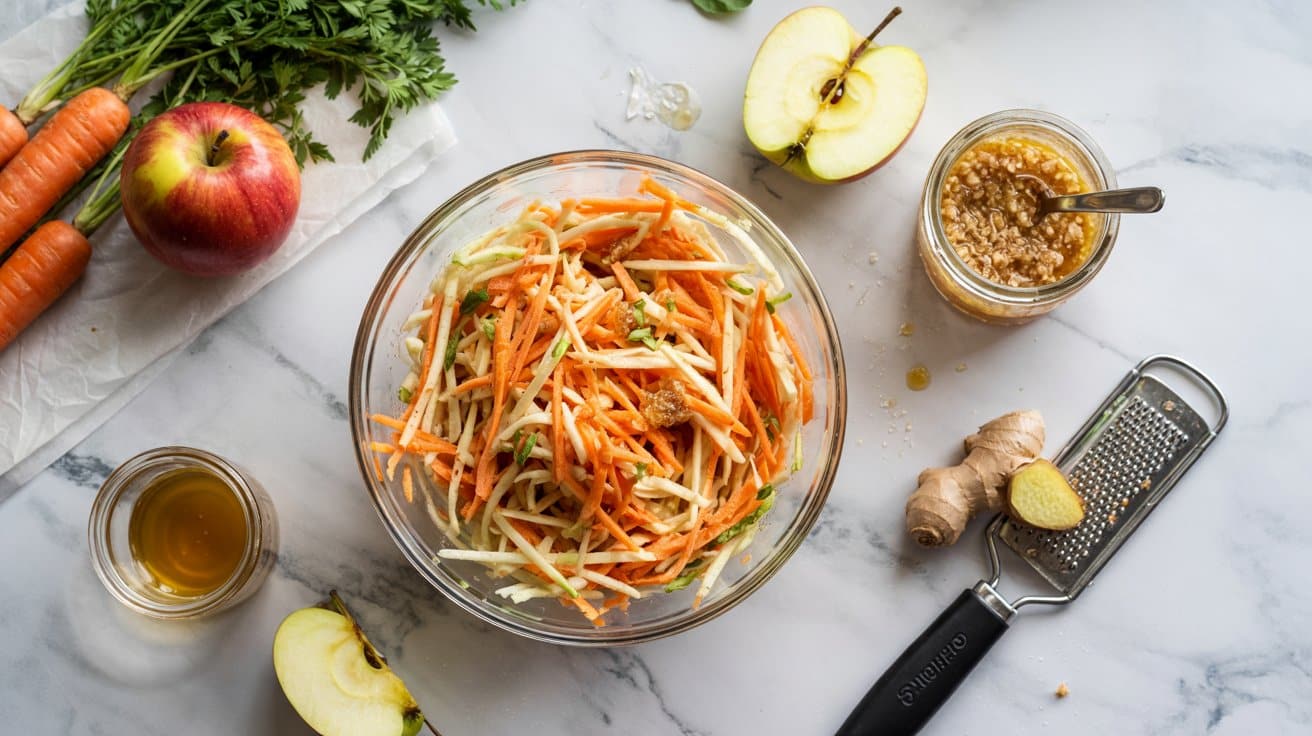
This slaw combines crisp carrots and sweet apples for a refreshing base that's full of contrasting flavors and textures. The ginger dressing adds a gentle warmth and tanginess that lifts the salad, making it a lively side dish or light snack.
You can prepare this slaw quickly with simple ingredients mostly found in your fridge or pantry. It's a great option for those who want a salad that feels fresh but also has a bit of a spicy kick from the ginger.
Why This Recipe Works
This carrot and apple slaw stands out for its bright, fresh components balanced by the zing of ginger dressing. It's practical and versatile enough to pair with many meals or enjoy on its own.
- Convenience - Requires no cooking and comes together within minutes.
- Flavor balance - Combines sweet, tangy, and spicy notes for a complex taste experience.
- Texture - Delivers a satisfying crunch from the carrots and apples.
- Appeal - Works well as a side salad for meals or a healthy snack for the family.
Ingredient Swap Ideas
Swapping ingredients can help you tailor this slaw to what you have at home or adjust to dietary preferences without losing its fresh character.
- Replace apples with pears to add a softer, juicier sweetness.
- Use lime juice instead of lemon for a slightly different citrus brightness.
- Swap honey for maple syrup to keep it vegan friendly without sacrificing sweetness.
- Add some chopped fresh mint or cilantro for a herbaceous twist on the dressing.
Ingredients
- 3 large carrots - peeled and julienned or grated for a crisp texture.
- 2 medium apples - cored and julienned; choose crisp varieties like Fuji or Granny Smith.
- 1 tablespoon fresh ginger - finely grated for the dressing's warming flavor.
- 2 tablespoons lemon juice - fresh for bright acidity.
- 1 tablespoon honey - for a touch of natural sweetness.
- 3 tablespoons olive oil - adds smoothness and richness to the dressing.
- ¼ teaspoon salt - to season and bring out the flavors.
- Freshly ground black pepper - a few cracks, to taste.
Instructions
- In a large bowl, combine the peeled and julienned carrots with the julienned apples. Toss gently to mix the two evenly.
- In a small bowl, whisk together the grated ginger, lemon juice, honey, olive oil, salt, and black pepper until well combined and slightly emulsified.
- Pour the ginger dressing over the carrot and apple mixture. Use tongs or a large spoon to toss everything together until the slaw is well coated with the dressing.
- Let the slaw sit for 5 to 10 minutes before serving. This allows the flavors to meld and the dressing to soften the vegetables slightly.
- Serve chilled or at room temperature, garnished with extra grated ginger or a sprinkle of fresh herbs if desired.
Rice sides add hearty starch and global flavors that pair well with burgers; explore creative rice side dishes for burgers. If you prefer quick, crispy accompaniments, air fryer recipes expand options beyond fries-see air fryer side dishes beyond fries.

Andrew Gray is a seasoned food writer and blogger with a wealth of experience in the restaurant and catering industries. With a passion for all things delicious, Andrew has honed his culinary expertise through his work as a personal chef and caterer.
His love for food led him to venture into food writing, where he has contributed to various online publications, sharing his knowledge and insights on the culinary world. As the proud owner of CooksCrafter.com, Andrew covers a wide range of topics, including recipes, restaurant reviews, product recommendations, and culinary tips.
Through his website, he aims to inspire and educate fellow food enthusiasts, offering a comprehensive resource for all things food-related.