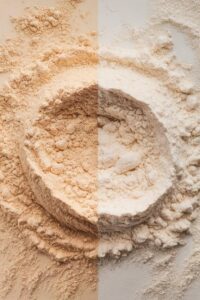
Baking fresh bread at home can feel like a big task, especially when time is tight. This collection of 20 no-knead loaves, which develop gluten through long, slow fermentation instead of mechanical kneading, offers a simple and satisfying way to enjoy homemade bread without heavy hands-on work.
The recipes range from classic artisan boules to flavored varieties like herbed focaccia, seeded multigrain, and sweet cinnamon raisin loaves. Each recipe focuses on easy preparation using common ingredients, making them ideal for busy days, casual meals, or entertaining guests.
These no-knead breads combine convenience with great taste and texture, relying on long, slow fermentation and minimal handling rather than traditional kneading to develop flavor and structure. They require minimal prep, little cleanup, and deliver a crusty exterior with a tender crumb, making them reliable choices for everyday baking.
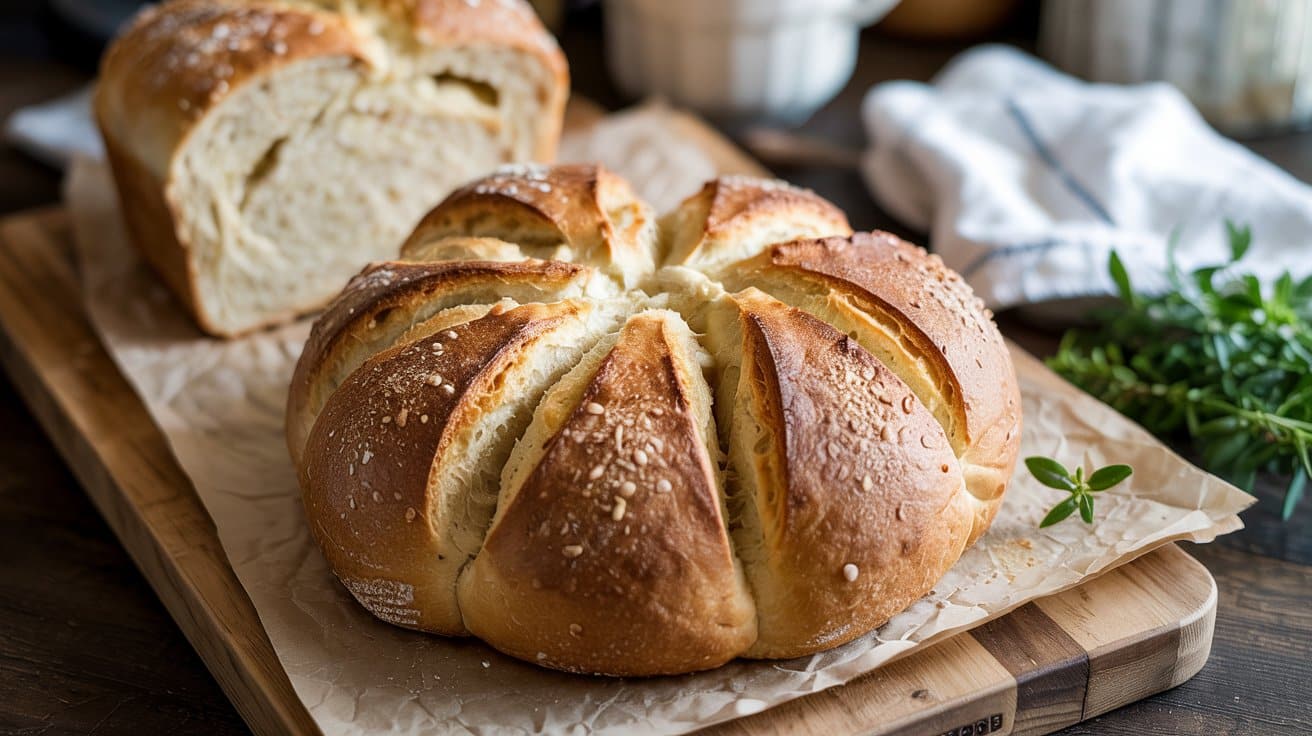
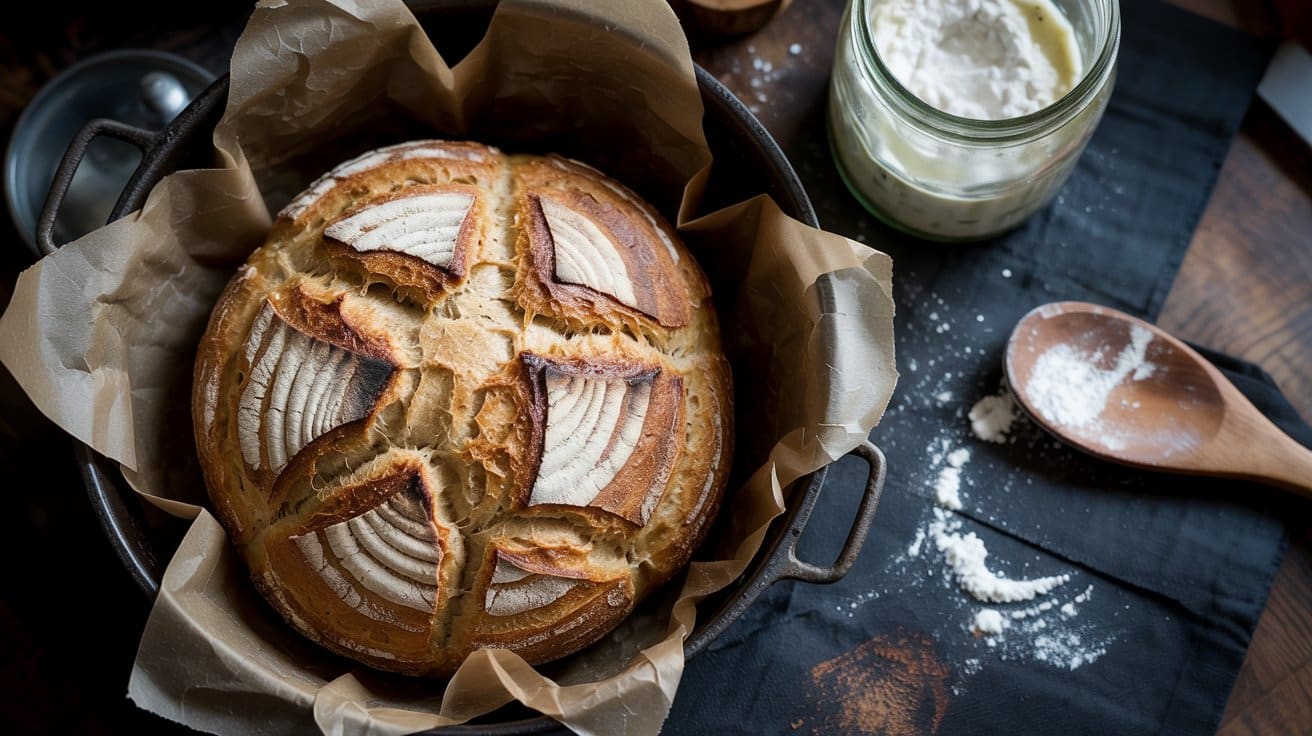
1. Classic No-Knead Artisan Bread

This no-knead artisan bread recipe has become a staple for many home cooks because it delivers bakery-style bread, producing a rustic boule with a chewy crust, with minimal effort - see artisan bread ideas for beginners.
You'll get a loaf with a thick, crackly crust and an airy, open crumb inside, especially when baked in a preheated Dutch oven at 450°F to trap steam for better oven spring. It's satisfying to make and versatile, perfect for sandwiches, soups, or just enjoying plain with butter.
If a recipe calls for a soft flatbread, consider naan alternatives for quick meals that work well for sandwiches and dips.
Why This Recipe Works
This recipe works well for busy cooks who want homemade bread without complicated steps or special tools, and it can be baked in a standard oven or a preheated Dutch oven (preheated to about 450°F) for better oven spring. It balances simple ingredients with a long fermentation to develop great flavor and texture.
- Convenience - Requires minimal active work and no kneading.
- Flavor balance - Deep, slightly tangy taste from slow fermentation.
- Texture - Crispy crust with a soft, open crumb inside.
- Appeal - Impressive results with just a few ingredients anyone has on hand.
Ingredient Swap Ideas
Swapping ingredients here can help tailor the bread for different preferences without changing how it rises or bakes, provided you keep similar hydration and fermentation times. This flexibility makes it a great recipe for experimenting.
- All-purpose flour - Substitute with bread flour, which has higher protein (11-13%), for a chewier texture.
- Water - Use sparkling water to introduce extra airiness.
- Yeast - Replace instant yeast with active dry yeast; just dissolve it in water first.
- Salt - Use kosher salt or sea salt, adjusting quantity to taste if coarse.
Ingredients
- 3 cups all-purpose flour
- ¼ teaspoon instant yeast
- 1 ¼ teaspoons salt
- 1 ½ cups water, lukewarm
- Cornmeal or flour for dusting
Instructions
- In a large bowl, combine the flour, yeast, and salt. Pour in the lukewarm water and stir with a wooden spoon or spatula until the mixture forms a sticky dough.
- Cover the bowl with plastic wrap or a clean towel and let it rest at room temperature for 12 to 18 hours. The dough will bubble and expand, signaling it's ready.
- After fermentation, generously flour a work surface and turn the dough out. Fold it over itself once or twice to shape it loosely into a ball. Sprinkle a kitchen towel with flour or cornmeal and place the dough seam-side down on it. Cover and let it rise for 1 to 2 hours until noticeably puffed.
- Meanwhile, place a Dutch oven with its lid inside your oven and preheat to 450°F (230°C). Once hot, carefully remove the Dutch oven. Lift the dough using the towel, gently place it inside the pot, cover, and place it back in the oven.
- Bake for 30 minutes covered, then remove the lid and bake for another 10 to 15 minutes until the crust is deeply golden and crisp. Remove from the oven and cool on a wire rack before slicing.
This no-knead bread keeps well for a couple of days at room temperature and makes excellent toast the next morning.
2. No-Knead Whole Wheat Bread
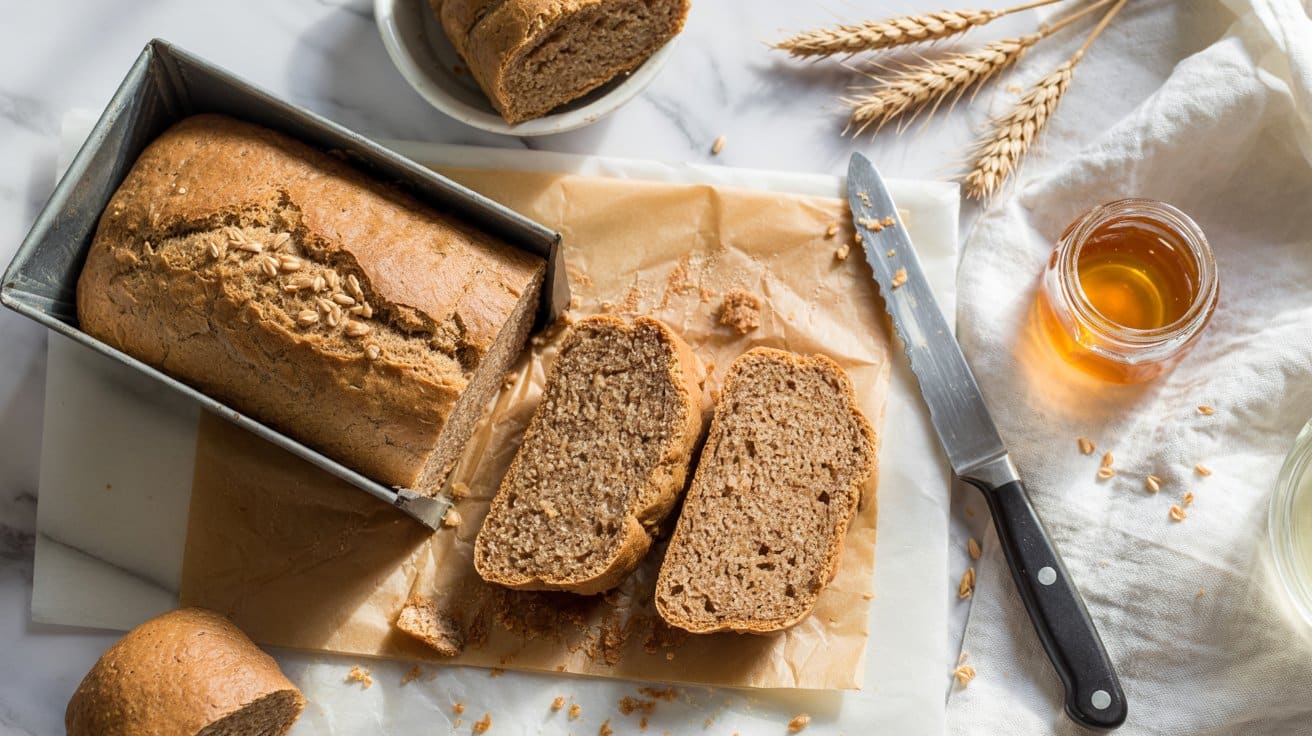
This no-knead whole wheat bread blends the hearty, nutty flavor of whole wheat flour (see whole wheat flour swaps for lighter loaves) with a simple preparation method, often using a slightly higher hydration (about 70-75%) to maintain a tender crumb.
The crust turns nicely golden and crisp while the interior offers a tender crumb that works well for sandwiches or alongside your favorite soups when baked at about 425°F. This recipe is forgiving and perfect for busy days, usually after a long (12-18 hour) bulk fermentation, giving you fresh homemade bread with straightforward steps.
Why This Recipe Works
This bread recipe offers a straightforward way to bake a nourishing whole wheat loaf that holds its shape and texture beautifully, without kneading effort.
- Convenience - Requires minimal hands-on time, with no kneading involved.
- Texture - Balances a soft crumb inside with a crisp, golden crust outside.
- Healthiness - Uses whole wheat flour to boost fiber and nutrients.
- Versatility - Suitable for sandwiches, toasting, or serving with meals.
Ingredient Swap Ideas
Swapping ingredients can tailor this bread to your dietary preferences or what's on hand, helping keep it simple and flexible.
- Whole wheat flour - Swap part or all with bread flour or all-purpose flour for a lighter crumb.
- Yeast type - Use active dry yeast instead of instant yeast; just proof it first in warm water.
- Sweetener - Substitute honey with maple syrup or agave nectar for a vegan option.
- Add-ins - Mix in nuts, seeds, or dried herbs for extra flavor and texture.
Ingredients
- 3 cups whole wheat flour
- ½ teaspoon instant yeast
- 1 ¼ teaspoons salt
- 1 ½ cups warm water (about 110°F)
- 1 tablespoon honey or maple syrup (optional for mild sweetness)
Instructions
- In a large bowl, combine the whole wheat flour, instant yeast, and salt. Mix well so all dry ingredients are evenly distributed.
- Add the warm water and honey or maple syrup, if using, to the dry ingredients. Stir with a wooden spoon or spatula until a shaggy dough forms and no dry flour remains.
- Cover the bowl tightly with plastic wrap or a clean kitchen towel. Let it rest at room temperature for 12 to 18 hours, until bubbles form on the surface and dough has doubled in size.
- Lightly flour a work surface and scrape out the dough. Fold it over itself gently a few times, then shape into a ball. Place it seam side down on a piece of parchment paper. Cover and let rise for another 1 to 2 hours.
- Preheat the oven to 450°F. Place a heavy, oven-safe pot with lid inside to heat for at least 30 minutes. Carefully transfer the dough with the parchment paper into the hot pot, cover, and bake for 30 minutes. Remove the lid and bake an additional 10 to 15 minutes to brown the crust.
- Let the bread cool on a rack before slicing to allow the crumb to set properly.
This simple loaf will become a staple for your weekly bread rotation, combining the benefits of whole grains with an easy approach to homemade baking.
3. No-Knead Rosemary Focaccia
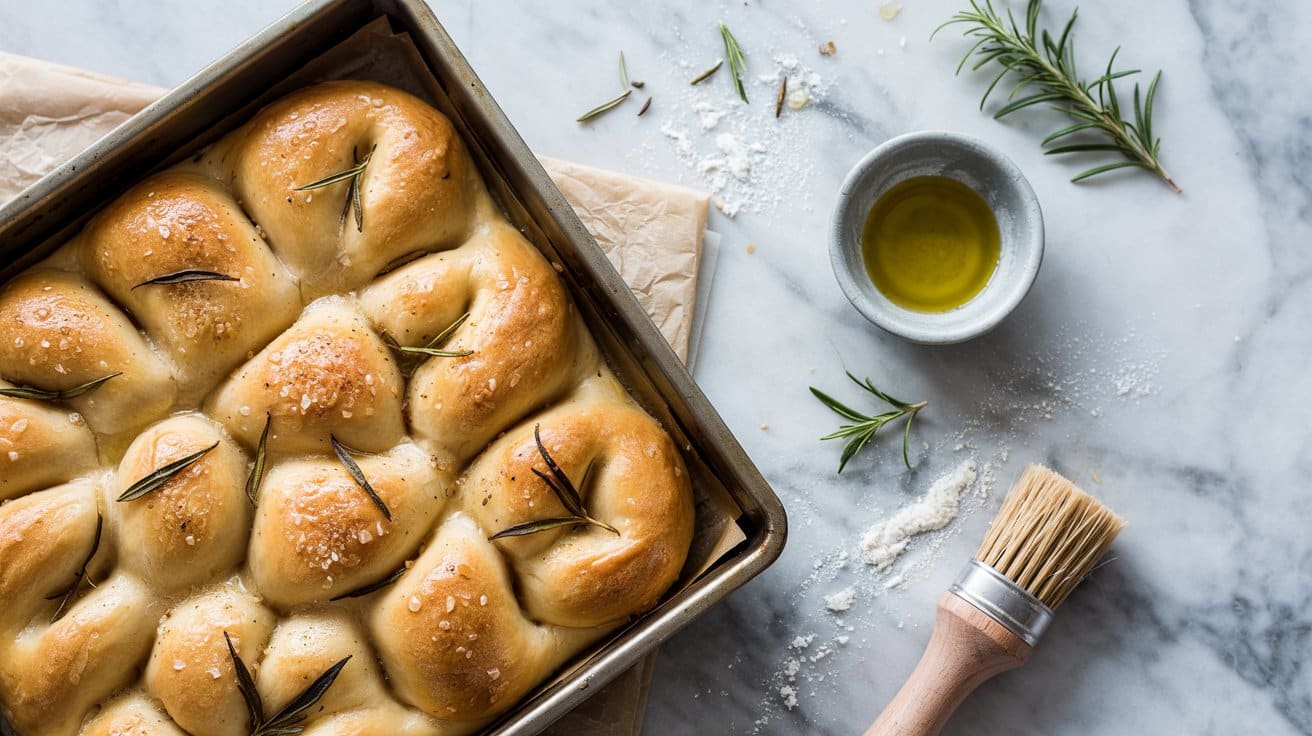
No-knead rosemary focaccia, an Italian flatbread, is a simple and satisfying bread that you can make without standing over the dough or working it extensively. The dough spends time rising slowly, developing a lovely structure and flavor with little intervention.
Topped with fresh rosemary (or rosemary alternatives for savory dishes) and coarse sea salt, it delivers a classic herby aroma and taste that pairs well with sandwiches, soups, or meals on their own.
Why This Recipe Works
This focaccia recipe combines ease and flavor, making fresh homemade bread accessible for busy cooks. It balances a crisp outside with a soft, open crumb inside for a versatile, crowd-pleasing bread.
- Convenience - Requires no kneading, saving time and avoiding complicated steps.
- Flavor balance - Fragrant rosemary and sea salt improve the mild, slightly tangy dough.
- Texture - Crisp crust contrasts with a light, airy interior for enjoyable mouthfeel.
- Appeal - Works well for casual meals or as a shareable appetizer with dips or toppings.
Ingredient Swap Ideas
Adjusting ingredients here can help you fit different dietary preferences or available pantry items without losing the bread's core character.
- Olive oil - Use avocado oil or another neutral oil if you prefer a lighter flavor.
- Fresh rosemary - Substitute with dried rosemary or a mix of other herbs like thyme or oregano.
- All-purpose flour - Try bread flour for more chew or a gluten-free flour blend designed for yeast breads.
- Sea salt - Regular kosher salt or flaky salt can be used to finish the focaccia, depending on texture preference.
Ingredients
- 3 ¼ cups all-purpose flour
- 1 teaspoon active dry yeast
- 1 ¼ teaspoons salt
- 1 ½ cups warm water
- 2 tablespoons olive oil, plus more for drizzling
- 2 tablespoons fresh rosemary leaves, chopped
- 1 teaspoon coarse sea salt
Instructions
- In a large bowl, combine the flour, yeast, and salt. Stir in the warm water and 2 tablespoons of olive oil using a wooden spoon or spatula until it forms a shaggy, sticky dough.
- Cover the bowl with plastic wrap or a clean kitchen towel and let the dough rise at room temperature for 12 to 18 hours. It should double in size and look bubbly on the surface.
- Lightly oil a 9x13-inch baking pan or sheet pan. Gently pour the dough into the pan and spread it evenly with your hands, being careful not to deflate it completely.
- Drizzle a little olive oil on top, then sprinkle the chopped rosemary and coarse sea salt evenly over the dough. Let it rest and rise again for about 45 minutes.
- Preheat the oven to 450°F (230°C). Bake the focaccia for 20 to 25 minutes or until the top is golden brown and crisp. Remove from the oven and allow it to cool slightly before slicing and serving.
4. No-Knead Olive and Herb Bread
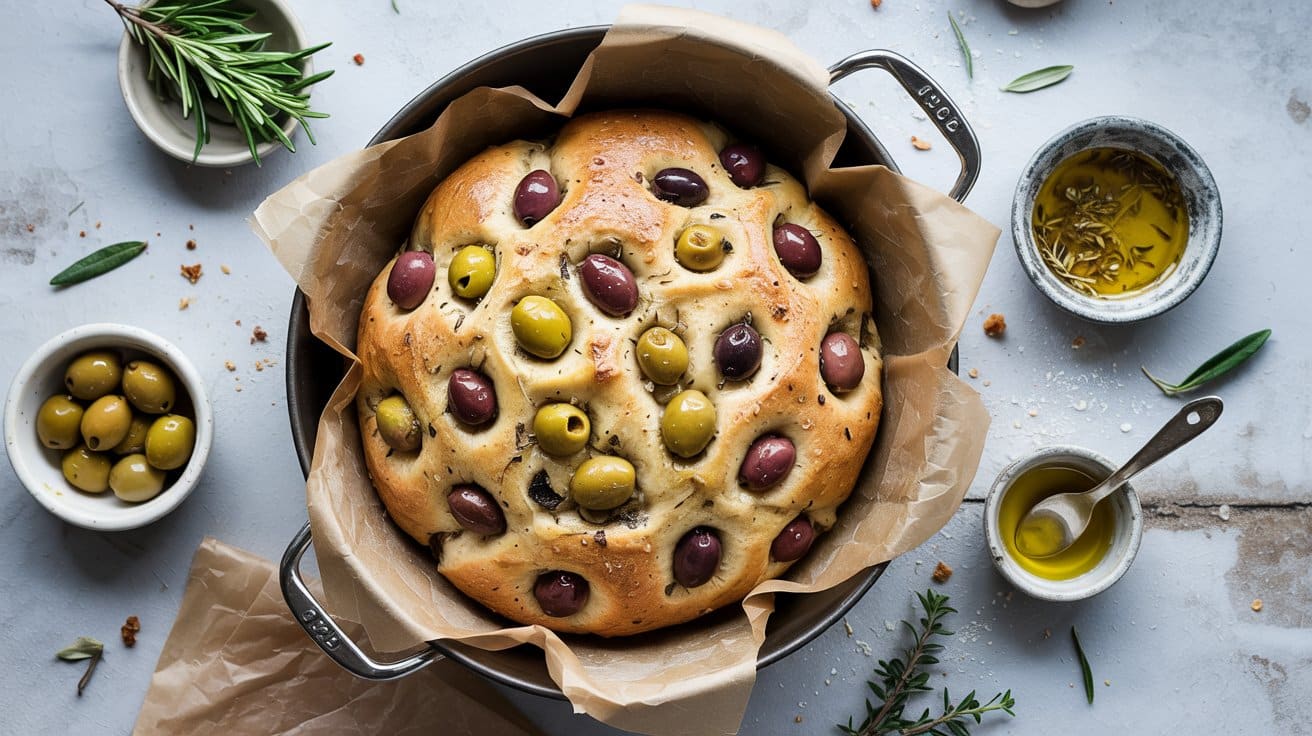
This no-knead olive and herb bread is a great way to bring Mediterranean flavors to your table without spending hours in the kitchen. The combination of briny olives and fresh herbs like rosemary and thyme creates a fragrant, savory loaf with a tender crumb and crisp crust.
Making this bread requires minimal hands-on time, making it an ideal option for busy days. Once the dough is mixed, you let it rest, then bake and enjoy warm slices that go well with soups, salads, or roasted dishes.
Why This Recipe Works
This recipe offers a straightforward way to bake artisan-style bread packed with flavor and texture.
- Convenience - Requires no kneading and minimal prep, perfect for a busy schedule.
- Flavor balance - Combines the saltiness of olives with the freshness of herbs for a well-rounded taste.
- Texture - Produces a crusty exterior with a soft and chewy inside.
- Versatility - Works well as a side, sandwich base, or snack on its own.
Ingredient Swap Ideas
Swapping ingredients can help you adjust the bread for different preferences or dietary considerations without losing the essence of the recipe.
- Olives - Use green olives instead of black for a milder, tangier flavor.
- Herbs - Substitute rosemary and thyme with basil or oregano to tune the taste toward your liking.
- Flour - Swap half the all-purpose flour with whole wheat flour for a nuttier, heartier loaf.
- Olive oil - Use avocado oil or sunflower oil as alternatives if needed.
Ingredients
- 3 cups all-purpose flour
- 1 ½ teaspoons salt
- ½ teaspoon instant yeast
- 1 ½ cups warm water
- 1 cup pitted olives, chopped
- 2 tablespoons fresh rosemary, chopped
- 1 tablespoon fresh thyme leaves
- 2 tablespoons extra-virgin olive oil
Instructions
- In a large mixing bowl, combine the flour, salt, and instant yeast. Stir until evenly mixed.
- Add the warm water and olive oil to the dry ingredients. Mix with a wooden spoon until a shaggy, sticky dough forms.
- Fold in the chopped olives, rosemary, and thyme until distributed throughout the dough. Cover the bowl with plastic wrap or a clean towel. Let it rest at room temperature for 12 to 18 hours until bubbly and doubled in size.
- Lightly flour a surface and tip the dough out. Shape it gently into a round loaf without kneading. Place the dough on a well-floured kitchen towel, cover it, and let it rise for 1 to 2 hours until puffed.
- Preheat your oven to 450°F (230°C) and place a heavy Dutch oven or oven-safe pot with a lid inside to heat. Carefully transfer the dough into the hot pot, cover with the lid, and bake for 30 minutes. Remove the lid and bake for an additional 15 to 20 minutes until the crust is golden and crisp.
Allow the bread to cool on a rack before slicing. Enjoy this fresh, aromatic bread alongside your preferred dishes or with a drizzle of olive oil.
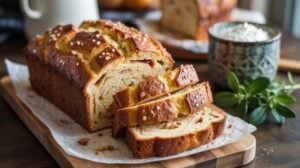
5. No-Knead Cinnamon Raisin Bread
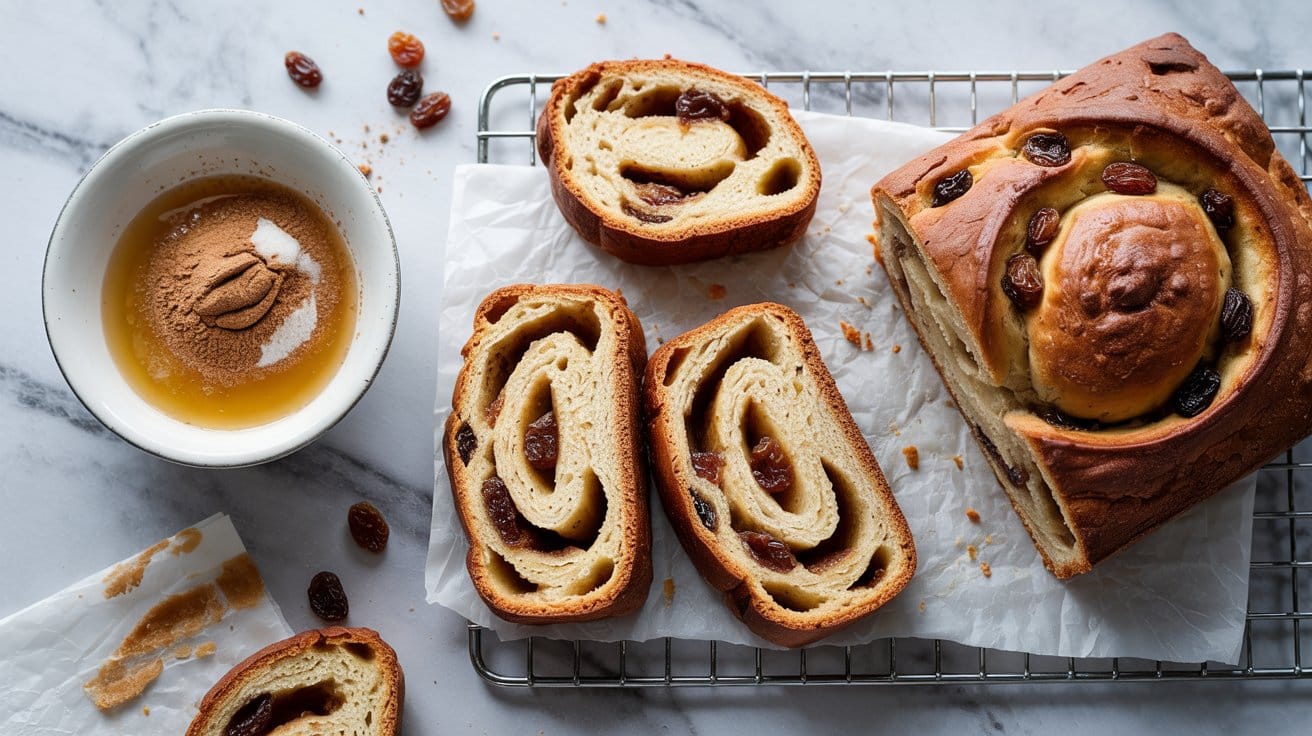
This no-knead cinnamon raisin bread brings a comforting mix of warm spice and sweet raisins into a tender, satisfying loaf. Its slightly sweet flavor and soft crumb are perfect for breakfast or a cozy afternoon snack with tea or coffee.
Making this bread requires minimal hands-on time, so it's a great choice when you want homemade bread without spending much time at the counter. The slow rise helps develop flavor while you focus on other tasks.
Why This Recipe Works
This recipe combines ease and delicious flavor into a loaf that feels homemade with little fuss.
- Convenience - Requires no kneading, making it simple to prepare even on busy days.
- Flavor balance - The cinnamon goes well with raisins for a warm, slightly sweet taste.
- Texture - Yields a soft, tender crumb with a light crust that's enjoyable to bite into.
- Appeal - Works well for breakfast, snacks, or sharing at gatherings with family and friends.
Ingredient Swap Ideas
Swapping ingredients in this recipe lets you adjust sweetness, add different textures, or accommodate dietary needs without losing the essence of the bread.
- Raisins - Replace with dried cranberries, chopped dates, or currants for varied fruit flavors.
- All-purpose flour - Use whole wheat flour for a nuttier taste and added fiber, but expect a denser loaf.
- Cinnamon - Swap with pumpkin pie spice or nutmeg for a different but complementary warm spice profile.
- Sugar - Substitute brown sugar or maple syrup instead of granulated sugar for a richer sweetness.
Ingredients
- 3 cups all-purpose flour
- 2 teaspoons ground cinnamon
- ¼ cup granulated sugar
- 1 teaspoon salt
- ½ teaspoon instant yeast
- 1 cup warm water (about 110°F)
- 1 cup raisins, soaked in warm water for 10 minutes and drained
- 2 tablespoons unsalted butter, melted (optional for brushing)
Instructions
- In a large bowl, whisk together the flour, cinnamon, sugar, salt, and yeast until well combined.
- Add the warm water and stir until a shaggy dough forms. Fold in the drained raisins evenly.
- Cover the bowl tightly with plastic wrap or a damp towel, and let the dough rise at room temperature for 12 to 18 hours until doubled and bubbly.
- Lightly flour a work surface and gently turn the dough out. Shape it into a rough ball without kneading. Place it on a parchment-lined baking sheet, cover loosely, and let it rest for 1 to 2 hours.
- Preheat the oven to 400°F. Optionally, brush the loaf with melted butter for a softer crust. Bake for 30 to 35 minutes, until golden brown and sounds hollow when tapped. Let cool before slicing.
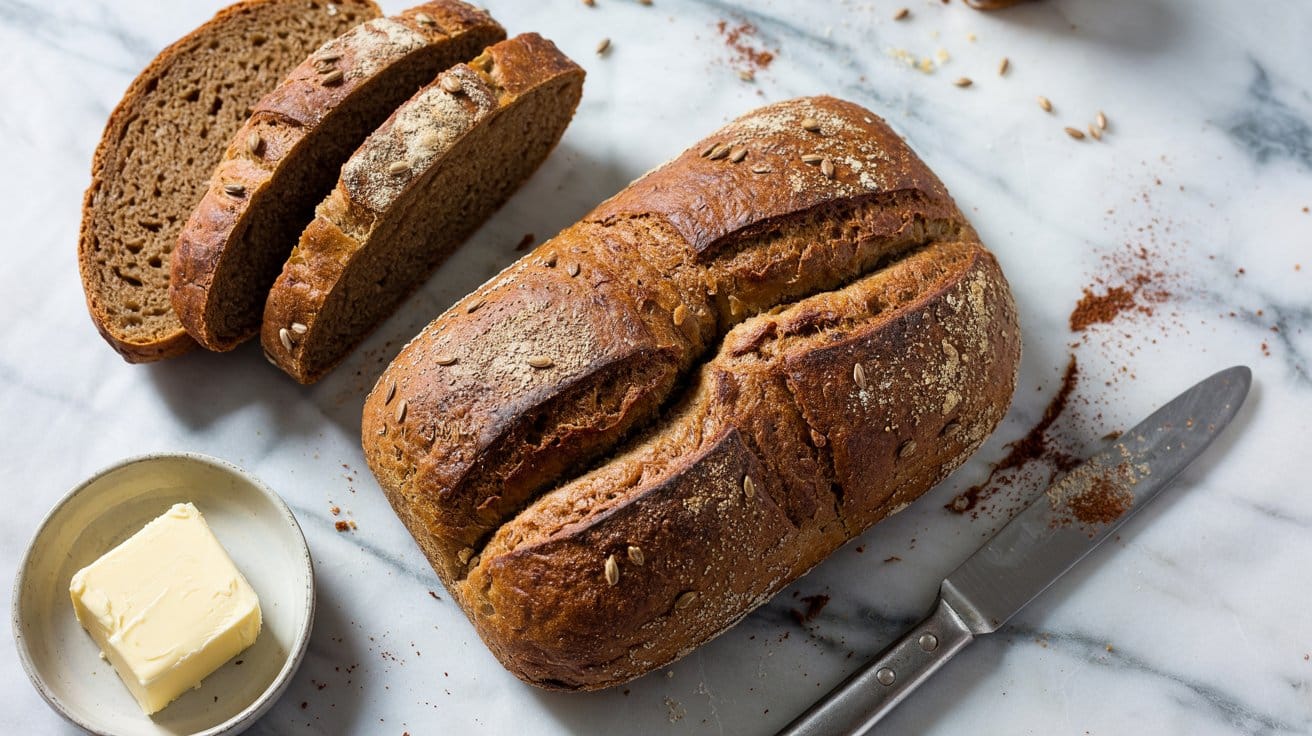
6. No-Knead Seeded Multigrain Bread
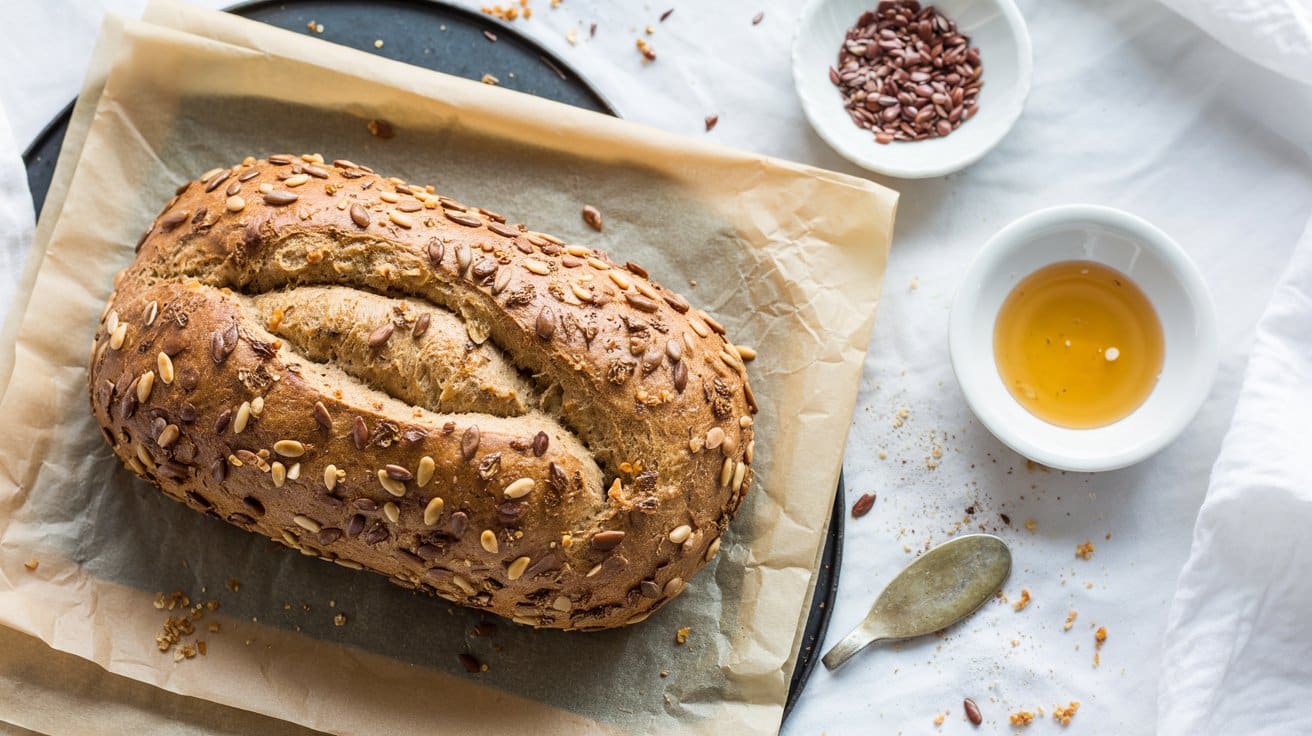
This no-knead seeded multigrain bread is a fantastic option if you're aiming for something straightforward yet packed with nutrition. The combination of sunflower, flax, and sesame seeds gives it a satisfying crunch and a boost of healthy fats, making every bite both filling and flavorful.
You'll appreciate how simple the preparation is, especially since no kneading is required-just mix, rest, and bake.
The loaf develops a beautifully textured crust on the outside, while staying moist and tender inside. It works well for sandwiches, toast, or simply served with butter.
This bread fits perfectly into a busy lifestyle where wholesome, homemade baked goods make a meaningful difference without taking up too much time.
Why This Recipe Works
This seeded multigrain bread balances convenience and nutrition, making it an excellent choice for everyday baking.
- Ease of preparation - No kneading needed; just mix the ingredients and let the dough rise.
- Nutritional boost - Packed with sunflower, flax, and sesame seeds for added fiber and healthy fats.
- Texture contrast - Crunchy seeds on a chewy, tender crumb offer a satisfying bite.
- Versatility - Suitable for sandwiches, toast, or as a side to soups and salads.
Ingredient Swap Ideas
Swapping ingredients helps you adjust the recipe to your preferences or dietary requirements while maintaining its wholesome character.
- Seeds - Replace sunflower, flax, or sesame seeds with pumpkin seeds or chia seeds for a different flavor or texture profile.
- Flour - Use whole wheat flour or spelt flour instead of all-purpose flour to increase fiber content and add a nutty taste.
- Sweetener - Substitute honey or maple syrup with agave nectar or omit it for a less sweet loaf.
- Salt - Use sea salt or pink Himalayan salt, which might give a subtle variation in taste.
Ingredients
- 3 cups all-purpose flour
- ½ cup whole wheat flour
- 2 teaspoons instant yeast
- 1 ½ teaspoons salt
- 1 ½ cups warm water
- 2 tablespoons honey or maple syrup
- ⅓ cup sunflower seeds
- 2 tablespoons flaxseeds
- 2 tablespoons sesame seeds
- Additional seeds for sprinkling on top (optional)
Instructions
- In a large mixing bowl, combine the all-purpose flour, whole wheat flour, instant yeast, and salt. Mix them until evenly distributed.
- Pour in the warm water and honey or maple syrup. Stir the mixture with a wooden spoon until it forms a rough dough.
- Add the sunflower seeds, flaxseeds, and sesame seeds to the dough and fold them in gently so the seeds are well incorporated.
- Cover the bowl with plastic wrap or a clean towel and let the dough rest at room temperature for 12 to 18 hours. The dough will rise and become bubbly.
- After the resting period, preheat the oven to 450°F (230°C) and place a covered Dutch oven or heavy oven-safe pot inside to heat.
- Turn the dough onto a floured surface, shape it into a round loaf, and sprinkle extra seeds on top if you like.
- Carefully remove the hot pot from the oven, place the dough inside, cover with the lid, and bake for 30 minutes.
- Remove the lid and bake for an additional 10 to 15 minutes to develop a golden, crisp crust.
- Transfer the bread to a wire rack and allow it to cool completely before slicing.
Enjoy this hearty multigrain bread as a nutritious base for your favorite spreads and sandwiches.
7. No-Knead Sourdough-Style Bread
This no-knead sourdough-style bread offers the tangy flavor and chewy texture that sourdough lovers appreciate, but without the usual shaping and kneading work. It uses a wild yeast starter to bring out that distinct sour note and develops a lovely crust with minimal handling.
The recipe is straightforward to follow, making it a practical choice for busy cooks who want artisan-style bread on the table with less fuss. It's a rewarding bake that suits sandwiches, toast, or simply enjoying with butter.
Why This Recipe Works
This recipe simplifies sourdough baking while delivering flavorful, crusty bread with a tender crumb. It fits well into a busy lifestyle without compromising on quality or taste.
- Convenience - Requires minimal shaping and no kneading, ideal for a low-maintenance bread bake.
- Flavor balance - The wild yeast starter creates a pleasant tang that enhances natural wheat flavors.
- Texture - Results in a crisp, golden crust with a soft, airy interior.
- Appeal - Versatile enough for everyday meals or casual entertaining.
Ingredient Swap Ideas
Swapping some ingredients can help you adjust this bread to suit gluten sensitivity, taste preferences, or what you have on hand.
- Flour - Substitute part or all-purpose flour with whole wheat for a nuttier taste and added fiber.
- Starter - Use a ripe sourdough starter or a naturally fermented preferment for similar results.
- Salt - Use sea salt or kosher salt interchangeably to suit your preferred grain size.
- Liquid - Replace water with a mild herbal tea or milk alternative for subtle flavor changes.
Ingredients
- 3 cups all-purpose flour
- 1 ½ teaspoons salt
- 1 ½ cups warm water
- ½ cup active sourdough starter
- Additional flour for dusting
Instructions
- In a large bowl, combine the flour and salt, mixing well to distribute the salt evenly.
- Add the warm water and sourdough starter to the dry ingredients. Stir with a wooden spoon or spatula until just combined into a sticky dough.
- Cover the bowl loosely with plastic wrap or a damp towel, and let it rise at room temperature for 12 to 18 hours until the surface is bubbly and the dough has roughly doubled in size.
- Generously flour your work surface. Turn the dough out onto it and fold it over itself a few times to shape into a rough ball. Let it rest for 15 minutes.
- Shape the dough into a tighter ball without kneading, place it seam-side down on a well-floured proofing cloth or parchment paper. Cover and allow it to rest for 1 to 2 hours until it has risen noticeably.
- Preheat your oven to 450°F (230°C) with a heavy lidded Dutch oven inside for at least 30 minutes. Carefully transfer the dough (still on parchment) into the hot Dutch oven, cover, and bake for 30 minutes.
- Remove the lid and bake uncovered for an additional 15 to 20 minutes until the crust turns deeply golden and crisp.
- Let the bread cool completely on a wire rack before slicing to finish the cooking process and avoid a gummy interior.
This no-knead sourdough-style bread rewards you with a rustic loaf combining tangy flavor and a satisfying crust, all with simple steps and minimal handling.
8. No-Knead Beer Bread
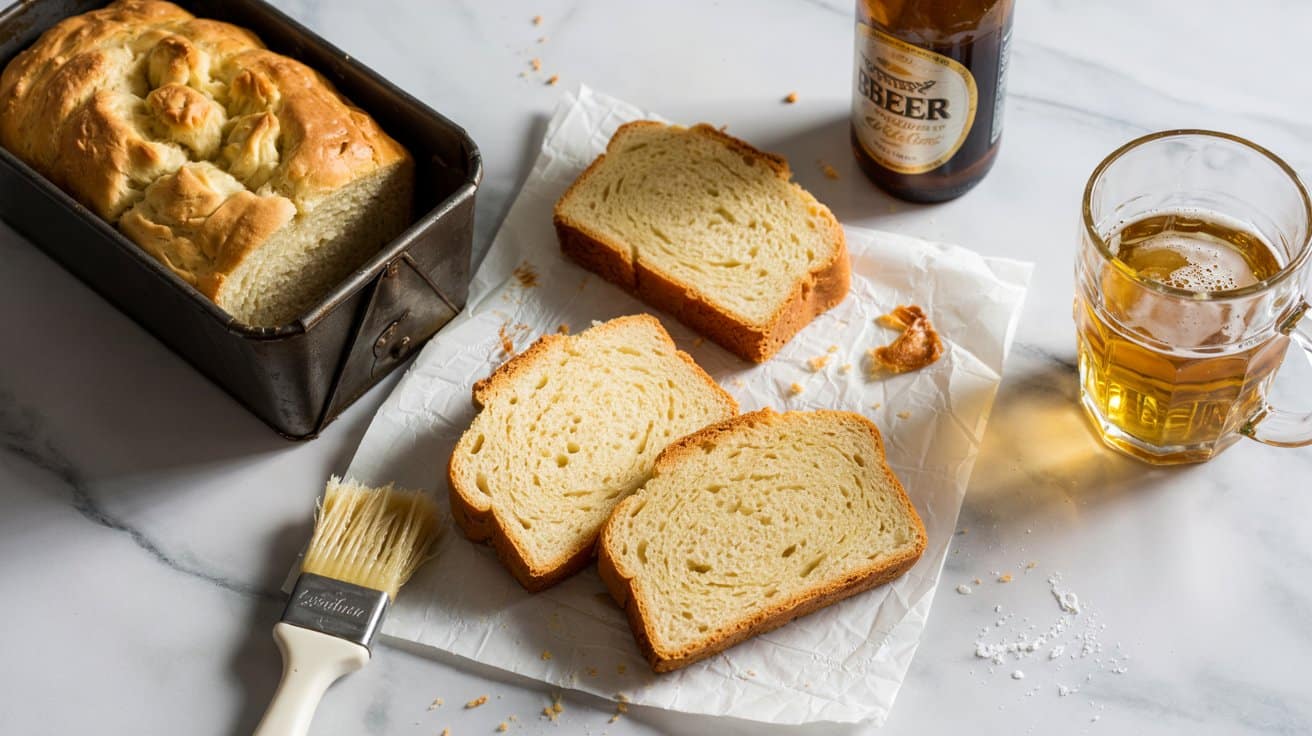
No-knead beer bread is a straightforward recipe that fits perfectly into a busy schedule. It uses just a few simple ingredients and skips the time-consuming kneading process, making fresh homemade bread accessible even on a hectic day.
The beer adds a mild maltiness and helps create a tender crumb with a crisp crust. This bread pairs well with soups, stews, or just a smear of butter, making it a versatile addition to any meal.
Why This Recipe Works
This bread recipe offers an easy way to bake satisfying homemade bread with minimal fuss and ingredients. Its delicious flavor and texture come through without complicated steps.
- Convenience - Requires no kneading and minimal prep time.
- Flavor balance - Beer provides a subtle malt note that goes with the bread's mild taste.
- Texture - Crisp crust with a soft, tender crumb inside.
- Appeal - Suitable for casual family meals or snack time.
Ingredient Swap Ideas
Adjusting the ingredients can help tailor this recipe for various preferences or dietary restrictions while keeping the core bread qualities intact.
- Beer substitute - Use sparkling water or soda water to maintain the rise if you prefer no alcohol.
- Flour option - Try whole wheat flour for a heartier, more fiber-rich loaf.
- Fat addition - Replace melted butter with olive oil for a different flavor and dairy-free option.
- Seasonings - Add herbs like rosemary or thyme for an herby twist.
Ingredients
- 3 cups all-purpose flour
- 1 tablespoon baking powder
- 1 teaspoon salt
- 12 ounces beer (room temperature)
- 2 tablespoons melted butter
Instructions
- Preheat the oven to 375°F (190°C). Grease a 9x5-inch loaf pan or line it with parchment paper.
- In a large mixing bowl, whisk together the flour, baking powder, and salt until evenly combined.
- Pour in the beer and stir with a wooden spoon until just mixed; the batter will be sticky and thick.
- Transfer the dough to the prepared pan and smooth the top with a spatula. Brush the melted butter over the surface.
- Bake for 45 to 55 minutes until the top is golden brown and a toothpick inserted in the center comes out clean. Let the bread cool in the pan for 10 minutes before removing to a wire rack.
Serve warm or at room temperature with your favorite toppings or alongside meals. This no-knead beer bread offers hearty flavor and simple preparation in one loaf.
9. No-Knead Cheddar Jalapeño Bread
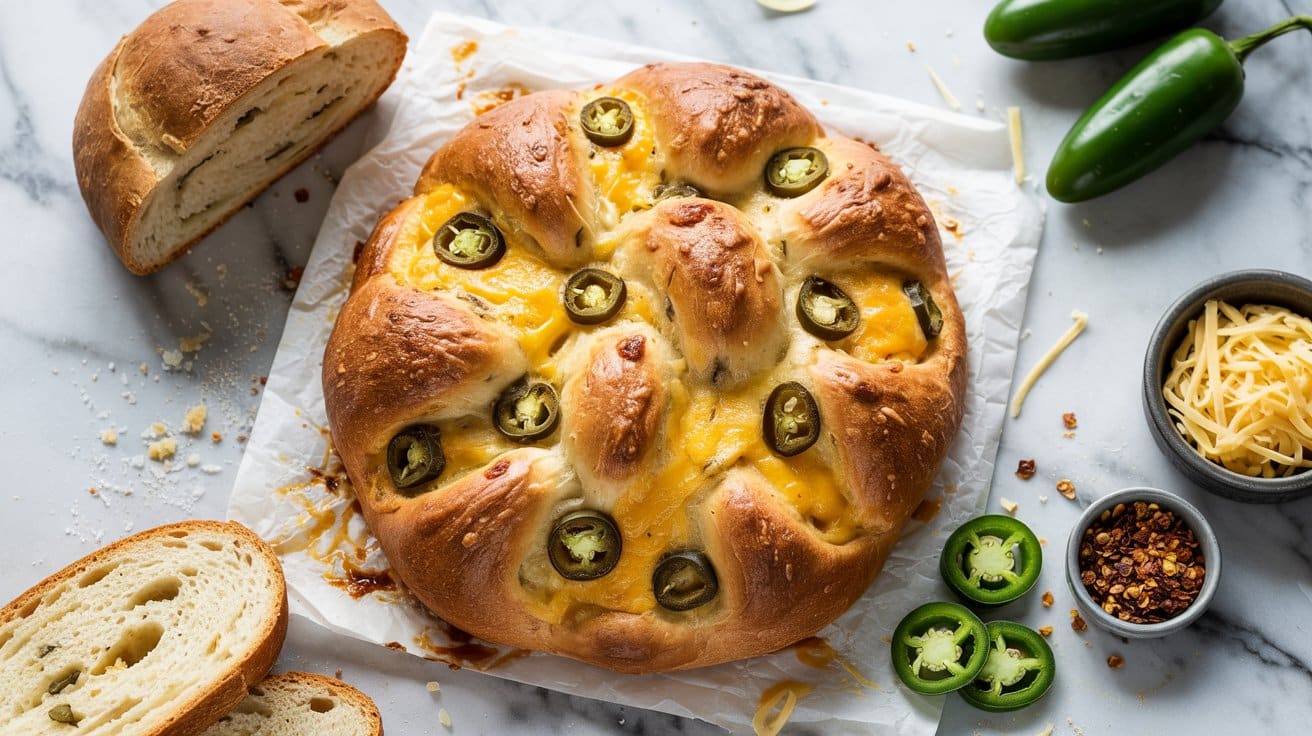
This no-knead cheddar jalapeño bread is a bold, savory loaf that combines melted cheese and spicy jalapeños for a flavorful bite every time. The crust turns beautifully crisp as it bakes, while the interior stays soft and tender, making it a satisfying choice for sandwiches or a snack on its own.
It's an easy bread to make because it requires no kneading, just mixing and a bit of patience while the dough rises. This is a great option for those who want to enjoy homemade rustic bread with some heat and cheesiness but prefer a simple, hands-off approach.
Why This Recipe Works
This bread balances convenience, flavor, and texture, making it an excellent choice for busy cooks who want something tasty and unique. The combination of sharp cheddar and spicy jalapeños adds a lively twist to a traditional no-knead bread.
- Convenience - Requires no kneading and minimal active prep time.
- Flavor balance - Combines rich, tangy cheddar with the bright heat of jalapeños.
- Texture - Features a crisp crust with a soft, chewy crumb inside.
- Appeal - Suitable for family meals, gatherings, or as a snack, with a generous kick.
Ingredient Swap Ideas
Adjusting ingredients can tailor this bread to your taste preferences or dietary needs without losing its signature character. Simple swaps keep the loaf flavorful and enjoyable.
- Cheddar - Substitute with Monterey Jack or a mild cheddar if you prefer less sharp cheese.
- Jalapeños - Use pickled jalapeños for a tangier flavor or switch to milder peppers like poblano if you want less heat.
- Flour - Replace all-purpose flour with bread flour for a slightly chewier texture.
- Milk - Use water instead of milk for a dairy-free version; the bread will still rise well.
Ingredients
- 3 cups all-purpose flour
- ¼ teaspoon instant yeast
- 1 ½ teaspoons salt
- 1 ½ cups warm milk
- 1 cup sharp cheddar cheese, shredded
- 2 jalapeño peppers, finely chopped
- Optional: 1 tablespoon butter, melted
Instructions
- In a large mixing bowl, combine the flour, salt, and instant yeast. Stir in the warm milk until a sticky dough forms. Mix in the shredded cheddar and chopped jalapeños evenly throughout the dough.
- Cover the bowl with plastic wrap or a kitchen towel and let the dough rise at room temperature for 12 to 18 hours, until it has doubled in size and looks bubbly.
- Lightly flour a work surface and turn the dough out. Shape it gently into a round loaf by folding the edges inward. Place the dough seam-side down on a piece of parchment paper. Cover and let rest for 30 minutes.
- Preheat your oven to 450°F (230°C) with a Dutch oven or heavy oven-safe pot inside. Once hot, carefully transfer the dough with the parchment paper into the pot. Cover with the lid and bake for 30 minutes.
- Remove the lid and bake another 15 to 20 minutes until the crust is deep golden brown and crisp. Optionally, brush with melted butter right after baking. Let the bread cool completely before slicing.
This bread keeps well for a couple of days and makes a great accompaniment to soups, salads, or chili. Enjoy the spicy, cheesy flavor with every warm slice.
10. No-Knead Garlic and Herb Bread
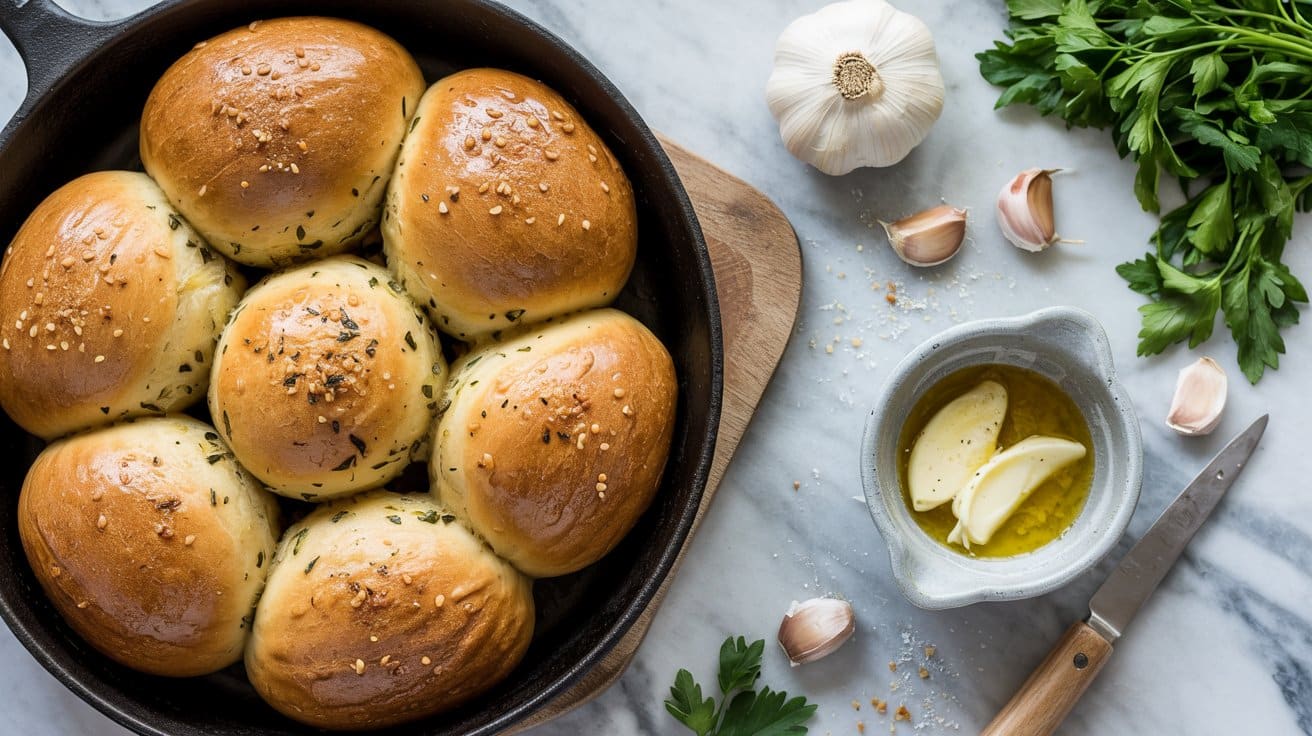
This no-knead garlic and herb bread brings together the rich, mellow flavor of roasted garlic with the fresh aroma of Italian herbs, creating a loaf that's both fragrant and flavorful. The simplicity of this recipe means you get a rustic, crusty bread with minimal hands-on time, perfect for a busy day or for sharing at a casual meal.
The bread has a delightfully crisp crust with a soft, airy crumb inside. It's ideal for dipping in olive oil or serving alongside soups and salads.
You'll find the herbs infuse the dough gently, offering a lovely subtle note that pairs well with the roasted garlic.
Why This Recipe Works
This recipe balances ease and flavor, resulting in a fresh, herb-infused bread with minimal effort. It fits well into everyday cooking, offering satisfying taste with simple ingredients.
- Convenience - Requires no kneading and only one rise, saving time and effort.
- Flavor balance - Roasted garlic and Italian herbs give a savory, aromatic touch without overpowering.
- Texture - Crisp, golden crust with a tender, open crumb inside.
- Versatility - Works as a side or for sandwiches, suitable for many occasions.
Ingredient Swap Ideas
Swapping ingredients can adapt this bread to your preferences or dietary needs while keeping the essential flavors intact.
- Herb blend - Use fresh herbs like rosemary, thyme, or parsley instead of dried for a brighter flavor.
- Flour type - Substitute half of the all-purpose flour with whole wheat for a nuttier taste and extra fiber.
- Garlic preparation - Use garlic powder instead of roasted garlic if short on time, though the flavor will be less mellow.
- Liquid choice - Replace water with milk or a plant-based alternative to enrich the dough slightly.
Ingredients
- 3 cups all-purpose flour
- ¼ teaspoon active dry yeast
- 1 ¼ teaspoons salt
- 1 head garlic
- 1 ½ teaspoons Italian seasoning
- 1 ½ cups warm water
- 2 tablespoons olive oil
Instructions
- Preheat the oven to 400°F (200°C). Cut the top off the garlic head, drizzle with olive oil, wrap in foil, and roast for 30-35 minutes until soft. Let cool, then squeeze out the roasted garlic cloves and mash into a paste.
- In a large bowl, whisk together the flour, yeast, salt, and Italian seasoning. Add the mashed roasted garlic and warm water. Stir until all ingredients are mixed into a sticky dough.
- Cover the bowl loosely with plastic wrap or a clean towel. Let the dough rest at room temperature for 12 to 18 hours, until it has risen and bubbles form on the surface.
- Generously flour a work surface and your hands. Turn the dough out and fold it over itself gently a couple of times to shape. Place the dough seam-side down on a well-floured kitchen towel, cover, and let rest for 30 minutes.
- Place a Dutch oven or heavy pot with lid in the oven to heat for 30 minutes. Carefully transfer the dough into the hot pot, cover with the lid, and bake for 30 minutes. Remove the lid and bake for an additional 10-15 minutes until the crust is deep golden brown.
- Let the bread cool on a rack for at least 1 hour before slicing. This allows the crumb to set and improves texture.
Serve warm or at room temperature for dipping in olive oil or alongside your favorite dishes.
11. No-Knead Rustic Rye Bread
This no-knead rustic rye bread combines the hearty, earthy flavor of rye with the lighter texture of all-purpose flour to create a dense but approachable loaf. The method requires minimal hands-on time, making this bread a great choice when you want fresh, homemade bread without intensive work.
The crust turns beautifully crisp while the interior stays chewy and packed with rich rye taste. It's a versatile loaf that works well for sandwiches, toasting, or enjoying alongside soups and stews.
Why This Recipe Works
This recipe offers a straightforward approach to baking flavorful, rustic bread without complex techniques or equipment.
- Minimal hands-on time - Mix the dough once and let it rise slowly, eliminating the need for kneading.
- Rich flavor - Rye flour lends a deep, nutty taste that enhances simple meals.
- Satisfying texture - Crisp crust balances a chewy, dense crumb.
- Versatile use - Suitable for everything from sandwiches to dipping in olive oil or broth.
Ingredient Swap Ideas
Swapping ingredients can help accommodate dietary needs or flavor preferences while keeping the essence of this rye bread intact.
- Whole wheat flour - Substitute part of the all-purpose flour for whole wheat to boost fiber and add a nutty note.
- Vital wheat gluten - Add a tablespoon to improve structure if using more rye flour, as rye lacks gluten.
- Honey or molasses - Use a tablespoon of either instead of sugar to enrich the flavor with subtle sweetness.
- Gluten-free flour blend - Replace the flours with a gluten-free mix and a xanthan gum addition, adapting for gluten intolerance.
Ingredients
- 1 ½ cups warm water
- 2 ¼ teaspoons active dry yeast
- 1 tablespoon granulated sugar
- 1 cup rye flour
- 1 ½ cups all-purpose flour
- 1 teaspoon salt
- Cornmeal or additional flour
Instructions
- In a large mixing bowl, combine warm water, yeast, and sugar. Stir gently and let sit for about 5 minutes until the mixture becomes foamy.
- Add the rye flour, all-purpose flour, and salt to the yeast mixture. Stir with a wooden spoon until the dough comes together into a shaggy ball. No kneading needed.
- Cover the bowl with a clean towel or plastic wrap. Let the dough rest at room temperature for 12 to 18 hours. It will rise and develop a bubbly surface.
- After the rise, turn the dough out onto a well-floured surface. Shape it gently into a round loaf, dusting with cornmeal or flour to prevent sticking.
- Place the dough seam-side down on parchment paper, cover with a towel, and let rise another 1 to 2 hours until slightly puffed. Preheat the oven to 450°F with a heavy covered pot inside.
- Transfer the dough on the parchment to the hot pot, cover with the lid, and bake for 30 minutes. Remove the lid and bake an additional 10 to 15 minutes to crisp the crust.
- Cool the bread completely on a wire rack before slicing to finish setting the crumb.
This simple no-knead rye bread recipe results in a loaf that's approachable and deeply flavorful-a reliable choice for anyone seeking homemade rustic bread.
12. No-Knead Sweet Potato Bread
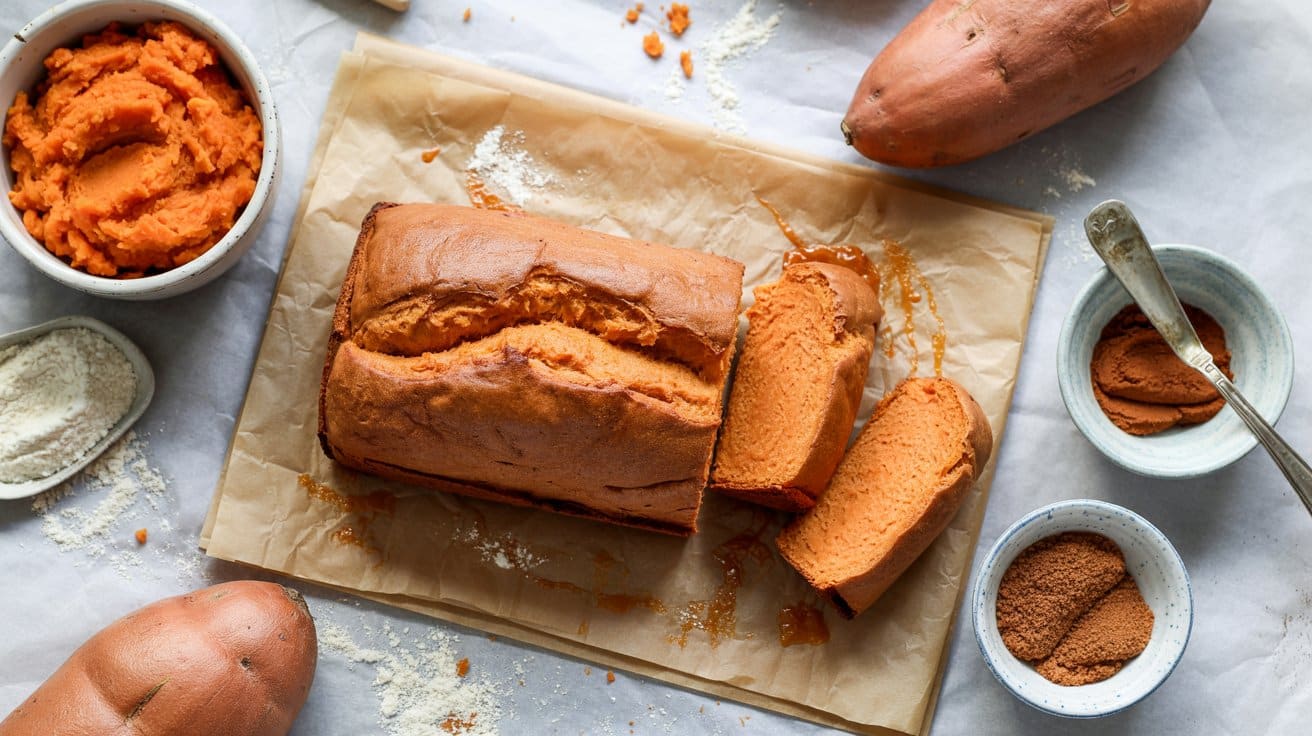
This no-knead sweet potato bread is a simple and satisfying way to bring a touch of natural sweetness and extra moisture to your homemade bread. Using mashed sweet potatoes gives the loaf a soft crumb and a lovely subtle flavor that pairs well with both sweet and savory toppings.
The recipe requires minimal hands-on time, making it accessible even if you're short on time or not comfortable with traditional bread baking techniques. It's a great choice when you want fresh bread without the usual kneading or intense effort.
Why This Recipe Works
This recipe delivers a soft, tender loaf with a slightly sweet undertone thanks to the mashed sweet potatoes. It's easy to prepare, requiring no kneading, and offers satisfying, wholesome bread with minimal fuss.
- Convenience - No kneading and minimal active prep make this recipe beginner-friendly and time-efficient.
- Texture - The mashed sweet potato adds moisture, resulting in a soft crumb and tender bite.
- Flavor balance - The subtle sweetness of sweet potatoes enhances the bread's flavor without overpowering it.
- Versatility - This bread pairs well with a variety of spreads and fillings for meals or snacks.
Ingredient Swap Ideas
Swapping ingredients can adapt this recipe to suit different dietary preferences or ingredient availability while keeping its core qualities intact.
- All-purpose flour can be replaced with whole wheat flour for a nuttier flavor and added fiber.
- Sweet potatoes can be swapped for pumpkin puree or butternut squash for a different but still sweet and moist effect.
- Active dry yeast can be substituted with instant yeast, adjusting proofing times accordingly.
- Honey or maple syrup can be replaced with agave nectar or brown sugar to vary the sweetness slightly.
Ingredients
- 1 cup mashed sweet potatoes
- 3 cups all-purpose flour
- 1 teaspoon salt
- 1 tablespoon sugar or honey
- ½ teaspoon active dry yeast
- 1 cup warm water
- 2 tablespoons olive oil
Instructions
- In a large mixing bowl, combine warm water, sugar or honey, and yeast. Stir gently and let it sit for 5 to 10 minutes until the mixture becomes foamy.
- Add mashed sweet potatoes, olive oil, and salt to the yeast mixture. Stir to combine. Gradually fold in the flour until you form a sticky, shaggy dough.
- Cover the bowl tightly with plastic wrap or a clean kitchen towel. Let the dough rise at room temperature for 8 to 12 hours, or until it has doubled in size and is bubbly on the surface.
- Lightly flour a work surface and shape the dough into a round loaf without kneading. Place it onto parchment paper and cover it with a towel. Allow it to rise for about 1 hour until puffed.
- Preheat the oven to 450°F (230°C) with a Dutch oven or heavy oven-safe pot inside. Carefully transfer the dough on the parchment into the hot pot, cover with the lid, and bake for 30 minutes. Remove the lid and bake for an additional 10 to 15 minutes until the crust is golden brown.
- Cool the bread completely on a wire rack before slicing to ensure the crumb sets nicely.
This no-knead sweet potato bread offers a straightforward way to enjoy fresh, homemade bread with added moisture and natural sweetness. It's an easy loaf to make any day of the week.
13. No-Knead French Batard
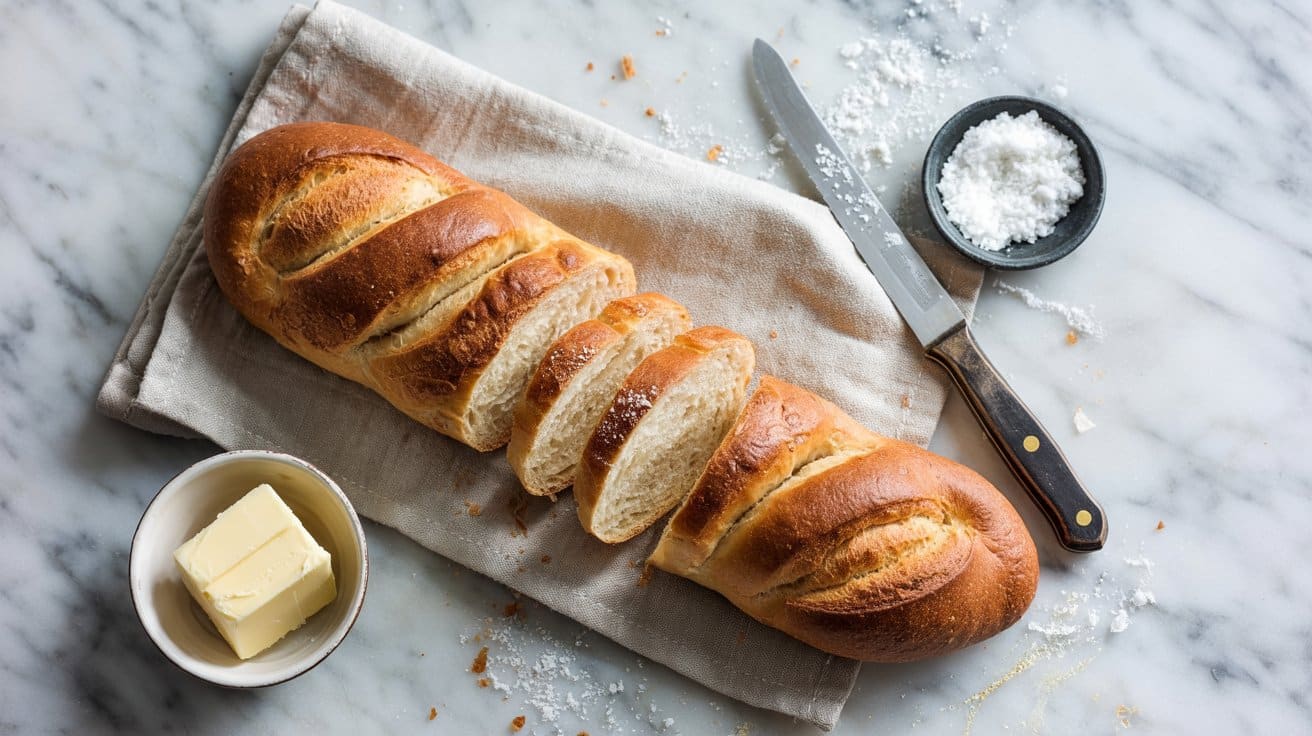
This no-knead French batard recipe offers a simple way to enjoy freshly baked artisan-style bread without spending a lot of time kneading dough. The batard shape is a classic French form-more oval than a traditional baguette-which creates a crusty exterior with a soft, airy crumb inside.
Its thin, crisp crust contrasts nicely with the tender interior, making it a wonderful choice for sandwiches or serving alongside soups and salads. The minimal hands-on time means you can prepare this lovely bread even after a busy day and still achieve bakery-worthy results.
Why This Recipe Works
This no-knead batard recipe is practical and rewarding, combining straightforward preparation with delicious taste and texture.
- Convenience - Requires minimal kneading and hands-on time, ideal for busy home cooks.
- Texture - Produces a thin, crisp crust and a soft, open crumb with satisfying chewiness.
- Flavor - Develops a subtle tang and deep, slightly nutty notes from long fermentation.
- Appearance - The classic batard shape lends a rustic and elegant touch to any meal.
Ingredient Swap Ideas
Adjusting ingredients can help tailor this batard to your preferences or dietary needs without losing its defining qualities.
- All-purpose flour - Use bread flour instead for a chewier texture and stronger gluten development.
- Water - Replace with an equal amount of filtered or spring water for a cleaner flavor.
- Salt - Opt for sea salt flakes or kosher salt for a different seasoning profile.
- Yeast - Instant yeast can substitute active dry yeast; adjust quantity slightly as needed.
Ingredients
- 3 cups all-purpose flour
- 1 ¼ cups warm water
- ¼ teaspoon active dry yeast
- 1 ½ teaspoons salt
Instructions
- In a large bowl, whisk together the flour, yeast, and salt until evenly combined. Slowly add warm water while stirring with a wooden spoon or spatula until a shaggy dough forms.
- Cover the bowl tightly with plastic wrap or a clean kitchen towel and let the dough rest at room temperature for 12 to 18 hours. It will bubble and rise significantly during this time.
- Lightly flour a clean surface and dump the dough out onto it. Gently fold it over itself a couple of times to shape into a rough oval batard. Avoid pressing or kneading out the air bubbles.
- Transfer the shaped dough onto parchment paper and cover loosely with a towel. Allow it to proof for 1 to 2 hours until it has noticeably puffed up. Meanwhile, preheat the oven to 450°F with a Dutch oven or heavy lidded pot inside to heat.
- Carefully place the parchment paper and dough inside the hot pot, score the top with a sharp knife, cover with the lid, and bake for 30 minutes. Remove the lid and bake an additional 10 to 15 minutes to develop a deep golden crust. Cool completely before slicing.
14. No-Knead Pumpkin Spice Bread
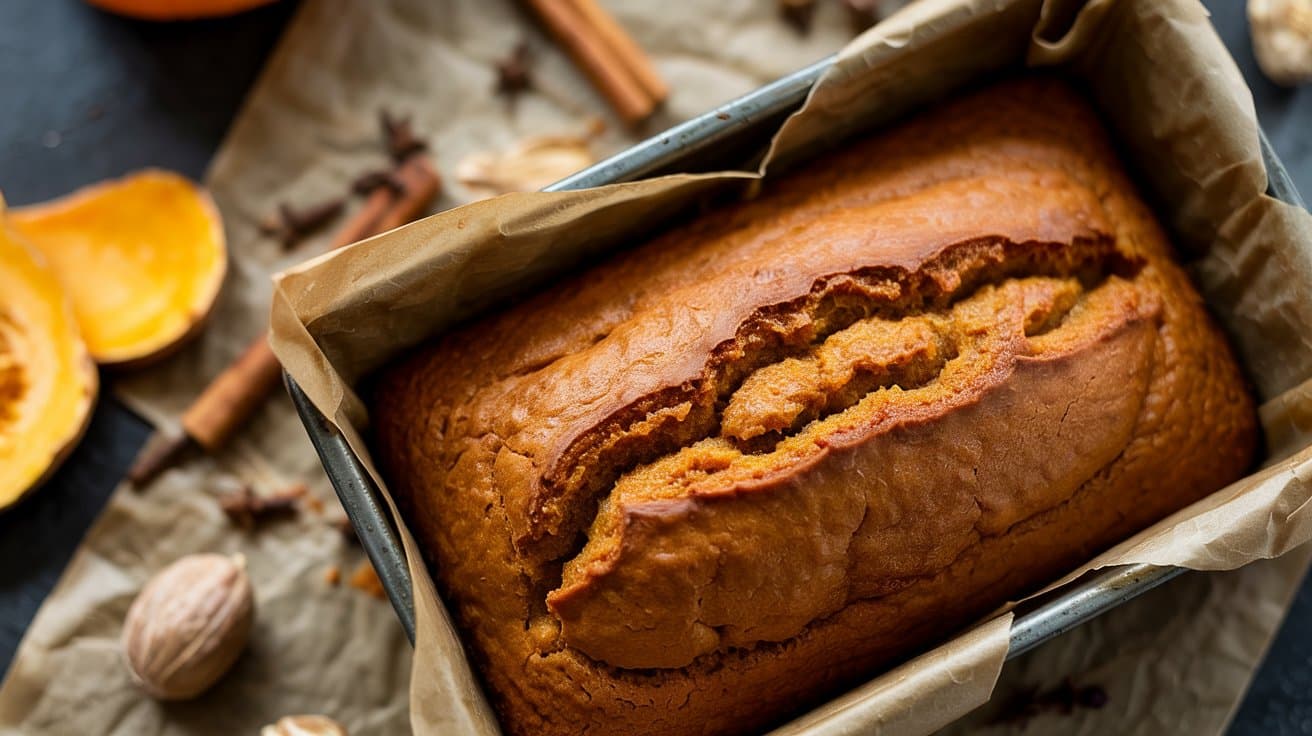
This No-Knead Pumpkin Spice Bread is a cozy, seasonal treat that's just right for autumn mornings or an afternoon snack. The bread combines the natural richness of pumpkin puree with warm spices like cinnamon and nutmeg, creating a soft, slightly sweet loaf that's satisfying without requiring much time or hands-on work.
With minimal preparation and no kneading needed, this recipe suits busy days when you want homemade comfort without the fuss. The texture stays tender and moist, while the spices offer just the right hint of warmth to brighten up your day.
Why This Recipe Works
This pumpkin bread is practical and flavorful, meeting the needs of busy home cooks seeking a straightforward yet comforting bake. The combination of spice and pumpkin offers a nostalgic taste of the season that's enjoyable for everyone.
- Convenience - Requires no kneading and minimal hands-on time, making it easy to prepare.
- Flavor balance - Combines mild sweetness with warming spices for a well-rounded taste.
- Texture - Delivers a moist crumb with a soft, tender bite throughout.
- Appeal - Works well for breakfast, snacks, or as part of seasonal gatherings.
Ingredient Swap Ideas
Adjusting ingredients helps fit dietary preferences or pantry availability without losing the essence of this pumpkin bread.
- Pumpkin puree - Substitute with canned sweet potato puree for a similar texture and sweetness.
- All-purpose flour - Use a gluten-free flour blend in equal parts to make it gluten-free.
- Brown sugar - Replace with coconut sugar for a lower glycemic index and subtle caramel notes.
- Spices - Swap pumpkin pie spice with a mix of ground cinnamon, ginger, and cloves if preferred.
Ingredients
- 2 cups all-purpose flour
- 1 teaspoon baking soda
- ½ teaspoon salt
- 1 ½ teaspoons pumpkin pie spice
- 1 cup pumpkin puree
- ¾ cup brown sugar
- ½ cup plain yogurt
- 2 large eggs
- 1 teaspoon vanilla extract
- Optional: ½ cup chopped nuts or chocolate chips
Instructions
- Preheat your oven to 350°F (175°C) and grease a standard 9x5-inch loaf pan.
- In a large bowl, whisk together the flour, baking soda, salt, and pumpkin pie spice until evenly combined.
- In a separate bowl, mix the pumpkin puree, brown sugar, yogurt, eggs, and vanilla extract until smooth.
- Gradually fold the wet ingredients into the dry ingredients, stirring just until no flour pockets remain. If using nuts or chocolate chips, gently fold them in now.
- Pour the batter into the prepared loaf pan and smooth the top with a spatula. Bake for 50 to 60 minutes, or until a toothpick inserted into the center comes out clean. Let the bread cool in the pan for 10 minutes, then transfer it to a wire rack to cool completely before slicing.
15. No-Knead Honey Oat Bread
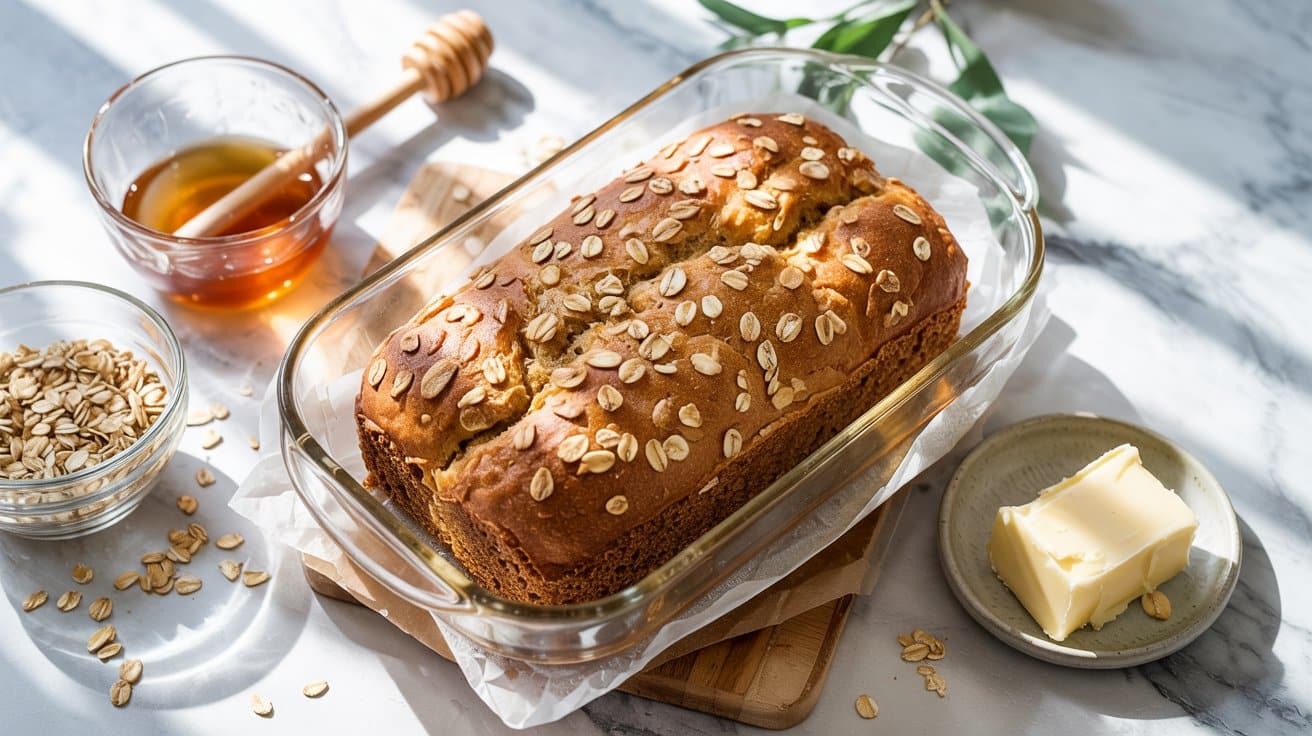
This no-knead honey oat bread is a simple way to enjoy freshly baked bread with minimal effort. It has a subtly sweet flavor from the honey and a pleasant chewiness thanks to the oats sprinkled throughout and on top.
The crust bakes up golden and slightly crisp, while the inside stays soft and tender. This bread is approachable for anyone who wants homemade bread without spending time kneading or fussing over complicated steps.
Why This Recipe Works
This recipe combines ease and taste in a way that fits well with busy schedules and a desire for wholesome bread. Its no-knead method means you get fresh bread with very little active time.
- Convenience - The dough requires no kneading and uses just one bowl, making preparation straightforward.
- Flavor balance - Honey adds a gentle sweetness that goes with the nutty oats.
- Texture - Rolled oats in the dough and topping add a pleasant chew and rustic texture.
- Appeal - This bread works well for toast, sandwiches, or alongside soups, making it versatile for family meals.
Ingredient Swap Ideas
Swapping ingredients can tailor this bread to different preferences or dietary needs without changing its character. Consider these easy swaps to adapt the recipe.
- Honey - Use maple syrup or agave nectar to keep it vegan and still add sweetness.
- Rolled oats - Substitute with quick oats if you prefer a softer oat texture in the bread.
- All-purpose flour - Try whole wheat flour for a heartier, nuttier flavor and more fiber.
- Milk - Replace with almond or soy milk for dairy-free baking.
Ingredients
- 3 cups all-purpose flour
- 1 ½ teaspoons salt
- ½ cup rolled oats
- 1 teaspoon instant yeast
- 1 ½ cups warm water (about 110°F)
- 2 tablespoons honey
- 2 tablespoons olive oil
Instructions
- In a large bowl, combine the flour, salt, rolled oats, and instant yeast. Mix these dry ingredients together evenly.
- Stir in the warm water, honey, and olive oil until the dough just comes together into a sticky ball. No kneading is necessary-mix until combined.
- Cover the bowl loosely with a clean kitchen towel or plastic wrap. Let the dough rise in a warm spot for 12 to 18 hours, until it has doubled in size and looks bubbly.
- Generously flour a work surface and turn the dough out onto it. Fold the dough over itself a couple of times to shape it into a round loaf. Place the loaf on a baking sheet lined with parchment paper and sprinkle more rolled oats on top.
- Let the dough rest for another 1 to 2 hours, until it puffs up. Meanwhile, preheat your oven to 450°F (230°C) with a heavy ovenproof pot or Dutch oven inside to heat up.
- Carefully transfer the dough into the preheated pot, cover with the lid, and bake for 30 minutes. Remove the lid and bake for another 10 to 15 minutes until the crust is golden and crisp.
- Cool the bread completely on a wire rack before slicing.
This no-knead honey oat bread provides satisfying homemade bread with a gentle sweetness and hearty texture. It's ideal for busy days and offers a wholesome choice that goes well with many meals.
16. No-Knead Zucchini Bread Loaf
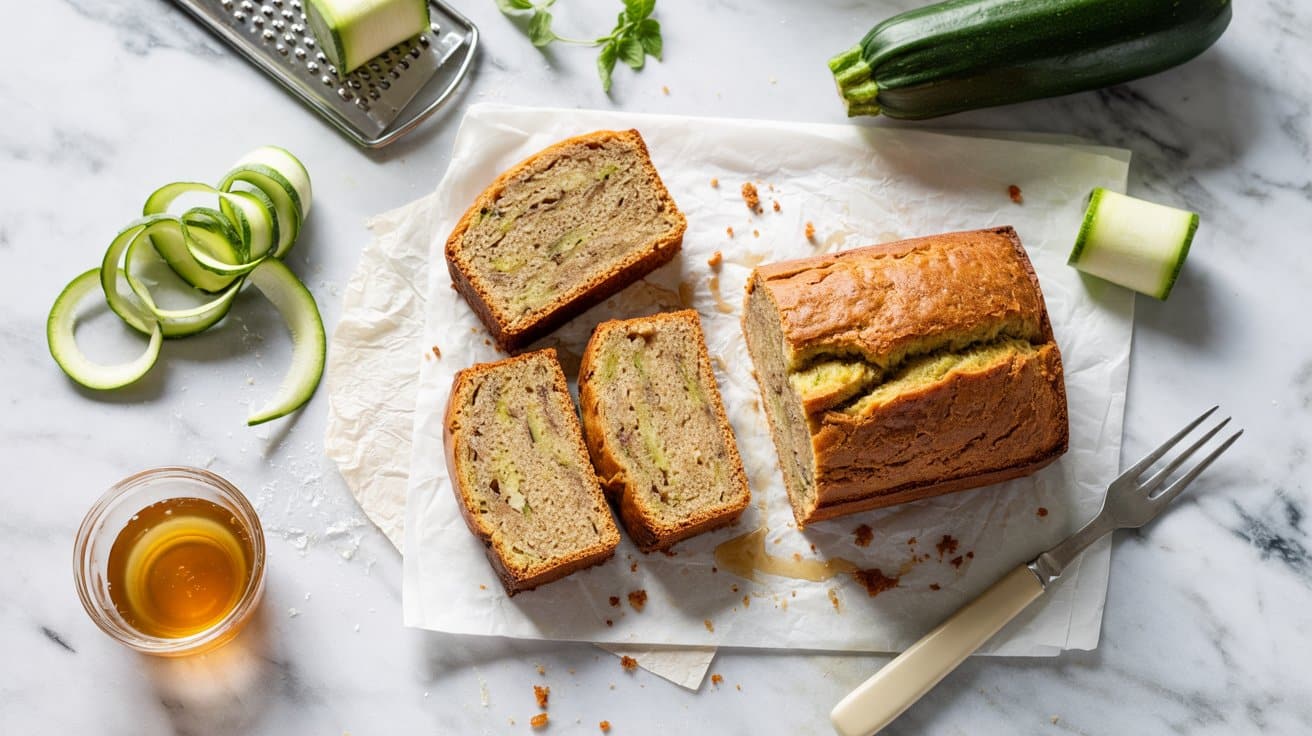
This no-knead zucchini bread loaf is an easy way to enjoy a moist, dense bread packed with subtle sweetness and a hint of spice. It's a smart choice for busy cooks who want to sneak some extra veggies into breakfast or snack time without extra fuss.
The tender crumb, thanks to the shredded zucchini, stays fresh for days, making it a reliable option for meal prep. The straightforward steps mean you won't spend much time mixing or cleaning up, but you'll still get a satisfying homemade bread.
Why This Recipe Works
This zucchini bread combines convenience, nutrition, and flavor in a simple recipe that anyone can follow. Its subtle sweetness and moist texture appeal to a wide range of tastes.
- Convenience - The no-knead method saves time and reduces hands-on effort.
- Moisture - Shredded zucchini adds natural moisture, keeping the bread tender and dense.
- Flavor balance - The light spice and simple sweetness go with the vegetable without overpowering it.
- Versatility - Works as a breakfast, snack, or a wholesome treat to share with family and friends.
Ingredient Swap Ideas
Swapping ingredients can help adjust the recipe for different dietary needs or personal preferences while keeping its essential qualities.
- Whole wheat flour - Use instead of all-purpose for added fiber and a nuttier flavor.
- Applesauce - Replace some oil with applesauce to reduce fat and add natural sweetness.
- Nuts or seeds - Add chopped walnuts or sunflower seeds for texture and nutrition.
- Dairy-free milk - Substitute regular milk with almond or oat milk to keep this recipe dairy-free.
Ingredients
- 2 cups all-purpose flour
- 1 teaspoon baking soda
- ½ teaspoon salt
- 1 teaspoon ground cinnamon
- ¼ teaspoon ground nutmeg
- 2 large eggs
- ½ cup vegetable oil
- 1 cup granulated sugar
- 1 teaspoon vanilla extract
- 1 ½ cups shredded zucchini
- ½ cup chopped walnuts (optional)
Instructions
- Preheat your oven to 350°F (175°C). Grease a 9x5-inch loaf pan or line it with parchment paper.
- In a large bowl, whisk together flour, baking soda, salt, cinnamon, and nutmeg until well combined.
- In another bowl, beat the eggs, then add oil, sugar, and vanilla extract, mixing until smooth.
- Stir the wet ingredients into the dry ingredients just until combined. Fold in the shredded zucchini and walnuts if using. Avoid overmixing to keep the bread tender.
- Pour the batter into the prepared loaf pan and smooth the top. Bake for 50-60 minutes, or until a toothpick inserted into the center comes out clean. Let cool in the pan for 10 minutes before transferring to a wire rack to cool completely.
Enjoy this zucchini bread slice toasted with a bit of butter or on its own for a wholesome treat.
17. No-Knead Beer and Cheddar Bread
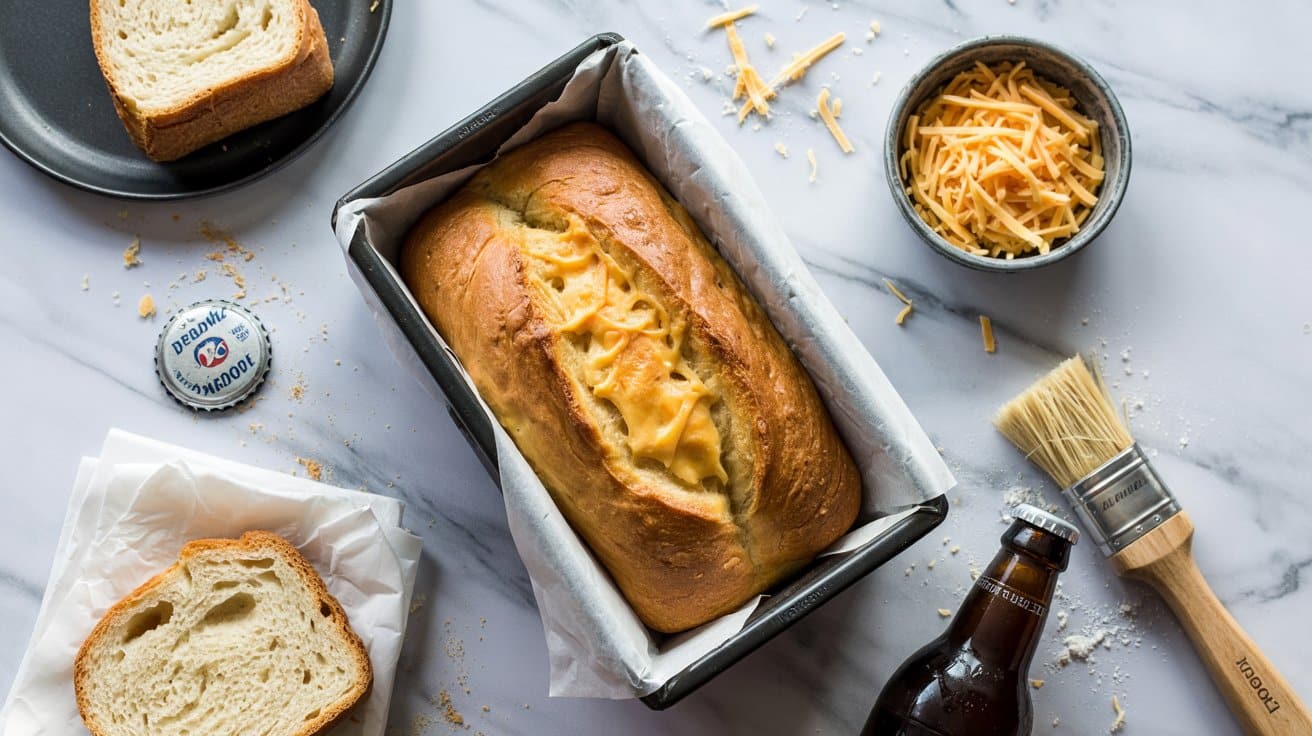
This no-knead beer and cheddar bread blends the sharpness of aged cheddar with the rich, malty flavors from a good beer. It's a satisfying loaf with a tender crumb and a crispy crust that comes together without any complicated kneading.
It's a straightforward bread to bake that brings a comforting taste and aroma to your table. You'll find it goes well with soups, stews, or simply sliced and slathered with butter.
Why This Recipe Works
This recipe combines ease and flavor in a way that makes baking bread approachable and rewarding. Bold flavors from the cheddar and beer enrich the dough without extra fuss.
- Simple preparation - No kneading makes this accessible for busy days.
- Rich flavor - Sharp cheddar and beer create a deeply savory profile.
- Textural contrast - Crispy crust meets soft, flavorful crumb.
- Versatile serving - Works great for sandwiches or alongside meals.
Ingredient Swap Ideas
Adapting this bread recipe is easy, helping you accommodate different flavors or dietary choices. Small swaps can keep the loaf enjoyable without losing its signature taste.
- Beer variation - Use a stout or amber ale for a darker, more strong flavor.
- Cheese substitution - Swap cheddar for gouda or mozzarella for a milder or creamier texture.
- Flour option - Substitute all-purpose flour with a blend that includes whole wheat for added fiber.
- Dairy-free tweak - Use a vegan cheddar alternative to keep it plant-based.
Ingredients
- 3 cups all-purpose flour
- ¼ teaspoon instant yeast
- 1 teaspoon salt
- 1 ½ cups sharp cheddar cheese, shredded
- 1 ¼ cups beer
- Optional: extra flour for dusting
Instructions
- In a large bowl, combine the flour, yeast, and salt. Stir in the shredded cheddar cheese so it's evenly distributed.
- Pour in the beer gradually, mixing with a wooden spoon or spatula until a sticky dough forms. Cover the bowl with plastic wrap or a damp towel and let it rest at room temperature for 12 to 18 hours.
- After the dough has risen and looks bubbly, dust a work surface lightly with flour. Turn the dough out and fold it over itself once or twice to shape it roughly into a ball. Let it rest for 30 minutes.
- Place the dough seam side down on parchment paper, then cover it with a towel and allow it to rise again for about 1 to 2 hours, until it puffs up noticeably.
- Preheat your oven to 450°F (230°C) and place a heavy covered pot (like a Dutch oven) inside to heat. Carefully transfer the dough with the parchment paper into the hot pot. Cover with the lid and bake for 30 minutes. Remove the lid and bake an additional 10 to 15 minutes until the crust is golden and crisp.
- Remove the bread from the oven and let it cool on a rack before slicing.
This no-knead beer and cheddar bread delivers a flavorful and hearty loaf that's simple to make and satisfying to eat.
18. No-Knead Potato Bread
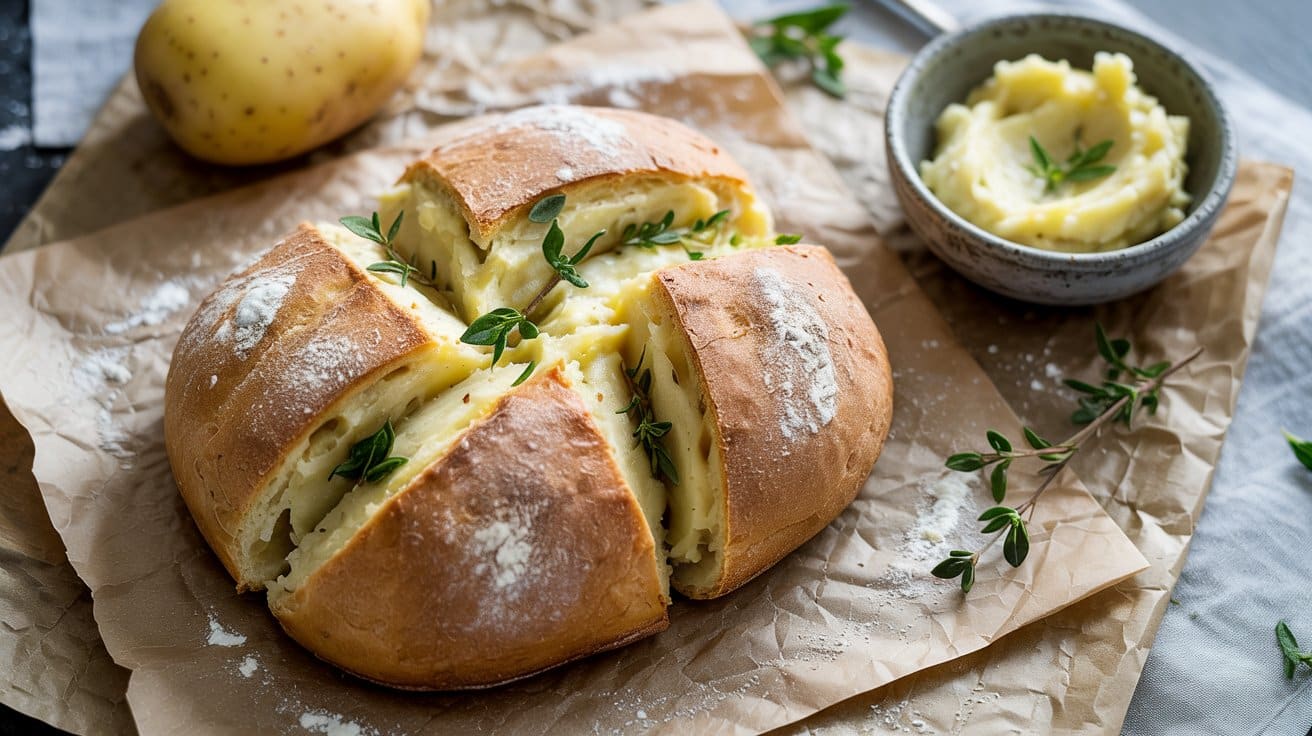
This no-knead potato bread brings together soft mashed potatoes with simple bread ingredients to create a loaf that's tender and fluffy on the inside, with a light, delicate crust. It's a straightforward recipe that gives you great results without spending a lot of time or effort working the dough.
The mashed potatoes add moisture and a slight richness to the bread, resulting in a soft crumb that stays fresh longer. This bread is excellent for sandwiches, toast, or as a side to your favorite meals.
Why This Recipe Works
This recipe combines the ease of no-knead baking with the comforting texture added by potatoes for a smooth, tender bread.
- Convenience - No kneading required, which saves time and simplifies the process.
- Moist Texture - Mashed potatoes keep the bread soft and prevent it from drying out quickly.
- Flavor Balance - Mild potato flavor with the classic yeast bread taste for versatility.
- Family Friendly - Soft crumb appeals to all ages, perfect for everyday meals or snacks.
Ingredient Swap Ideas
Adjusting ingredients can help you create versions that work better for your diet or preferences without losing the bread's defining softness and flavor.
- Use sweet potatoes instead of white potatoes for a sweeter twist and added nutrients.
- Replace all-purpose flour with whole wheat flour for a heartier, more nutritious loaf.
- Substitute olive oil with melted butter to add a richer flavor and slightly softer crust.
- For a dairy-free option, swap milk with almond or oat milk without changing the bread's texture much.
Ingredients
- 2 cups mashed potatoes
- 3 ½ cups all-purpose flour
- 1 tablespoon sugar
- 2 teaspoons salt
- 1 packet (2 ¼ teaspoons) active dry yeast
- 1 cup warm water
- 2 tablespoons olive oil
Instructions
- In a large mixing bowl, combine the warm water, sugar, and yeast. Stir gently and let sit for 5 to 10 minutes until the mixture is foamy. This confirms the yeast is active.
- Add the mashed potatoes, olive oil, salt, and about 3 cups of flour to the yeast mixture. Stir with a wooden spoon or spatula until ingredients begin to come together.
- Gradually add the remaining flour, half a cup at a time, mixing until the dough becomes sticky but holds together well. The dough will be soft and slightly sticky, no kneading needed.
- Cover the bowl with a clean kitchen towel or plastic wrap and let the dough rise in a warm spot for 1 to 1 ½ hours, or until doubled in size.
- Turn the dough onto a floured surface, shape it gently into a round loaf without kneading, and place it on a parchment-lined baking sheet. Cover again and let it rise for another 30 minutes.
- Preheat the oven to 375°F (190°C). Bake the bread for 30 to 35 minutes, until the crust is lightly golden and the loaf sounds hollow when tapped on the bottom.
- Remove the bread from the oven and cool completely on a wire rack before slicing.
This no-knead potato bread offers a soft, tender crumb and a manageable process that invites you to enjoy fresh homemade bread any day of the week.
19. No-Knead Cardamom and Orange Bread

This no-knead cardamom and orange bread offers a fragrant twist on a simple loaf. The subtle warmth of cardamom blends smoothly with the bright, zesty notes from fresh orange zest, creating a comforting yet lively flavor.
It has a soft, tender crumb and a lightly crisp crust that makes it easy to slice for breakfast, brunch, or a light dessert. Since it requires no kneading, the preparation is straightforward, giving you a flavorful bread with minimal hands-on time.
Why This Recipe Works
This bread stands out for its charming flavor balance and easy preparation that fits well into a busy schedule.
- Convenience - No kneading means less effort and easy shaping.
- Flavor balance - Warm cardamom goes well with fresh orange zest for a bright, fragrant taste.
- Texture - Soft, airy crumb contrasted with a crisp crust.
- Versatility - Great for breakfast, brunch, or paired with tea or coffee.
Ingredient Swap Ideas
Swapping ingredients can help you customize this bread to your preference or dietary needs while keeping the core flavors intact.
- Orange zest - Replace with lemon zest for a sharper citrus note.
- Cardamom - Use cinnamon or nutmeg for a different warm spice flavor.
- All-purpose flour - Substitute half with whole wheat flour for a heartier texture.
- Honey - Switch to maple syrup or agave nectar as a plant-based sweetener option.
Ingredients
- 3 cups all-purpose flour
- ¼ teaspoon instant dry yeast
- 1 teaspoon ground cardamom
- 1 teaspoon salt
- 1 tablespoon honey
- Zest of 1 large orange
- 1 ½ cups warm water
- Extra flour for dusting
Instructions
- In a large mixing bowl, whisk together the flour, yeast, cardamom, salt, honey, and orange zest until evenly combined.
- Pour in the warm water and stir with a wooden spoon until a sticky, shaggy dough forms. Cover the bowl with plastic wrap or a clean towel.
- Let the dough rest at room temperature for 12 to 18 hours until it bubbles and nearly doubles in size.
- Lightly flour your work surface, then turn the dough out and fold it over once or twice gently. Shape it into a rough ball without kneading. Cover and let rise for 1 to 2 hours.
- Preheat the oven to 450°F (230°C). Place a heavy oven-safe pot or Dutch oven inside to heat. Once hot, carefully transfer the dough to the pot, cover with the lid, and bake for 30 minutes. Then remove the lid and bake for another 10 to 15 minutes until the crust turns golden and crisp.
- Cool on a wire rack before slicing. Enjoy warm or at room temperature with butter or jam.
20. No-Knead Gluten-Free Bread (Mix Based)
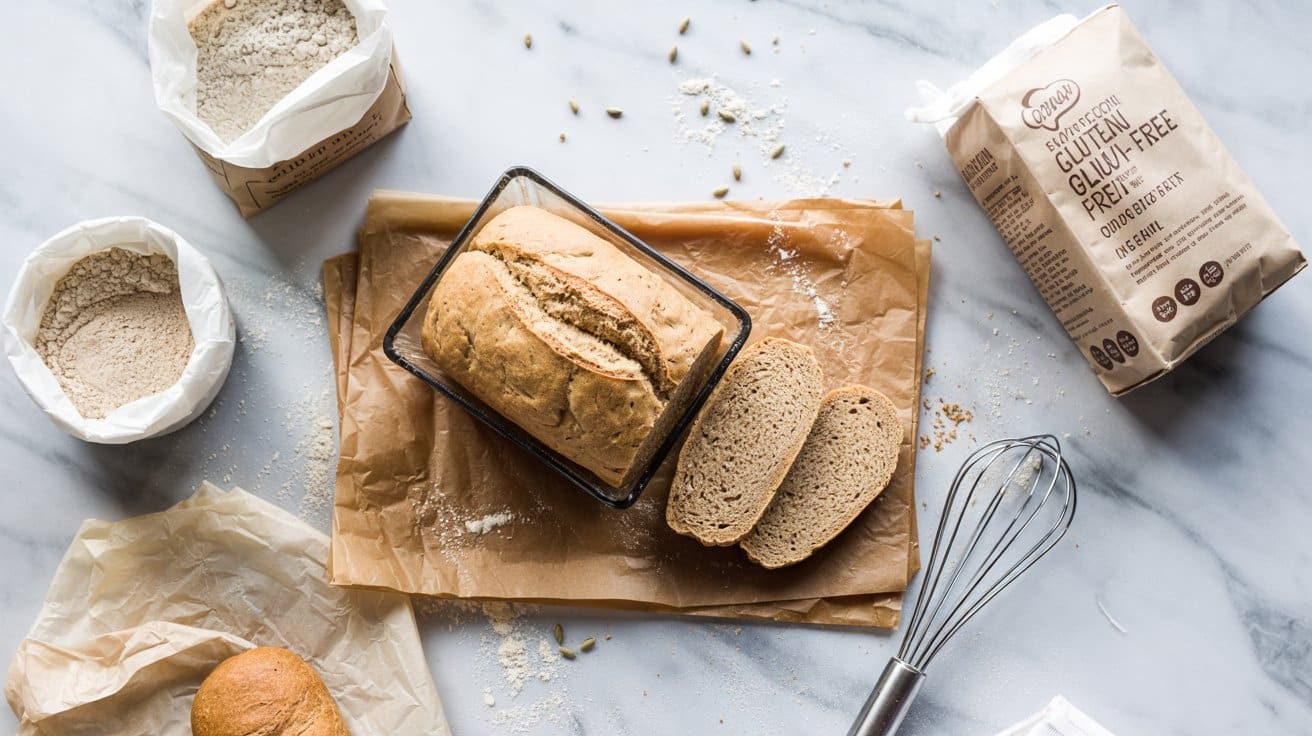
This no-knead gluten-free bread recipe offers a straightforward way to enjoy fresh, homemade bread without the usual intensive labor. The bread has a tender crumb with a light crust, making it a great base for sandwiches or just to enjoy with a spread of butter or jam.
Using a reliable gluten-free flour blend and simple binders, this recipe keeps things practical while delivering on taste and texture. It's ideal for busy days when you want wholesome bread ready without complicated steps.
Why This Recipe Works
This recipe combines ease and flavor, providing a satisfying gluten-free bread that fits well into everyday meals. Its no-knead approach saves time, while still producing a loaf with good structure and taste.
- Convenience - Requires minimal mixing and no kneading, making preparation quick and simple.
- Texture - Produces a soft, moist interior with a slightly crisp crust for a pleasant bite.
- Flavor balance - Mild and versatile taste that pairs well with both savory and sweet toppings.
- Family-Friendly - Suitable for gluten-intolerant eaters and can be enjoyed by everyone at the table.
Ingredient Swap Ideas
Swapping ingredients can help tailor this bread to your preferences or dietary needs without losing its core qualities. Small adjustments keep the bread flexible and accessible in any kitchen.
- Gluten-Free Flour Blend - Use any 1-to-1 gluten-free baking mix that includes xanthan gum for structure.
- Binders - Substitute psyllium husk powder with ground chia seeds mixed with water for a similar binding effect.
- Liquid - Replace warm water with unsweetened almond milk or another plant milk for a richer flavor.
- Sweetener - Swap honey or sugar with maple syrup or agave nectar if preferred or avoiding refined sugars.
Ingredients
- 2 cups gluten-free all-purpose flour blend
- 1 teaspoon psyllium husk powder
- 1 teaspoon salt
- 1 tablespoon sugar
- 1 packet (2 ¼ teaspoons) active dry yeast
- 1 ¼ cups warm water (about 110°F / 43°C)
- 2 tablespoons olive oil
Instructions
- In a large bowl, combine the gluten-free flour blend, psyllium husk powder, salt, and sugar. Mix well to distribute evenly.
- In a separate small bowl, sprinkle the yeast over the warm water and let it activate for about 5 minutes until foamy.
- Pour the yeast mixture and olive oil into the dry ingredients. Stir thoroughly until all ingredients come together into a sticky dough. Cover the bowl with plastic wrap or a clean towel.
- Let the dough rest in a warm spot for 1 to 1 ½ hours. It should rise and become slightly puffed but won't double like traditional bread dough.
- Preheat the oven to 375°F (190°C). Transfer the dough to a greased or parchment-lined loaf pan, smoothing the top gently. Bake for 45 to 50 minutes until the crust is golden and a toothpick inserted in the center comes out clean.
- Remove from the oven and let the bread cool in the pan for 10 minutes, then transfer it to a wire rack to cool completely before slicing.
This no-knead gluten-free bread offers a manageable way to enjoy baking fresh bread without fuss while making sure it suits gluten-intolerant needs.
Soft flatbreads such as pita often serve as sandwich vessels or scoops for dips, so choosing pita alternatives for versatile serving can adapt recipes to what you have on hand. High-protein bread flour helps strengthen gluten for chewier, higher-rising loaves, though many bakers opt for bread flour swaps for better rise to achieve different textures.

Andrew Gray is a seasoned food writer and blogger with a wealth of experience in the restaurant and catering industries. With a passion for all things delicious, Andrew has honed his culinary expertise through his work as a personal chef and caterer.
His love for food led him to venture into food writing, where he has contributed to various online publications, sharing his knowledge and insights on the culinary world. As the proud owner of CooksCrafter.com, Andrew covers a wide range of topics, including recipes, restaurant reviews, product recommendations, and culinary tips.
Through his website, he aims to inspire and educate fellow food enthusiasts, offering a comprehensive resource for all things food-related.