Finding a dessert that satisfies a sweet craving without leaving extra portions can be a challenge, single-serve desserts are individual portions often used to reduce waste and commonly featured on tasting menus. This collection of 10 single-serve dessert ideas offers just the right solution, providing individual treats made specifically for one person to enjoy fully, a useful approach for minimizing waste and commonly found on bistro tasting menus.
These recipes cover a range of styles and flavors, from warm and gooey chocolate mug cakes to fresh, no-bake fruit parfaits. Whether you want something baked, creamy, fruity, or frozen, each option is designed to deliver deliciousness quickly and simply, without requiring large batches or complicated preparation.
What makes this lineup especially practical is how straightforward the recipes are, with minimal cleanup and common ingredients. They're tailored for busy days or quiet evenings when a little indulgence feels just right, all while avoiding waste and extra effort.
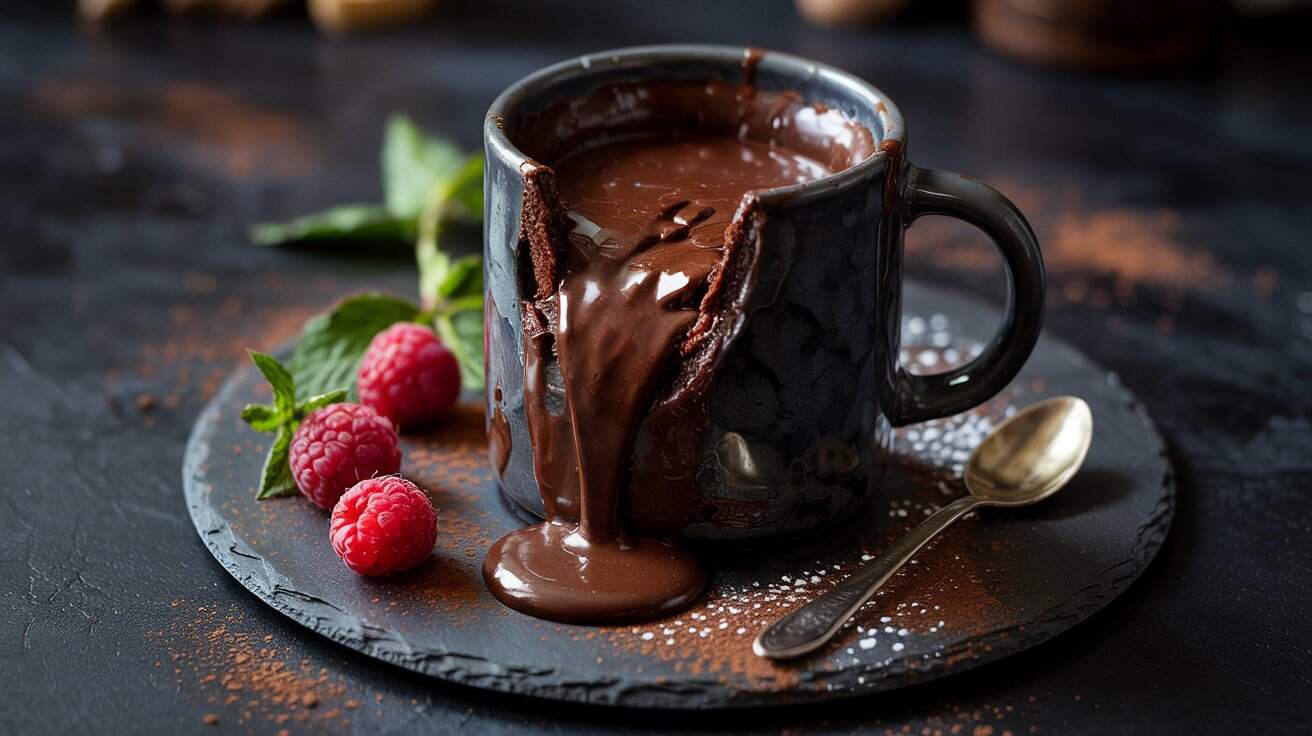
1. Microwave Chocolate Mug Cake
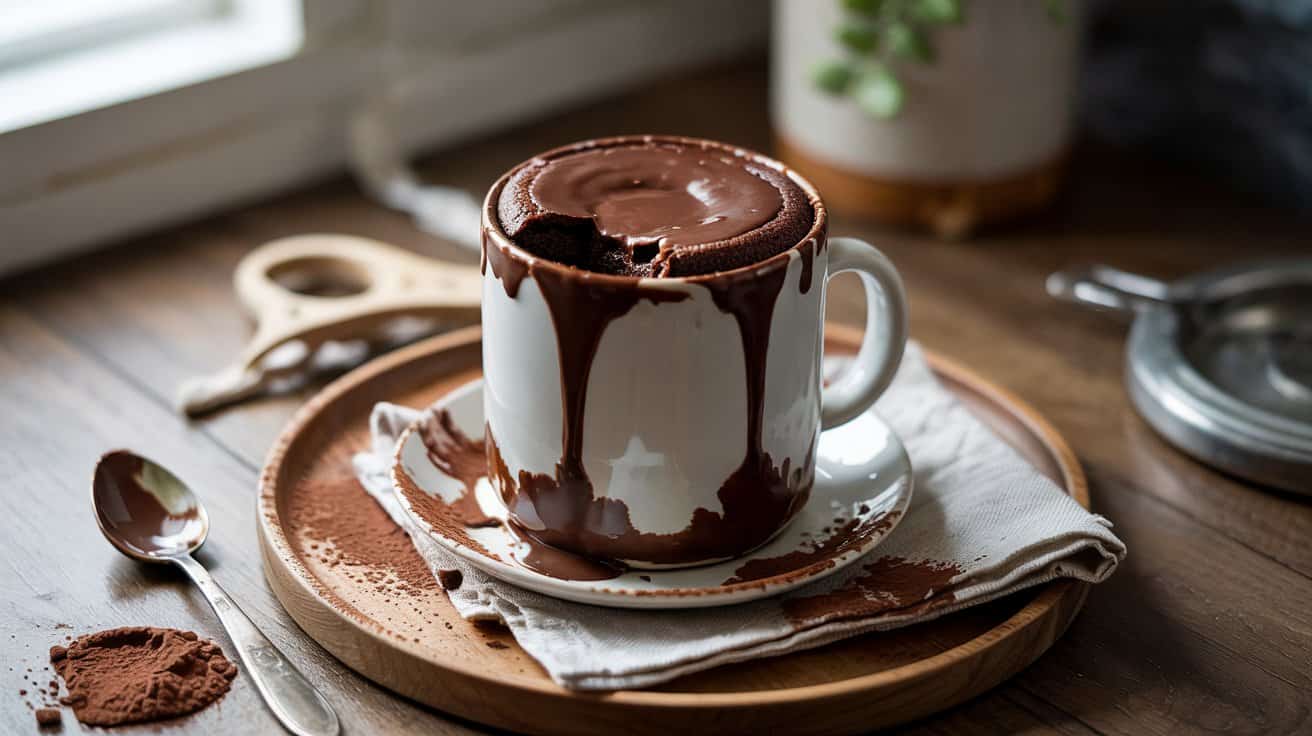
This Microwave Chocolate Mug Cake is a handy treat when you want a quick, warm dessert without turning on the oven, and it can be ready in about 2 to 3 minutes in most microwaves, depending on microwave wattage (about 2-3 minutes in a 1000W microwave). It has a rich chocolate flavor and a soft, moist texture that feels like having a freshly baked cake in just a few minutes.
The recipe is simple enough to mix right in a mug, so you can whip it up anytime the craving hits; for more ideas see mug cake recipes for moist results.
You can enjoy it as is or add a scoop of ice cream or a drizzle of peanut butter for extra indulgence, or try an easy air-fryer chocolate bark for simple treats.
Why This Recipe Works
This recipe delivers a quick, chocolatey dessert with minimal prep and cleanup, making it an ideal sweet fix for busy days, often ready in about 2 to 3 minutes in most microwaves. The flavor is rich without being overwhelming, and the single-serving size keeps portions in check, with darker cocoa lending a pleasantly bittersweet finish when used.
- Convenience - Ready in under 5 minutes using just a mug and a microwave.
- Flavor balance - Rich chocolate taste balanced with a tender, cake-like crumb.
- Texture - Soft and moist with a slightly fudgy center.
- Appeal - Individual serving, perfect for late-night cravings or quick treats; for lighter options, see refreshing honey-based desserts to savor.
- Cleanup - Minimal dishes since everything is mixed in one mug.
Ingredient Swap Ideas
Switching up ingredients helps tailor this mug cake to different tastes or dietary needs without losing its charm. You can adjust for allergies, preferences, or whatever you have on hand.
- Milk options - Use almond, oat, or soy milk instead of dairy milk for a plant-based version.
- Sweeteners - Replace granulated sugar with maple syrup or honey, adjusting for liquid volume if needed, using about ¾ cup maple syrup for each 1 cup granulated sugar.
- Flour types - Try whole wheat or gluten-free flour blends instead of all-purpose flour; for related tiny-batch baking ideas, see small-batch cupcake ideas for tiny batches.
- Cocoa powder - Use dark cocoa for a more intense chocolate flavor or regular cocoa for milder sweetness, since dark cocoa often contains higher cocoa solids (around 50-70%) for a deeper taste.
- Add-ins - Stir in chopped nuts, chocolate chips, or dried fruit to change texture and flavor.
Ingredients
- 4 tablespoons all-purpose flour
- 4 tablespoons granulated sugar
- 2 tablespoons unsweetened cocoa powder
- ⅛ teaspoon baking powder
- 3 tablespoons milk
- 2 tablespoons vegetable oil
- ¼ teaspoon vanilla extract
- Pinch of salt
Instructions
- In a microwave-safe mug, whisk together the flour, sugar, cocoa powder, baking powder, and salt to combine evenly.
- Add the milk, vegetable oil, and vanilla extract to the dry ingredients. Stir thoroughly until the batter is smooth and there are no lumps.
- Place the mug in the microwave and cook on high for 70 to 90 seconds. Keep an eye to avoid overcooking; the cake should be set but still moist inside.
- Let the mug cake cool for a couple of minutes before eating, as it will be very hot. You can top it with a spoonful of yogurt, ice cream, or fresh fruit if desired.
- Enjoy your quick chocolate treat directly from the mug with a spoon.
2. Single-Serve Berry Crisp
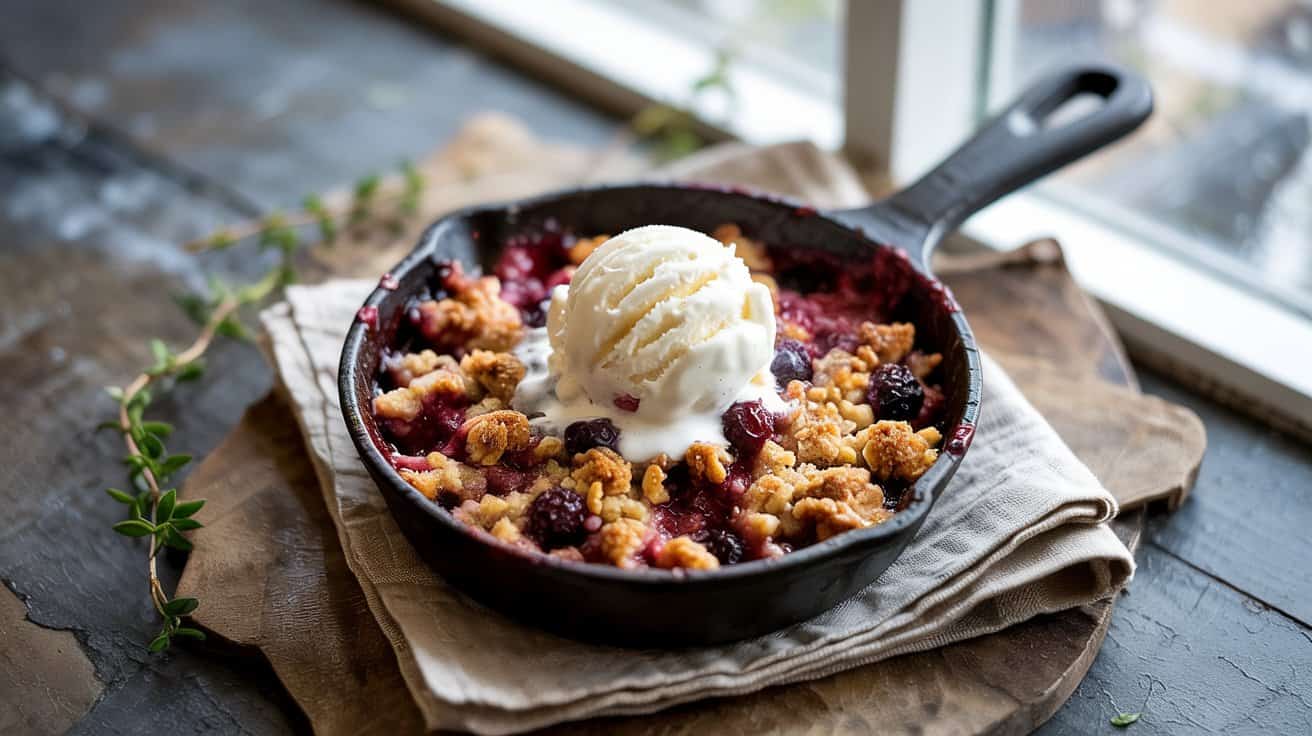
This single-serve berry crisp is a simple yet satisfying way to enjoy fresh or frozen berries with a warm, buttery oat topping; for more berry-forward desserts, explore light and fresh berry desserts to brighten your day.
The contrast between the juicy berries and the crisp, golden crumble creates a lovely texture that feels both indulgent and wholesome, with the fruit bubbling and thickening when baked at about 375°F (190°C).
Making this dessert in a ramekin means you'll get a nicely portioned dish for yourself or a loved one, a 6-ounce ramekin works well for a single serving. Plus, it cooks quickly, so it's ready to enjoy with minimal waiting.
It's a great way to bring a bit of comfort with seasonal fruit, whether it's summer berries fresh from the market or frozen berries from your freezer.
Why This Recipe Works
This recipe combines ease and flavor, delivering a warm dessert that's light on prep and heavy on satisfaction. It's a simple way to enjoy fruit with a bit of crunch, perfect for busy evenings or anytime you want something sweet without the fuss.
- Convenience - Quick to assemble and bakes in a single ramekin, perfect for one or two servings.
- Flavor balance - Juicy berries provide natural sweetness against the buttery oat topping.
- Texture - The crisp oat crumble contrasts beautifully with the soft, bubbling fruit underneath.
- Appeal - A comforting dessert that feels special yet approachable for everyday cooking.
- Cleanup ease - Minimal dishes since it's baked in one small dish, reducing mess.
Ingredient Swap Ideas
Swapping ingredients can help you adjust this crisp for allergies, dietary preferences, or simply to use what you have on hand. These options maintain the recipe's essence while offering a bit of flexibility.
- Butter alternative - Use coconut oil for a dairy-free and slightly tropical flavor.
- Oats - Replace rolled oats with gluten-free oats if you need a gluten-free version.
- Sweetener - Substitute brown sugar with maple syrup or honey to change the sweetness profile.
- Fruit - Use apples, peaches, or cherries instead of berries depending on the season or preference.
- Flour - Swap all-purpose flour with almond or oat flour for a different texture and added nutrition.
Ingredients
- 1 cup berries (fresh or frozen mixed blueberries, raspberries, or blackberries)
- 2 tablespoons brown sugar
- 3 tablespoons rolled oats
- 2 tablespoons all-purpose flour
- 2 tablespoons cold unsalted butter
- ¼ teaspoon ground cinnamon
- Pinch of salt
- Optional: 1 teaspoon lemon juice
Instructions
- Preheat your oven to 350°F (175°C). Lightly grease a 6-ounce ramekin with butter or nonstick spray.
- In the ramekin, combine the berries with lemon juice if using. Spread them evenly on the bottom.
- In a small bowl, mix the brown sugar, rolled oats, flour, cinnamon, and salt. Add the cold butter pieces and use your fingers or a pastry cutter to blend until the mixture looks like coarse crumbs.
- Sprinkle the oat topping evenly over the berries in the ramekin. Press down lightly to cover the fruit.
- Bake in the preheated oven for about 20 to 25 minutes, until the topping is golden and the berries are bubbly.
- Remove from the oven and let cool for a few minutes. Serve warm, optionally with a scoop of vanilla ice cream or a dollop of whipped cream.
3. Mini Cheesecake in a Jar
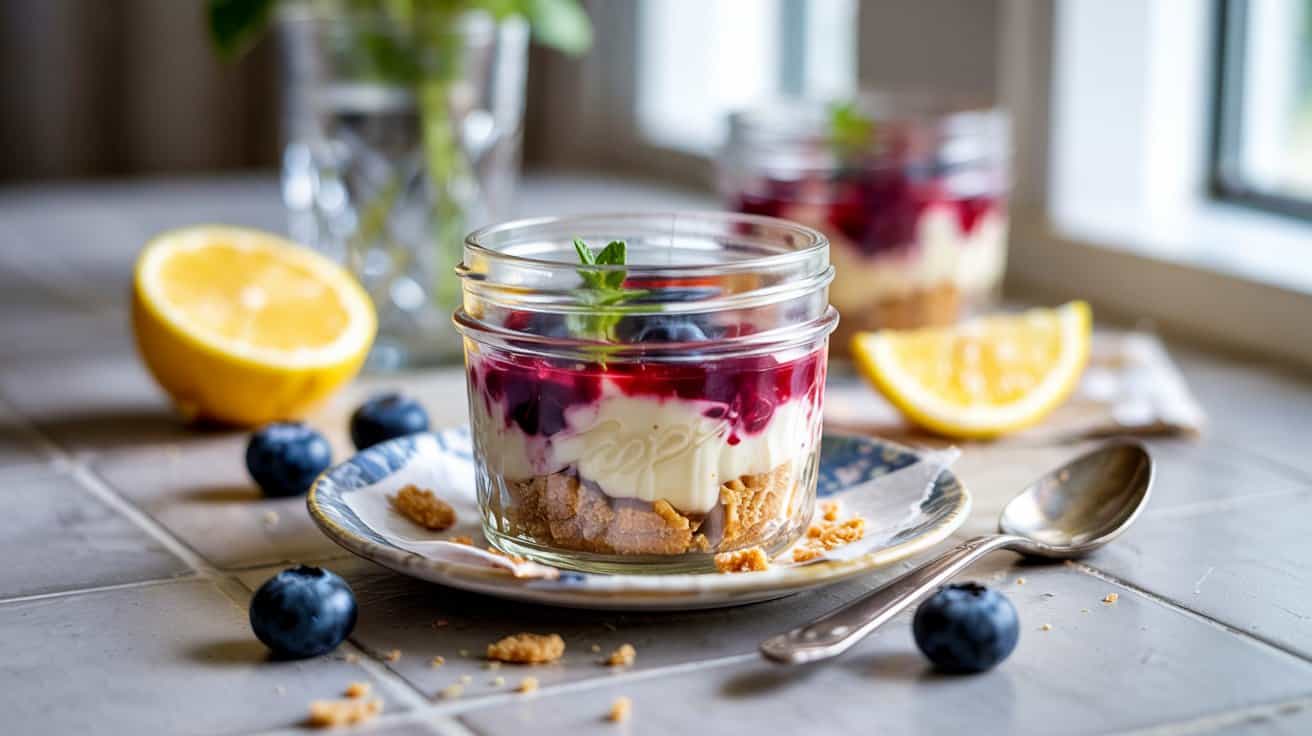
Mini cheesecake in a jar offers a charming way to enjoy a classic dessert without any fuss, a compact take on classic American-style cheesecake. The layers of creamy cream cheese filling combined with a crunchy graham cracker crust create a nice balance in every bite.
This recipe is great when you want to prepare something ahead of time for a gathering or just treat yourself with a little sweetness; for more ideas see mini cheesecake recipes for easy make-ahead desserts.
The texture is silky smooth while the crust adds just the right amount of crispness, making it a satisfying dessert option.
Why This Recipe Works
This mini cheesecake in a jar is both practical and delicious, making it a standout treat for busy cooks and dessert lovers alike.
- Convenience - Easy to prepare and assemble, requiring no baking.
- Flavor balance - Creamy, tangy filling paired with sweet, crunchy crust.
- Texture - Smooth filling contrasts nicely with the crumbly graham cracker base.
- Appeal - Individually portioned jars make it visually attractive and easy to serve.
- Make-ahead friendly - Can be stored in the fridge for several days without losing quality.
Ingredient Swap Ideas
Adjusting the ingredients can make this dessert fit different dietary preferences or flavor preferences without losing its essence.
- Graham cracker crust - Use crushed digestive biscuits or gluten-free cookies for a gluten-free option.
- Cream cheese - Swap for a dairy-free cream cheese alternative to make it vegan.
- Sweetener - Replace granulated sugar with honey or maple syrup for a natural touch.
- Toppings - Add fresh berries, fruit compote, or a dollop of whipped coconut cream to vary flavors.
- Flavor extracts - Substitute vanilla extract with almond or lemon extract for a different twist.
Ingredients
- 1 cup graham cracker crumbs
- 3 tablespoons unsalted butter, melted
- 8 ounces cream cheese, softened
- ⅓ cup granulated sugar
- 1 teaspoon vanilla extract
- ½ cup heavy cream
- Fresh fruit or fruit preserves (optional)
Instructions
- In a medium bowl, mix the graham cracker crumbs with melted butter until the mixture resembles wet sand. Divide this mixture evenly into the bottom of 4 mason jars and gently press down to form a firm crust layer.
- In a separate bowl, beat the softened cream cheese with sugar and vanilla extract until smooth and creamy using an electric mixer.
- Whip the heavy cream in another bowl until stiff peaks form. Gently fold the whipped cream into the cream cheese mixture to create a light, fluffy filling.
- Spoon or pipe the cream cheese filling over the graham cracker crust layers in the jars, filling up to just below the rim. If desired, add a layer of fruit preserves or fresh fruit on top before sealing the jars.
- Cover each jar with a lid or plastic wrap and refrigerate for at least 4 hours or overnight to allow the cheesecake to set properly.
- Serve chilled, straight from the jar, garnished with extra fruit or a sprinkle of crushed graham crackers if preferred.
4. Peanut Butter Banana Mug Muffin
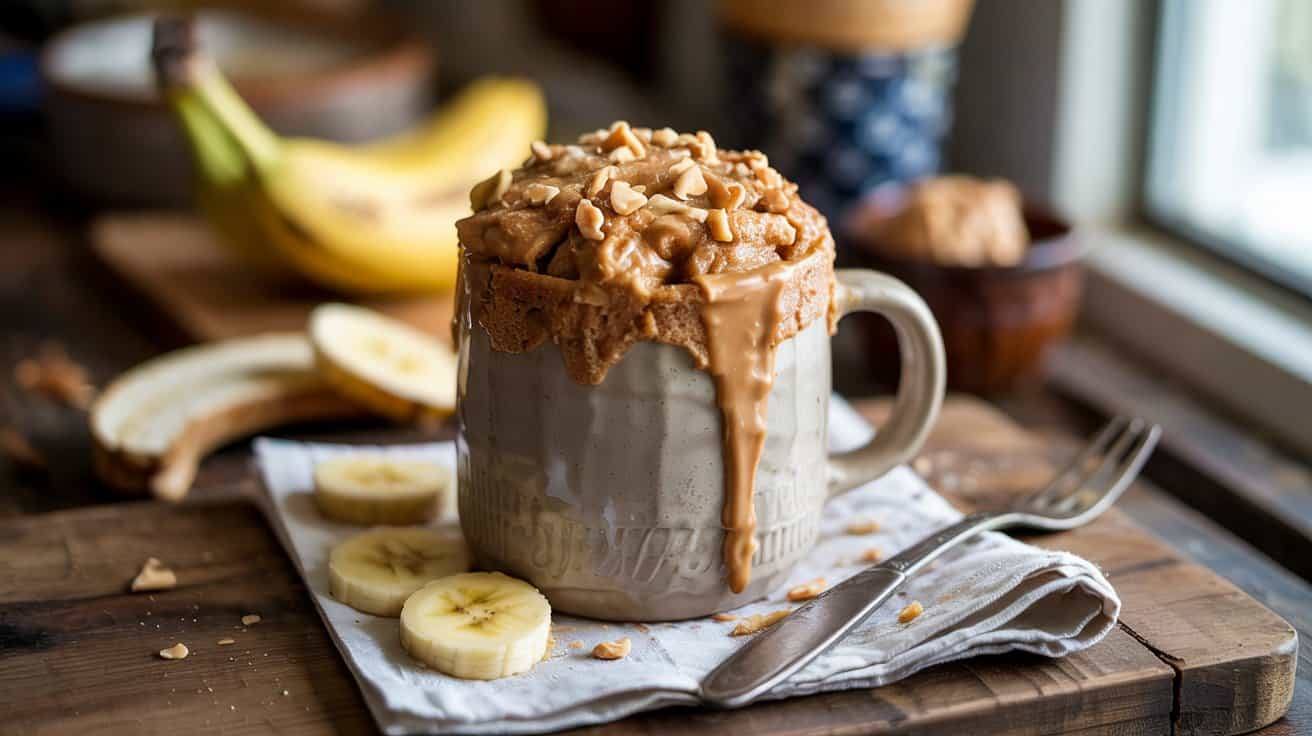
This peanut butter banana mug muffin is a quick and satisfying treat you can enjoy any time of day. Combining the creamy richness of peanut butter with the natural sweetness of ripe bananas creates a comforting flavor that feels like a little hug in a cup.
You can whip it up in minutes, making it a great option for busy mornings or an easy dessert fix. The texture is soft and slightly moist, just like a traditional muffin, but it comes together much faster without needing an oven.
Why This Recipe Works
This recipe offers a simple, speedy way to bake a tasty banana muffin with a peanut butter twist, all cooked right in your mug. It balances wholesome ingredients and sweet flavors to keep things both nutritious and delicious.
- Convenience - Ready to eat in under 5 minutes with minimal prep and cleanup.
- Flavor balance - Combines nutty peanut butter with naturally sweet banana for satisfying taste.
- Texture - Moist and tender muffin crumb, with a slightly denser feel from the peanut butter.
- Appeal - Perfect single-serving portion, ideal for solo breakfasts or quick snack moments.
- Ease of cooking - Microwave baking avoids heating up the whole kitchen and cuts down waiting time.
Ingredient Swap Ideas
You can adjust this recipe to match your dietary needs or taste preferences without losing the core flavor and texture. Swapping ingredients also helps keep it allergy-friendly or vegan if needed.
- Peanut butter - Use almond butter or sunflower seed butter for a different nut or seed flavor.
- All-purpose flour - Replace with gluten-free flour blends for gluten-sensitive diets.
- Sugar - Substitute with honey, maple syrup, or coconut sugar for natural sweetness alternatives.
- Banana - Use ripe mashed avocado for a creamy texture without banana flavor.
- Milk - Use any plant-based milk like almond, oat, or soy for dairy-free versions.
Ingredients
- 1 medium ripe banana, mashed
- 2 tablespoons peanut butter
- 3 tablespoons all-purpose flour
- 1 tablespoon sugar (white or brown)
- ¼ teaspoon baking powder
- ⅛ teaspoon baking soda
- Pinch of salt
- 3 tablespoons milk (dairy or plant-based)
- ¼ teaspoon vanilla extract (optional)
Instructions
- In a microwave-safe mug, mash the ripe banana thoroughly with a fork until smooth.
- Add the peanut butter and mix well to combine with the banana.
- Stir in the flour, sugar, baking powder, baking soda, and salt until the batter looks uniform without lumps.
- Pour in the milk and vanilla extract if using, then mix until everything is evenly incorporated.
- Microwave the mug on high for 1 minute and 30 seconds to 2 minutes. The muffin should rise and be set but still moist inside.
- Let it cool slightly before eating to avoid burns, then enjoy your warm peanut butter banana mug muffin straight from the cup.
5. Single-Serve Chocolate Pudding
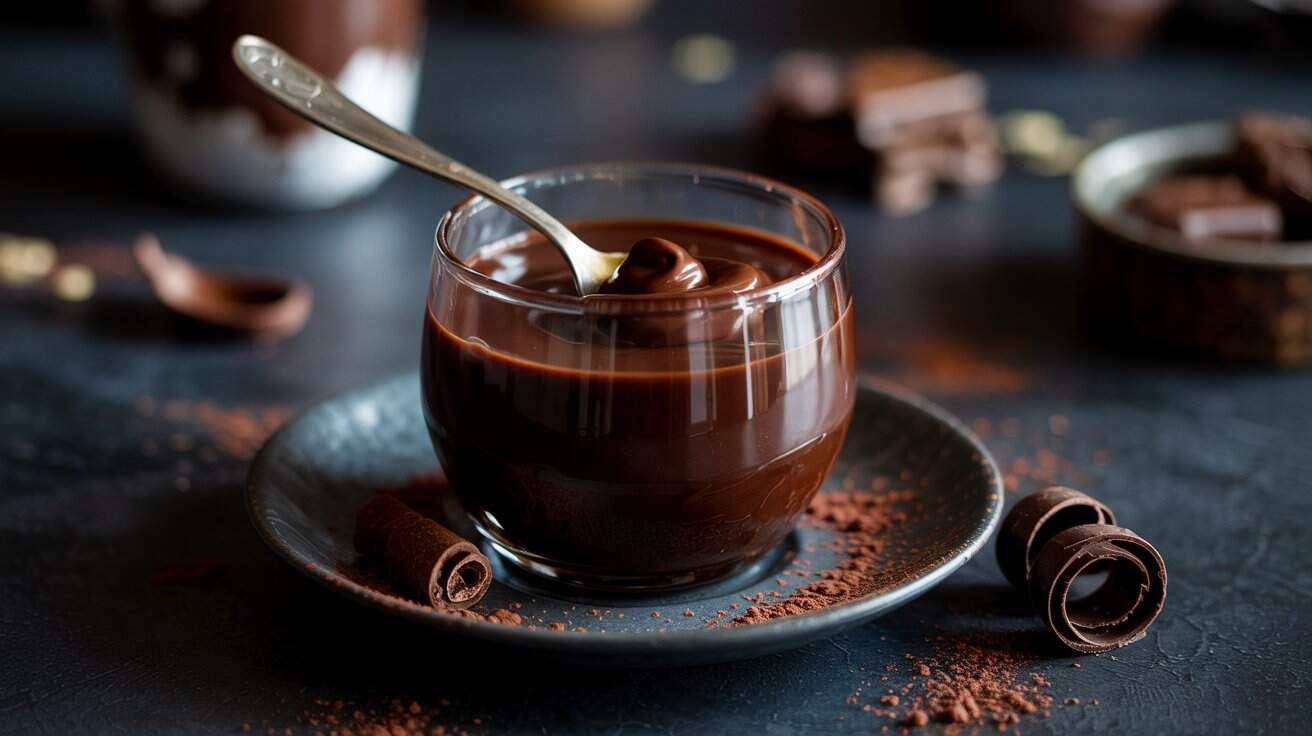
Single-serve chocolate pudding is a comforting treat that's both simple to make and satisfying to eat. This recipe brings together rich cocoa flavor with a creamy texture that you can enjoy anytime, whether as a quick dessert or a cozy snack.
Made with just a handful of ingredients, this pudding sets nicely in small glasses, making it ideal for portion control or serving guests. It captures that nostalgic feel of homemade pudding without requiring much time or fuss.
You'll appreciate how smooth and luscious the pudding turns out, with a balanced sweetness that lets the chocolate shine. Plus, it's easy to customize with toppings or mix-ins to suit your preferences.
Why This Recipe Works
This single-serve chocolate pudding is quick to prepare and delivers a rich, creamy dessert without complicated steps. It balances simple, wholesome ingredients for a dependable treat you can make anytime.
- Convenience - Made in individual portions with minimal prep and cook time.
- Rich flavor - The cocoa provides a deep chocolate taste without overpowering sweetness.
- Creamy texture - Silky and smooth, it sets perfectly in small serving glasses.
- Portion control - Single servings help avoid leftovers and support mindful eating.
- Versatile presentation - Great plain or topped with fruit, nuts, or whipped cream.
Ingredient Swap Ideas
Swapping certain ingredients can help this pudding fit different diets or flavor preferences without losing its creamy charm. Feel free to experiment based on what you have available or need to avoid.
- Milk alternatives - Use almond milk, oat milk, or soy milk instead of dairy to keep it dairy-free.
- Sweeteners - Replace white sugar with coconut sugar, maple syrup, or honey for a different sweetness profile.
- Cocoa powder - Swap regular unsweetened cocoa with Dutch-processed cocoa for a milder, smoother chocolate taste.
- Cornstarch substitute - Use arrowroot powder or tapioca starch if you want a gluten-free thickener alternative.
- Flavor twists - Add a pinch of cinnamon or a drop of vanilla extract for added warmth and depth.
Ingredients
- 1 cup whole milk
- 2 tablespoons unsweetened cocoa powder
- 2 tablespoons granulated sugar
- 1 tablespoon cornstarch
- Pinch of salt
- ½ teaspoon vanilla extract
Instructions
- In a small saucepan, whisk together the cocoa powder, sugar, cornstarch, and salt until evenly combined.
- Gradually pour in the milk while continuously whisking to avoid lumps.
- Place the saucepan over medium heat and cook the mixture, stirring constantly until it thickens and starts to bubble, about 5 to 7 minutes.
- Remove from heat and stir in the vanilla extract.
- Pour the pudding into individual serving glasses or bowls. Let it cool slightly before placing in the refrigerator to chill for at least 1 hour to set.
- Serve chilled, topped with fresh berries, whipped cream, or chopped nuts if desired.
6. No-Bake Lemon Yogurt Parfait
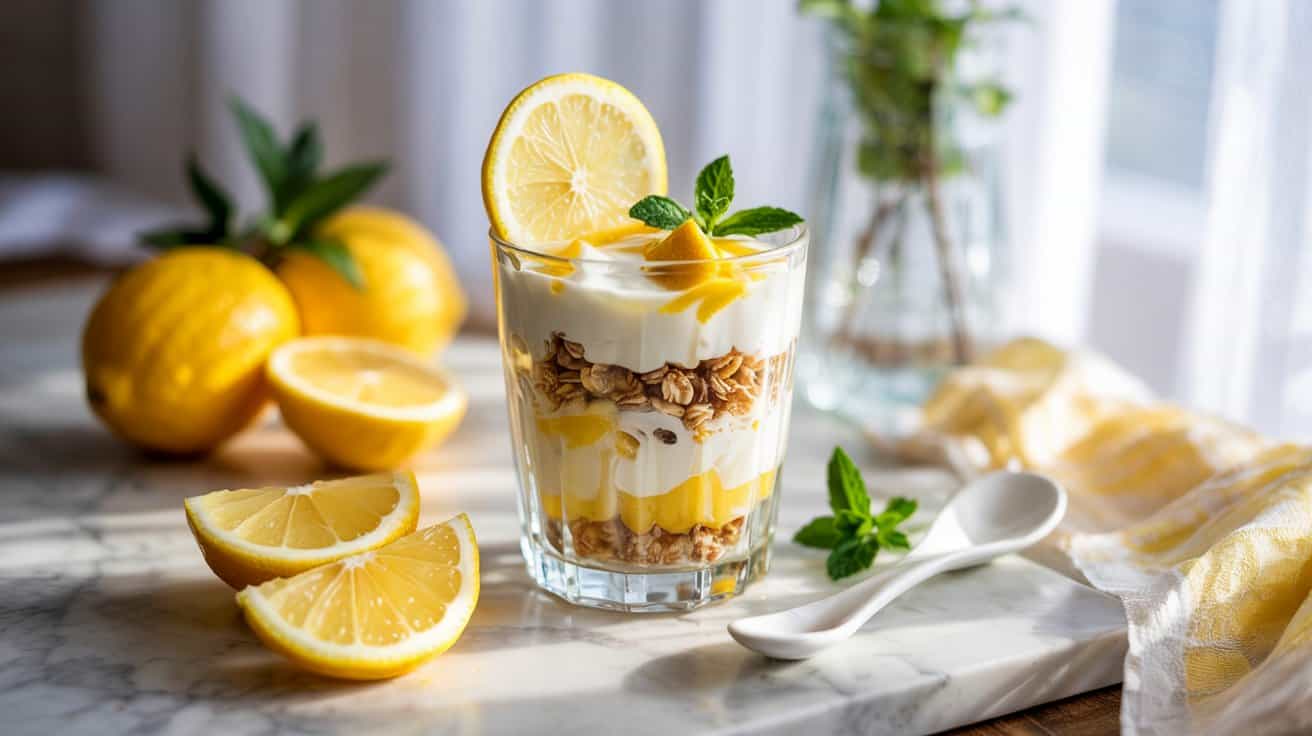
This no-bake lemon yogurt parfait is a refreshing and light treat that's perfect for warm days or whenever you want something quick yet satisfying. The bright tartness of lemon yogurt layered with crunchy granola and fresh fruit creates an appealing mix of flavors and textures.
What makes this parfait so approachable is that it requires no oven time and can be assembled in minutes, making it ideal for busy days or last-minute guests. It's a great way to enjoy a balanced snack or a casual dessert with a hint of citrus zing that keeps things feeling fresh.
Why This Recipe Works
This recipe combines convenience and fresh flavors in an easy-to-assemble parfait that's both nourishing and enjoyable.
- Convenience - No baking or heating needed, so it comes together quickly.
- Flavor balance - The tart lemon yogurt goes well with sweet fruit and crunchy granola.
- Texture - Creamy yogurt layered with crisp granola and juicy fruit offers a lovely variety.
- Appeal - It's visually attractive in layers and suits all ages.
- Healthy choice - Uses wholesome ingredients to support a balanced diet.
Ingredient Swap Ideas
Swapping ingredients here can help adjust taste preferences or accommodate dietary needs without altering the overall concept of the parfait. You can keep it fresh and simple while making small changes that suit you.
- Greek yogurt - Swap for plant-based yogurt like coconut or almond yogurt for a dairy-free version.
- Granola - Use nut-free granola or toasted oats if you need a nut allergy-friendly option.
- Lemon curd or lemon yogurt - Replace lemon curd with plain yogurt mixed with fresh lemon zest and a little honey for a less sweet alternative.
- Fresh fruit - Substitute berries with seasonal fruit or whatever you have on hand like kiwi, mango, or peaches.
- Sweetener - Use maple syrup or agave instead of honey to keep it vegan.
Ingredients
- 1 cup lemon yogurt
- ½ cup lemon curd
- 1 cup granola
- 1 cup fresh fruit (mixed berries like strawberries, blueberries, and raspberries)
- Honey or maple syrup (optional)
Instructions
- In a clear glass or bowl, spoon a couple of tablespoons of lemon yogurt as the first layer.
- Add a layer of granola over the yogurt to provide a crunchy contrast.
- Spoon a layer of lemon curd on top of the granola, spreading gently to maintain distinct layers.
- Add a handful of fresh fruit as the next layer to bring natural sweetness and color.
- Repeat layering with lemon yogurt, granola, lemon curd, and more fruit until you reach the top of your glass or run out of ingredients.
- Drizzle a little honey or maple syrup on top if you want extra sweetness, then serve immediately or chill briefly before enjoying.
7. Mini Apple Crisp for One
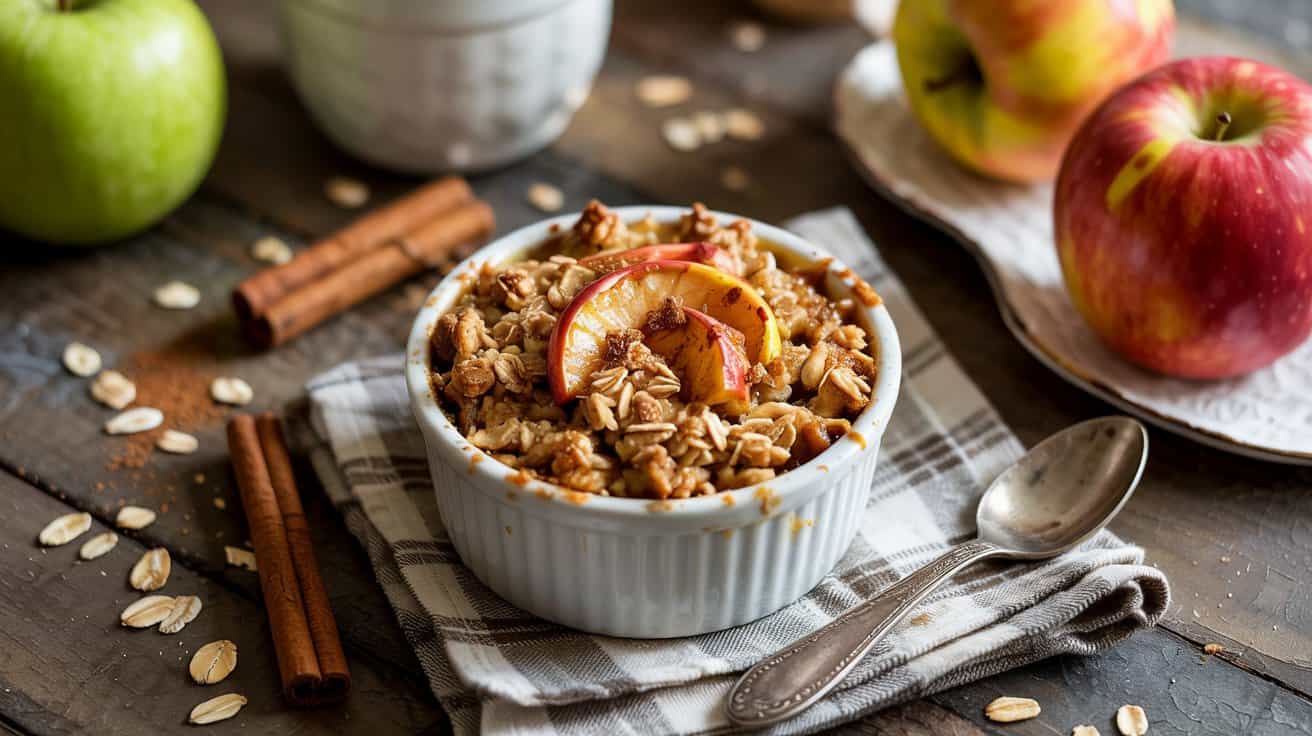
This Mini Apple Crisp for One is a cozy dessert that hits just the right note of sweetness and warmth. It's designed to give you a single-serving treat without any waste, making it perfect for a quiet night in or a simple finish to your meal.
The blend of tender baked apples with cinnamon spices goes well with a crunchy topping that adds texture without being too heavy. This dessert comes together quickly, using common pantry ingredients, so it's easy to whip up whenever the craving strikes.
You'll love how approachable this recipe is-no complicated steps or special equipment needed. It's a comforting little dessert that feels special without taking much time at all.
Why This Recipe Works
This dessert provides a balanced mix of soft fruit and crisp topping that's both satisfying and light, ideal for a solo treat.
- Convenience - Quick to prepare with simple ingredients and minimal cleanup.
- Flavor balance - Warm cinnamon and sweet apples create a classic, inviting taste.
- Texture - Soft baked apples contrast with a crunchy oat and nut topping.
- Appeal - Single-serving size is customizable and portion-controlled.
- Ease of serving - Baked in a small dish, ready to enjoy straight away.
Ingredient Swap Ideas
You can easily modify this recipe to suit different preferences or dietary needs by switching out a few ingredients while keeping the core flavors intact.
- Apples - Use pears or peaches as a mild, juicy alternative to apples.
- Topping - Replace oats with gluten-free oats if you need a gluten-free option.
- Sweetener - Substitute brown sugar with maple syrup or honey for a different natural sweetness.
- Butter - Use coconut oil or a plant-based margarine for a dairy-free version.
- Spices - Add nutmeg or allspice along with cinnamon for a more complex spice blend.
Ingredients
- 1 medium apple, peeled, cored, and sliced
- 1 tablespoon brown sugar
- ¼ teaspoon ground cinnamon
- 1 tablespoon rolled oats
- 1 tablespoon chopped walnuts or pecans
- 1 teaspoon unsalted butter
- ½ teaspoon lemon juice
- Pinch of salt
Instructions
- Preheat your oven to 350°F (175°C). Lightly grease a small oven-safe dish suitable for a single serving.
- Toss the sliced apple with lemon juice, brown sugar, cinnamon, and a pinch of salt in a small bowl. Transfer the mixture to the prepared dish, spreading the apples evenly.
- In a separate bowl, combine the rolled oats, chopped nuts, and butter. Use your fingers to mix the butter into the oats and nuts until crumbly. Sprinkle this topping evenly over the apples.
- Bake for 25 to 30 minutes, or until the apples are tender and the topping turns golden brown and crisp.
- Remove the dish from the oven and let it cool slightly before serving. It's delicious on its own or with a small scoop of vanilla ice cream or yogurt.
8. Single-Serve Pumpkin Mug Cake

This single-serve pumpkin mug cake is a quick and cozy treat that fits perfectly into any busy day. Its bright pumpkin flavor combined with the warmth of traditional spices makes it a comforting dessert or snack, especially in the cooler months.
You don't need to spend time baking a whole cake to enjoy that classic fall taste. This recipe comes together in just minutes using simple pantry ingredients and your microwave.
The texture is soft and moist, with just a hint of spice to keep each bite inviting.
Whether you want a personal-sized dessert or a small indulgence with your afternoon tea, this mug cake delivers flavorful satisfaction without much fuss.
Why This Recipe Works
This recipe provides a quick way to enjoy the flavors of pumpkin spice in a handy portion sized just for you. It balances rich pumpkin with warm spices and a tender crumb, making it both satisfying and simple.
- Convenience - Ready in minutes using a microwave with minimal prep.
- Flavor balance - Combines pumpkin's natural sweetness with cinnamon, nutmeg, and clove for warmth.
- Texture - Moist and soft crumb that holds together well in a mug.
- Portion control - Single serving helps avoid leftover cake or waste.
- Minimal cleanup - Everything mixes and cooks in one mug, so fewer dishes.
Ingredient Swap Ideas
Adjusting ingredients can help customize this pumpkin mug cake for different tastes or diets without losing its autumnal charm. Swaps keep it flexible and approachable.
- Pumpkin puree - Use canned or fresh pumpkin for similar flavor; canned offers consistent texture.
- Flour - Swap all-purpose flour with gluten-free blend to make it gluten-free.
- Sweetener - Replace brown sugar with maple syrup or honey to vary sweetness and flavor.
- Milk - Use any dairy or plant-based milk such as almond or oat milk for a dairy-free option.
- Oil - Substitute vegetable oil with melted coconut oil for a subtle, complementary richness.
Ingredients
- 4 tablespoons all-purpose flour
- ¼ teaspoon baking powder
- ¼ teaspoon ground cinnamon
- ⅛ teaspoon ground nutmeg
- Pinch ground cloves
- 2 tablespoons brown sugar
- 3 tablespoons pumpkin puree
- 2 tablespoons milk
- 1 tablespoon vegetable oil
- ¼ teaspoon vanilla extract
- Pinch salt
Instructions
- In a microwave-safe mug, whisk together the flour, baking powder, cinnamon, nutmeg, cloves, brown sugar, and salt until fully combined.
- Add the pumpkin puree, milk, vegetable oil, and vanilla extract to the dry ingredients. Stir well until smooth and uniform with no lumps remaining.
- Microwave the mug batter on high for 1 to 1 ½ minutes, checking at the one-minute mark. The cake should have risen and be set in the center but still soft.
- Let the mug cake cool for a couple of minutes before eating, as it will be very hot immediately after microwaving.
- Serve directly from the mug or loosen the edges with a spoon and transfer to a small plate to enjoy. Optionally, top with a dollop of whipped cream or a sprinkle of cinnamon.
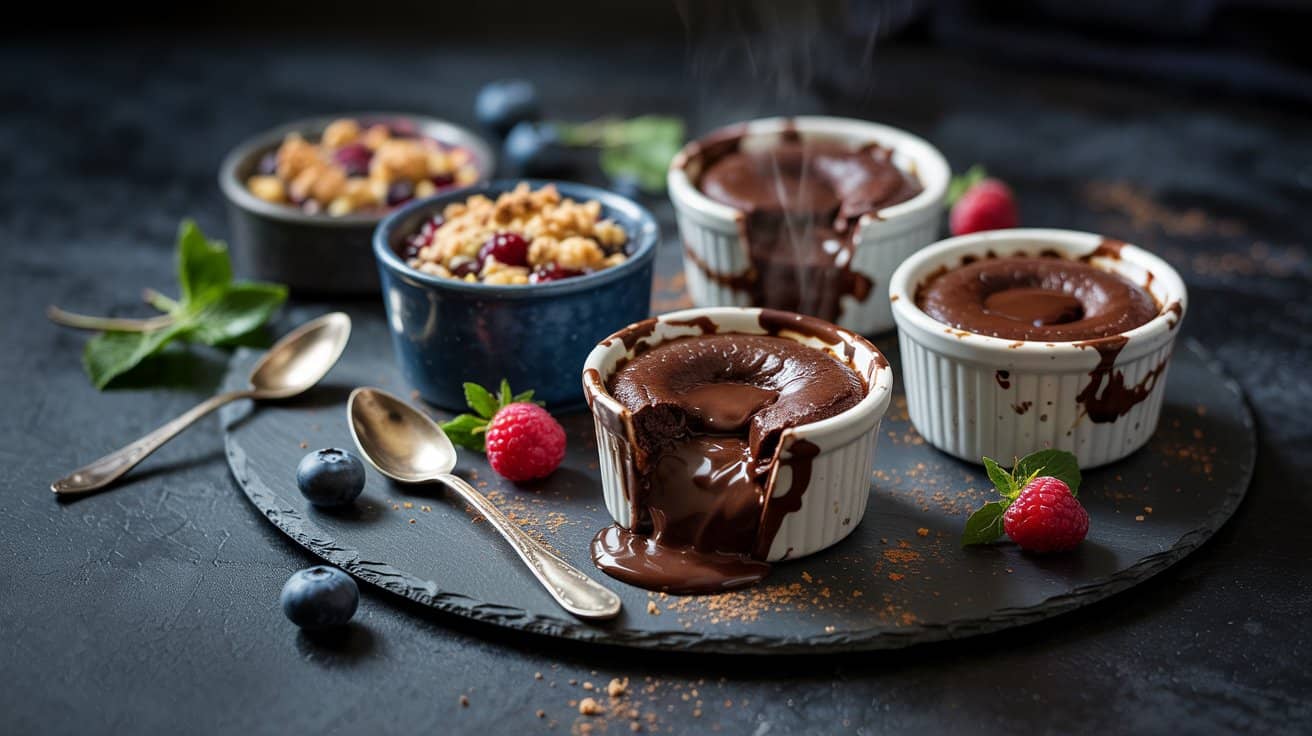
9. Chocolate Lava Mug Cake
This chocolate lava mug cake gives you a rich, gooey dessert all in a single serving. It's especially handy when you want a quick treat without turning on the oven or making a whole cake.
The outside cooks up soft and tender, while the center stays molten and fudgy. You get that classic molten chocolate effect but with minimal fuss and just a few ingredients.
Because it's made in a mug and cooked in the microwave, the clean-up is straightforward, making it a smart choice for busy evenings or when you crave chocolate on short notice.
Why This Recipe Works
This mug cake offers a fast and satisfying way to enjoy a restaurant-style chocolate dessert at home with minimal ingredients and time.
- Convenience - Comes together in minutes and cooks in the microwave, perfect for quick cravings.
- Flavor balance - Combines deep chocolate richness with a buttery hint that feels indulgent but not overwhelming.
- Texture - Features a soft cake exterior with a warm, gooey molten center that contrasts beautifully.
- Appeal - Single-serving size avoids leftovers and makes it feel special without committing to a large dessert.
- Cleanup ease - Minimal dishes since everything cooks in one mug, saving time.
Ingredient Swap Ideas
Swapping a few ingredients can adjust this recipe for different diets or flavor preferences without losing the molten chocolate effect.
- All-purpose flour - Use gluten-free flour blend to make it gluten-free while keeping the light texture.
- Sugar - Substitute with coconut sugar or a sugar substitute if you want a lower glycemic option.
- Butter - Swap with coconut oil for a dairy-free version that still adds richness.
- Egg - Use a flax egg (1 tablespoon ground flaxseed mixed with 3 tablespoons water) for a vegan or egg-free alternative.
- Chocolate - Try dark chocolate chips instead of semisweet for a slightly more intense chocolate flavor.
Ingredients
- 4 tablespoons all-purpose flour
- 4 tablespoons granulated sugar
- 2 tablespoons unsweetened cocoa powder
- ⅛ teaspoon baking powder
- Pinch of salt
- 3 tablespoons milk
- 2 tablespoons melted butter
- ½ teaspoon vanilla extract
- 2 tablespoons chocolate chips
Instructions
- In a microwave-safe mug, whisk together the flour, sugar, cocoa powder, baking powder, and salt until combined.
- Stir in the milk, melted butter, and vanilla extract until smooth and no dry spots remain.
- Drop the chocolate chips into the center of the batter, gently pressing them down slightly.
- Microwave on high for 45 to 60 seconds. Start checking at 45 seconds-stop as soon as the edges are set but the center still looks slightly molten. The cake will continue to cook a little as it cools.
- Let the mug cake sit for 1 to 2 minutes before enjoying so the lava center thickens just a bit but remains soft.
Serve it straight from the mug, optionally topped with a dusting of powdered sugar or a scoop of vanilla ice cream for an extra touch.
10. Homemade Frozen Yogurt Popsicles

Frozen yogurt popsicles are a simple and refreshing treat, especially when the days start getting warmer. They combine the creamy tang of yogurt with the natural sweetness of fresh fruit, making them a lighter alternative to traditional ice cream.
These popsicles are easy to prepare, requiring just a few ingredients and minimal time in the freezer. They're ideal for a snack or a healthy dessert that satisfies without overdoing the sugar.
Plus, making them at home means you control exactly what goes inside, keeping them wholesome and free from unnecessary additives.
Why This Recipe Works
This recipe delivers a cool, creamy snack that balances sweetness and tartness naturally while being quick to prepare and kid-friendly.
- Convenience - Requires only a few ingredients and can be assembled in minutes before freezing.
- Flavor balance - Combines tangy yogurt with fresh fruit for a naturally sweet and creamy result.
- Texture - Smooth and creamy with a slight bite from frozen fruit bits.
- Appeal - Suitable for all ages and easy to personalize with different fruits or yogurt types.
- Serving ease - Individual portions simplify serving and reduce mess.
Ingredient Swap Ideas
Swapping ingredients lets you tailor these popsicles to different dietary needs or flavor preferences without compromising the refreshing quality.
- Swap regular yogurt with Greek yogurt for a thicker, protein-rich popsicle.
- Use dairy-free yogurt such as coconut or almond milk yogurt to accommodate lactose intolerance.
- Replace fresh fruit with frozen berries for convenience or seasonal availability.
- Sweeten with a drizzle of honey or maple syrup if you prefer it sweeter.
- Add a handful of spinach or kale for a subtle green boost without overpowering fruit flavors.
Ingredients
- 2 cups plain or flavored yogurt, preferably full-fat for creaminess
- 1 cup fresh fruit of choice, chopped
- 1 to 2 tablespoons honey or maple syrup (optional)
- 1 teaspoon vanilla extract (optional)
Instructions
- In a bowl, combine the yogurt, chopped fruit, honey or maple syrup (if using), and vanilla extract. Stir gently to mix evenly without breaking up the fruit too much.
- Spoon the mixture into popsicle molds, filling each mold almost to the top. Tap the molds lightly on the counter to remove air bubbles and evenly distribute the fruit.
- Insert popsicle sticks and freeze the molds for at least 4 to 6 hours, or until completely solid.
- To remove popsicles, briefly run warm water over the outside of the molds until they loosen, then gently pull on the sticks to release.
- Serve immediately or store in an airtight container in the freezer for up to one week.
Enjoy this easy homemade frozen yogurt popsicle as a refreshing and wholesome treat that's both tasty and simple to make.
For more cup-style portions, see single-serve dessert cups for portion control. If you prefer chill-and-serve sweets, try no-bake single-serve cups for easy desserts.

Andrew Gray is a seasoned food writer and blogger with a wealth of experience in the restaurant and catering industries. With a passion for all things delicious, Andrew has honed his culinary expertise through his work as a personal chef and caterer.
His love for food led him to venture into food writing, where he has contributed to various online publications, sharing his knowledge and insights on the culinary world. As the proud owner of CooksCrafter.com, Andrew covers a wide range of topics, including recipes, restaurant reviews, product recommendations, and culinary tips.
Through his website, he aims to inspire and educate fellow food enthusiasts, offering a comprehensive resource for all things food-related.