Discover a curated collection of 14 single-serve dessert cups that offer just the right amount of sweetness without overwhelming your appetite or creating leftovers, often served in jars, ramekins, or small glasses. These desserts are designed for anyone seeking a manageable, stylish treat that feels special and indulgent.
This selection includes a diverse range of flavors and textures-from creamy no-bake cheesecakes and rich chocolate mousses to light fruit parfaits and velvety panna cottas. Each recipe combines straightforward preparation with attractive presentation, making them suitable for quick treats at home or elegant offerings at small gatherings.
These desserts work well together because they focus on simplicity and balanced portions, making sure minimal fuss in both preparation and cleanup. The variety also means there is something for every taste preference and dietary need, all while controlling portion size without sacrificing flavor.
1. Classic No-Bake Mini Cheesecakes in Jars
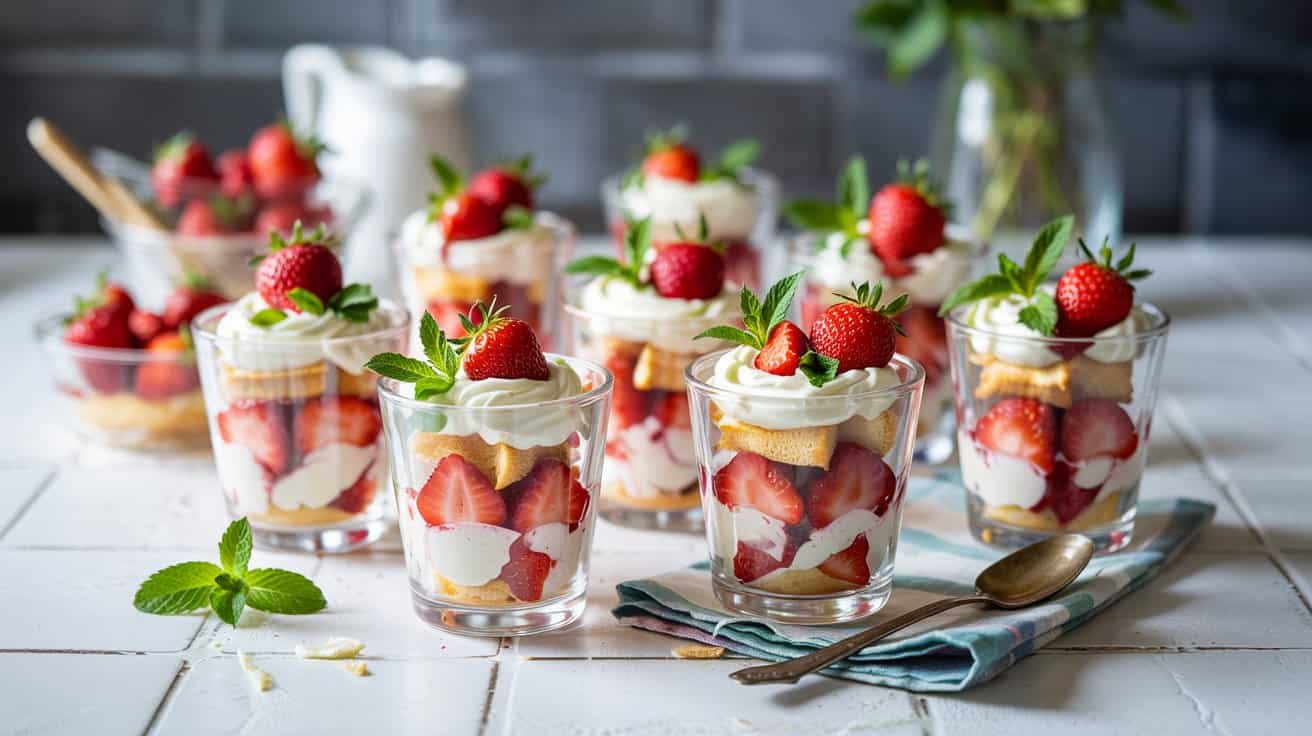
This recipe for Classic No-Bake Mini Cheesecakes in Jars offers a simple way to enjoy a creamy, tangy dessert with minimal fuss, and sets in the refrigerator for at least 4 hours. The smooth cheesecake filling goes well with a crunchy graham cracker crust, all served in individual jars that are great for portion control and presentation.
The addition of fresh berries on top adds a bright, juicy contrast to the rich cheesecake, making it a refreshing treat. These mini cheesecakes can be prepared in advance, which is perfect for busy days or when you want to impress guests with an elegant but easy dessert.
Why This Recipe Works
This recipe combines convenience with balanced flavors and textures, making it a dependable choice for a variety of occasions.
- Convenience - No baking required, and assembly is quick, saving time and effort.
- Flavor balance - The cheesecake is creamy and tangy, complemented by a slightly sweet, crunchy crust.
- Texture - Smooth filling contrasts nicely with a crisp crust and fresh berries.
- Appeal - The individual jars offer an elegant look and make serving simple and mess-free.
Ingredient Swap Ideas
Swapping ingredients can help tailor the recipe to your tastes or dietary needs while keeping the dessert's charm.
- Graham cracker crust - Use crushed digestive biscuits or gluten-free cookies to accommodate gluten sensitivities.
- Cream cheese - Substitute with a plant-based cream cheese for a dairy-free version.
- Sweetener - Replace granulated sugar with honey or maple syrup for a natural alternative.
- Toppings - Try mixed berries, sliced kiwi, or even a drizzle of chocolate or caramel sauce for variety.
Ingredients
- 1 ½ cups graham cracker crumbs - For the crunchy base of the cheesecake jars.
- 6 tablespoons unsalted butter, melted - Binds the crumbs and adds richness.
- 16 ounces cream cheese, softened - The main component for the creamy filling.
- ⅔ cup granulated sugar - Sweetens the cheesecake filling evenly.
- 1 teaspoon vanilla extract - improves the flavor.
- 1 cup heavy cream - Whipped to create a light, fluffy texture.
- Fresh berries (strawberries, blueberries, raspberries) - For topping and added freshness.
Instructions
- Combine graham cracker crumbs and melted butter in a bowl. Mix until the crumbs are evenly coated. Divide the mixture evenly among jars, pressing down firmly to form a crust layer.
- In a large bowl, beat softened cream cheese with sugar and vanilla extract until smooth and creamy.
- Whip the heavy cream separately until stiff peaks form, then gently fold it into the cream cheese mixture until fully incorporated and airy.
- Spoon or pipe the cheesecake filling over the crust layer in each jar, smoothing the tops. Cover and refrigerate for at least 4 hours or overnight to allow the filling to set.
- Before serving, top each cheesecake jar with fresh berries. Serve chilled for a refreshing dessert.
2. Chocolate Mousse Cups with Whipped Cream and Chocolate Shavings
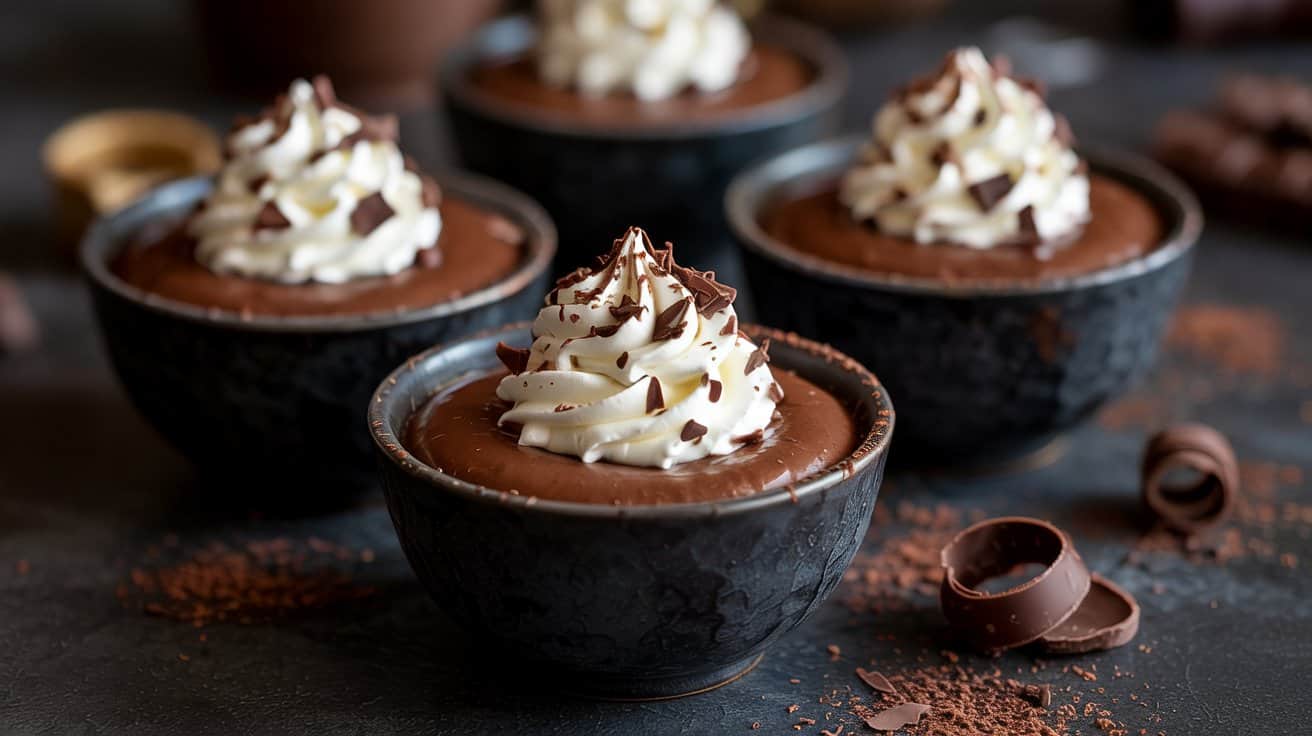
These mousse cups are easy to make ahead, which makes them an excellent choice for serving at gatherings or as a special treat after a busy day; pair them with side dishes to pair with chocolate mousse to round out the menu.
Topped with a light swirl of whipped cream and a sprinkle of chocolate shavings, they offer a lovely contrast in texture and an elegant look without demanding too much time in the kitchen.
The dessert balances deep chocolate flavor with a creamy, smooth finish. Because it's portioned into individual cups, it's straightforward to serve and enjoy without extra fuss.
This recipe combines simple ingredients and methods to deliver a satisfying, sophisticated dessert that suits a range of occasions.
Why This Recipe Works
This chocolate mousse recipe stands out for its rich flavor and simple preparation, making it both delicious and convenient to serve. It offers an inviting presentation that feels special without requiring complex techniques.
- Convenience - Can be made ahead and stored, saving time on the day you want to serve it.
- Flavor balance - Combines intense chocolate richness with a light whipped topping to add creaminess and subtle sweetness.
- Texture - The mousse is fluffy and smooth, contrasting nicely with the airy whipped cream and delicate chocolate shavings.
- Appeal - The individual cups make it a neat, attractive dessert ideal for sharing or individual servings.
Ingredient Swap Ideas
Adjusting ingredients allows you to cater this dessert to dietary preferences or ingredient availability while keeping the essential character of the dish.
- Dairy substitutions - Replace heavy cream with coconut cream for a dairy-free version that still whips well.
- Chocolate options - Swap standard dark chocolate for a higher-cacao variety if you prefer a more intense chocolate flavor.
- Sweetener alternatives - Use maple syrup or honey instead of sugar for a natural sweetness variation.
- Serving style - Serve in small glasses instead of cups or layer with fresh berries for added freshness.
Ingredients
- 6 ounces bittersweet or semisweet chocolate - chopped into small pieces for easy melting.
- 3 tablespoons unsalted butter - adds richness and smooth texture.
- 3 large eggs, separated - yolks provide creaminess, whites give lightness when whipped.
- ¼ cup granulated sugar - sweetens the mousse without overpowering the chocolate.
- ½ cup heavy cream - for whipping and folding into the mousse to create airy texture.
- Whipped cream for topping - use store-bought or freshly whipped cream to garnish.
- Chocolate shavings - for decoration and added chocolate flavor.
Instructions
- Melt the chopped chocolate and butter together in a heatproof bowl set over simmering water, stirring until smooth. Remove from heat and let it cool slightly.
- In a separate bowl, whisk the egg yolks with the granulated sugar until the mixture becomes pale and slightly thickened. Gradually stir the melted chocolate into the yolk mixture until combined.
- In another clean bowl, beat the egg whites until stiff peaks form. Gently fold them into the chocolate mixture in batches, keeping the mousse light and airy.
- Whip the heavy cream until soft peaks appear, then fold it into the mousse carefully, preserving the fluffy consistency.
- Spoon the mousse into individual cups or glasses. Cover and chill in the refrigerator for at least 3 hours or overnight. Before serving, top each cup with a swirl of whipped cream and finish with a sprinkle of chocolate shavings.
3. Lemon Berry Parfaits with Greek Yogurt and Granola
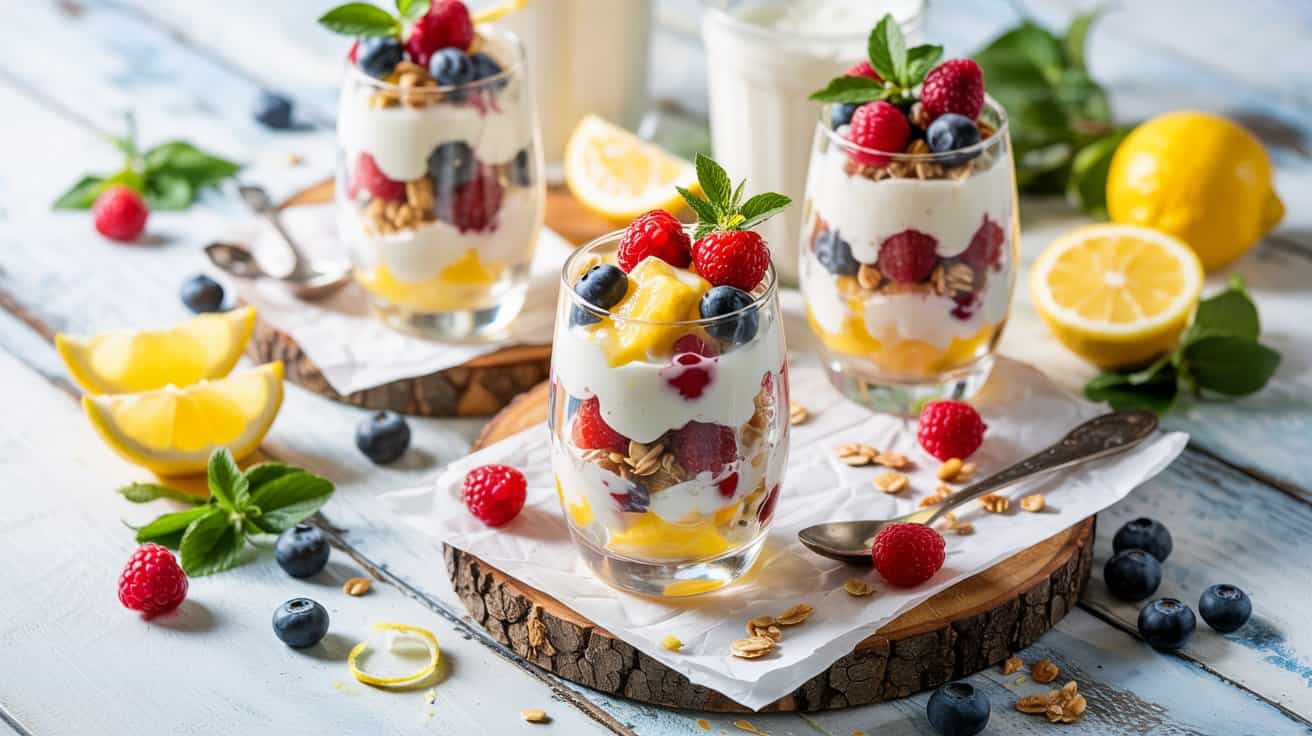
Lemon Berry Parfaits bring a fresh twist to classic yogurt parfaits by layering tart lemon curd with sweet berries, creamy Greek yogurt substitutes for quick swaps, and crunchy granola.
The flavors balance beautifully between tangy lemon and juicy berries, all rounded out by the smooth yogurt and textured granola. Plus, these parfaits come together quickly, making them easy to prepare for busy days or casual gatherings.
Why This Recipe Works
This recipe highlights fresh, wholesome ingredients with an inviting mix of flavors and textures. It's simple to assemble and easily customizable to suit different tastes or occasions.
- Convenience - Requires no cooking and can be prepared in minutes, perfect for busy schedules or last-minute treats.
- Flavor balance - Combines tart lemon curd with sweet berries and creamy Greek yogurt for a bright taste.
- Texture - Adds satisfying crunch with granola, contrasting with smooth yogurt and soft berries.
- Appeal - Visually attractive layers make it an eye-catching dessert or snack for family and guests.
Ingredient Swap Ideas
Adjusting ingredients can make this parfait work for various dietary needs or flavor preferences without losing its fresh character. Here are some easy substitutions to consider:
- Greek yogurt - Use dairy-free yogurt such as coconut or almond-based alternatives for a vegan or lactose-free option.
- Granola - Swap for toasted nuts and seeds if you want to lower sugar or avoid grains.
- Lemon curd - Replace with orange marmalade or raspberry jam to change the fruit profile while keeping citrusy sweetness.
- Berries - Use any seasonal fruit like sliced peaches, mango, or pomegranate arils for variety and color.
Ingredients
- 1 cup Greek yogurt - Plain, full-fat or low-fat depending on preference.
- ½ cup lemon curd - Store-bought or homemade with fresh lemon juice and zest.
- 1 cup mixed berries - Fresh or thawed frozen berries such as strawberries, blueberries, raspberries.
- ½ cup granola - Your choice of crunchy, preferably with nuts and seeds.
- 1 tablespoon honey or maple syrup - Optional, for added sweetness if desired.
- Fresh mint leaves - For garnish (optional).
Instructions
- In serving glasses or bowls, spoon a layer of Greek yogurt to cover the bottom, smoothing it evenly.
- Add a layer of lemon curd over the yogurt, spreading gently without mixing.
- Scatter a layer of mixed berries on top of the lemon curd, distributing evenly.
- Sprinkle a layer of granola over the berries to provide crunch.
- Repeat layers if your glasses allow, finishing with a small amount of granola and a few fresh berries on top.
- Drizzle a little honey or maple syrup on the final layer if you want extra sweetness.
- Garnish each parfait with a fresh mint leaf before serving.
These parfaits are best served immediately to keep the granola crisp but can be prepared an hour ahead and chilled if needed.
4. Salted Caramel Pudding Cups with Sea Salt Flakes
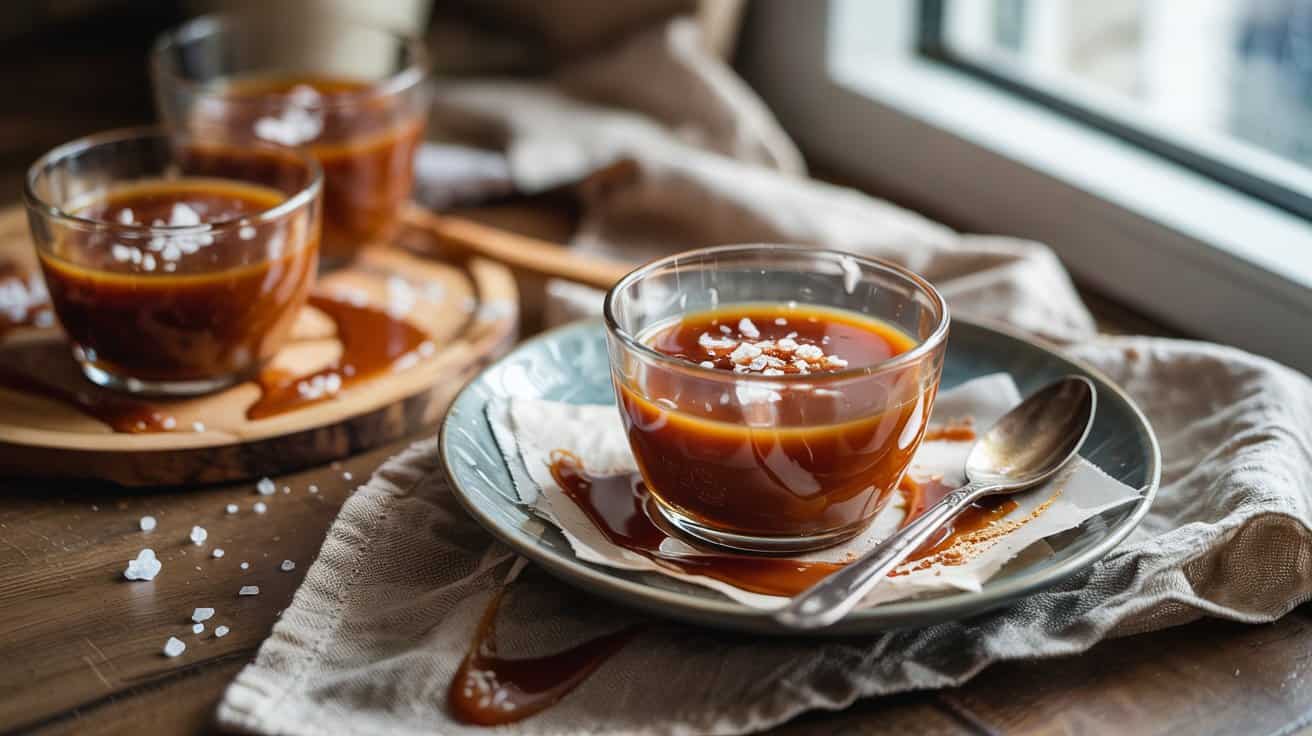
These salted caramel pudding cups bring together a lovely contrast between rich, silky caramel and a pinch of sea salt. The balance of sweet and salty lets each spoonful feel indulgent without being overwhelming.
Because the pudding is smooth and creamy, it works wonderfully served in small glass cups, making it easy to enjoy a bit of sweetness in moderation. Plus, the recipe comes together with straightforward steps and simple ingredients that you probably already have on hand.
Why This Recipe Works
This recipe offers a delicious, balanced treat that feels special but is surprisingly easy to prepare. It shows the combination of sweet caramel with a touch of sea salt for depth and interest.
- Convenience - Simple to make ahead and portion out into individual servings.
- Flavor balance - Combines smooth sweetness with a slight salty edge for complexity.
- Texture - Silky, creamy pudding contrasts with a crunchy sea salt topping.
- Appeal - Sophisticated yet approachable dessert suitable for casual or special occasions.
Ingredient Swap Ideas
You can adjust this recipe easily depending on your dietary preferences or ingredient availability. Swapping a few items helps keep the rich caramel flavor while fitting different needs.
- Dairy substitute - Use coconut cream instead of heavy cream to make it dairy-free and add subtle coconut notes.
- Sweetener option - Swap granulated sugar with maple syrup or honey for a natural sweetener variation.
- Salt type - Replace sea salt flakes with fleur de sel or flaky Maldon salt for a different texture and luxurious finish.
- Milk alternative - Use almond or oat milk with a bit of thickener if avoiding dairy completely, though the pudding may be less creamy.
Ingredients
- 1 cup granulated sugar - For making the rich caramel base.
- 2 tablespoons unsalted butter - Adds smoothness and richness to the caramel.
- 1 ¼ cups whole milk - Provides creaminess and balances the caramel flavor.
- 1 cup heavy cream - Enhances the pudding's silky texture.
- 3 large egg yolks - Help thicken the pudding and give it a custard-like richness.
- 2 tablespoons cornstarch - is a thickener for the pudding.
- 1 teaspoon vanilla extract - Adds warm, aromatic depth to the dessert.
- Sea salt flakes - Sprinkled on top to finish and improve the salted caramel flavor.
Instructions
- In a medium saucepan, heat the granulated sugar over medium heat, stirring constantly with a wooden spoon or heatproof spatula. Continue until the sugar melts completely and turns a deep amber color.
- Remove the pan from heat and carefully whisk in the butter until fully melted and combined. Slowly add the whole milk and heavy cream while stirring to mix, then return the pan to low heat.
- In a separate bowl, whisk the egg yolks with cornstarch until smooth. Gradually pour about half a cup of the warm caramel mixture into the egg yolks, whisking constantly to temper them. Then pour the egg yolk mixture back into the saucepan.
- Cook the mixture over low heat, stirring constantly, until it thickens enough to coat the back of a spoon-this should take about 5 to 7 minutes. Remove from heat and stir in the vanilla extract.
- Pour the pudding evenly into small glass cups or ramekins. Let them cool to room temperature, then refrigerate for at least 2 hours until fully set. Just before serving, sprinkle a pinch of sea salt flakes on top of each pudding cup.
5. Tiramisu Cups
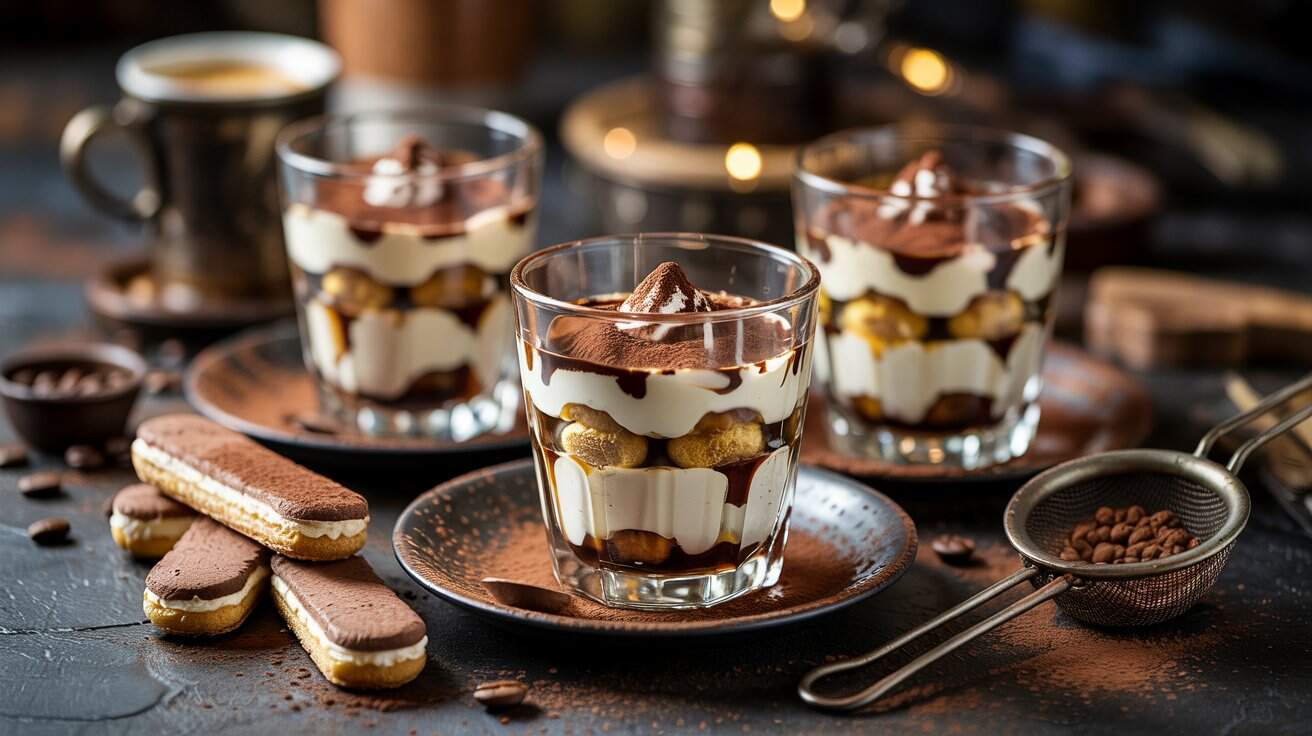
Tiramisu cups offer a fresh spin on the classic Italian dessert, making it easier to enjoy without slicing from a large tray. These individual servings bring together espresso-soaked ladyfingers layered with a rich mascarpone cream, creating a good mix of bold coffee and creamy sweetness.
The texture contrasts beautifully between the soft, coffee-wet cookies and the smooth, airy mascarpone filling. Plus, these cups are straightforward to assemble and make for an elegant dessert at any gathering.
Why This Recipe Works
This recipe balances rich flavors with ease of preparation, making it an excellent dessert option for busy cooks who want to impress. The portioned servings simplify presentation and help control serving sizes.
- Convenience - Easy to assemble in individual cups, no slicing required.
- Flavor balance - Combines bold espresso with smooth, lightly sweetened mascarpone.
- Texture - Soft coffee-soaked ladyfingers contrast with creamy, airy filling.
- Presentation - Individual servings look elegant and are great for entertaining.
Ingredient Swap Ideas
Swapping ingredients can help tailor the tiramisu cups to dietary needs or flavor preferences without losing their signature taste. Consider these swaps to adjust the recipe for you or your guests.
- Espresso - Use strong brewed coffee if you don't have espresso on hand.
- Ladyfingers - Substitute with gluten-free ladyfingers or sponge cake pieces for gluten sensitivity.
- Mascarpone cheese - Replace mascarpone with cream cheese mixed with a little heavy cream for a similar creamy texture.
- Sweetener - Use maple syrup or agave syrup instead of granulated sugar for a different sweetness profile.
Ingredients
- 1 cup strong espresso or very strong brewed coffee, cooled
- 2 tablespoons coffee liqueur (optional)
- 20 ladyfingers (savoiardi biscuits)
- 8 ounces mascarpone cheese, softened
- 1 cup heavy cream
- ⅓ cup granulated sugar
- 1 teaspoon vanilla extract
- Unsweetened cocoa powder, for dusting
Instructions
- Combine the cooled espresso and coffee liqueur in a shallow dish. Quickly dip each ladyfinger into the mixture, soaking briefly to avoid sogginess. Set aside.
- In a mixing bowl, whip the heavy cream with the sugar and vanilla extract until soft peaks form. Gently fold the mascarpone cheese into the whipped cream until smooth and combined.
- Place a layer of dipped ladyfingers at the bottom of each serving cup. Spoon a generous layer of the mascarpone cream over the ladyfingers. Repeat layers, finishing with mascarpone cream on top.
- Cover the cups and refrigerate for at least 4 hours or overnight to allow flavors to meld and the dessert to set.
- Before serving, dust the tops with a light layer of unsweetened cocoa powder using a fine sieve. Serve chilled and enjoy.
6. Peach and Vanilla Bean Trifle Cups
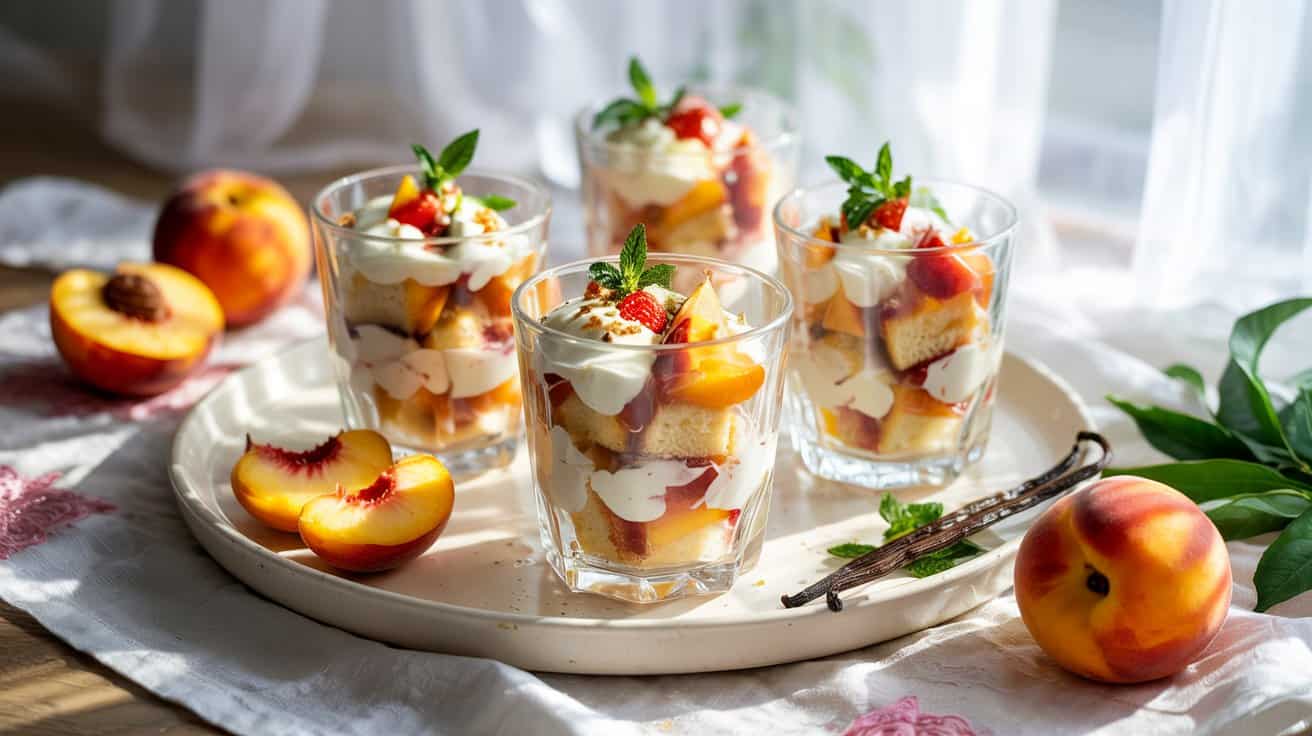
This dessert combines creamy vanilla custard with juicy fresh peaches and crumbled pound cake, creating a light and refreshing treat. It's an excellent choice for summer gatherings or when you want something sweet but not too heavy.
Each layer offers different textures-the smooth custard, tender peaches, and soft cake-making every bite enjoyable and balanced. Plus, assembling individual trifle cups is simple and allows for portion control.
Why This Recipe Works
Peach and Vanilla Bean Trifle Cups bring together classic flavors in a convenient, visually appealing way. You get a fresh fruit treat with creamy and cake layers that balance sweetness and texture.
- Convenience - No baking required to assemble; custard can be made in advance.
- Flavor balance - Sweet peaches and rich vanilla custard combine beautifully without overpowering each other.
- Texture - Creamy custard, soft cake pieces, and juicy fresh fruit create a pleasing contrast.
- Portion control - Individual cups make serving simple and reduce mess.
Ingredient Swap Ideas
Switching ingredients lets you adapt the trifle to your dietary needs or personal tastes without losing its essence. Use these swaps to adjust sweetness, make it dairy-free, or incorporate different fruits.
- Pound cake - Substitute with gluten-free pound cake or sponge cake for dietary needs.
- Vanilla bean custard - Use coconut milk-based custard for a dairy-free option.
- Fresh peaches - Replace with nectarines, plums, or berries for seasonal variety.
- Sugar - Swap white sugar for honey or maple syrup in the custard to change the sweetness profile.
Ingredients
- 2 cups vanilla custard homemade or store-bought, chilled
- 2 large ripe peaches peeled and sliced
- ½ pound pound cake cut or crumbled into small pieces
- 1 vanilla bean split and seeds scraped into the custard (optional, for extra flavor)
- 2 tablespoons sugar for macerating peaches (optional)
- Fresh mint leaves for garnish (optional)
Instructions
- If desired, toss peach slices with sugar and let them sit for 10 minutes to macerate and produce some juice. This enhances their sweetness.
- In serving cups, start by layering a spoonful of custard at the bottom. Add a layer of crumbled pound cake, followed by sliced peaches. Repeat layers until the cups are nearly full, finishing with a spoonful of custard on top.
- Garnish each cup with a few peach slices and a mint leaf for color and freshness.
- Chill the trifle cups for at least 30 minutes before serving to allow flavors to meld.
- Serve cold and enjoy the refreshing combination of custard, peaches, and cake in every bite.
7. Matcha Green Tea Mousse Cups
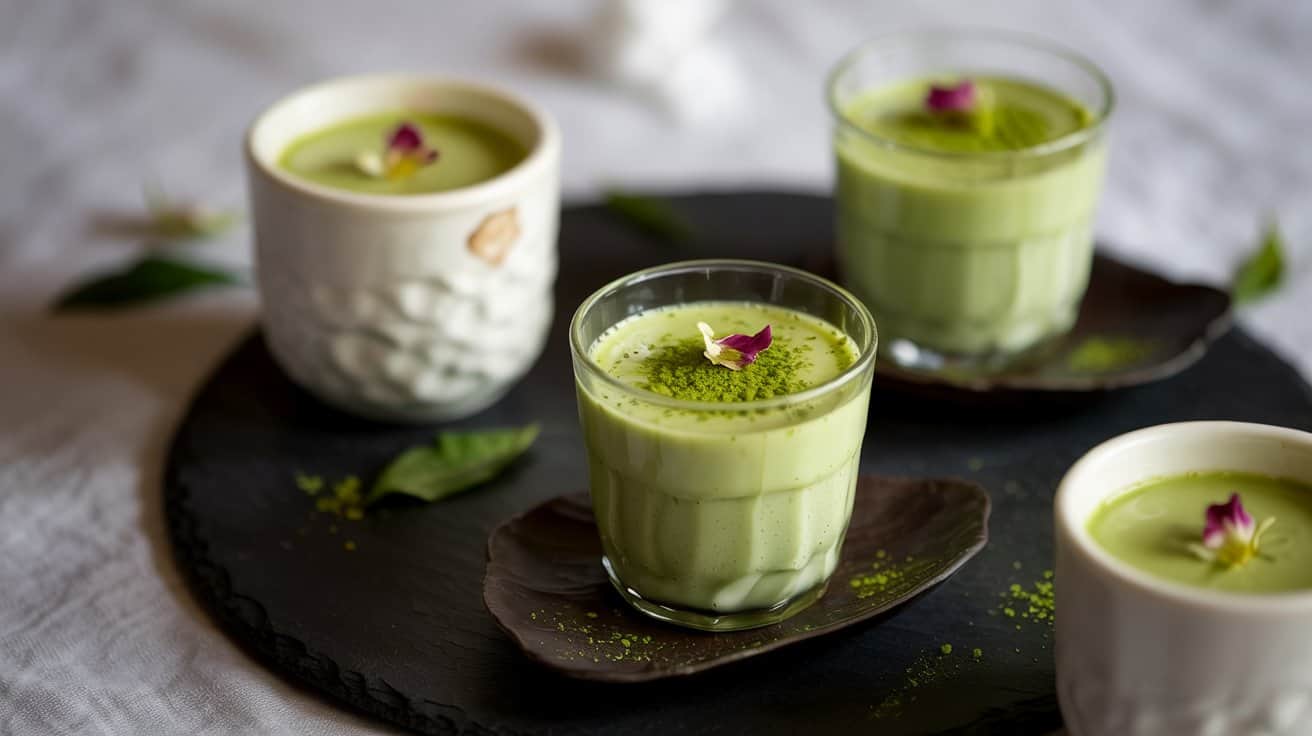
Matcha Green Tea Mousse Cups offer a refreshing twist on traditional mousse desserts. The bright green color from the matcha powder catches the eye, while the subtle grassy flavor balances with a creamy, lightly sweet texture.
This recipe is straightforward, making it suitable for evenings when you want something light yet satisfying.
The mousse holds well in small cups, making it an elegant choice for parties or a simple treat after dinner. It's a nice way to enjoy the benefits of green tea in a delicious and smooth dessert.
Why This Recipe Works
This mousse recipe delivers a mix of practical ease and refined flavor that fits neatly into busy schedules and special moments.
- Convenience - Requires minimal ingredients and steps, ready to serve after chilling.
- Flavor balance - Combines earthy matcha with gentle sweetness for a well-rounded taste.
- Texture - Light and airy mousse that melts smoothly on the palate.
- Appeal - Eye-catching color and neat presentation make it suitable for guests and family alike.
Ingredient Swap Ideas
Adjusting ingredients here helps accommodate different diets or preferences without losing the mousse's signature texture and flavor.
- Matcha powder - Use culinary-grade matcha for authentic flavor; replace with powdered green tea if unavailable.
- Heavy cream - Swap with coconut cream to make it dairy-free and add a subtle tropical note.
- Sweetener - Substitute granulated sugar with maple syrup or agave nectar for a natural alternative.
- Gelatin - Replace with agar-agar powder to create a vegetarian-friendly mousse.
Ingredients
- 2 teaspoons matcha green tea powder - Provides the distinctive flavor and color.
- 1 cup heavy whipping cream - Adds richness and helps create the mousse texture.
- ¼ cup granulated sugar - Sweetens the mousse without overpowering matcha's earthiness.
- 1 teaspoon vanilla extract - Enhances overall flavor with a hint of warmth.
- 1 teaspoon gelatin powder - Helps the mousse set firmly.
- 2 tablespoons hot water - Used to dissolve gelatin smoothly.
Instructions
- Dissolve the gelatin powder in hot water, stirring well until fully dissolved. Set aside to cool slightly.
- In a medium bowl, sift the matcha powder to prevent clumps, then whisk in the sugar and vanilla extract until blended.
- Pour the cooled gelatin mixture into the matcha mixture and combine thoroughly.
- In a separate bowl, whip the heavy cream until it forms soft peaks. Gently fold the whipped cream into the matcha mixture until well incorporated and smooth.
- Spoon the mousse evenly into small serving cups or ramekins. Refrigerate for at least 2 hours or until the mousse is set and chilled.
Serve chilled as a refreshing, creamy dessert with a subtle green tea kick.
8. Pumpkin Spice Panna Cotta
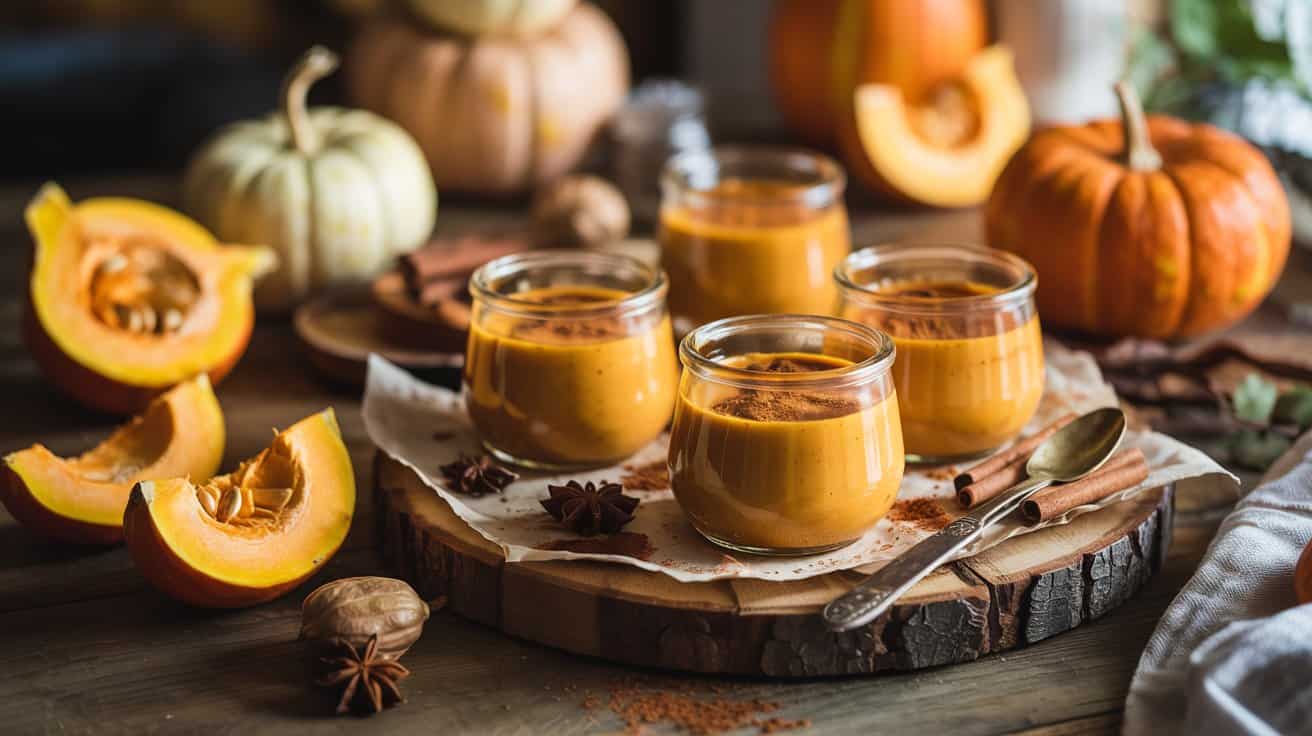
This pumpkin spice panna cotta brings the flavors of fall right to your table in a smooth and creamy dessert. It's gently spiced with warm notes of cinnamon, nutmeg, and cloves, making it a comforting treat for cooler evenings or seasonal gatherings.
The panna cotta sets nicely in small cups, so it's easy to serve and portion for guests. Plus, it requires just a few simple steps and ingredients, making it a straightforward dessert that feels a little special without demanding too much time.
Why This Recipe Works
This pumpkin spice panna cotta combines classic autumn spices with a silky texture that feels indulgent but stays light enough to enjoy after a meal. It's practical and flavorful, fitting well for casual or more festive occasions.
- Convenience - Can be made in advance and chilled until ready to serve.
- Flavor balance - Mild pumpkin sweetness with warm, inviting spices.
- Texture - Smooth and creamy with a delicate, set firmness.
- Appeal - Served in individual cups, it offers an elegant presentation without extra effort.
Ingredient Swap Ideas
Adjusting a few ingredients can make this dessert suitable for different diets or personal tastes, while still keeping its seasonal charm.
- Heavy cream - Use full-fat coconut milk for a dairy-free and slightly tropical twist.
- Pumpkin puree - Try sweet potato puree as an alternative for a similar texture with a slightly different flavor.
- Sugar - Replace white sugar with maple syrup for natural sweetness and extra depth.
- Gelatin - Substitute agar-agar to create a vegetarian version, but follow package instructions for setting.
Ingredients
- 2 cups heavy cream - Provides the creamy base for the panna cotta.
- ½ cup whole milk - Lightens the texture and balances richness.
- ½ cup pumpkin puree - Adds natural sweetness and autumn flavor.
- ½ cup granulated sugar - Sweetens the dessert evenly.
- 1 teaspoon vanilla extract - Enhances the overall flavor.
- 1 ½ teaspoons pumpkin pie spice - A blend of cinnamon, nutmeg, ginger, and cloves for warm seasoning.
- 2 teaspoons powdered gelatin - Helps the panna cotta set firmly.
- 3 tablespoons cold water - Used to bloom the gelatin before mixing.
Instructions
- Sprinkle the powdered gelatin over the cold water in a small bowl and let it sit for 5 minutes until it blooms and softens.
- In a medium saucepan, combine heavy cream, milk, pumpkin puree, sugar, vanilla extract, and pumpkin pie spice. Heat over medium heat, stirring occasionally until the sugar dissolves and the mixture is hot but not boiling.
- Remove the saucepan from heat and whisk in the bloomed gelatin until fully dissolved. Make sure the mixture is smooth and gelatin is completely incorporated.
- Pour the panna cotta mixture evenly into small serving cups or ramekins. Let them cool slightly at room temperature, then cover with plastic wrap and refrigerate for at least 4 hours or overnight until set.
- Before serving, you can garnish each panna cotta with a sprinkle of cinnamon or a dollop of whipped cream if you like. Serve chilled and enjoy the cozy fall flavors.
9. Banoffee Pie Cups

Banoffee Pie Cups bring together the rich sweetness of caramel and bananas with a light whipped cream finish, all located inside a crisp biscuit cup. This dessert offers all the classic banoffee flavors in a handy, portion-controlled format that's simple to put together.
With layers of creamy caramel, fresh bananas, and airy whipped cream, these cups offer a satisfying texture contrast and a nice combination of flavors. They're perfect for busy days when you want a sweet treat without spending much time baking or assembling.
Why This Recipe Works
This recipe balances indulgence and ease, delivering beloved banoffee pie flavors in a straightforward, mess-free way.
- Convenience - No baking required, quick to assemble, and ideal for making ahead.
- Flavor balance - Combines sweet caramel, fresh banana, and light cream for a rich but fresh taste.
- Texture - The crumbly biscuit cups provide a crisp base contrasted with smooth caramel and fluffy whipped cream.
- Appeal - Individual servings make it easy to present elegantly for gatherings or family treats.
Ingredient Swap Ideas
Swapping certain ingredients can help personalize the recipe to fit different dietary needs or flavor preferences while keeping the dessert's core appeal.
- Biscuit cups - Use gluten-free digestive biscuits or shortbread for a gluten-free option.
- Caramel - Substitute with dulce de leche or a store-bought caramel sauce to simplify prep.
- Whipped cream - Replace with coconut whipped cream for a dairy-free alternative.
- Bananas - Try sliced pears or peaches if you want a different fruit flavor and texture.
Ingredients
- 10 digestive biscuits - Crushed into fine crumbs for the biscuit cups.
- 4 tablespoons unsalted butter - Melted to bind the biscuit crumbs.
- 1 cup dulce de leche or caramel sauce - Use store-bought or homemade for the caramel layer.
- 2 ripe bananas - Sliced fresh for layering.
- 1 cup heavy whipping cream - Chilled, to be whipped for the topping.
- 2 tablespoons powdered sugar - To sweeten the whipped cream.
- 1 teaspoon vanilla extract - Added to whipped cream for flavor.
Instructions
- In a bowl, combine crushed biscuits with melted butter until the crumbs are evenly coated. Press this mixture into the bases of 6 small serving cups or ramekins to form the biscuit cups. Chill for 15 minutes to set.
- Spread dulce de leche or caramel sauce evenly over the chilled biscuit bases. Arrange banana slices over the caramel layer.
- In a mixing bowl, whisk the chilled heavy cream with powdered sugar and vanilla extract until soft peaks form. Spoon or pipe the whipped cream over the banana layer to finish each cup.
- Refrigerate the assembled cups for at least 30 minutes to allow flavors to meld and the whipped cream to firm slightly. Serve chilled.
- Optionally, garnish with a dusting of cocoa powder or grated chocolate before serving for extra visual appeal.
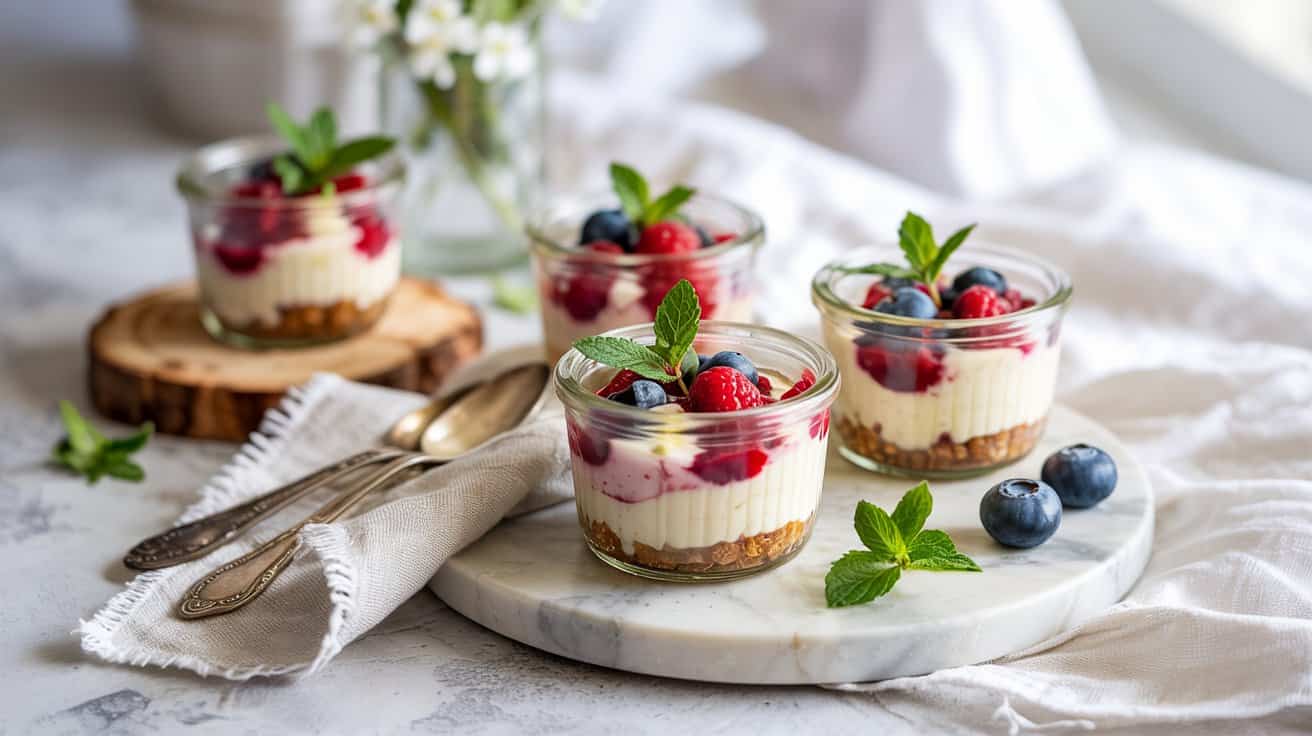
10. Raspberry and White Chocolate Cheesecake Parfaits
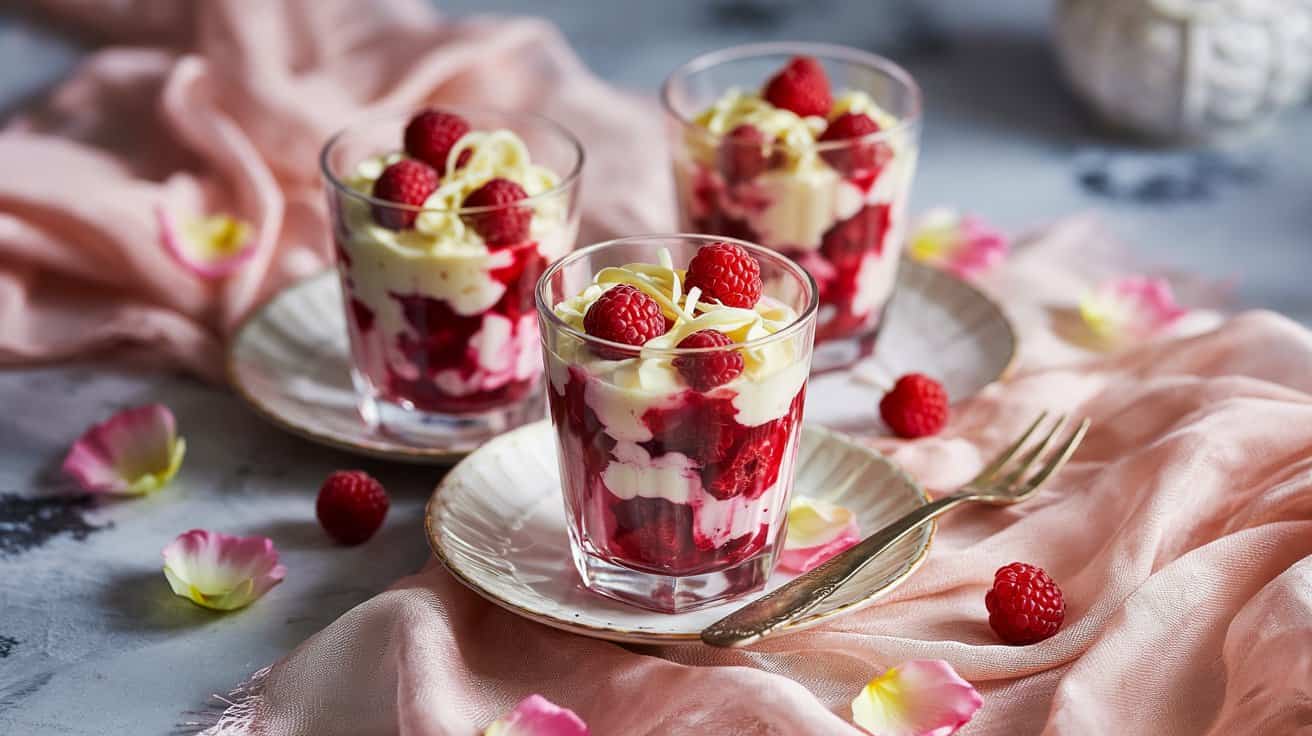
Raspberry and white chocolate cheesecake parfaits offer a wonderful balance of creamy sweetness and bright fruitiness. These layered desserts look beautiful served in clear glasses, making them ideal for casual family treats or special occasions alike.
The combination of smooth white chocolate cheesecake and tart, fresh raspberries creates a flavor contrast that feels indulgent yet refreshing. Despite their elegant appearance, these parfaits are straightforward to make and come together quickly without baking.
Why This Recipe Works
This recipe provides a simple way to enjoy a cheesecake-inspired dessert without the fuss of a full cake. The flavors blend beautifully, creating a dessert that's both rich and light.
- Convenience - No baking required, quick layering in cups for easy assembly.
- Flavor balance - Creamy white chocolate and tangy raspberries combine for a pleasing taste contrast.
- Texture - Smooth cheesecake filling paired with juicy raspberries and crumbly cookie base.
- Appeal - Attractive presentation in clear glasses makes these parfaits perfect for gatherings or simple desserts.
Ingredient Swap Ideas
Adjusting ingredients here allows you to cater to different diets or flavor preferences without losing the essence of the dessert.
- White chocolate - Use milk or dark chocolate for a richer, less sweet variation.
- Raspberries - Substitute with strawberries, blueberries, or mixed berries for a seasonal twist.
- Cream cheese - Replace with mascarpone or ricotta for a lighter texture.
- Cookies for the base - Use graham crackers, digestive biscuits, or gluten-free cookies to suit dietary needs.
Ingredients
- White chocolate - 4 ounces, chopped.
- Cream cheese - 8 ounces, softened.
- Heavy cream - 1 cup, chilled.
- Powdered sugar - ⅓ cup, sifted.
- Vanilla extract - 1 teaspoon.
- Fresh raspberries - 1 ½ cups, washed and dried.
- Graham crackers or digestive biscuits - 1 ½ cups, crushed into crumbs.
- Unsalted butter - 4 tablespoons, melted.
Instructions
- Melt the white chocolate gently in a heatproof bowl set over simmering water or in short bursts in the microwave, stirring until smooth. Set aside to cool slightly.
- In a large bowl, beat the cream cheese with powdered sugar and vanilla extract until smooth and creamy. Gradually add the melted white chocolate, mixing to combine.
- In a separate bowl, whip the heavy cream until stiff peaks form, then gently fold it into the cream cheese mixture until fully incorporated.
- Combine the crushed graham crackers and melted butter in a small bowl, mixing until the crumbs are evenly coated.
- To assemble, spoon a layer of the crumb mixture into the bottom of clear parfait glasses, followed by a layer of white chocolate cheesecake filling, then a layer of fresh raspberries. Repeat to fill the glasses, finishing with raspberries on top. Chill for at least 2 hours before serving to allow the parfaits to set.
11. Vegan Coconut Chia Pudding Cups
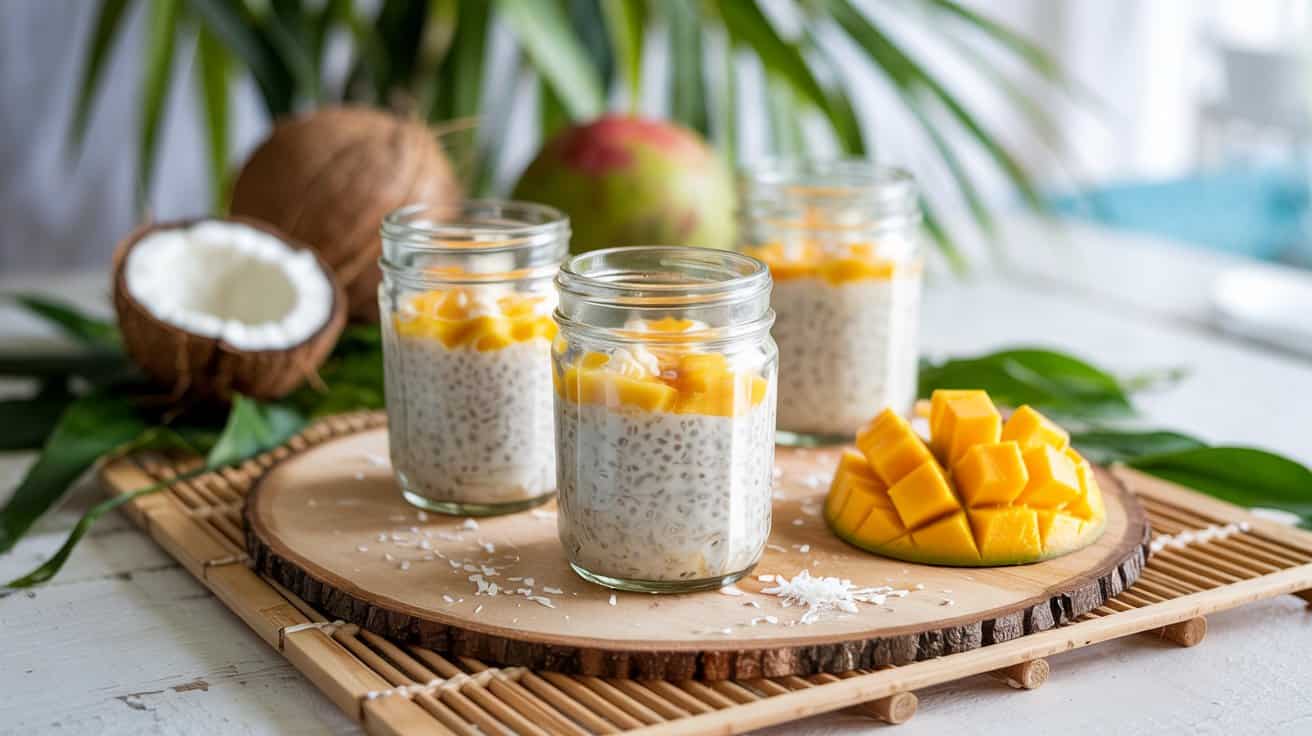
This vegan coconut chia pudding is a wholesome treat that fits perfectly into a busy lifestyle. It combines creamy coconut milk with chia seeds to create a thick, satisfying pudding that needs no baking and minimal prep time.
Topped with fresh fruit, it balances natural sweetness and texture beautifully, making it a refreshing breakfast or a light dessert. It's easy to portion in cups and store, so you can have a nutritious option ready whenever you need it.
Why This Recipe Works
This chia pudding recipe offers a healthy and delicious dairy-free option that is both filling and refreshing.
- Convenience - No cooking or baking required, and you can prepare it ahead of time.
- Flavor balance - The coconut milk provides creaminess while the fruit adds a fresh, bright contrast.
- Texture - The chia seeds swell to create a satisfying, pudding-like thickness.
- Appeal - It's a versatile recipe that works well for breakfast, snack, or dessert.
Ingredient Swap Ideas
Substituting some ingredients can tailor this recipe to your preferences or dietary needs while keeping its essence intact.
- Coconut milk - Use almond milk or oat milk for a lighter option with less coconut flavor.
- Chia seeds - Substitute with flaxseeds or hemp seeds for a different nutritional profile and texture.
- Sweetener - Replace maple syrup with agave nectar, coconut sugar, or your preferred vegan sweetener.
- Fresh fruit toppings - Use any seasonal fruits such as mango, kiwi, or berries to vary the flavor and presentation.
Ingredients
- 1 ½ cups full-fat coconut milk - Provides the creamy base of the pudding.
- ½ cup chia seeds - Thickens the mixture and adds fiber and omega-3s.
- 3 tablespoons maple syrup - Adds natural sweetness.
- 1 teaspoon vanilla extract - Enhances the overall flavor.
- Fresh fruit for topping - Such as sliced strawberries, blueberries, or mango.
- Optional: shredded coconut or nuts - For added texture and garnish.
Instructions
- In a medium bowl, whisk together coconut milk, chia seeds, maple syrup, and vanilla extract until well combined.
- Let the mixture sit for about 5 minutes, then whisk again to prevent clumps from forming.
- Cover the bowl and refrigerate for at least 4 hours or overnight, allowing the chia seeds to absorb the liquid and thicken.
- Stir the pudding once more before serving, then divide it evenly into serving cups.
- Top each cup with fresh fruit and optional shredded coconut or nuts to add texture and freshness. Serve chilled.
12. Mini Pavlova Cups with Passionfruit and Kiwi
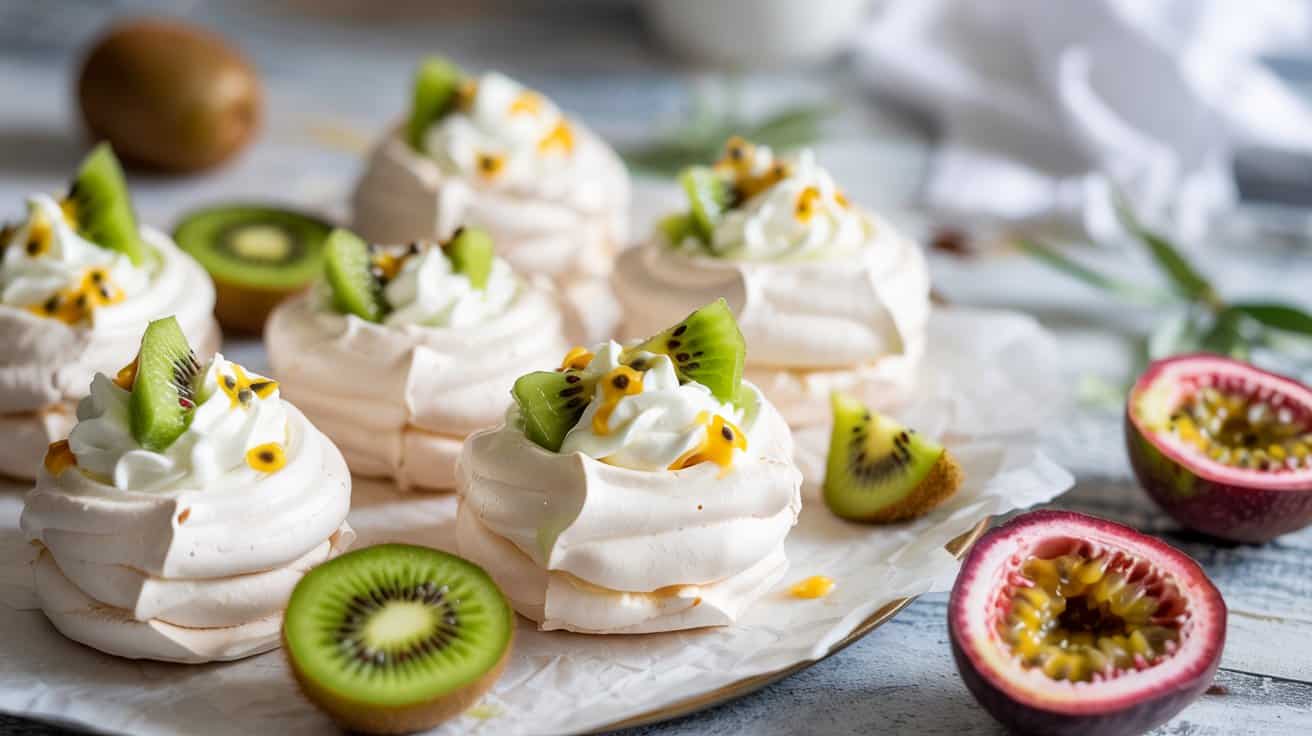
Mini Pavlova cups offer a fresh and light dessert option that's both charming and easy to make. These crisp meringue shells hold a fluffy whipped cream filling, topped with tangy passionfruit pulp and fresh kiwi, creating a nice contrast between crunch and creaminess.
This recipe is a wonderful way to serve individual desserts at gatherings or enjoy a refreshing treat after a meal. The tropical fruit adds a bright, natural sweetness that balances the meringue's airy texture perfectly.
Why This Recipe Works
This recipe combines texture and flavor in a way that's simple yet elegant, making it a crowd-pleaser with minimal fuss.
- Convenience - The meringue shells can be made ahead of time and filled just before serving.
- Flavor balance - The sweet meringue and whipped cream go with the tart tropical fruits beautifully.
- Texture - Crisp outside shells with soft, creamy centers create an enjoyable mouthfeel.
- Appeal - The individual portions make it easy to serve at parties or family meals.
Ingredient Swap Ideas
Swapping ingredients can help you tailor this dessert to your taste preferences or dietary needs without losing its core qualities.
- Passionfruit - Use mango puree or orange segments if passionfruit isn't available.
- Kiwi - Substitute with sliced strawberries or blueberries for a different fruity touch.
- Whipped cream - Try coconut cream whipped for a dairy-free or vegan option.
- Sugar - Use caster sugar or superfine sugar instead of granulated for a smoother meringue.
Ingredients
- 4 large egg whites - at room temperature for better whipping.
- 1 cup granulated sugar - to sweeten and stabilize the meringue.
- ½ teaspoon white vinegar - to help the meringue hold its shape.
- 1 teaspoon cornstarch - adds stability and a marshmallow-like texture inside.
- 1 cup heavy cream - chilled, for whipping.
- 2 passionfruits - pulp scooped out, seeds included.
- 2 kiwis - peeled and sliced.
- 1 teaspoon vanilla extract - optional, for whipped cream flavor.
Instructions
- Preheat your oven to 275°F (135°C) and line a baking sheet with parchment paper.
- In a clean bowl, whisk egg whites using an electric mixer on medium speed until soft peaks form. Gradually add sugar, a tablespoon at a time, while continuing to whisk until stiff, glossy peaks appear.
- Gently fold in the white vinegar and cornstarch to the meringue mixture.
- Spoon or pipe 8 small rounds onto the baking sheet, creating shallow cups by slightly hollowing the centers with the back of a spoon.
- Bake for 45-50 minutes, then turn off the oven and leave the meringues inside with the door slightly open to cool completely. This helps prevent cracking.
- Whip the chilled cream with vanilla extract until soft peaks form.
- Carefully fill each cooled meringue cup with the whipped cream, then top with passionfruit pulp and sliced kiwi.
- Serve immediately for crisp meringue or within a few hours for a slightly softer texture.
This recipe produces a show-stopping dessert that's both visually appealing and delicious. It's a sheer pleasure to prepare and share with others.
13. Espresso Panna Cotta with Dark Chocolate Ganache
Espresso panna cotta is a creamy, coffee-flavored dessert that offers a smooth, melt-in-your-mouth texture. Topped with a rich dark chocolate ganache, this dessert combines the bold bitterness of espresso with the deep sweetness of chocolate, creating a balanced and indulgent treat.
It's surprisingly simple to make and can be prepared ahead of time, making it a wonderful choice for an elegant finish to any meal or a special occasion. The single-serving presentation adds some sophistication without any fuss.
Why This Recipe Works
This espresso panna cotta with dark chocolate ganache offers a deliciously rich yet balanced dessert that is both straightforward and impressive.
- Convenience - Simple ingredients and minimal hands-on time let you prepare a refined dessert without stress.
- Flavor balance - The deep espresso taste blends smoothly with creamy panna cotta and bittersweet ganache.
- Texture - Silky panna cotta contrasts with the glossy, slightly firm chocolate topping.
- Appeal - Elegant single servings make it perfect for guests or personal indulgence.
Ingredient Swap Ideas
Adjusting ingredients can accommodate dietary needs or different tastes while keeping the core flavors intact.
- Dairy-free option - Use full-fat coconut milk instead of cream to keep the panna cotta luscious and creamy.
- Sweetener swap - Replace sugar with maple syrup or honey for a natural sweetness variation.
- Coffee substitute - Switch espresso with strong brewed coffee if you don't have an espresso machine.
- Chocolate alternative - Use milk chocolate ganache instead of dark for a sweeter finish.
Ingredients
- 1 cup heavy cream - Provides the creamy base for the panna cotta.
- ½ cup whole milk - Adds extra liquid and softens the creaminess.
- 2 teaspoons powdered gelatin - Helps the panna cotta set with a smooth texture.
- 2 tablespoons cold water - Used to bloom the gelatin before adding to the cream mixture.
- ⅓ cup granulated sugar - Sweetens the dessert softly.
- 1 tablespoon instant espresso powder - Gives the panna cotta its bold coffee flavor.
- ½ teaspoon vanilla extract - Enhances flavor complexity.
- 3 ounces dark chocolate (60-70% cocoa) - Used for the rich ganache topping.
- ¼ cup heavy cream - Combined with chocolate to create the ganache.
Instructions
- In a small bowl, sprinkle the gelatin over cold water and let it bloom for 5 minutes.
- In a saucepan, combine heavy cream, milk, sugar, and espresso powder. Heat over medium, stirring until sugar and espresso dissolve, and the mixture is hot but not boiling. Remove from heat.
- Stir the bloomed gelatin into the warm cream mixture until fully dissolved. Add vanilla extract and mix well.
- Pour the mixture into serving glasses or ramekins. Chill in the refrigerator for at least 4 hours or until set.
- For the ganache, heat ¼ cup heavy cream in a small pan until just simmering. Pour over the chopped dark chocolate and let sit for 2 minutes. Stir until smooth and glossy. Cool slightly before spooning over the set panna cotta. Serve chilled.
14. Chocolate Hazelnut Lava Cups
These Chocolate Hazelnut Lava Cups offer a rich, gooey treat that melts in your mouth. The combination of molten chocolate center and crunchy hazelnut adds a lovely contrast in texture that's irresistible.
They're baked right in individual cups, which makes them ideal for serving at a gathering or enjoying a personal indulgence without any fuss.
The recipe is approachable, even busy cooks can prepare these cups without spending hours. Plus, the hazelnut twist lifts the familiar molten cake to another level with added nutty depth and flavor.
Why This Recipe Works
This recipe combines indulgent taste and practical presentation for a dessert that's easy to pull off yet feels special.
- Convenience - Individual portions baked in cups for simple serving and cleanup.
- Flavor balance - Deep chocolate richness paired with toasty hazelnut notes.
- Texture - Smooth molten center contrasted by slightly crisp edges and nut crunch.
- Appeal - Elegant yet approachable dessert, suited for casual dinners or celebrations.
Ingredient Swap Ideas
Adjusting some ingredients can better suit diet preferences or vary the flavor without losing the core appeal of molten chocolate and hazelnut.
- Hazelnuts - Substitute with toasted almonds or pecans for a different nutty texture.
- Chocolate - Use dairy-free chocolate to make these cups vegan friendly.
- Butter - Replace with coconut oil if you prefer a dairy-free or lighter fat option.
- Sugar - Swap granulated sugar for coconut sugar or maple syrup for a more natural sweetener.
Ingredients
- 4 ounces dark chocolate - high-quality, chopped or chips.
- ¼ cup unsalted butter - plus extra for greasing cups.
- ⅓ cup granulated sugar - to sweeten the batter.
- 2 large eggs - at room temperature.
- 2 tablespoons all-purpose flour - for structure.
- ¼ cup chopped toasted hazelnuts - adds crunch and flavor.
- Pinch of salt - to enhance taste.
- Powdered sugar - for dusting (optional).
Instructions
- Preheat the oven to 425°F (220°C). Grease 4 small ramekins or oven-safe cups generously with butter.
- Melt the chocolate and butter together in a heatproof bowl over simmering water, stirring until smooth. Remove from heat and whisk in sugar until combined.
- Add the eggs one at a time, mixing well after each addition. Gently fold in the flour, toasted hazelnuts, and a pinch of salt until just combined.
- Divide the batter evenly among the prepared cups. Bake for 12 to 14 minutes until the edges are set but the center still looks slightly gooey.
- Let the lava cups cool for a couple of minutes before running a knife around the edges and carefully inverting onto plates. Dust with powdered sugar if desired, and serve immediately.
If you prefer chilled, no-heat desserts, explore no-bake single-serve dessert ideas that rely on chilling instead of baking. For a concise selection of compact treats, consult simple single-serve dessert recipes focused on quick prep and strong flavor profiles.

Andrew Gray is a seasoned food writer and blogger with a wealth of experience in the restaurant and catering industries. With a passion for all things delicious, Andrew has honed his culinary expertise through his work as a personal chef and caterer.
His love for food led him to venture into food writing, where he has contributed to various online publications, sharing his knowledge and insights on the culinary world. As the proud owner of CooksCrafter.com, Andrew covers a wide range of topics, including recipes, restaurant reviews, product recommendations, and culinary tips.
Through his website, he aims to inspire and educate fellow food enthusiasts, offering a comprehensive resource for all things food-related.