Potluck gatherings call for desserts that can handle warm weather and still taste incredible. This collection of 12 potluck desserts that survive the heat offers recipes designed specifically for those times when the temperature climbs but the sweet cravings don't fade, focusing on no-bake (set in the refrigerator), chilled (refrigerated or frozen), and sturdy baked options that travel well.
These recipes cover a variety of styles, from no-bake bars and fruity crisps to chilled parfaits and dense cakes. Each one is crafted to hold its shape and flavor under warmer conditions.
They feature popular, familiar flavors like chocolate, citrus, berries, and nuts, with textures ranging from chewy bars to refreshing frozen treats. Most recipes are straightforward to prepare and easy to transport, making them well-suited for sharing at outdoor or summer events.
Together, these desserts offer reliable results without the stress of complicated steps or delicate presentations. Their balance of durability and deliciousness ensures that cleanup stays simple and guests enjoy every bite, no matter the setting.
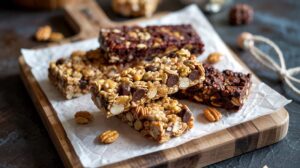
1. No-Bake Peanut Butter Chocolate Bars12 - Cinnamon Sugar Roasted Peach Cobbler (Baked)
A bright, top-down food photography shot on marble of a rustic peach cobbler in a cast-iron skillet, bubbling at the edges with golden biscuit topping dusted in cinnamon sugar. A serving spoon rests in the pan, a scoop on a small plate sits nearby, and peach slices, cinnamon sticks, and a light sugar dust scatter the counter for a home-baked warmth.
These no-bake peanut butter chocolate bars are a wonderful treat that's easy to prepare without turning on the oven, relying on refrigeration to set the layers (chill about 2 hours) and serving as a quick alternative to air fryer peanut butter cookie alternatives.
You can whip them up quickly, making them a great choice for a simple dessert or snack that still feels special. The chocolate drizzle on top stays firm and won't get messy, which makes these bars convenient for serving or packing in lunchboxes.
For other options see peanut butter alternatives for baking.
Why This Recipe Works
This recipe combines convenience with a classic flavor pairing, making it a favorite for both adults and kids alike; for other make-ahead crowd-pleasers try honey-based dessert ideas for summer.
- Convenience - Requires no baking, ideal for busy days or warmer weather.
- Flavor balance - Combines nutty peanut butter richness with smooth chocolate for a satisfying treat.
- Texture - The firm base offers a nice chew, while the chocolate coating provides a crisp finish.
- Appeal - Kid-friendly and great for sharing at gatherings or packing in snacks.
Ingredient Swap Ideas
You can adapt this recipe to suit different preferences or dietary needs without losing its core character; for scaled-down dessert ideas see small-batch cupcake ideas for two.
- Use almond or cashew butter instead of peanut butter for a different nut flavor or to avoid peanut allergies.
- Replace the semi-sweet chocolate with dark chocolate (70% cacao) for a richer, less sweet topping.
- Swap the honey with maple syrup or agave nectar for a vegan-friendly version.
- Add crushed pretzels or toasted oats to the base for extra crunch and texture variety.
Ingredients
- 1 ½ cups peanut butter - Creamy or crunchy, depending on your preferred texture.
- 1 cup powdered sugar - Adds sweetness and helps firm the base.
- ½ cup unsalted butter, melted - Helps bind the base ingredients smoothly.
- 1 teaspoon vanilla extract - Enhances the peanut butter flavor subtly.
- 1 cup semi-sweet chocolate chips - For the chocolate topping.
- 1 tablespoon coconut oil - Keeps the chocolate drizzle shiny and firm.
Instructions
- In a medium mixing bowl, combine the peanut butter, powdered sugar, melted butter, and vanilla extract. Stir until the mixture is well blended and forms a thick, firm dough.
- Press this peanut butter mixture evenly into an 8x8-inch pan lined with parchment paper, creating a smooth, compact surface.
- In a microwave-safe bowl, combine the chocolate chips and coconut oil. Heat in 30-second intervals, stirring between each, until the chocolate is fully melted and smooth.
- Pour the melted chocolate over the peanut butter base, using a spatula to spread it evenly. For a decorative touch, use a fork to create a drizzled pattern if you like.
- Refrigerate the pan for at least 2 hours or until the bars are completely set and firm. Slice into squares and serve chilled or at room temperature. Store leftovers in the refrigerator for up to one week.
2. Lemon Blueberry Shortbread Bars
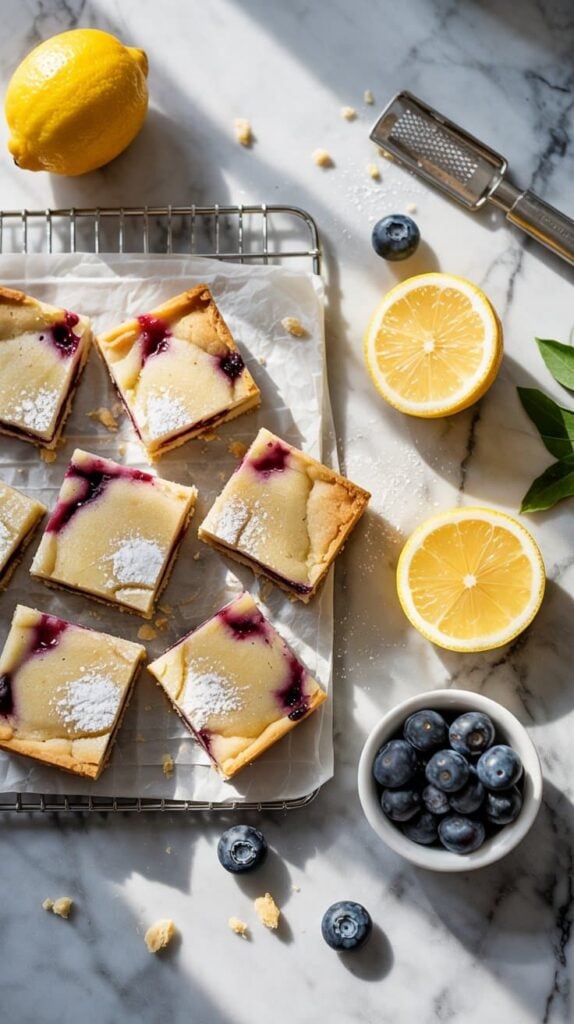
These Lemon Blueberry Shortbread Bars combine a sturdy, buttery base with a bright, tangy citrus layer (made with lemon juice and zest) and juicy bursts of blueberry. The result is a handheld treat that balances richness and freshness in every bite.
They are easy to make and can be prepared ahead, making them great for serving at warm-weather gatherings or just keeping on hand for a sweet snack, and can be refrigerated for up to 48 hours before serving; for another citrus option try a quick air-fryer lemon pound cake; for different acidic swaps see fresh lemon juice alternatives for baking.
The crisp shortbread crust holds up well under the lemon filling, which has a pleasant tartness that goes with the subtle sweetness of the berries. You'll find the bars both satisfying and refreshing, with textures that range from crumbly to soft and juicy.
Why This Recipe Works
This recipe offers a refreshing citrus twist on classic shortbread bars that's simple and crowd-pleasing. The combination of buttery crust with tangy lemon and sweet blueberries makes these bars a standout option for warm days.
- Convenience - The bars come together with straightforward steps and can be made ahead of time.
- Flavor balance - Tangy lemon zest and juice contrast nicely with the sweetness of fresh blueberries.
- Texture - A sturdy, crumbly shortbread base holds a soft, slightly gooey lemon layer topped with juicy berries.
- Appeal - These bars are easy to serve and eat, perfect for casual get-togethers or packed lunches.
Ingredient Swap Ideas
Adjusting a few ingredients can help these bars suit your specific needs or preferences without losing their bright flavor and texture.
- Butter - Use a plant-based margarine or vegan butter substitute for a dairy-free version.
- Flour - Substitute all-purpose flour with a gluten-free baking flour blend to make the bars gluten-free.
- Lemon - Lime juice and zest can replace lemon for a different citrus flavor.
- Berries - Swap blueberries with raspberries or blackberries for a varied berry taste.
Ingredients
- 1 cup unsalted butter - softened to room temperature for the shortbread crust.
- ½ cup granulated sugar - to sweeten the shortbread base.
- 2 cups all-purpose flour - provides structure for the crust and topping.
- ¼ teaspoon salt - balances sweetness and enhances flavor in the crust.
- 1 cup granulated sugar - for the lemon filling's sweetness.
- 2 tablespoons all-purpose flour - thickens the lemon filling.
- 3 large eggs - bind and set the lemon layer firmly.
- ⅓ cup fresh lemon juice - adds tangy citrus flavor to the filling.
- Zest of 2 lemons - boosts fresh lemon flavor in the filling.
- 1 ½ cups fresh blueberries - folded into the filling and scattered on top.
Instructions
- Preheat your oven to 350°F (175°C). Line a 9x13-inch baking pan with parchment paper, leaving an overhang on the sides for easy removal.
- In a mixing bowl, cream the softened butter with ½ cup sugar until light and fluffy. Gradually add 2 cups flour and salt, mixing until the dough just comes together. Press the dough evenly into the bottom of the prepared pan. Bake for 18 to 20 minutes until the edges are lightly golden.
- While the crust bakes, whisk together 1 cup sugar, 2 tablespoons flour, eggs, lemon juice, and lemon zest in a separate bowl until smooth and combined. Gently fold in 1 cup of the blueberries.
- Pour the lemon mixture over the warm shortbread crust, then sprinkle the remaining ½ cup of blueberries evenly on top. Return to the oven and bake for an additional 20 to 25 minutes, until the lemon layer is mostly set but still slightly jiggly in the center.
- Let the bars cool completely in the pan on a wire rack. Once cooled, lift them out using the parchment paper and cut into squares or bars. Store in the refrigerator for up to 4 days for best flavor and texture.
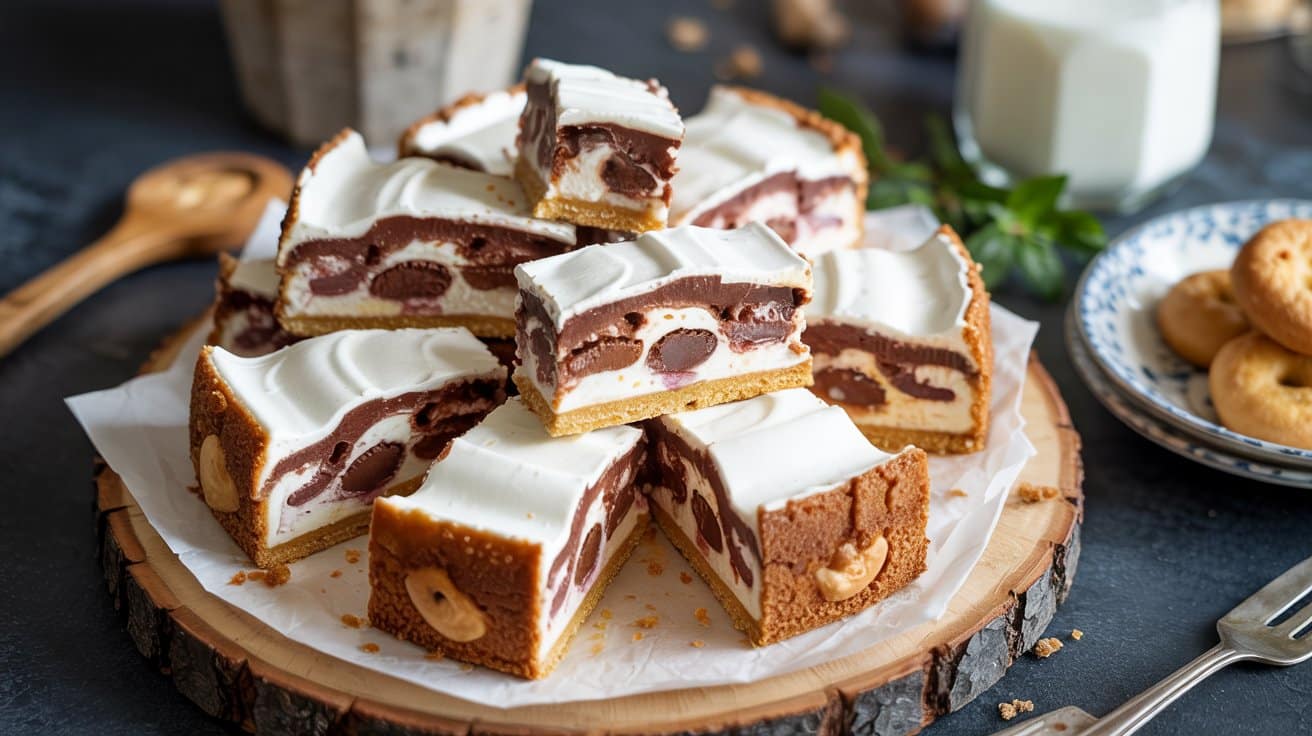
3. Salted Caramel Pretzel Cheesecake Bites (No-Bake)
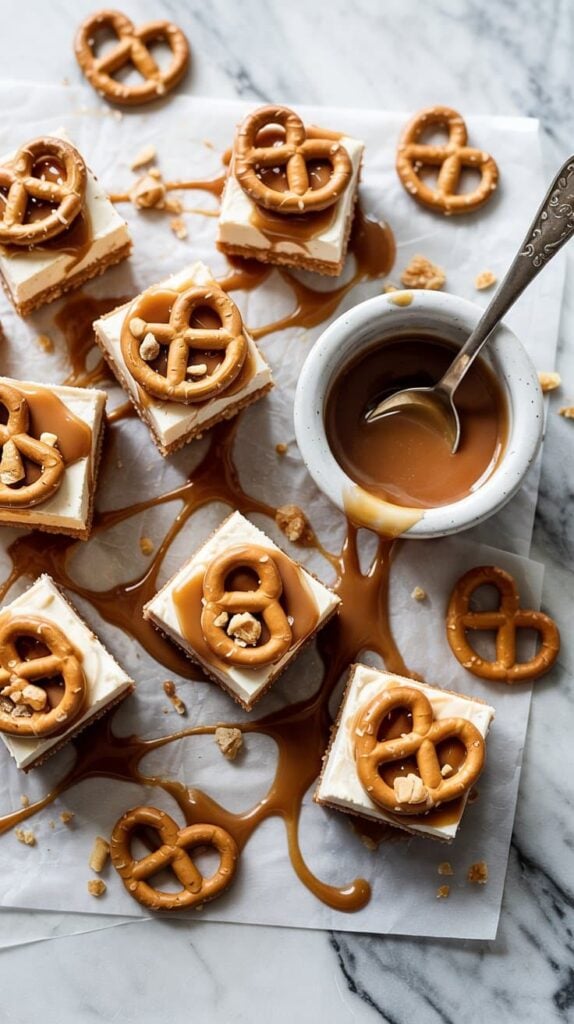
The crunchy pretzel base adds a satisfying texture that contrasts beautifully with the smooth, tangy filling; for crunchy swaps see pretzel alternatives for crunch.
This recipe is simple to prepare without needing an oven, making it a great choice for warmer days or any time you want a quick, crowd-pleasing dessert (chill at least 45 minutes before serving). The salted caramel drizzle ties everything together with a lovely balance of sweet and salty flavors.
Why This Recipe Works
This recipe offers an easy way to create a classic flavor pairing in a bite-sized, manageable form.
- Convenience - No baking required, ready in under an hour including chilling time.
- Flavor balance - Combines creamy, tangy cheesecake with salty pretzel crunch and sweet caramel.
- Texture - Crunchy base with a smooth, rich filling and sticky caramel topping.
- Appeal - Ideal for parties or family gatherings, easy to portion and serve.
Ingredient Swap Ideas
Swapping ingredients can help cater to different dietary needs or flavor preferences without losing the essence of the recipe.
- Pretzels - Use gluten-free pretzels to make the base gluten-free.
- Cream cheese - Substitute with vegan cream cheese for a dairy-free option.
- Caramel sauce - Replace store-bought caramel with a homemade date caramel for a natural sweetener.
- Sweetener - Use maple syrup instead of sugar if you prefer a natural sugar alternative.
Ingredients
- Crushed pretzels - 1 ½ cups, finely crushed for the base.
- Unsalted butter - 5 tablespoons, melted to bind the crust.
- Cream cheese - 8 ounces, softened to room temperature for smooth filling.
- Powdered sugar - ⅓ cup, for sweetness without graininess.
- Vanilla extract - 1 teaspoon, adds depth of flavor.
- Heavy cream - ¼ cup, whipped lightly to fold into the filling.
- Salted caramel sauce - ½ cup, for drizzling over the top.
- Flaky sea salt - A pinch, to sprinkle on top for extra salty contrast.
Instructions
- In a medium bowl, combine the crushed pretzels with melted butter until the mixture resembles wet sand. Press this mixture firmly into the bottom of mini muffin liners or a small baking tray to form the crust. Chill in the fridge while preparing the filling.
- In a large mixing bowl, beat the softened cream cheese with powdered sugar and vanilla extract until smooth and creamy.
- Gently fold in the whipped heavy cream until fully incorporated, creating a light and airy cheesecake filling.
- Spoon or pipe the filling evenly over the chilled pretzel crusts, smoothing the tops. Refrigerate for at least 30 minutes until the bites set firmly.
- Before serving, drizzle salted caramel sauce over each cheesecake bite and sprinkle with a pinch of flaky sea salt to highlight the sweet and salty contrast. Serve chilled for the best texture.
4. Berry Oatmeal Crisp (Baked)
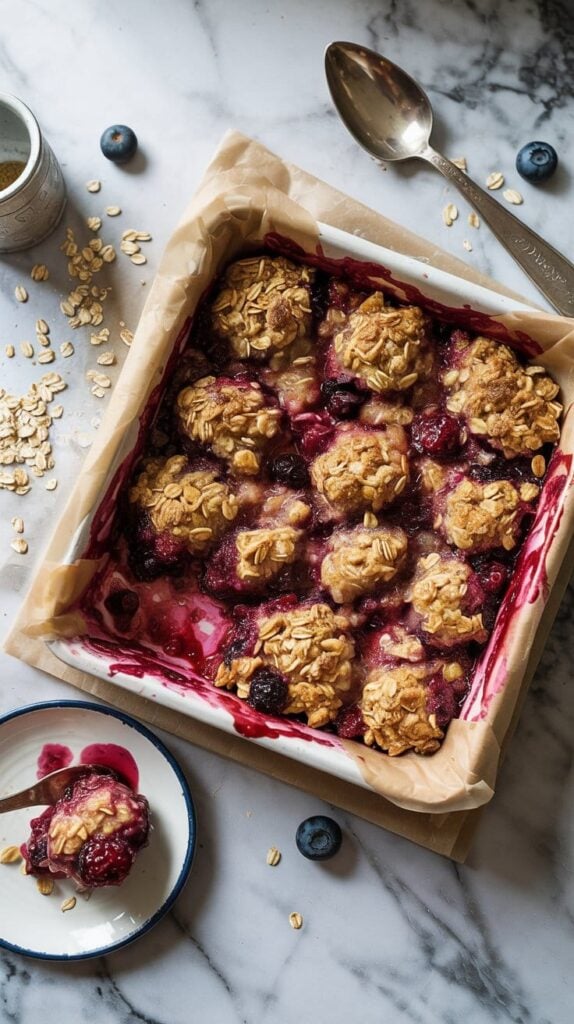
This baked berry oatmeal crisp is a simple, comforting dessert that brings together the natural sweetness and tartness of mixed berries with a crunchy oat topping. It's satisfying without being overly rich, making it an ideal treat any time of day.
The topping creates a sturdy barrier that keeps the fruit from becoming soggy, offering a lovely contrast of textures.
You can easily prepare this crisp ahead of time and enjoy it warm or cool, either on its own or with a dollop of yogurt or a scoop of ice cream. Its straightforward ingredients and baking process make it a reliable choice for busy home cooks wanting a wholesome dessert that satisfies a crowd.
Why This Recipe Works
This berry oatmeal crisp shines for its practical preparation and inviting flavor combinations. It balances fresh fruit juices with a crispy, buttery topping that holds its texture well.
- Convenience - Easy to assemble and perfect for baking in one dish with minimal cleanup.
- Flavor balance - Combines tart berries with a subtly sweet, cinnamon-spiced crisp topping.
- Texture - The oat topping stays crisp in the oven, protecting the juicy fruit filling underneath.
- Appeal - Suitable for casual family desserts or simple gatherings, with natural, wholesome ingredients.
Ingredient Swap Ideas
Adjusting some ingredients can help fit your dietary preferences or pantry supplies without changing what makes this crisp so enjoyable.
- Use gluten-free oats - Keep the texture and taste while making the recipe suitable for gluten sensitivities.
- Replace brown sugar with maple syrup - For a more natural sweetener and slight flavor variation.
- Swap butter with coconut oil - To create a dairy-free version with a subtle coconut aroma.
- Use any fresh or frozen berries - Blueberries, raspberries, or blackberries all work well and can be mixed depending on what you have on hand.
Ingredients
- Mixed berries - 5 cups fresh or frozen, such as strawberries, blueberries, and raspberries, rinsed if fresh.
- Old-fashioned rolled oats - 1 cup, providing the base of the crisp topping.
- All-purpose flour - ½ cup, to bind the oat topping and add structure.
- Brown sugar - ½ cup, for natural sweetness and moisture in the crumble.
- Ground cinnamon - 1 teaspoon, adds warmth and depth of flavor to the topping.
- Salt - ¼ teaspoon, to balance the sweetness.
- Unsalted butter - ½ cup (1 stick), cold and cut into small pieces, for a rich, crunchy topping.
- Lemon juice - 1 tablespoon, to brighten the berry filling.
Instructions
- Preheat your oven to 350°F (175°C). Lightly grease a 9-inch square baking dish to prevent sticking.
- In a mixing bowl, toss the mixed berries with lemon juice. Spread them evenly in the prepared baking dish.
- Combine oats, flour, brown sugar, cinnamon, and salt in another bowl. Add the cold butter pieces and use your fingers or a pastry cutter to mix until the mixture resembles coarse crumbs.
- Sprinkle the oat topping evenly over the berry layer, covering it completely.
- Bake in the preheated oven for 35 to 40 minutes, or until the topping is golden brown and crisp, and the berry filling is bubbling around the edges.
Let it cool slightly before serving-it tastes wonderful warm or at room temperature, great on its own or with yogurt or ice cream.
5. Almond Flour Chocolate Chip Blondies
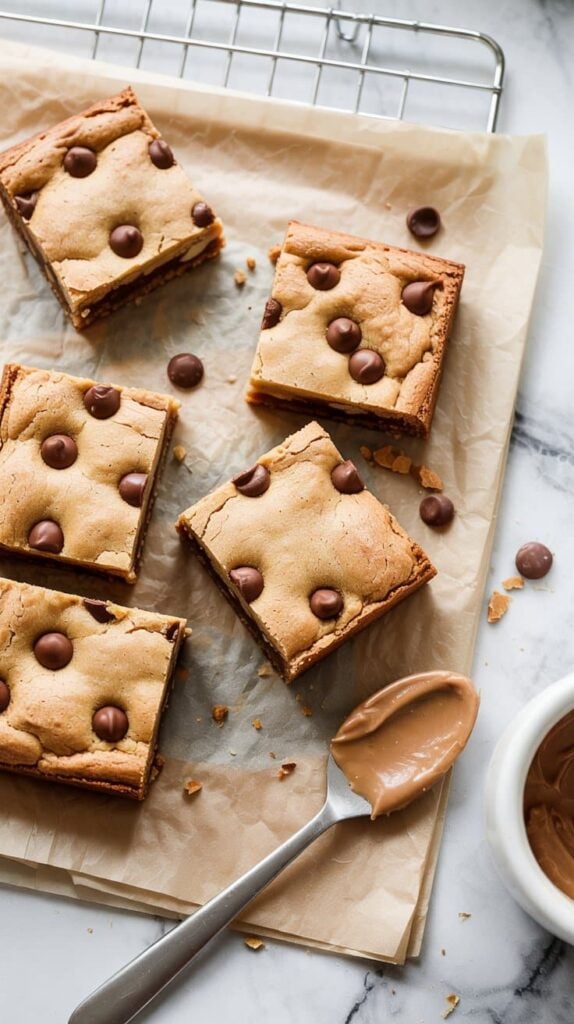
These Almond Flour Chocolate Chip Blondies bring together a chewy and tender texture with rich pockets of melted chocolate in every bite. Using almond flour instead of regular flour gives them a naturally moist, dense feel and adds a subtle nutty flavor that goes well with the sweet chocolate chips.
They hold up well whether kept at room temperature or transported, making them an excellent choice for snacks, lunchboxes, or gatherings.
The recipe is straightforward and quick to prepare, requiring just a few simple ingredients. You don't need any special equipment or complicated steps, so these blondies fit nicely into a busy day without sacrificing taste or quality.
Why This Recipe Works
This recipe offers a delicious balance of texture and flavor while being accessible for home cooks who want gluten-free options.
- Convenience - Uses pantry-friendly almond flour and simple ingredients, ready in under an hour.
- Texture - Chewy and moist inside with a slightly crisp top that holds its shape well.
- Flavor balance - Nutty almond flour blends smoothly with sweet bursts of semi-sweet chocolate chips.
- Versatility - Gluten-free and adaptable for various dietary preferences without losing appeal.
Ingredient Swap Ideas
Swapping certain ingredients can help make these blondies suit different tastes or dietary needs without changing their fundamental character.
- Almond flour - Substitute with oat flour or a gluten-free all-purpose flour blend for a milder nut flavor.
- Chocolate chips - Use dark chocolate chunks or white chocolate chips to customize the sweetness or add variation.
- Sweetener - Swap brown sugar with coconut sugar or maple syrup for a different depth of sweetness.
- Fat - Use melted coconut oil instead of butter for a dairy-free alternative with a subtle tropical note.
Ingredients
- 2 ½ cups almond flour - finely ground, provides structure and natural moisture.
- ½ teaspoon baking powder - helps the blondies rise slightly for a light texture.
- ¼ teaspoon salt - balances the sweetness and enhances flavor.
- ⅓ cup unsalted butter - melted, adds richness and moisture.
- ½ cup light brown sugar - packs sweetness with a hint of caramel.
- 1 large egg - binds the ingredients and contributes to texture.
- 1 teaspoon pure vanilla extract - boosts the overall flavor.
- ¾ cup semi-sweet chocolate chips - melts and disperses bursts of chocolate throughout.
Instructions
- Preheat your oven to 350°F (175°C). Line an 8x8-inch baking pan with parchment paper, allowing some overhang for easier removal.
- In a medium bowl, whisk together the almond flour, baking powder, and salt until evenly combined.
- In a separate large bowl, mix the melted butter and brown sugar until smooth. Add the egg and vanilla extract, stirring well to blend.
- Gradually fold the dry ingredients into the wet until just combined. Gently fold in the chocolate chips, distributing them throughout the batter.
- Spread the batter evenly into the prepared pan and smooth the top with a spatula. Bake for 25 to 30 minutes until the top is set and a toothpick inserted near the center comes out with a few moist crumbs.
- Allow the blondies to cool completely in the pan before lifting them out using the parchment overhang. Cut into squares and serve.
These blondies store well in an airtight container at room temperature for several days and maintain their chewy texture even after refrigeration.
6. Frozen Yogurt Fruit Bark
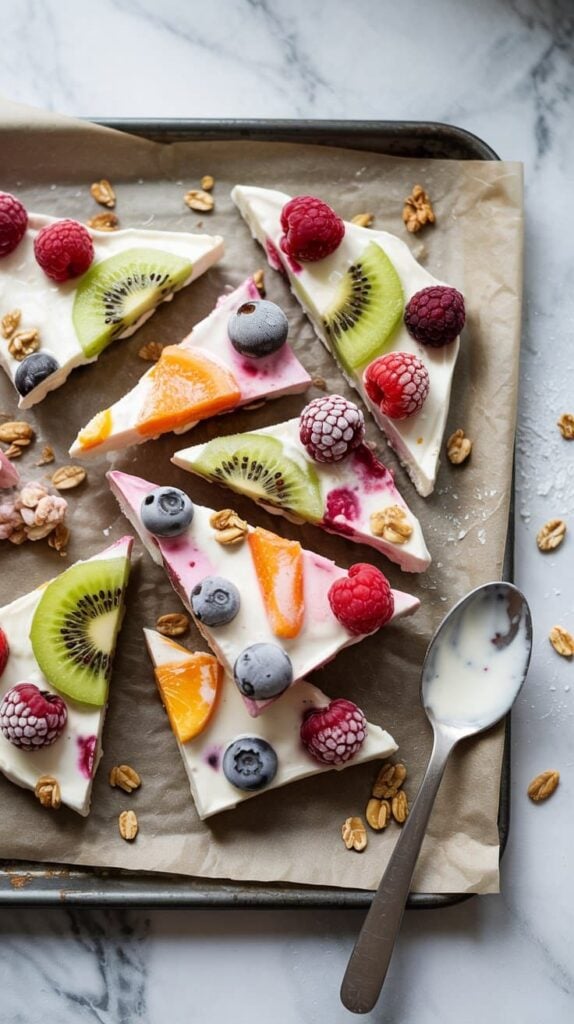
Frozen yogurt fruit bark offers a refreshing way to enjoy a sweet, tangy treat that's light and cooling. Combining creamy frozen yogurt with a crisp base and fresh fruit creates a satisfying mix of textures that naturally invites you to snack more mindfully.
The simple preparation means this snack comes together quickly and is easy to customize according to what you have on hand.
You can think of it as a chilled dessert or a healthy snack option that's great for warm days, kids' lunchboxes, or gatherings when you want something fresh and colorful. Plus, it's easy to portion and serve straight from the freezer.
Why This Recipe Works
This frozen yogurt fruit bark checks all the boxes for a simple, tasty, and visually appealing snack.
- Convenience - Requires minimal ingredients and can be prepped ahead for grab-and-go enjoyment.
- Flavor balance - Combines creamy yogurt with the natural sweetness and brightness of fresh fruit.
- Texture - The bark achieves a crunchy base with a smooth frozen top, accented by juicy fruit bursts.
- Appeal - Kid-friendly and adaptable to various dietary preferences without sacrificing taste.
Ingredient Swap Ideas
Swapping ingredients allows you to adjust this recipe easily for different dietary needs or flavor preferences while keeping the core concept intact.
- Use dairy-free yogurt - Substitute regular yogurt with plant-based options like coconut or almond yogurt for a vegan-friendly version.
- Change the base - Instead of granola, try crushed nuts or seed clusters to vary texture and nutrition.
- Vary the fruit - Choose seasonal fruits or berries like mango, kiwi, or pomegranate seeds to match flavor availability and personal taste.
- Add a sweetener - If you prefer a sweeter bark, drizzle honey or maple syrup over the yogurt before freezing.
Ingredients
- 2 cups plain or vanilla Greek yogurt - Provides a creamy and tangy frozen layer.
- 1 cup granola - Forms the crunchy base for the bark.
- 1 tablespoon honey or maple syrup (optional) - adds some sweetness when desired.
- 1 cup mixed fresh fruit, chopped - Use berries, kiwi, mango, or any fruit you prefer.
- 1 teaspoon lemon zest (optional) - Brightens the overall flavor with citrus notes.
Instructions
- Line a baking sheet or shallow pan with parchment paper to prevent sticking. Spread the granola evenly over the paper to form a thin, firm base.
- In a bowl, mix the Greek yogurt with honey or maple syrup if using, and lemon zest if desired. Stir until well combined.
- Spread the yogurt mixture evenly over the granola base, smoothing it gently with a spatula to cover completely.
- Scatter the chopped fresh fruit over the yogurt layer, pressing lightly so some pieces adhere to the yogurt without sinking.
- Place the pan in the freezer for at least 4 hours or until the bark is completely frozen and firm.
- Break the frozen bark into pieces and serve immediately, or store in an airtight container in the freezer for up to 2 weeks.
This frozen yogurt fruit bark keeps things fresh and simple while making it easy to enjoy a cool, textured treat anytime.
7. Pineapple Coconut Rum Cake (Dense and Moist)
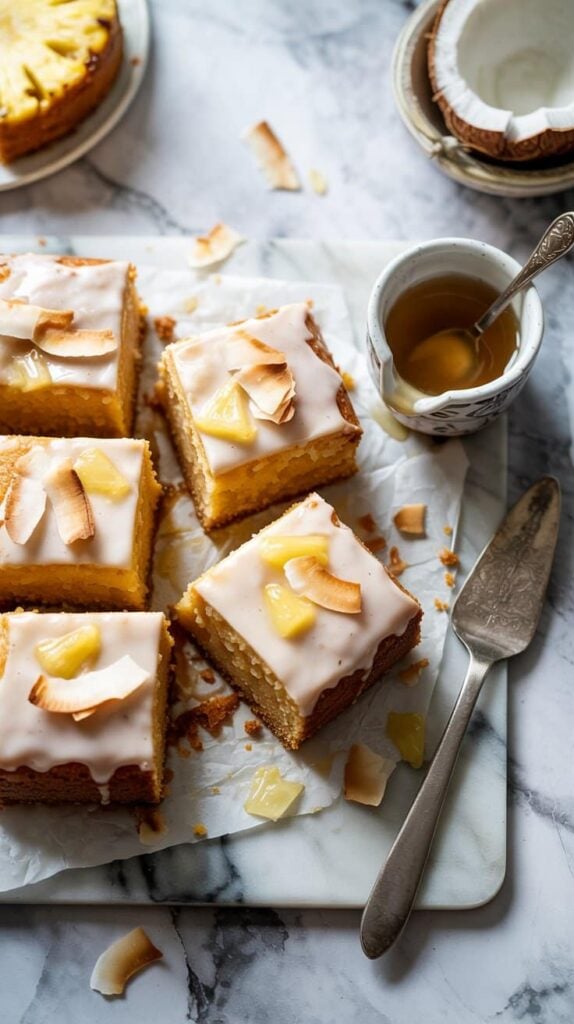
This Pineapple Coconut Rum Cake offers a dense, moist bite that captures the essence of tropical summer flavors, making it a standout choice for any gathering. The combination of sweet pineapple, creamy coconut, and a splash of rum creates a beautifully balanced dessert that holds its moisture well without becoming soggy.
The syrup-soaked texture keeps the cake tender and rich, so it's ideal for potlucks or family meals where a make-ahead dessert is appreciated. The flavors come together naturally, delivering something that feels special but is simple enough for a busy home cook to pull off.
Why This Recipe Works
This cake brings tropical vibes to your table with practical and tasty benefits. It's a dense and moist treat that holds up well even after soaking in syrup, so every slice is full of flavor and texture.
- Convenience - The cake can be baked in advance and stays moist for days, perfect for prepping ahead.
- Flavor balance - Sweet pineapple and creamy coconut blend with rum for a bright but mellow taste.
- Texture - A syrup soak keeps the crumb tender without making it mushy.
- Appeal - Bright tropical notes make it a crowd-pleaser that's a little different from traditional cakes.
Ingredient Swap Ideas
Swapping ingredients here can help adjust the recipe to your preferences or dietary needs without losing the tropical essence of the cake. Small changes keep the cake moist and flavorful while catering to what you have on hand or your tastes.
- Use fresh pineapple instead of canned for a less sweet, more natural fruit flavor.
- Replace rum with pineapple juice or coconut water if avoiding alcohol.
- Swap all-purpose flour with gluten-free flour blend to make it gluten-free.
- Use almond milk or another plant-based milk instead of dairy milk to keep it dairy-free.
Ingredients
- 1 cup all-purpose flour - Provides the structure for the cake.
- 1 teaspoon baking powder - Helps the cake rise slightly.
- ¼ teaspoon salt - Balances the sweetness and enhances flavor.
- ½ cup unsalted butter, softened - Adds richness and moisture.
- 1 cup granulated sugar - Sweetens the cake evenly.
- 2 large eggs - Bind ingredients and provide structure.
- ½ cup canned crushed pineapple with juice - Adds sweetness and moisture.
- ½ cup coconut milk - Brings creamy coconut flavor.
- 1 teaspoon vanilla extract - Enhances overall flavor.
- ¼ cup dark rum - Infuses the cake with tropical warmth.
- 1 cup powdered sugar - For making the rum syrup.
- ¼ cup water - Combined with sugar and rum to soak the cake.
- ¼ cup dark rum (for syrup) - Blends into syrup to soak the cake.
- ½ cup shredded sweetened coconut, toasted - Garnish that adds texture and flavor.
Instructions
- Preheat your oven to 325°F (163°C). Grease and flour a 9x5-inch loaf pan or bundt pan to prevent sticking.
- In a medium bowl, sift together the flour, baking powder, and salt. Set this aside while you prepare the batter.
- In a large bowl, cream the softened butter and granulated sugar until light and fluffy using a mixer. Add in the eggs one at a time, beating well after each addition.
- Mix in the crushed pineapple (with juice), coconut milk, vanilla extract, and ¼ cup rum until fully combined. Gradually fold in the dry ingredients, stirring just until incorporated.
- Pour the batter into the prepared pan and bake for 50-60 minutes, or until a toothpick inserted into the center comes out clean.
- While the cake is baking, prepare the rum syrup by combining powdered sugar, water, and ¼ cup rum in a small saucepan over medium heat. Stir until the sugar dissolves completely, then remove from heat.
- When the cake is done, let it cool in the pan for 10 minutes. While still warm, poke holes all over the top with a skewer or fork, then slowly pour the warm syrup over the cake to soak in.
- Allow the cake to cool completely before removing it from the pan. Sprinkle toasted shredded coconut over the top as garnish.
- Slice and serve at room temperature. The cake keeps well covered and tastes even better the next day as the flavors develop further.
8. Salted Honey and Toasted Pecan Bars
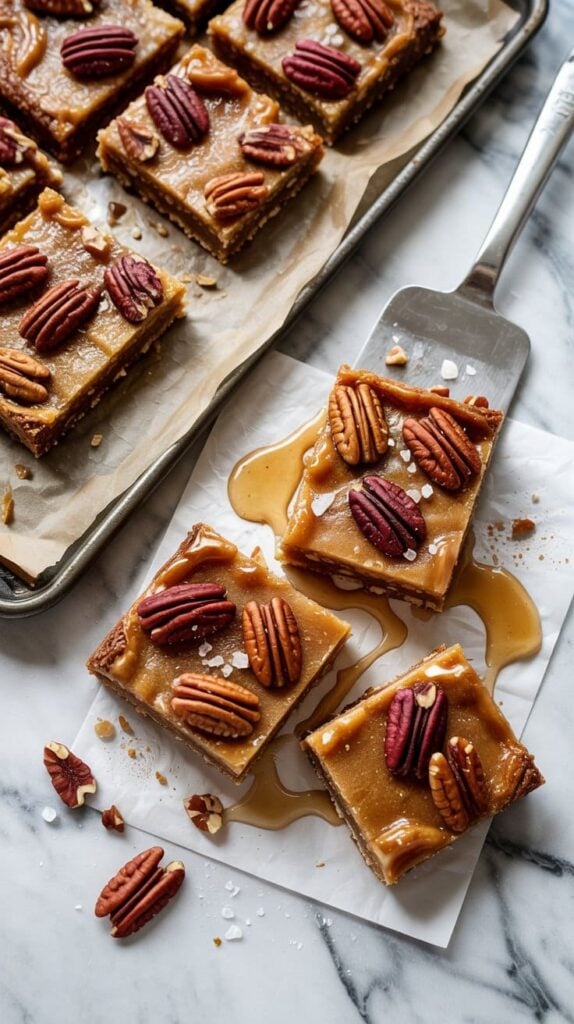
These Salted Honey and Toasted Pecan Bars bring together a sweet and nutty combination that's both satisfying and easy to enjoy. The honey is a natural binder, keeping the bars from being crumbly or too sticky, while the toasted pecans add a rich crunch and depth of flavor.
This recipe works well as a snack or a light treat alongside coffee or tea. It's straightforward to prepare and uses simple ingredients, making it a great option for busy days when you want something homemade without too many steps.
Why This Recipe Works
This recipe combines delightfully balanced flavors with practical preparation and satisfying texture. It's a versatile bar that keeps well and suits a range of taste preferences.
- Convenience - Requires minimal preparation and can be made ahead, making it easy to have on hand.
- Flavor balance - Sweet honey goes with the saltiness and rich taste of toasted pecans.
- Texture - Combines a chewy base with crunchy pecan pieces for pleasing contrast.
- Appeal - A wholesome, crowd-pleasing treat that fits well with a balanced lifestyle.
Ingredient Swap Ideas
Swapping ingredients can help adjust these bars for dietary needs or flavor preferences while keeping the core texture and sweetness intact.
- Nuts - Substitute pecans with walnuts or almonds for a different but similar crunch.
- Sweetener - Use maple syrup instead of honey to keep a similar moisture and sweetness with a distinct flavor.
- Base binder - Incorporate oat flour or almond flour instead of all-purpose flour for gluten-free options.
- Salt - Experiment with smoked or flavored salts for an extra dimension of taste.
Ingredients
- 1 cup pecans - Toasted and roughly chopped to bring out their natural flavor and crunch.
- ¾ cup all-purpose flour - Provides structure to the bars.
- ½ teaspoon salt - Balances the sweetness and enhances the other flavors.
- ¼ teaspoon baking soda - Helps the bars rise slightly and keep a tender crumb.
- ½ cup unsalted butter - Melted, adds richness and moisture.
- ⅓ cup honey - is a natural sweetener and binder.
- ½ cup brown sugar - Adds sweetness with a hint of molasses depth.
- 1 large egg - Binds ingredients together and gives structure.
- 1 teaspoon vanilla extract - Adds warmth and aroma.
Instructions
- Preheat your oven to 350°F (175°C). Line an 8-inch square baking pan with parchment paper, leaving some overhang to easily lift the bars out later.
- Spread the pecans on a baking sheet and toast them in the oven for about 8 minutes, stirring once halfway through. Remove and chop roughly once cooled.
- In a medium bowl, whisk together the flour, salt, and baking soda. Set aside.
- In a larger bowl, combine melted butter, honey, and brown sugar. Stir until smooth, then beat in the egg and vanilla extract. Gradually add the dry ingredients, mixing just until combined. Fold in the toasted pecans.
- Spread the mixture evenly in the prepared pan and bake for 20 to 25 minutes, or until the edges are golden and a toothpick inserted in the center comes out mostly clean. Allow to cool completely before slicing into bars.
Enjoy these bars as a wholesome snack that holds together nicely and offers a balanced mix of sweet, salty, and nutty flavors with every bite.
9. Key Lime Pie Parfaits (Chilled in Cups)
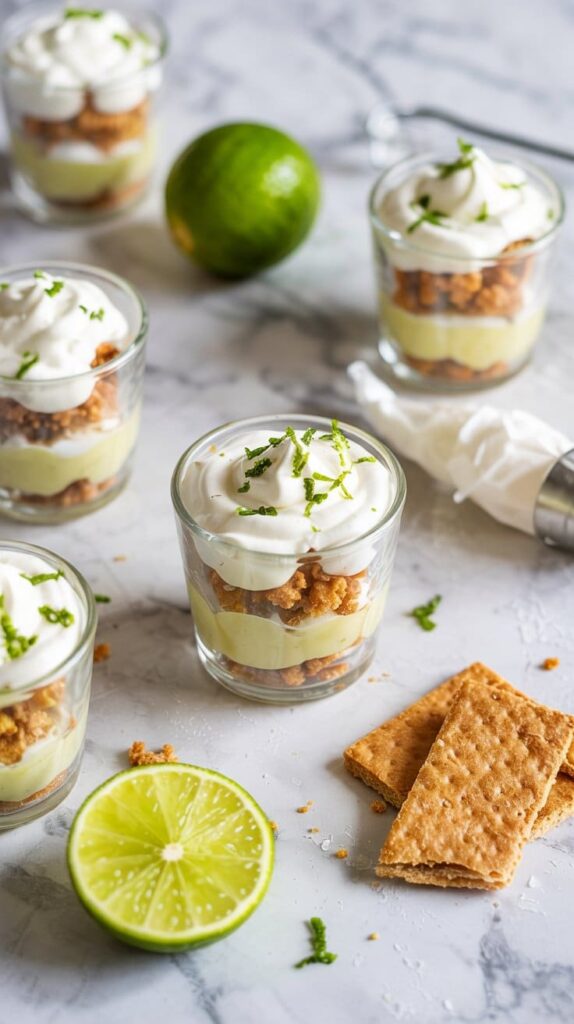
These Key Lime Pie Parfaits are a fresh twist on a classic dessert, bringing all the bright, tangy flavors into convenient individual servings. The combination of creamy lime pudding layered with crunchy graham crackers creates a nice texture contrast that stays crisp even when chilled.
They're easy to assemble and perfect for outdoor gatherings or when you want a fuss-free dessert that feels special. Plus, serving them in clear cups shows off the pretty green layers, making a simple dessert feel festive and inviting.
Why This Recipe Works
This recipe offers a refreshing, easy-to-make dessert that balances sweet and tangy flavors perfectly. It's a great option for summer or anytime you want something light but satisfying.
- Convenience - No baking required, and it can be made ahead and chilled.
- Flavor balance - The creamy lime pudding and crunchy graham crackers blend sweet and tangy beautifully.
- Texture - Crisp layers of graham crackers stand up well to the pudding without getting soggy.
- Serving ease - Individual portions in cups mean less mess and easy transport for outdoor events or picnics.
Ingredient Swap Ideas
You can adjust this recipe by swapping a few ingredients to fit your dietary needs or flavor preferences without losing the core appeal.
- Dairy-free option - Use coconut milk or another plant-based milk in place of regular milk for the pudding.
- Gluten-free - Substitute gluten-free graham crackers or crushed gluten-free cookies to keep the crunchy layer.
- Sugar swap - Try using maple syrup or honey instead of granulated sugar in the pudding for a natural sweetener option.
- Citrus variation - Replace key lime juice with regular lime juice or lemon juice to adjust the acidity and flavor.
Ingredients
- 1 (3.4-ounce) package instant lime gelatin mix - Provides the lime flavor and helps set the pudding.
- 1 (3.4-ounce) package instant vanilla pudding mix - Adds creamy texture and sweetness.
- 2 cups cold milk - Used to prepare the pudding layers.
- 1 cup sour cream - Enhances creaminess and adds a slight tang to the pudding.
- 1 (14-ounce) can sweetened condensed milk - Adds richness and sweetness.
- ¼ cup fresh key lime juice - Brings fresh, bright lime flavor essential to the dessert.
- 1 ½ cups graham cracker crumbs - Forms the crunchy layers.
- ¼ cup unsalted butter, melted - Binds the graham cracker crumbs to keep them intact.
- Whipped cream, for topping - Optional, adds lightness and balances the tangy lime.
Instructions
- In a large bowl, whisk together the lime gelatin mix, vanilla pudding mix, and cold milk until smooth. Let it sit for about 5 minutes to start thickening.
- Stir in the sour cream, sweetened condensed milk, and fresh key lime juice until fully combined and creamy.
- In a separate small bowl, mix the graham cracker crumbs and melted butter until the crumbs are evenly coated and hold together when pressed.
- To assemble the parfaits, spoon a layer of graham cracker crumbs into the bottom of each clear cup. Add a layer of lime pudding over the crumbs, then repeat the layers until cups are filled, ending with pudding on top.
- Chill the parfaits in the refrigerator for at least 2 hours to allow layers to set and the flavors to meld. Before serving, top with whipped cream if desired.
These parfaits hold up well chilled and make a great grab-and-go dessert for any occasion.
10. Chocolate Dipped Rice Krispies Treats
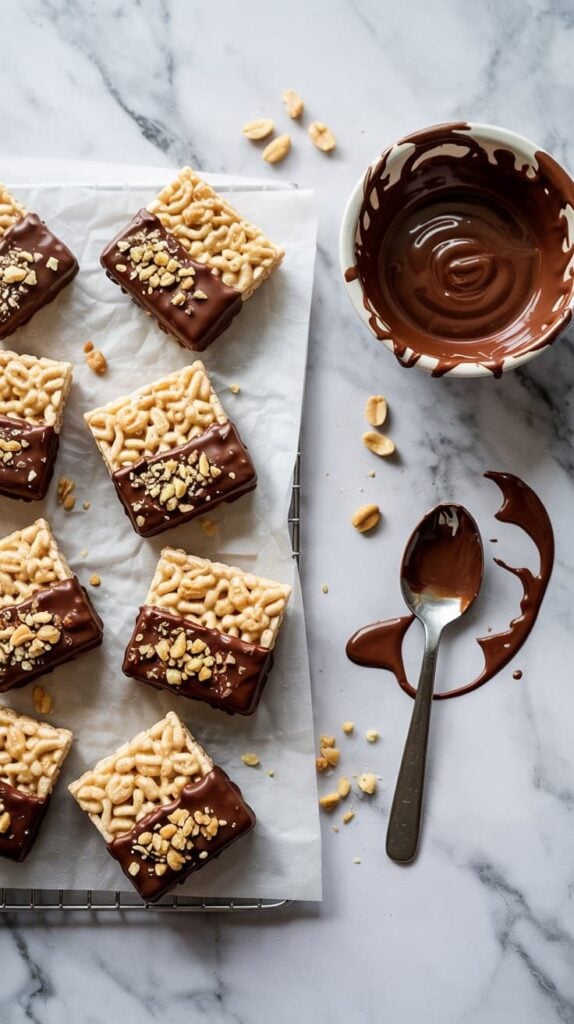
These Chocolate Dipped Rice Krispies Treats bring a nostalgic favorite into a simple, delicious dessert with a chocolate twist. The classic crispy bars have the familiar sturdy texture from melted marshmallows and cereal, and the smooth chocolate coating adds a rich finish that's both satisfying and fun to eat.
They come together quickly using just a handful of ingredients and require no baking, making them an ideal treat you can prepare anytime from a last-minute snack to a party dessert. The chocolate layer sets nicely without melting too fast, so they're easy to handle and share.
Why This Recipe Works
This recipe is a quick and crowd-pleasing dessert that mixes simplicity with a classic chocolate flavor. It combines familiar textures and tastes into a well-loved treat that suits busy days and casual gatherings.
- Convenience - No baking required, ready in under 30 minutes.
- Texture - Crisp and chewy base with a smooth, firm chocolate coating.
- Flavor balance - Sweet marshmallow and crisp cereal paired with rich chocolate.
- Appeal - Familiar and fun dessert that appeals to kids and adults alike.
Ingredient Swap Ideas
Swapping ingredients lets you customize these treats for different dietary needs or flavor preferences without losing the core enjoyment. You can adjust components to be dairy-free, less sweet, or incorporate other cereals.
- Marshmallows - Use vegan marshmallows if avoiding gelatin.
- Cereal - Substitute Rice Krispies with gluten-free crispy rice cereal for a gluten-free version.
- Chocolate - Swap milk chocolate for dark chocolate or dairy-free chocolate chips to reduce sweetness or suit dairy-free diets.
- Butter - Use coconut oil instead of butter for a dairy-free option.
Ingredients
- 6 cups Rice Krispies cereal - Provides the crunchy, crispy base.
- 4 cups mini marshmallows - Creates the sticky, chewy texture to hold the bars together.
- 3 tablespoons unsalted butter - Helps melt the marshmallows evenly and adds richness.
- 1 cup semi-sweet chocolate chips - Used for dipping the bars to add a smooth chocolate coating.
- 1 teaspoon vegetable oil - Added to chocolate for a glossy finish and easier dipping.
Instructions
- Lightly grease a 9x13-inch baking pan or line it with parchment paper. Set aside.
- In a large pot over low heat, melt the butter until completely melted. Add marshmallows and stir continuously until fully melted and smooth. Remove from heat immediately.
- Quickly fold the Rice Krispies cereal into the melted marshmallow mixture, making sure the cereal is evenly coated. Press the mixture firmly and evenly into the prepared pan. Let it cool and set for about 10 minutes.
- Meanwhile, melt the chocolate chips with the vegetable oil in a microwave-safe bowl in 20-second intervals, stirring after each, until smooth and shiny.
- Cut the Rice Krispies mixture into bars or squares. Dip the top of each bar into the melted chocolate or spoon the chocolate over the bars to coat the surface. Place on wax paper to let the chocolate set before serving.
These chocolate dipped bars store well in an airtight container at room temperature for several days, making them an easy grab-and-go option whenever you need a quick sweet bite.
11. Frozen Banana Bites with Dark Chocolate and Nuts
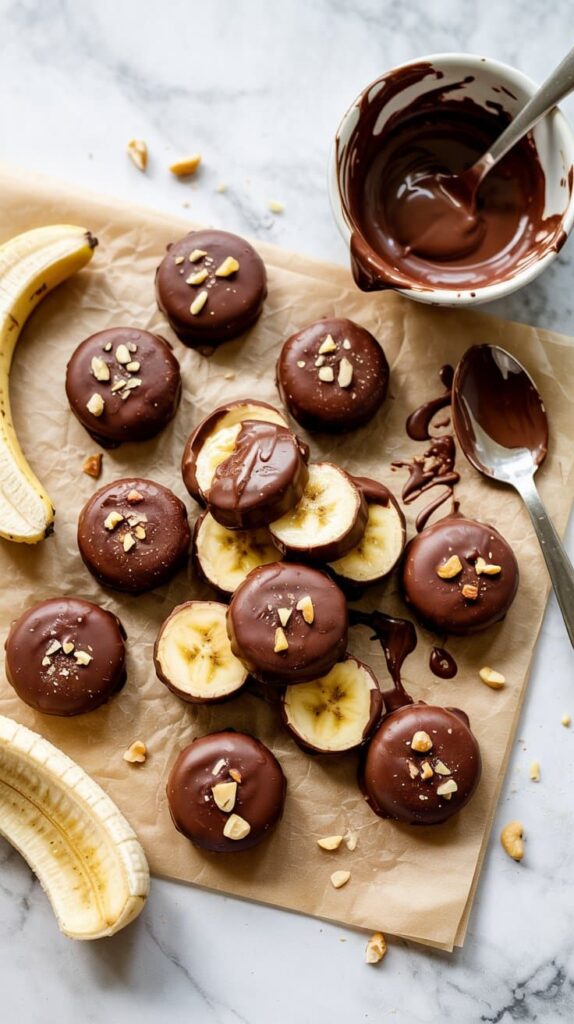
Frozen banana bites coated in dark chocolate and sprinkled with nuts make a refreshing and wholesome snack. They bring together the natural sweetness of ripe bananas with the rich bitterness of dark chocolate, while nuts add a satisfying crunch.
These treats are simple to prepare and hold up well in warm settings, making them ideal for hot days or as a make-ahead snack for both kids and adults.
You can enjoy these frozen bites straight from the freezer, offering a cool texture that contrasts perfectly with the smooth chocolate and crisp nuts. Plus, they're a great way to incorporate fruit into snacking without any fuss.
Why This Recipe Works
This recipe combines ease and taste with health-conscious choices to create a snack that appeals widely.
- Convenience - Quick to assemble with minimal ingredients and no baking required.
- Flavor balance - The sweetness of banana goes well with slightly bitter dark chocolate and earthy nuts.
- Texture - Creamy banana centers coated in firm chocolate with a crunchy nut topping.
- Appeal - Kid-friendly and suitable for adults looking for a light, healthier sweet option.
Ingredient Swap Ideas
Adjusting ingredients can help this recipe fit different tastes or dietary preferences easily.
- Bananas - Use frozen plantains instead for a less sweet, more starchy bite.
- Dark Chocolate - Substitute with milk chocolate for a sweeter coating or use vegan chocolate to keep it dairy-free.
- Nuts - Try chopped pecans, pistachios, or shredded coconut for a different flavor and texture.
- Nut-Free Option - Replace nuts with crushed freeze-dried berries or toasted seeds like pumpkin or sunflower for crunch without allergens.
Ingredients
- 2 large ripe bananas peeled and sliced into ½-inch rounds
- 6 ounces dark chocolate broken into small pieces or chips
- ¼ cup mixed nuts chopped (such as almonds, walnuts, or hazelnuts)
- 1 teaspoon coconut oil (optional, for smoother chocolate coating)
Instructions
- Line a baking sheet with parchment paper and arrange banana slices in a single layer. Place the sheet in the freezer for at least 1 hour until the bananas are firm.
- Melt the dark chocolate and coconut oil together in a heatproof bowl over simmering water or in short bursts in the microwave, stirring frequently until smooth.
- Using a fork or skewer, dip each frozen banana slice into the melted chocolate, coating it completely. Let any excess chocolate drip off.
- Place the chocolate-covered banana back onto the parchment paper and immediately sprinkle chopped nuts on top while the chocolate is still wet.
- Return the baking sheet to the freezer for another 30 minutes until the chocolate hardens. Store the frozen banana bites in an airtight container in the freezer until ready to serve.
Enjoy these chilled treats anytime you want a cool, naturally sweet snack with a little crunch.
12. Cinnamon Sugar Roasted Peach Cobbler (Baked)
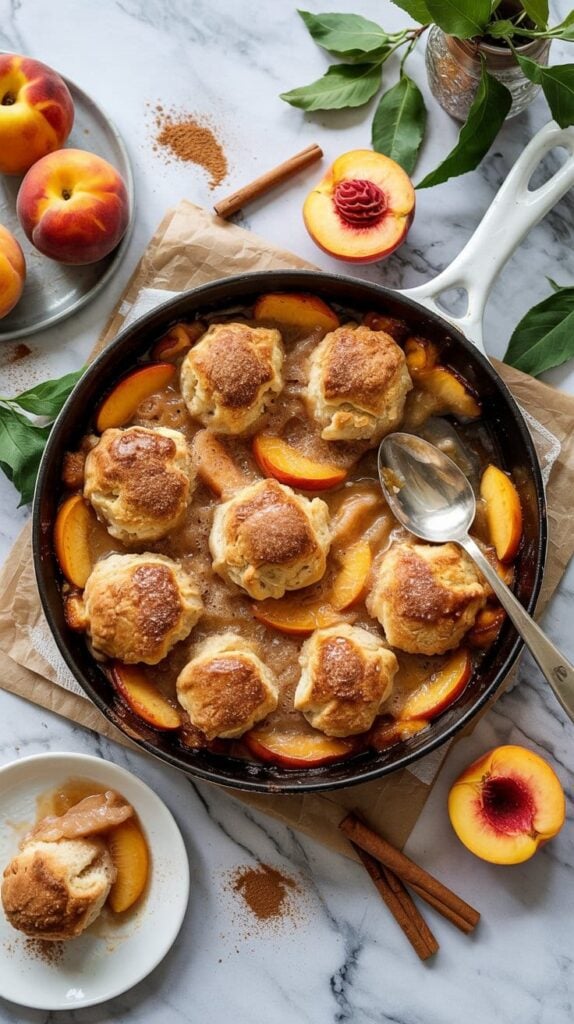
This cinnamon sugar roasted peach cobbler brings together warm, spiced peaches with a tender, lightly crisp topping. The natural sweetness of the peaches contrasts beautifully with the cinnamon and sugar, creating a cozy dessert that holds its shape well, making it ideal for serving at room temperature.
The recipe is straightforward and doesn't require extensive baking skills. It's a great way to enjoy peaches throughout the year, whether for family dinners or casual gatherings.
The crumble topping adds just the right amount of crunch without overpowering the juicy fruit beneath.
Why This Recipe Works
This peach cobbler combines balanced flavors and textures in an easy-to-prepare baked dessert. It's both approachable and versatile for any home cook to enjoy with minimal fuss.
- Convenience - Simple prep steps and bake time make it a manageable dessert after a busy day.
- Flavor balance - Warm cinnamon and sugar go with the sweet, juicy peaches perfectly.
- Texture - Tender peaches stay intact under a crumbly, slightly crisp topping.
- Serving ease - Keeps well at room temperature, ideal for buffets or potlucks without reheating.
Ingredient Swap Ideas
Swapping ingredients can help tailor this recipe to your preferences or pantry items without losing its comforting feel.
- Peaches - Use nectarines or plums if fresh peaches aren't available or for a different fruity twist.
- Sugar - Substitute brown sugar for the cinnamon sugar to deepen the caramel notes in the topping.
- Gluten-free option - Replace all-purpose flour in the topping with a gluten-free blend for dietary needs.
- Butter - Use coconut oil or vegan butter as a dairy-free alternative while maintaining the crumble texture.
Ingredients
- 5 cups fresh peaches - peeled and sliced into wedges for roasting.
- ¼ cup granulated sugar - to sweeten the peaches.
- 1 teaspoon ground cinnamon - for warming spice flavor.
- 1 tablespoon fresh lemon juice - to brighten the peach mixture.
- 1 cup all-purpose flour - for the crumble topping.
- ½ cup granulated sugar - mixed into the topping.
- ¼ cup brown sugar - adds moisture and richness to the topping.
- ½ teaspoon ground cinnamon - enhances the crumble's flavor.
- ¼ teaspoon salt - balances sweetness.
- 6 tablespoons cold unsalted butter - cut into small pieces for a flaky topping.
Instructions
- Preheat your oven to 375°F (190°C). In a mixing bowl, toss the sliced peaches with ¼ cup granulated sugar, 1 teaspoon cinnamon, and fresh lemon juice until the fruit is evenly coated.
- Transfer the peach mixture to a baking dish and spread evenly. Place the dish in the oven and roast for 15 minutes to soften the fruit and intensify flavors.
- While the peaches roast, prepare the crumble topping. In a separate bowl, combine the flour, ½ cup granulated sugar, brown sugar, ½ teaspoon cinnamon, and salt. Add the cold butter pieces and use your fingers or a pastry cutter to mix until the mixture resembles coarse crumbs.
- Remove the peaches from the oven and evenly sprinkle the crumble topping over them. Return the dish to the oven and bake for an additional 25 to 30 minutes, or until the topping is golden and crisp.
- Allow the cobbler to cool for about 15 minutes before serving. It holds its shape well when served at room temperature, making it easy to prepare ahead for events or casual dessert.
Seasonal peach desserts - from grilled peaches to chilled peach tarts - showcase fruit that stands up to heat; explore more ideas at easy peach dessert ideas for summer. For outdoor gatherings, choose picnic-friendly options like dense loaf cakes and chilled bars that resist melting and travel well - see picnic-friendly desserts that hold up in heat.

Andrew Gray is a seasoned food writer and blogger with a wealth of experience in the restaurant and catering industries. With a passion for all things delicious, Andrew has honed his culinary expertise through his work as a personal chef and caterer.
His love for food led him to venture into food writing, where he has contributed to various online publications, sharing his knowledge and insights on the culinary world. As the proud owner of CooksCrafter.com, Andrew covers a wide range of topics, including recipes, restaurant reviews, product recommendations, and culinary tips.
Through his website, he aims to inspire and educate fellow food enthusiasts, offering a comprehensive resource for all things food-related.