Summer calls for refreshing, bright desserts that capture the season's natural sweetness and bright flavors. This collection of 14 easy fruit-based desserts offers just that, showing simple recipes that bring the best of summer fruits to the table; fruit-based desserts use fresh fruit as the primary ingredient, often highlighting seasonal produce like berries, peaches, and mangoes (they typically feature fresh, minimally processed fruit to showcase seasonal flavor).
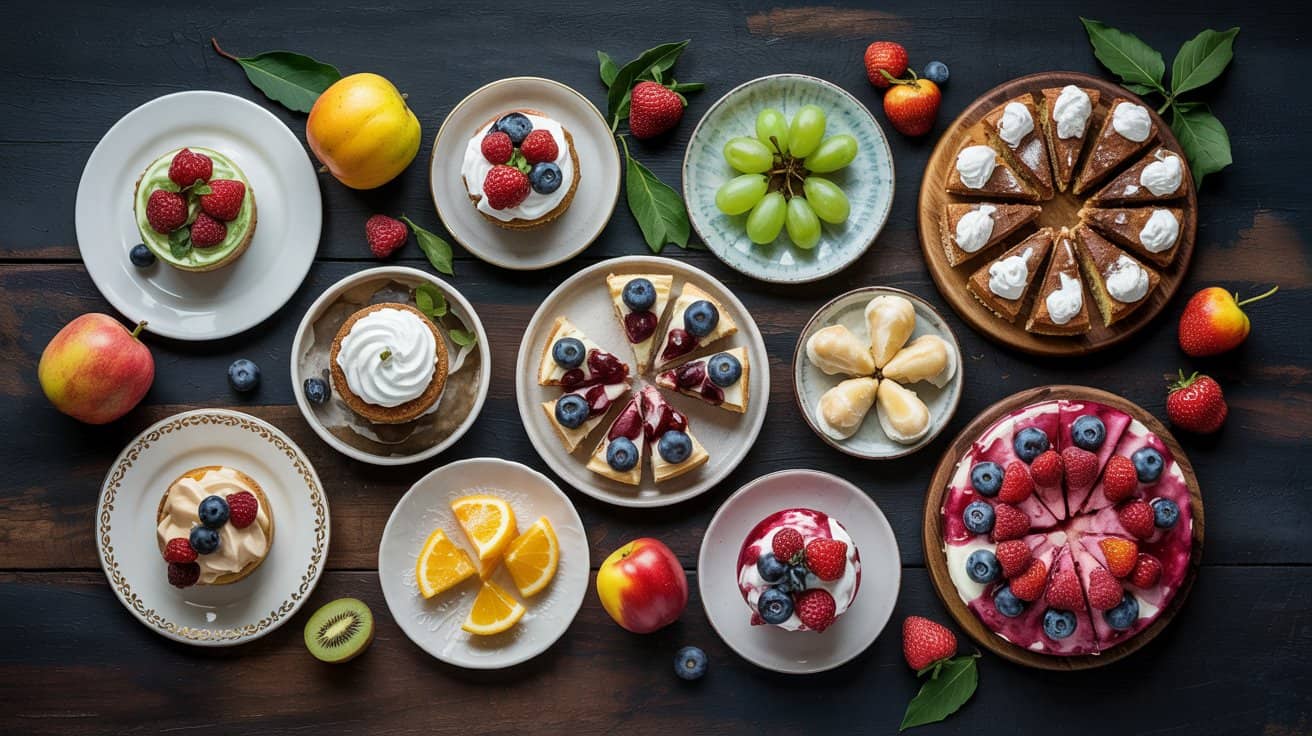
Inside, you'll find a mix of no-bake treats, quick bakes, and frozen delights that suit a variety of occasions-from casual family dinners to outdoor gatherings. These recipes highlight seasonal fruits like berries, peaches, and mangoes, each with a fresh twist that keeps the dessert light and appealing.
Many include straightforward steps and minimal ingredients, making them accessible for cooks at any level.
What ties these recipes together is their focus on ease and flavor without requiring complicated techniques or long preparation times. They provide satisfying summer sweetness while keeping cleanup low, so you can enjoy more time with your guests or family.
1. Mixed Berry Parfait with Honeyed Yogurt

Layers of creamy, honey-sweetened Greek yogurt (a strained yogurt higher in protein; see Greek yogurt substitutes for dairy-free swaps) go well with the natural tartness of fresh berries - see fresh berry dessert ideas, while crunchy granola adds a pleasant texture contrast.
The simplicity of this recipe makes it ideal for busy days when you want something healthy without a lot of fuss, and it can be assembled in about 5 minutes. It's a no-bake option that comes together quickly, making it a go-to option for breakfasts, snacks, or even a casual dessert.
With the bright colors of the berries and the inviting aroma of honey, this parfait not only appeals to the palate but looks inviting on the table. It's a versatile recipe that you can adjust based on what berries are in season or preferred crunchy toppings.
Why This Recipe Works
- Convenience - Requires no baking and comes together in minutes.
- Flavor balance - Combines creamy, tart, sweet, and nutty notes harmoniously, with honey and Greek yogurt providing sweetness and tang (see refreshing honey-based desserts).
- Texture - Creamy yogurt layered with juicy berries and crisp granola.
- Appeal - Bright and colorful, inviting for family and guests alike.
- Flexible - Easily adaptable to different fruits or yogurt varieties.
Ingredient Swap Ideas
- Greek yogurt - Substitute with plant-based yogurt for a dairy-free option.
- Mixed berries - Use any fresh or frozen fruits like mango, peaches, or cherries depending on the season.
- Granola - Swap for nuts or seeds if you want less sweetness or gluten-free crunch (see small-batch cupcake ideas for two).
- Honey - Replace with maple syrup or agave syrup to keep it vegan.
- Add-ins - Incorporate shredded coconut or dark chocolate chips for extra texture and flavor.
Ingredients
- 2 cups plain Greek yogurt
- 3 tablespoons honey
- 1 cup strawberries, hulled and sliced
- 1 cup blueberries
- 1 cup raspberries
- 1 cup granola
Instructions
- In a medium bowl, mix the Greek yogurt with honey until well combined and smooth.
- In clear serving glasses or bowls, start layering by spooning a few tablespoons of the honeyed yogurt into the bottom.
- Add a layer of mixed berries over the yogurt, distributing the strawberries, blueberries, and raspberries evenly.
- Sprinkle a layer of granola on top of the berries for a crunchy texture.
- Repeat the layering process until the glasses are filled, finishing with a small handful of berries and granola on top for garnish.
- Serve immediately or refrigerate for up to 2 hours before serving to keep the granola crunchy.
2. Peach Cobbler with Cinnamon Crumble Topping

This peach cobbler brings a classic Southern dessert to your table, combining juicy peaches with a buttery, crunchy topping baked at 375°F for about 35-45 minutes until the filling is bubbly. The warmth from the cinnamon crumble adds a cozy touch that goes well with the natural sweetness of the fruit.
Making this cobbler is straightforward and satisfying, with fresh peaches (ripe but firm) or good-quality canned ones working well - see easy peach dessert ideas.
The combination of tender fruit and crisp topping creates a texture contrast that is both inviting and deeply satisfying. This recipe is ideal for busy home cooks who want a reliable dessert that doesn't require a lot of fuss but delivers on flavor.
Pair this cobbler with easy side dishes for peach desserts that complement stone-fruit flavors.
Why This Recipe Works
- Simple preparation - Uses common ingredients and straightforward steps that keep the process manageable.
- Balanced flavors - Combines juicy, slightly tart peaches with a warm cinnamon-spiced crumble.
- Textural contrast - Features a crisp, crumbly topping over soft baked fruit.
- Versatile appeal - Great as a standalone dessert or served with ice cream or whipped cream.
- Portion control - Makes it easy to serve individual or family-sized portions without extra work.
Ingredient Swap Ideas
- Peaches - Use fresh peaches when in season for the best flavor, or substitute with high-quality canned or frozen peaches if fresh aren't available.**
- Butter - Replace with a plant-based butter alternative to make the topping dairy-free while keeping that rich, crumbly texture.
- Sugar - Use coconut sugar or maple syrup for a different sweetness profile and to reduce refined sugars.
- All-purpose flour - Swap for a gluten-free flour blend to make this cobbler suitable for gluten sensitivities.
- Cinnamon - Feel free to add a pinch of nutmeg or ground ginger for extra warmth in the crumble topping.
Ingredients
- 6 cups fresh peaches peeled and sliced (or equivalent canned/frozen peaches, drained)
- ½ cup granulated sugar for peach filling
- 1 tablespoon cornstarch to thicken the peach juices
- 1 teaspoon lemon juice fresh, to brighten the fruit
- 1 cup all-purpose flour for the crumble topping
- ½ cup granulated sugar for the topping
- ¼ cup packed brown sugar for added depth in the topping
- 1 teaspoon ground cinnamon for warmth in the topping
- ¼ teaspoon salt to balance sweetness
- ½ cup unsalted butter cold and cut into small pieces for a crumbly texture
- ¼ cup rolled oats to add crunch in the topping
Instructions
- Preheat the oven to 350°F (175°C). Lightly grease a 9x13-inch baking dish.
- In a large bowl, combine the sliced peaches, ½ cup granulated sugar, cornstarch, and lemon juice. Toss gently to coat evenly, then pour this mixture into the prepared baking dish.
- In a separate bowl, mix the flour, ½ cup granulated sugar, brown sugar, cinnamon, and salt. Add the cold butter pieces, using your fingers or a pastry cutter to work it into the dry ingredients until the mixture resembles coarse crumbs. Stir in the rolled oats.
- Sprinkle the crumble topping evenly over the peach mixture in the baking dish.
- Bake for 40 to 45 minutes, or until the topping is golden brown and the peach filling is bubbling around the edges.
- Remove from the oven and let it cool slightly before serving. Serve warm on its own or paired with vanilla ice cream or whipped cream if desired.
3. Strawberry and Basil Shortcake

This shortcake recipe (or try an easy air-fryer shortcake method) brings together the bright sweetness of macerated strawberries with the fresh, herbal notes of basil, creating a refreshing twist on a classic dessert.
The biscuit shortcakes are tender and fluffy, made with cold butter for flaky layers, offering a soft base that balances the juicy, aromatic strawberry topping. This combination is straightforward to prepare and makes a lovely treat for a weekend gathering or a simple dessert after a family meal.
You'll appreciate how the basil adds an unexpected dimension without overpowering the fruit, creating a balance that's both light and satisfying. It's an inviting recipe that feels special without requiring advanced skills or hard-to-find ingredients.
Why This Recipe Works
- Convenience - Quick preparation with no complicated steps or special equipment needed.
- Flavor balance - Sweet strawberries meet fragrant basil, creating a refreshing contrast.
- Texture - Tender, flaky shortcakes soak up the syrupy macerated strawberries.
- Appeal - Elegant enough for guests but simple for everyday family meals.
- Serving ease - Easy to portion and assemble, minimal cleanup involved.
Ingredient Swap Ideas
- Use gluten-free flour - Replace regular flour with a gluten-free blend to make this dish gluten-free.
- Substitute fresh basil with mint - Mint leaves offer a different fresh note while keeping the herbal effect.
- Swap white sugar for maple syrup - Use maple syrup to add a natural sweetness and slight depth.
- Try coconut milk yogurt - For a dairy-free biscuit, substitute regular yogurt with coconut milk yogurt.
- Replace buttermilk with lemon and milk - Mix milk with lemon juice or vinegar as a simple buttermilk alternative.
Ingredients
- 2 cups fresh strawberries, hulled and sliced
- 2 tablespoons granulated sugar
- 1 tablespoon fresh basil leaves, finely chopped
- 2 cups all-purpose flour
- ¼ cup granulated sugar
- 1 tablespoon baking powder
- ½ teaspoon salt
- ½ cup unsalted butter, cold and cubed
- ¾ cup buttermilk
- 1 teaspoon vanilla extract
- Whipped cream or vanilla ice cream, for serving (optional)
Instructions
- Combine sliced strawberries, 2 tablespoons sugar, and chopped basil in a bowl. Let them sit at room temperature for 30 minutes to macerate and release their juices.
- Preheat the oven to 425°F (220°C). In a large bowl, whisk together flour, ¼ cup sugar, baking powder, and salt. Cut in cold butter using a pastry cutter or your fingers until the mixture resembles coarse crumbs.
- Stir in buttermilk and vanilla extract until the dough just comes together. Do not overmix; it should be slightly sticky but manageable.
- Turn the dough out onto a lightly floured surface and gently pat it to about 1-inch thickness. Use a biscuit cutter or glass to cut rounds and place them on a baking sheet lined with parchment paper.
- Bake for 12-15 minutes until the shortcakes are golden brown. Remove from the oven and let cool slightly.
- To serve, split the shortcakes horizontally, spoon generous amounts of the strawberry and basil mixture over the bottom halves, then top with the other shortcake half. Add a dollop of whipped cream or a scoop of ice cream if desired.
4. Mango Sorbet with Lime

Mango sorbet with lime brings a bright, tropical touch to any day. It's a refreshing frozen treat that captures the juicy sweetness of ripe mangoes, balanced by the zingy acidity of fresh lime.
This combination makes it both bright and satisfying without feeling heavy or overly sweet.
The texture is smooth, creamy, and icy, making it a great option to cool down on warm days or to serve as a light dessert after a meal. Plus, it requires just a few simple ingredients and minimal prep, so you can have it ready in no time.
Why This Recipe Works
- Convenience - Requires only a few ingredients and simple steps, making it quick to prepare.
- Flavor balance - Combines the natural sweetness of mango with zesty lime for brightness.
- Texture - Smooth and icy sorbet that's light and refreshing.
- Healthy option - Uses real fruit and minimal added sugar for a wholesome score.
- Versatile serving - Works well as a snack, dessert, or palate cleanser between courses.
Ingredient Swap Ideas
- Mango pulp - Use frozen mango chunks in place of fresh for convenience and longer storage.
- Sugar substitute - Swap granulated sugar with honey, agave, or maple syrup for a different sweetness profile.
- Lime juice - Try lemon juice if lime is unavailable; it will still add a bright citrus note.
- Add-ins - Blend in a small handful of fresh mint or basil for an herbal twist.
- Coconut milk - For a slightly creamier sorbet, add a splash of coconut milk during blending.
Ingredients
- 3 ripe mangoes - peeled, pitted, and chopped into pieces.
- ½ cup granulated sugar - adjust to taste depending on mango sweetness.
- ½ cup water - to make the simple syrup.
- 2 tablespoons fresh lime juice - adds a bright tang.
- 1 teaspoon lime zest - for enhanced citrus aroma.
- Pinch of salt - balances the flavors.
Instructions
- Combine the sugar and water in a small saucepan over medium heat. Stir until the sugar dissolves completely, then remove from heat and let cool to room temperature.
- Place the chopped mangoes in a blender or food processor. Add the cooled simple syrup, fresh lime juice, lime zest, and a pinch of salt. Blend until completely smooth.
- Pour the mango mixture into a shallow container or an ice cream maker. Freeze for several hours, stirring every 30 minutes if using a container, until firm and scoopable.
- Scoop the sorbet into bowls or dessert glasses. Garnish with extra lime zest or fresh mint leaves if desired. Serve immediately or keep frozen until ready to enjoy.
5. Watermelon and Feta Salad with Mint

This watermelon and feta salad is a refreshing dish that feels like a sweet treat while still being a bright, savory salad. The juicy watermelon offers a pop of freshness that contrasts beautifully with the salty, creamy feta cheese.
Adding fresh mint brings a pop of cool herbaceous flavor, making the salad even more bright.
It's incredibly simple to prepare, which makes it a great option for warm days or when you want something light and satisfying. This salad works well on its own or as a side dish alongside grilled meats or seafood.
Plus, the combination of flavors and textures keeps every bite interesting.
Why This Recipe Works
- Convenience - Requires minimal prep and no cooking, perfect for quick assembly.
- Flavor balance - Bright sweetness from watermelon offset by tangy, salty feta.
- Texture contrast - Juicy watermelon pieces meet firm, crumbly cheese for a pleasing bite.
- Appeal - Colorful and fresh, making it great for family meals or casual gatherings.
- Versatility - Can be served as a side, snack, or light dessert alternative.
Ingredient Swap Ideas
- Feta cheese - Use crumbled goat cheese for a milder, creamier texture or a dairy-free cheese for a vegan option.
- Watermelon - Substitute with cantaloupe or honeydew melon for a different sweet flavor.
- Mint - Replace with fresh basil for a sweeter, slightly peppery taste.
- Add-ins - Include sliced cucumbers or chopped red onions for extra crunch and flavor complexity.
- Dressing - Drizzle with a little balsamic reduction or a squeeze of lime juice instead of plain lemon juice for a twist.
Ingredients
- 4 cups watermelon, cut into bite-sized cubes
- 1 cup feta cheese, crumbled
- ¼ cup fresh mint leaves, chopped
- 2 tablespoons fresh lime juice
- 1 tablespoon extra-virgin olive oil
- ¼ teaspoon salt
- ¼ teaspoon black pepper
Instructions
- Place the watermelon cubes in a large bowl. Add the crumbled feta and chopped mint leaves.
- In a small bowl, whisk together the lime juice, olive oil, salt, and pepper until fully combined.
- Pour the dressing over the watermelon and feta mixture. Gently toss everything together to coat the ingredients evenly.
- Let the salad sit for about 5 minutes at room temperature to allow the flavors to meld.
- Give the salad one last gentle stir before serving. Optionally, garnish with a few extra mint leaves for presentation.
- Serve chilled or at room temperature, depending on your preference.
6. Blueberry Lemon Bars

Blueberry lemon bars bring together a bright, tangy lemon custard and sweet, juicy blueberries resting on a crumbly shortbread base. The combination delivers a fresh flavor contrast that feels light but satisfying.
These bars are easy to prepare and slice, making them ideal for serving at gatherings or enjoying as a treat any day. The shortbread crust provides a tender, buttery texture that goes well with the smooth lemon layer and juicy bursts of blueberry.
You'll find this recipe straightforward and approachable, designed with busy home cooks in mind. It's a great choice when you want a dessert that feels special without requiring complicated techniques or ingredients.
Why This Recipe Works
- Convenience - Simple steps come together quickly, suitable for make-ahead dessert options.
- Flavor balance - Bright lemon flavor complements sweet, ripe blueberries perfectly.
- Texture - Buttery shortbread crust offers a crunchy base with a soft, custardy topping.
- Appeal - This recipe is well-suited for family gatherings as it can be easily portioned.
- Serving ease - Bars are straightforward to cut and serve, minimizing mess or fuss.
Ingredient Swap Ideas
- Blueberries - Substitute fresh or frozen raspberries or blackberries to vary the fruit flavor.
- Lemon juice - Use lime juice instead to introduce a different tangy note.
- Butter - Replace with coconut oil in equal measure for a dairy-free crust option.
- All-purpose flour - Swap with gluten-free flour blend to make the recipe suitable for gluten sensitivities.
- Sugar - Use coconut sugar or a natural sweetener instead of granulated sugar for a less refined taste.
Ingredients
- 1 cup all-purpose flour
- ¼ cup granulated sugar
- ½ cup unsalted butter, softened
- 2 large eggs
- ¾ cup granulated sugar
- 2 tablespoons all-purpose flour
- ¼ teaspoon salt
- ¼ cup fresh lemon juice
- 1 tablespoon lemon zest
- 1 cup fresh blueberries
Instructions
- Preheat the oven to 350°F (175°C). Grease or line an 8x8-inch baking pan with parchment paper, leaving some overhang for easy removal.
- In a medium bowl, combine 1 cup flour and ¼ cup sugar. Cut in the softened butter using a fork or pastry blender until the mixture forms coarse crumbs. Press this mixture evenly into the bottom of the prepared pan.
- Bake the crust for 15 to 18 minutes or until lightly golden. Remove from the oven while you prepare the filling.
- In a separate bowl, whisk together the eggs, ¾ cup sugar, 2 tablespoons flour, salt, lemon juice, and lemon zest until smooth.
- Scatter the blueberries evenly over the baked crust. Carefully pour the lemon custard mixture over the blueberries, spreading it gently with a spatula.
- Return the pan to the oven and bake for another 20 to 25 minutes, or until the lemon layer has set and the edges are golden.
- Allow the bars to cool completely in the pan before lifting them out with the parchment paper. Chill in the refrigerator for at least 2 hours before slicing into bars.
- Cut into squares and serve chilled or at room temperature.
7. Grilled Pineapple with Honey and Cinnamon

Grilled pineapple with honey and cinnamon is a simple dessert that brings a smoky, caramelized twist to sweet fruit. The natural sugars in pineapple deepen when heated, creating a luscious glaze that goes well with the warmth of cinnamon and the light sweetness of honey.
This treat takes just a few minutes on the grill, making it a quick and convenient choice for outdoor meals or BBQ gatherings. It's a wonderful way to end a warm-weather meal on a fresh and flavorful note without feeling heavy.
Whether you're serving it on its own or alongside a scoop of vanilla ice cream, this easy recipe gives you a satisfying dessert with minimal fuss and maximum taste.
Why This Recipe Works
- Convenience - Needs only a few ingredients and can be prepared in under 15 minutes.
- Balanced flavors - Sweet honey, warm cinnamon, and smoky char go with the tangy pineapple perfectly.
- Texture contrast - The caramelized edges provide a slight crispness compared to the juicy, tender fruit inside.
- Family-friendly - Easily enjoyed by kids and adults, great for summer meals.
- Minimal cleanup - Grilled right on a grill pan or BBQ, no heavy sauces or utensils needed.
Ingredient Swap Ideas
- Honey - Use maple syrup or agave nectar if you want a vegan-friendly alternative.**
- Cinnamon - Ground nutmeg or ground ginger can add a different but complementary spice note.**
- Pineapple - Try mango or peach slices for a similarly sweet and grill-friendly fruit.**
- Optional butter - Replace with coconut oil to add a subtle tropical flavor and keep the recipe dairy-free.**
Ingredients
- 1 fresh pineapple - peeled, cored, and cut into 1-inch thick rings or wedges.
- 2 tablespoons honey - for drizzling over the pineapple before grilling.
- 1 teaspoon ground cinnamon - to sprinkle evenly across the fruit for warm spice.
- 1 tablespoon butter - melted, used to brush on the pineapple for extra caramelization (optional).
Instructions
- Preheat your grill or grill pan to medium-high heat. Make sure the grates are clean and lightly oiled to prevent sticking.
- In a small bowl, mix the honey and ground cinnamon together. Brush or drizzle this mixture generously over both sides of each pineapple slice.
- If using, brush the melted butter on top of the pineapple slices to encourage caramelization.
- Place the pineapple onto the grill and cook for about 3-4 minutes per side. You want nice grill marks and a bit of char, but avoid burning. The pineapple should turn golden and start to soften.
- Remove the pineapple from the grill carefully and transfer to a serving plate. Serve warm either on its own or with a scoop of ice cream or yogurt, if desired.
- Optionally, sprinkle a bit more cinnamon or a drizzle of honey on top just before serving for extra flavor.
8. Cherry Clafoutis

Cherry clafoutis is a simple, rustic French dessert that brings fresh cherries to the forefront with a soft, custard-like base. The cherries bake inside a rich, slightly sweet batter that sets into a tender, almost pancake-like texture.
It's an inviting treat that feels both comforting and a little special, making it great for quiet evenings or small gatherings.
You'll find this dessert easy to prepare, with minimal ingredients and no need for elaborate techniques. The natural juiciness of cherries seeps into the batter during baking, creating pockets of sweetness that contrast beautifully with the smooth custard.
This straightforward tart delivers classic flavors in a relaxed, approachable way.
Why This Recipe Works
- Convenience - Uses minimal ingredients and a simple batter you can mix quickly.
- Flavor balance - Combines juicy cherries with a subtly sweet, light custard base.
- Texture - Offers a tender, soft custard that frames the fruit perfectly.
- Appeal - Both homey and refined enough to serve for casual meals or special occasions.
- Serving ease - Bakes in one dish, making cleanup easy and portions straightforward.
Ingredient Swap Ideas
- Cherries - Use other firm fruits like blueberries, blackberries, or sliced plums if cherries aren't in season.
- Milk - Replace whole milk with almond, oat, or soy milk for a dairy-free version.
- Sugar - Try coconut sugar or maple syrup instead of granulated sugar for a deeper sweetness.
- Flour - Use gluten-free all-purpose flour in place of regular flour to make the dessert gluten-free.
- Butter - Swap butter for coconut oil for a vegan-friendly and slightly tropical twist.
Ingredients
- 2 cups fresh cherries whole, pitted if preferred
- 3 large eggs
- 1 cup whole milk or your preferred milk alternative
- ½ cup granulated sugar
- ½ cup all-purpose flour
- ¼ teaspoon salt
- 1 teaspoon vanilla extract
- 2 tablespoons unsalted butter melted, plus extra for greasing
- Powdered sugar for dusting, optional
Instructions
- Preheat your oven to 350°F (175°C). Grease a 9-inch round baking dish or deep tart pan with butter.
- Spread the cherries evenly over the bottom of the prepared dish.
- In a mixing bowl, whisk the eggs and sugar together until the mixture is smooth and pale.
- Add the flour and salt and whisk until fully combined, then stir in the milk, vanilla extract, and melted butter. The batter should be thin and consistent.
- Pour the batter gently over the cherries in the baking dish.
- Bake for 35 to 40 minutes, or until the clafoutis is puffed and lightly golden around the edges. A knife inserted into the center should come out clean.
- Allow it to cool slightly before dusting with powdered sugar, if using. Serve warm or at room temperature.
9. No-Bake Raspberry Cheesecake Cups
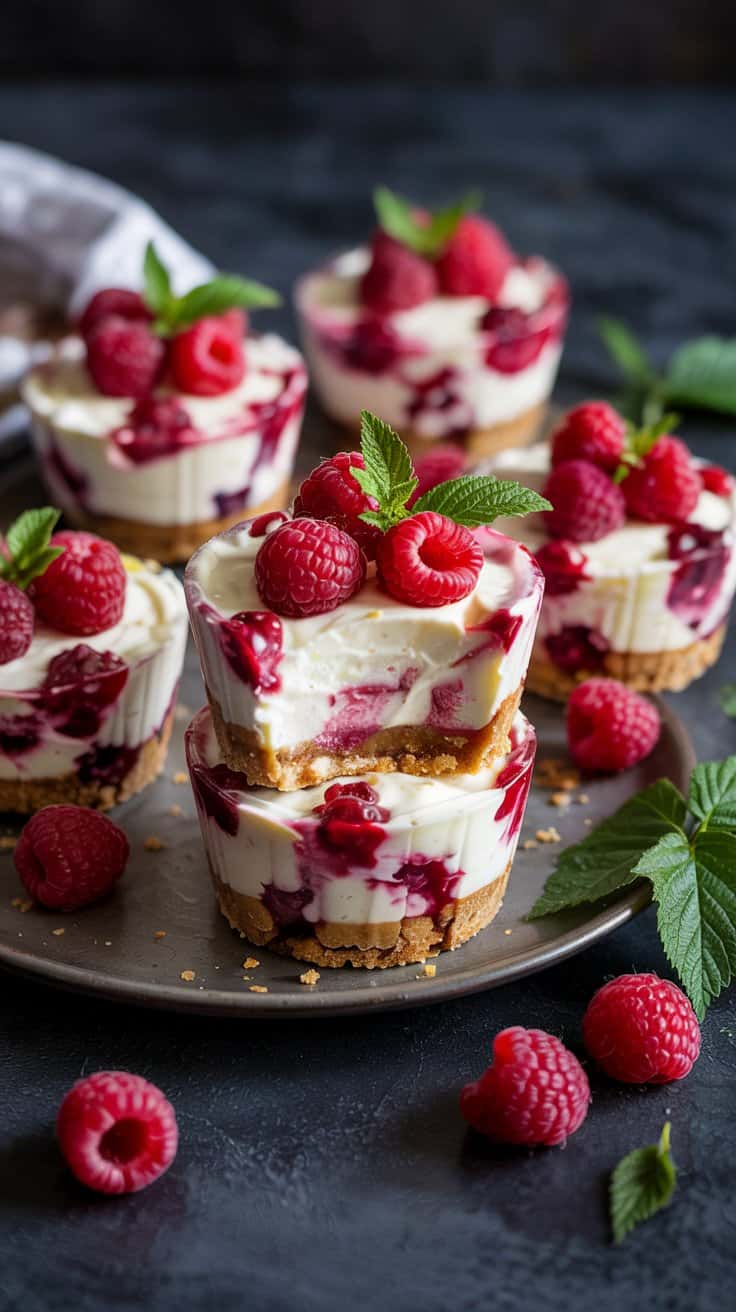
No-bake raspberry cheesecake cups offer a simple and inviting way to enjoy a classic dessert without turning on the oven. These individual servings combine a creamy cheesecake filling with the bright, fresh taste of raspberries, making each bite refreshing and satisfying.
This recipe works well for busy days or last-minute gatherings since it requires minimal preparation and chilling time. The layers of smooth, tangy cream cheese and juicy berries create a lovely contrast that feels both indulgent and light.
If you want a dessert that looks elegant without complicated steps, these cups provide just that. They're easy to assemble, portioned perfectly, and versatile enough for everyday treats or special occasions.
Why This Recipe Works
- Convenience - No baking means quick assembly and minimal kitchen heat.
- Flavor balance - Creamy, tangy filling goes well with sweet, tart raspberries.
- Texture contrast - Crunchy crust beneath smooth cheesecake and soft berries.
- Visual appeal - Individual cups provide an elegant presentation for any event.
- Easy serving - Ready-to-eat portions reduce mess and simplify cleanup.
Ingredient Swap Ideas
- Crust base - Use gluten-free graham crackers or crushed nuts for a gluten-free option.
- Cheesecake filling - Substitute cream cheese with a dairy-free cream cheese alternative for lactose intolerance.
- Sweetener - Replace granulated sugar with honey or maple syrup to add a natural sweetness.
- Fruit topping - Swap raspberries for blueberries, strawberries, or mixed berries to vary the flavor.
- Toppings - Add chopped nuts or shredded coconut for extra texture and richness.
Ingredients
- 1 ½ cups graham cracker crumbs - Finely crushed for a crunchy cheesecake base.
- 5 tablespoons unsalted butter - Melted, to bind the crust together.
- 12 ounces cream cheese - Softened, to create a smooth, creamy filling.
- 1 cup powdered sugar - To sweeten the cheesecake mixture evenly.
- 1 cup heavy cream - Whipped to add lightness and volume to the filling.
- 1 teaspoon vanilla extract - For subtle flavor enhancement.
- 1 ½ cups fresh raspberries - Washed and dried, used in layers and for garnish.
Instructions
- Combine graham cracker crumbs and melted butter in a bowl. Mix well until crumbs are evenly coated and hold together when pressed. Divide this mixture evenly among serving cups, pressing down gently to form the crust.
- In a separate large bowl, beat softened cream cheese and powdered sugar until smooth and creamy. Add vanilla extract and mix to combine.
- Whip heavy cream in another bowl until stiff peaks form. Gently fold the whipped cream into the cream cheese mixture until fully incorporated and light in texture.
- Spoon or pipe a layer of the cheesecake filling over the graham cracker crust in each cup. Add a layer of fresh raspberries on top of the filling, then add another layer of cheesecake filling.
- Finish each cup with a few raspberries placed on top for garnish. Cover the cups and refrigerate for at least 2 hours to allow the cheesecake to set.
- Serve chilled directly from the refrigerator. These cups hold well for up to 2 days when stored in an airtight container.
10. Peach and Blueberry Crisp with Oat Topping
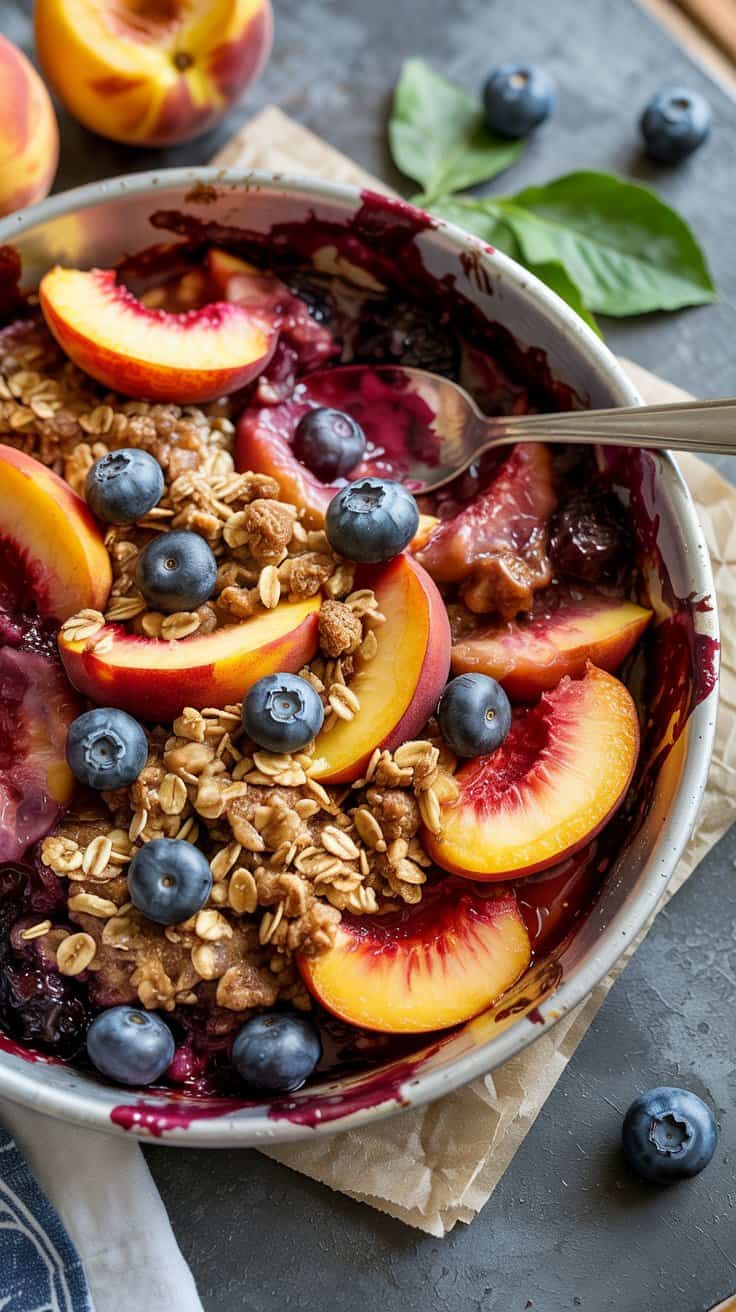
This Peach and Blueberry Crisp with Oat Topping brings together the natural sweetness of ripe peaches and juicy blueberries in a warm, comforting dessert. The combination of these two fruits gives a bright, fresh flavor that feels light yet indulgent at the same time.
What makes this crisp really stand out is the crunchy oat topping, which adds a satisfying texture contrast to the soft, bubbling fruit beneath. It's simple to prepare and bakes up beautifully in one dish, making it a great choice for busy evenings or casual gatherings.
You'll find that this dessert strikes a nice balance between wholesome ingredients and classic indulgence, so it's easy to serve after a family meal or share with friends. Plus, the oats bring a hint of wholesome goodness that feels just right alongside fresh summer fruit.
Why This Recipe Works
- Convenience - Quick to prepare with minimal hands-on time and one baking dish needed.
- Flavor balance - Combines juicy peaches and tangy blueberries for natural sweetness and depth.
- Texture - Crisp oat topping provides a satisfying crunch above soft, bubbling fruit.
- Appeal - Works well for family dinners, casual get-togethers, or even a simple treat.
- Serving ease - Easy to portion and serve warm with optional accompaniments.
Ingredient Swap Ideas
- Peaches - Substitute with nectarines or plums if peaches aren't in season or available.**
- Blueberries - Use raspberries or blackberries to add a different tang without changing texture much.
- Oats - Replace rolled oats with gluten-free oats for a gluten-free option.
- Butter - Use coconut oil or vegan butter to make the topping dairy-free.
- Sweetener - Swap granulated sugar for maple syrup or honey to add a subtle different sweetness note.
Ingredients
- 4 cups fresh peaches, peeled and sliced
- 2 cups fresh blueberries
- ½ cup granulated sugar
- 1 tablespoon lemon juice
- 1 teaspoon vanilla extract
- ¾ cup rolled oats
- ½ cup all-purpose flour
- ½ cup light brown sugar, packed
- ½ teaspoon ground cinnamon
- ¼ teaspoon salt
- ½ cup unsalted butter, cold and cut into small pieces
Instructions
- Preheat your oven to 350°F (175°C). Lightly grease a 9-inch baking dish and set it aside.
- In a large bowl, gently toss the sliced peaches, blueberries, granulated sugar, lemon juice, and vanilla extract until the fruit is evenly coated. Transfer this fruit mixture into the prepared baking dish and spread it out evenly.
- In a separate bowl, combine the rolled oats, flour, brown sugar, cinnamon, and salt. Cut the cold butter into the mixture using a pastry cutter or your fingers until it resembles coarse crumbs.
- Sprinkle the oat topping evenly over the fruit layer in the baking dish.
- Bake the crisp in the preheated oven for 40 to 45 minutes, or until the fruit is bubbling around the edges and the topping is golden brown and crisp.
- Remove from the oven and let it cool slightly before serving. This dessert is delicious on its own or served with vanilla ice cream or plain yogurt.
11. Citrus Pavlova with Mixed Berries

Citrus Pavlova with Mixed Berries offers a light and airy dessert that beautifully combines crisp meringue, creamy whipped topping, and the bright freshness of seasonal berries. The tangy citrus notes balance well with the natural sweetness of the berries, creating a refreshing finish after any meal.
This dessert is surprisingly easy to prepare, making it a great choice for gatherings or a special treat at home. The contrast between the crunchy exterior of the meringue and the soft center adds an enjoyable texture that'll impress family and friends alike.
Why This Recipe Works
- Light preparation - You only need basic pantry ingredients and some fresh fruit to make this dessert.
- Flavor contrast - The crisp meringue shell with the creamy cream and tart fruit creates a balanced taste experience.
- Texture variety - The crunchy outside with a marshmallow-like center goes with the soft berries and fluffy cream.
- Visual appeal - The colorful mixed berries give this pavlova a bright, fresh look.
- Make-ahead friendly - You can prepare the meringue base in advance and assemble just before serving.
Ingredient Swap Ideas
- Use coconut cream instead of heavy cream to make the topping dairy-free while keeping richness.
- Swap mixed berries with stone fruits like sliced peaches or nectarines for a summer twist.
- Replace granulated sugar with coconut sugar or a natural sweetener for a less refined option.
- Add a splash of vanilla extract to the whipped cream for extra aromatic depth.
- Substitute the citrus zest with a touch of ground ginger or cinnamon to vary the flavor.
Ingredients
- 4 large egg whites
- 1 cup granulated sugar
- 1 teaspoon white vinegar
- 2 teaspoons cornstarch
- Zest of 1 lemon
- Zest of 1 orange
- 1 cup heavy cream, chilled
- 2 tablespoons powdered sugar
- 1 teaspoon vanilla extract
- 2 cups mixed berries (such as strawberries, blueberries, raspberries, and blackberries)
Instructions
- Preheat your oven to 275°F (135°C) and line a baking sheet with parchment paper. Draw an 8-inch circle on the paper as a guide for your meringue.
- In a clean, dry bowl, beat the egg whites using an electric mixer on medium speed until soft peaks form. Gradually add the granulated sugar, a tablespoon at a time, beating on high speed until the meringue is glossy and forms stiff peaks.
- Gently fold in the white vinegar, cornstarch, lemon zest, and orange zest until evenly combined.
- Spoon the meringue onto the parchment paper within the drawn circle, smoothing the edges and creating a slight well in the center to hold the cream and fruit later.
- Bake the meringue for 1 hour and 15 minutes, then turn off the oven and allow it to cool completely inside with the door slightly ajar to prevent cracking.
- Meanwhile, whip the heavy cream with powdered sugar and vanilla extract until soft peaks form.
- When ready to serve, carefully transfer the cooled meringue to a serving plate. Top with the whipped cream, then scatter the mixed berries evenly over the cream. Serve immediately for the best texture contrast.
12. Blackberry and Apple Galette
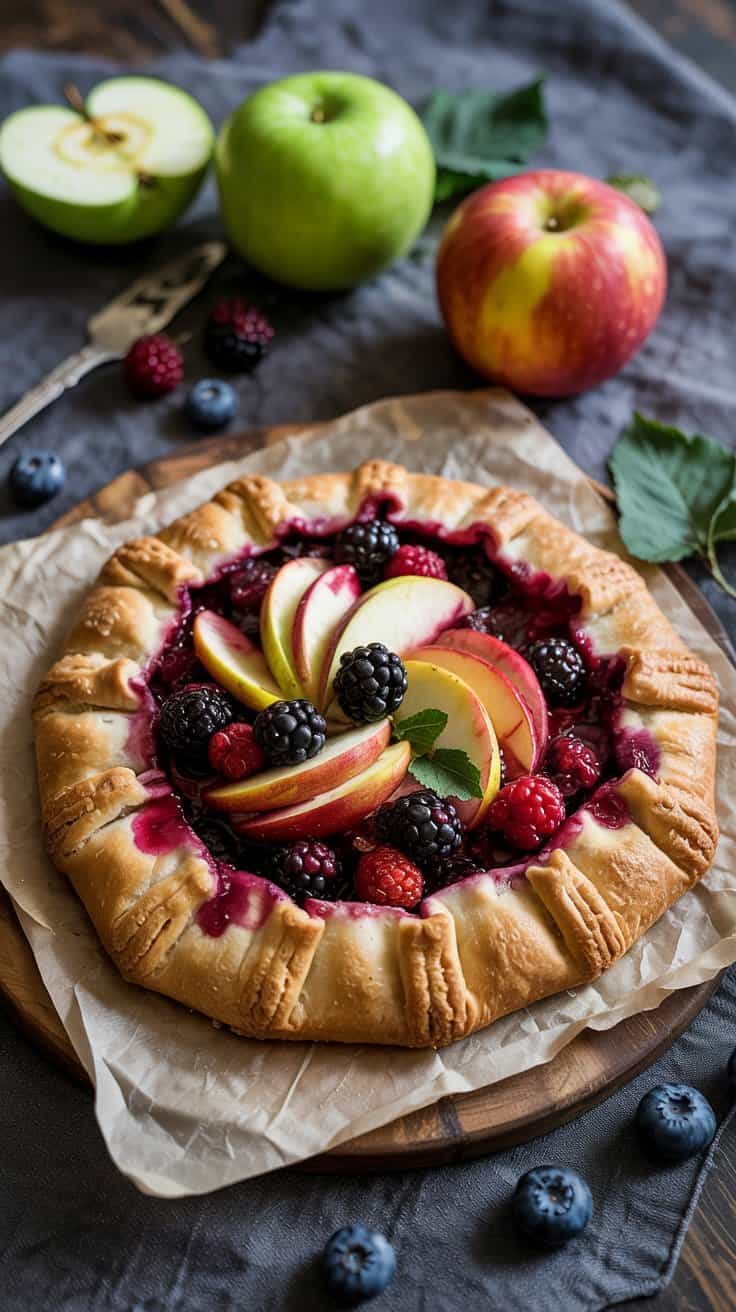
This blackberry and apple galette brings together the best of both fruits for a simple, rustic dessert that's full of flavor. The tartness of the blackberries blends beautifully with the crisp sweetness of the apples, creating a filling that's bright and fresh.
Wrapped in flaky, buttery pastry, this galette is a hands-on treat that doesn't require fancy skills or a lot of time.
Preparing this dessert lets you enjoy a homemade tart without fussing over a perfect crust or complicated techniques. You can easily customize it with your choice of fruit, making it a versatile option for any season.
It's also ideal for sharing at family dinners or casual gatherings, combining comforting textures with a lively fruit mix.
Why This Recipe Works
- Simple preparation - Uses a free-form tart crust, no pie dish required.
- Flavor contrast - Combines sweet, tart apples with juicy, slightly tangy blackberries.
- Flaky texture - The pastry bakes crisp and golden, complementing the soft fruit.
- Visual appeal - The rustic fold-over design gives it a charming, homemade look.
- Shareable size - Makes a nicely portioned dessert for family or guests without leftovers.
Ingredient Swap Ideas
- Fruit options - Use pears or peaches in place of apples for a different seasonal twist.
- Pastry substitution - Swap all-purpose flour pastry for gluten-free dough to accommodate sensitivities.
- Sweetener alternatives - Replace granulated sugar with maple syrup or honey for a natural sweetener.
- Dairy swap - Use coconut oil or a vegan butter substitute in the crust for a dairy-free option.
- Spices variation - Add cinnamon or nutmeg to the filling to bring a warm, cozy flavor.
Ingredients
- 1 sheet of puff pastry, thawed
- 1 large tart apple, peeled, cored, and thinly sliced
- 1 cup fresh blackberries, rinsed and drained
- ¼ cup granulated sugar
- 1 tablespoon lemon juice
- 1 tablespoon all-purpose flour
- 1 egg, beaten (for egg wash)
- 1 tablespoon coarse sugar for sprinkling (optional)
Instructions
- Preheat your oven to 375°F (190°C). Line a baking sheet with parchment paper.
- On a floured surface, roll the puff pastry out into a roughly 12-inch circle. Transfer it to the prepared sheet.
- In a medium bowl, gently toss apple slices and blackberries with sugar, lemon juice, and flour until evenly coated.
- Arrange the fruit mixture in the center of the dough, leaving about a 2-inch border all around. Fold the edges of the dough over the fruit, pleating to create a rustic edge.
- Brush the exposed dough edges with the beaten egg and sprinkle with coarse sugar if using.
- Bake for 35 to 40 minutes or until the pastry is golden and crisp, and the fruit filling is bubbling. Let it cool slightly before serving.
13. Strawberry Mango Smoothie Bowl with Coconut

A bright and creamy smoothie bowl is a wonderful way to start your day or refresh your afternoon. This Strawberry Mango Smoothie Bowl with Coconut combines tropical sweetness with a smooth texture that's both satisfying and nourishing.
The strawberries add a gentle tartness while the mango brings a luscious, sunny flavor. Topped with crunchy seeds and coconut flakes, this bowl offers a nice contrast of soft and crisp textures.
It's a no-cook recipe that comes together quickly, making it ideal for busy mornings or a light, wholesome dessert.
Why This Recipe Works
- Convenience - Quick to blend with simple ingredients you likely have on hand.
- Flavor balance - Combines sweet mango and tart strawberry perfectly.
- Texture contrast - Creamy base topped with crunchy seeds and coconut flakes.
- Healthful ingredients - Loaded with vitamins and fiber from fresh fruit and seeds.
- Appeal - Visually inviting with bright colors and an easy-to-customize presentation.
Ingredient Swap Ideas
- Strawberries - Substitute fresh or frozen raspberries or blueberries if preferred.
- Mango - Use pineapple or peach instead for a slightly different tropical touch.
- Coconut flakes - Toast sliced almonds or chopped walnuts to vary the topping crunch.
- Seeds - Replace chia or pumpkin seeds with sunflower or flax seeds as desired.
- Liquid base - Use almond milk, oat milk, or even coconut water for blending instead of plain water or juice.
Ingredients
- 1 cup fresh or frozen strawberries, hulled
- 1 cup fresh or frozen mango chunks
- ½ cup plain Greek yogurt or dairy-free alternative
- ¼ cup coconut water or almond milk
- 1 tablespoon honey or maple syrup (optional, for extra sweetness)
- 2 tablespoons shredded coconut flakes, for topping
- 1 tablespoon chia seeds or pumpkin seeds, for topping
Instructions
- Add strawberries, mango, Greek yogurt, and coconut water to a blender. Blend until smooth and creamy.
- Taste the mixture and add honey or maple syrup if you prefer it sweeter. Blend briefly again to combine.
- Pour the smoothie into a serving bowl, creating an even layer.
- Sprinkle shredded coconut flakes and chia or pumpkin seeds evenly on top.
- Serve immediately with a spoon to enjoy the creamy texture and crunchy toppings together.
14. Frozen Yogurt Bark with Mixed Fruit and Nuts

Frozen yogurt bark offers a refreshing snack option combining the creaminess of Greek yogurt with the natural sweetness of fresh fruit and the satisfying crunch of nuts. It's a cool treat that you can prepare ahead of time, making it ideal for busy days or as a light dessert.
Each bite delivers a balance of tangy yogurt, bright fruit flavors, and nutty texture. Plus, it's easy to customize based on your favorite fruits and nuts, allowing you to keep things interesting every time you make it.
Why This Recipe Works
- Easy Prep - Requires just a few ingredients and minimal steps.
- Make-Ahead Friendly - Can be stored in the freezer for quick access.
- Flavor Balance - Combines tart yogurt with sweet fruit and toasted nuts.
- Customizable - Use any combination of seasonal fruits and nuts.
- Mess-Free Serving - Breaks into portions perfect for on-the-go snacking.
Ingredient Swap Ideas
- Use Coconut Greek Yogurt - For a dairy-free alternative with a hint of tropical flavor.
- Replace Mixed Nuts with Seeds - Switch to pumpkin or sunflower seeds for a nut-free option.
- Add Different Fruits - Substitute summer berries with chopped stone fruits or dried fruit pieces.
- Sweeten with Agave Nectar - Swap honey or maple syrup for a vegan-friendly sweetener.
- Incorporate Dark Chocolate Chips - Mix in a few for extra richness without overpowering the freshness.
Ingredients
- 2 cups Greek yogurt plain or vanilla for added sweetness
- 2 tablespoons honey or maple syrup for vegan option
- ½ teaspoon vanilla extract optional for extra flavor
- 1 cup mixed fresh fruit such as strawberries, blueberries, and kiwi, chopped
- ⅓ cup mixed nuts like almonds, pistachios, and walnuts, roughly chopped
- 1 tablespoon chia seeds for added texture and nutrition (optional)
Instructions
- In a medium bowl, stir together Greek yogurt, honey or maple syrup, and vanilla extract until smooth and well combined.
- Line a baking sheet with parchment paper or a silicone mat to prevent sticking.
- Spread the yogurt mixture evenly onto the prepared sheet, creating a layer about ¼-inch thick.
- Scatter chopped mixed fruit, nuts, and chia seeds evenly over the yogurt layer, pressing them down gently so they stick.
- Freeze the tray for at least 4 hours or until the yogurt is fully set and firm.
- Once frozen, break the yogurt bark into pieces and store in an airtight container in the freezer until ready to serve.
Complement summer fruit desserts with quick single-serve ideas from mug cake recipes for moist single-serve desserts. For richer combinations, explore chocolate and fruit dessert ideas for every occasion.

Andrew Gray is a seasoned food writer and blogger with a wealth of experience in the restaurant and catering industries. With a passion for all things delicious, Andrew has honed his culinary expertise through his work as a personal chef and caterer.
His love for food led him to venture into food writing, where he has contributed to various online publications, sharing his knowledge and insights on the culinary world. As the proud owner of CooksCrafter.com, Andrew covers a wide range of topics, including recipes, restaurant reviews, product recommendations, and culinary tips.
Through his website, he aims to inspire and educate fellow food enthusiasts, offering a comprehensive resource for all things food-related.