Finding flavorful dips without mayonnaise can be a refreshing change for any gathering or snacking moment, offering alternatives such as bean-, yogurt-, or avocado-based spreads, many of which are egg-free or vegan, that provide creamy texture without mayo. This collection of 15 homemade dips offers a variety of tasty options that skip the mayo but still deliver creamy, satisfying results.
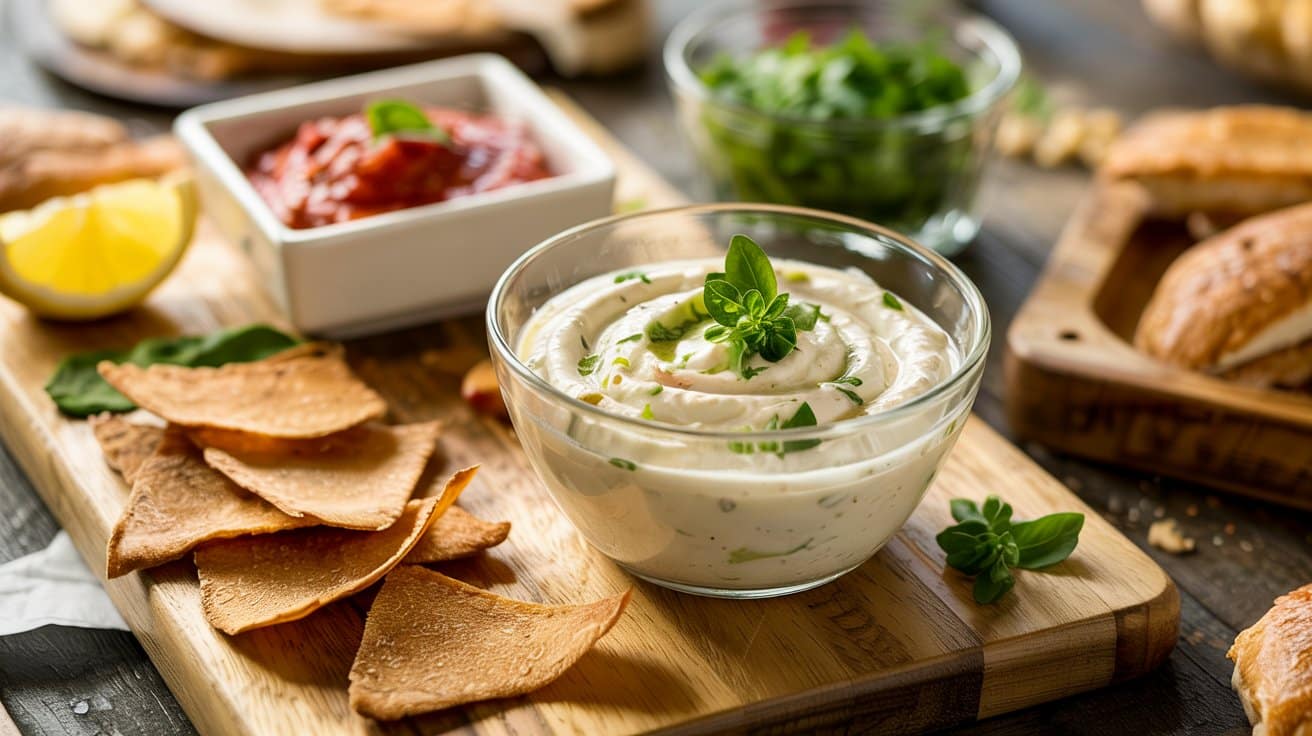
The recipes range from classic favorites like hummus and guacamole to bright roasted vegetable blends and herb-packed yogurt dips. Each one stands out with fresh ingredients and bold flavors, making them perfect for sharing with friends or enjoying as a simple snack.
These dips are designed to be straightforward and quick to prepare, requiring minimal ingredients and cleanup. Their balance of wholesome textures and bright tastes makes them versatile additions for any occasion.
1. Classic Hummus
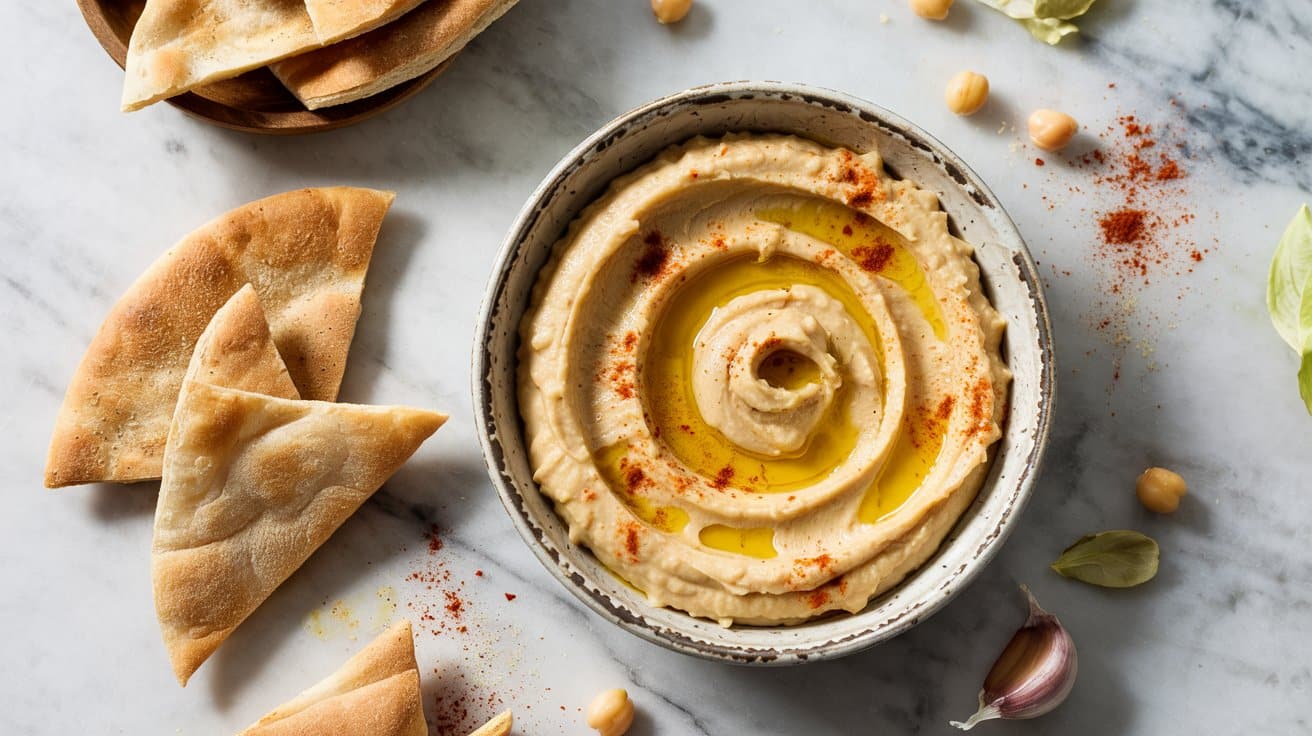
Classic hummus is a creamy, smooth chickpea dip that brings bright, fresh flavors to your table with minimal effort, a Mediterranean staple, originating in the Levant, made from cooked chickpeas, tahini, and lemon. Combining the natural sweetness of chickpeas with tangy lemon juice, garlicky warmth, and the nutty richness of tahini, this dip offers a perfect balance that's satisfying and nutritious.
It's a versatile staple you can whip up quickly for snacks, appetizers, or as a spread in sandwiches, and it pairs well with Ghanaian salad side options; explore hummus alternatives for flavor variety.
Why This Recipe Works
It's a dependable option for gatherings or everyday snacks, delivering smooth texture and bright flavor every time, and it pairs nicely with blended cocktails for summer parties.
- Convenience - Quick to prepare with basic pantry ingredients and no cooking required.
- Flavor balance - A lively mix of creamy tahini, zesty lemon, and savory garlic.
- Texture - Silky and smooth, perfect for dipping or spreading.
- Appeal - Familiar and crowd-pleasing, fitting a variety of meals and diets.
Ingredient Swap Ideas
Swapping ingredients can help tailor this hummus to dietary needs or personal taste while keeping its essence intact.
- Chickpeas - Use canned or cooked dried chickpeas based on availability and convenience, which can be handy when you need quick recipes like five-ingredient desserts for quick baking.
- Tahini - Substitute with almond butter or sunflower seed butter for a nutty twist or if tahini is unavailable, using a 1:1 swap by volume.
- Lemon juice - Freshly squeezed lemon juice brings brightness, but a splash of apple cider vinegar works in a pinch.
- Garlic - Adjust garlic to taste or use roasted garlic for a milder, sweeter flavor.
Ingredients
- 1 can (15 ounces) chickpeas - drained and rinsed, or about 1 ¾ cups cooked chickpeas.
- ¼ cup tahini - well-stirred before measuring.
- 3 tablespoons fresh lemon juice - about 1 large lemon.
- 2 cloves garlic - minced or finely grated.
- 2 tablespoons extra-virgin olive oil - plus more for serving.
- ½ teaspoon ground cumin - adds a warm, earthy note.
- ½ teaspoon salt - adjust to taste.
- 2 to 3 tablespoons cold water - to thin and smooth the hummus.
- Paprika or chopped fresh parsley - for garnish, optional.
Instructions
- In a food processor, combine the chickpeas, tahini, lemon juice, garlic, olive oil, cumin, and salt. Blend until the mixture forms a thick paste.
- With the food processor running, slowly add cold water, one tablespoon at a time, until the hummus reaches a smooth and creamy consistency.
- Taste and adjust the seasoning with more salt, lemon juice, or garlic if needed.
- Transfer the hummus to a bowl and drizzle with extra olive oil. Sprinkle paprika or chopped parsley on top if desired.
- Serve with fresh vegetable sticks, pita bread, or use it as a spread in sandwiches. Refrigerate leftovers in an airtight container for up to 4 days.
2. Roasted Red Pepper and White Bean Dip
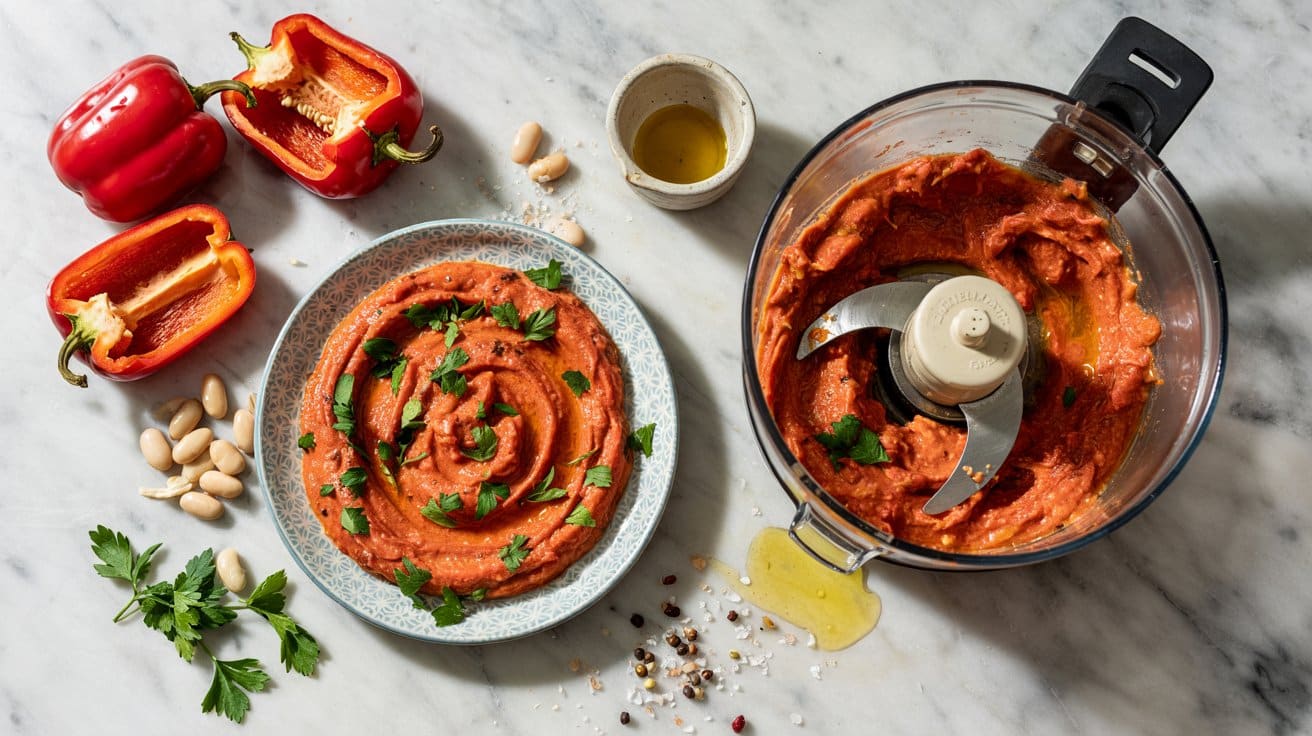
This roasted red pepper and white bean dip offers a smooth, creamy texture paired with the subtle sweetness and smoky depth from the roasted peppers, often charred under the broiler for 8-10 minutes, and it complements sauces that work with roasted vegetables.
The ingredients come together quickly, making it a smart choice when you want something satisfying without spending long in the kitchen, often blending in under 5 minutes in a food processor. This dip balances bright herbs and garlic with the natural earthiness of beans, creating a dish you'll reach for again and again.
If you prefer a different kind of heat, check red pepper flakes alternatives for balanced heat to find milder or smokier swaps that suit this dip.
Why This Recipe Works
This dip stands out for how simply it delivers big flavor and healthy benefits. It's a convenient, versatile option that suits many occasions and dietary preferences.
- Convenience - Requires just a handful of common ingredients and blends together in minutes.
- Flavor balance - Combines smoky, sweet, and savory notes with a fresh herby finish.
- Texture - Silky and smooth with a slight thickness that makes it ideal for dipping or spreading.
- Appeal - Wholesome and crowd-pleasing, perfect for sharing at casual get-togethers or snack times.
Ingredient Swap Ideas
Adjusting ingredients can help you tailor this dip for different diets or flavor preferences without losing its essence.
- White beans - Substitute cannellini or navy beans for chickpeas to vary texture and taste.
- Roasted peppers - Use jarred roasted red peppers if fresh ones aren't available, making sure you drain them well.
- Herbs - Swap parsley for cilantro or basil for a different herbal brightness.
- Garlic - If raw garlic feels too strong, roast it or reduce the amount for a milder flavor.
Ingredients
- 2 cups cooked white beans - Cannellini or great northern beans, rinsed and drained if canned.
- 2 large roasted red peppers - Skin removed, roughly chopped.
- 2 cloves garlic - Minced or pressed.
- 2 tablespoons fresh lemon juice - Adds brightness to balance the creaminess.
- ¼ cup extra-virgin olive oil - Helps create a smooth, rich texture.
- ¼ cup fresh parsley - Chopped, for a fresh herbal note.
- ½ teaspoon ground cumin - Provides a warm, earthy undertone.
- ½ teaspoon salt - Adjust to taste.
- ¼ teaspoon black pepper - Freshly ground for best flavor.
Instructions
- Place the white beans, roasted red peppers, and garlic into a food processor or blender. Pulse a few times to begin breaking down the ingredients.
- Add the lemon juice, olive oil, parsley, cumin, salt, and pepper. Blend until the mixture is completely smooth and creamy. Stop to scrape down the sides as needed.
- Taste and adjust seasoning by adding more salt, lemon juice, or pepper if desired.
- Transfer the dip to a serving bowl. Chill for at least 30 minutes if you have time to let the flavors meld.
- Serve with fresh vegetable sticks, pita bread, or crackers for dipping. Store leftovers in an airtight container in the refrigerator for up to 4 days.
3. Greek Yogurt Tzatziki Dip
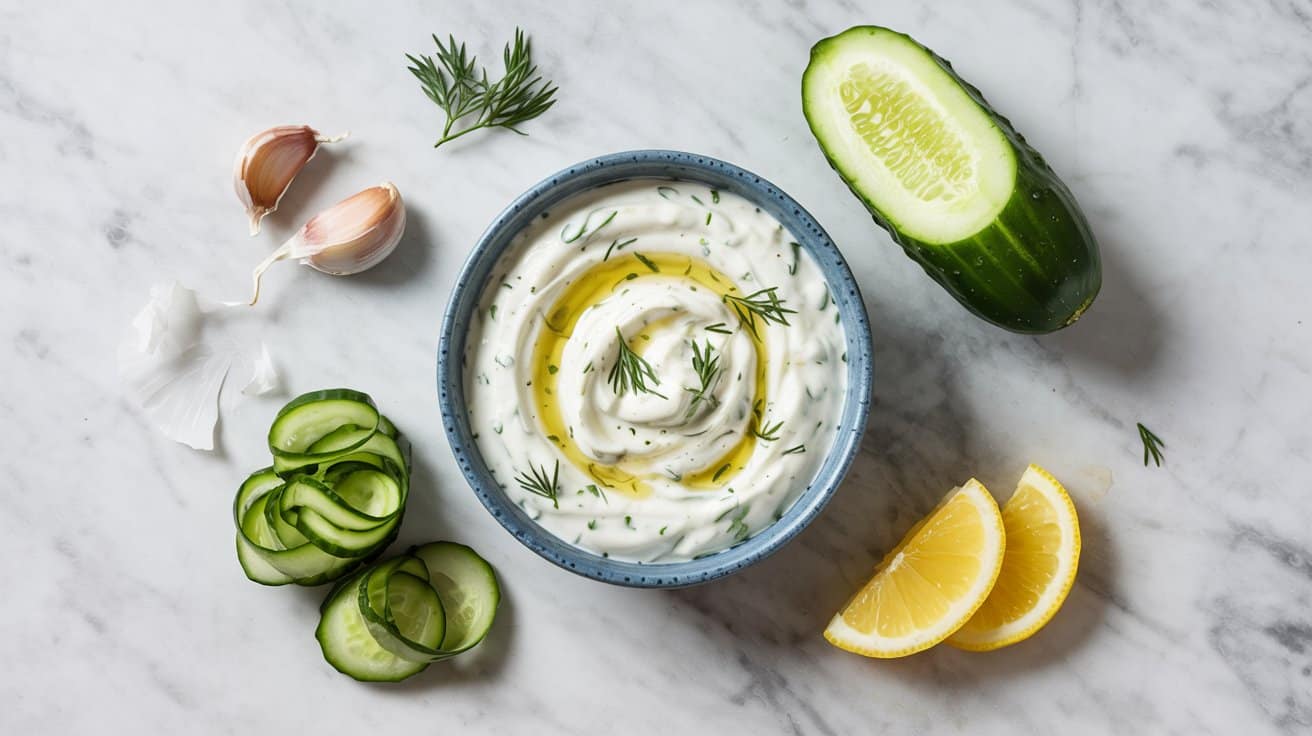
This version uses Greek yogurt to keep it creamy without being heavy, while cucumber, garlic, dill, and lemon add brightness and a bit of tang; if you need alternatives, see Greek yogurt substitutes for similar creaminess.
This dip comes together quickly with simple ingredients you likely keep on hand. Its refreshing flavors and smooth texture make it a good addition to casual gatherings or weekday meals alike.
Why This Recipe Works
This tzatziki dip offers a refreshing blend of creamy, tangy, and herbaceous notes, making it a versatile and easy-to-make accompaniment.
- Convenience - Requires only simple ingredients and minimal prep time.
- Flavor balance - Combines cool cucumber, garlic, and lemon for a bright taste.
- Texture - Smooth Greek yogurt contrasts with crisp cucumber pieces.
- Appeal - A light, healthy option that complements a range of dishes from mezze plates to grilled proteins.
Ingredient Swap Ideas
Adjusting ingredients can help accommodate dietary preferences or what you have in your pantry without losing the essence of this classic dip.
- Greek yogurt - Use plain regular yogurt if Greek yogurt isn't available, but drain excess whey to keep the dip thick.
- Cucumber - Substitute with finely grated zucchini for a similar texture and freshness.
- Dill - Swap for fresh mint or parsley for a different herbal note.
- Lemon juice - Use white wine vinegar or apple cider vinegar for a slightly different acidity.
Ingredients
- 1 cup Greek yogurt - Thick and creamy, is the base of the dip.
- ½ medium cucumber - Peeled and finely grated, to add freshness and crunch.
- 2 garlic cloves - Minced, for pungent flavor.
- 1 tablespoon fresh dill - Chopped, providing herbal brightness.
- 1 tablespoon fresh lemon juice - Adds acidity and zest.
- 1 tablespoon extra-virgin olive oil - Enhances richness and mouthfeel.
- ¼ teaspoon salt - Balances flavors.
- ⅛ teaspoon black pepper - Adds mild heat.
Instructions
- Start by peeling the cucumber, then grate it finely using a box grater. Place the grated cucumber in a clean kitchen towel or cheesecloth and squeeze out excess water to avoid a watery dip.
- In a medium bowl, combine the Greek yogurt, grated cucumber, minced garlic, chopped dill, and fresh lemon juice. Mix well until all ingredients are evenly incorporated.
- Stir in the olive oil, salt, and black pepper. Taste and adjust the seasoning if needed.
- Cover the bowl and refrigerate the tzatziki dip for at least 30 minutes to allow the flavors to meld.
- Serve chilled alongside pita bread, grilled meats, or fresh veggies for dipping.
4. Avocado Cilantro Lime Dip (Guacamole Style)
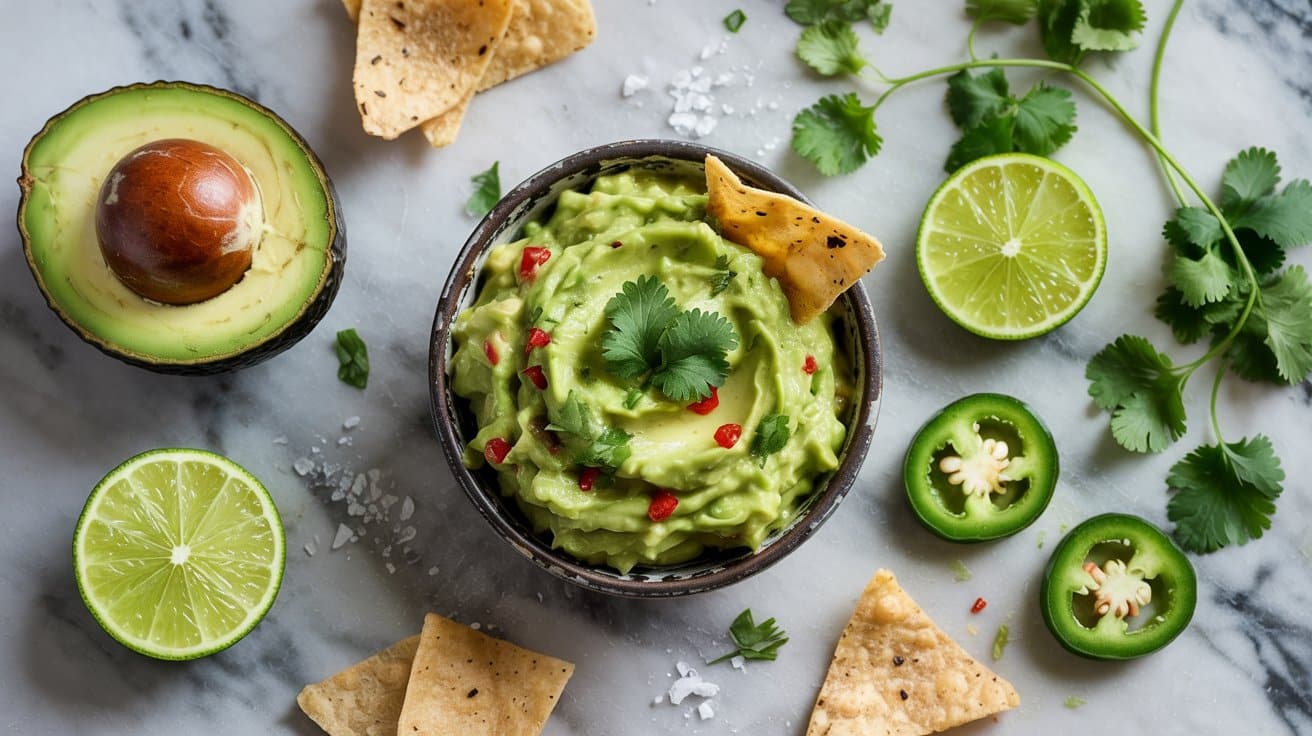
This avocado cilantro lime dip brings a fresh twist to the classic guacamole. It combines creamy avocado with zesty lime and bright cilantro for a lively flavor that works well as a snack or appetizer.
The addition of ripe tomatoes adds a subtle sweetness and a bit of texture, making this dip a great companion to chips, vegetables, or even as a topping for tacos. It's simple to prepare, requiring just a few minutes and minimal ingredients.
Why This Recipe Works
This dip is both quick to make and bursting with balanced, fresh flavors, making it an easy addition to many meals or gatherings.
- Convenience - Ready in under 10 minutes with minimal prep and no cooking required.
- Flavor balance - Combines creamy avocado with tangy lime and fragrant cilantro for a bright, fresh taste.
- Texture - Smooth base with chunks of tomato providing a pleasant contrast.
- Appeal - Suitable for a variety of occasions, from casual snacking to party platters.
Ingredient Swap Ideas
Swapping ingredients can help you adjust this recipe to fit dietary needs or personal preferences without losing its fresh essence.
- Cilantro - Replace with fresh parsley or basil for a milder herb flavor.
- Lime juice - Use lemon juice if limes are unavailable for a slightly different citrus note.
- Tomatoes - Swap with diced red bell pepper or cucumber for a different crunch and color.
- Avocado - For a creamier dip without avocado, blend in cooked peas instead, seasoned similarly for an alternative texture.
Ingredients
- 2 ripe avocados peeled and pitted
- ¼ cup fresh cilantro leaves chopped
- 1 tablespoon fresh lime juice
- 1 small tomato seeded and diced
- ¼ teaspoon salt
- ⅛ teaspoon black pepper
- 1 small garlic clove minced (optional)
Instructions
- In a medium bowl, mash the avocados with a fork until smooth but still slightly chunky.
- Stir in the chopped cilantro, lime juice, salt, pepper, and minced garlic if using. Mix well to combine.
- Gently fold in the diced tomato, distributing it evenly throughout the dip.
- Taste and adjust seasoning with more salt or lime juice if needed.
- Serve immediately with tortilla chips, fresh veggies, or as a topping for your favorite dishes.
This dip is best enjoyed fresh but can be stored in an airtight container in the refrigerator for up to one day. Press a piece of plastic wrap directly onto the surface of the dip to slow browning.
5. Spicy Black Bean Dip
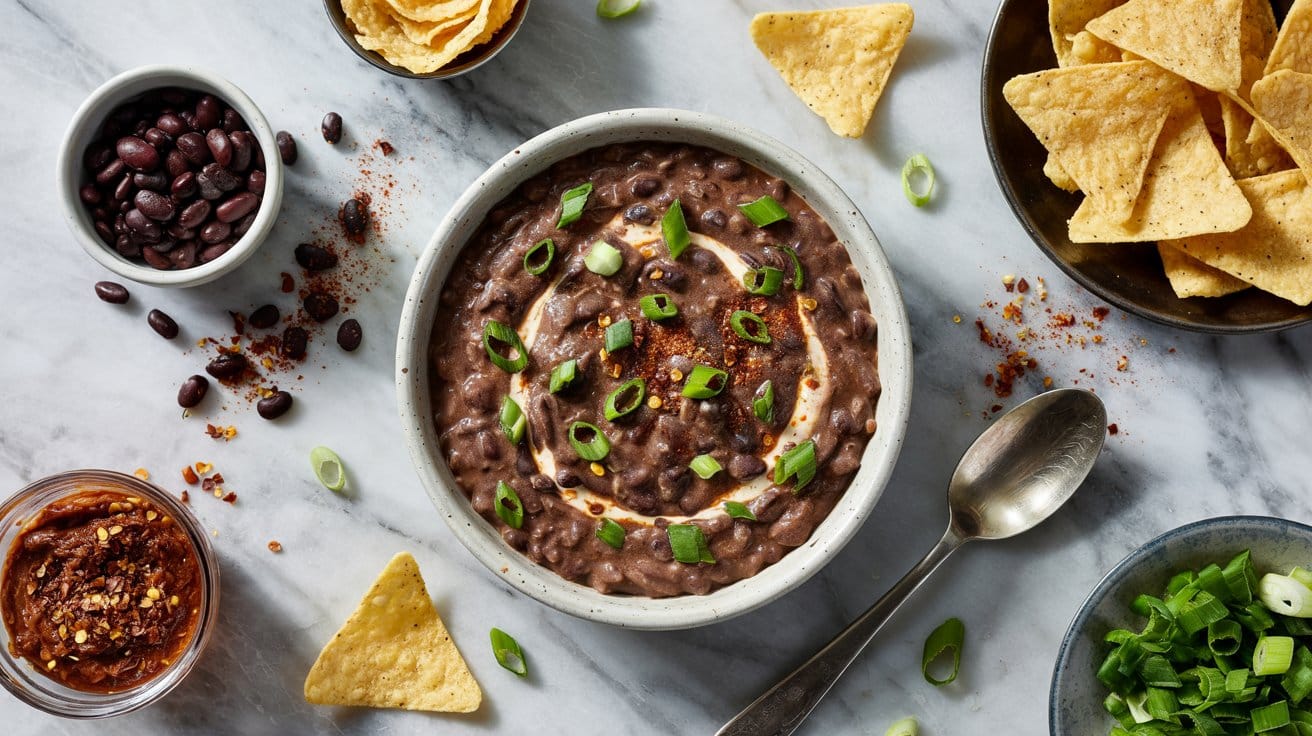
This spicy black bean dip combines smoky chipotle chili with the earthy flavor of black beans, creating a dip that brings a pleasant kick to any gathering. It's smooth and creamy with a bold spice that pairs well with tortilla chips, fresh veggies, or even as a spread on sandwiches.
The recipe comes together quickly in a blender or food processor, making it a practical choice for busy weeknights or unexpected guests. You'll appreciate how the simple ingredients turn into a versatile dip that adds a punch of flavor without requiring much time or fuss.
Why This Recipe Works
This dip provides a flavorful, smoky snack option that's both filling and easy to prepare. It suits everyday occasions and casual entertaining alike, offering a satisfying bite with a touch of heat.
- Convenience - Ready in minutes using pantry staples and minimal prep steps.
- Flavor balance - Combines smoky chipotle and warm cumin with earthy black beans for a rich depth.
- Texture - Silky smooth yet hearty enough to hold up well with chips or veggies.
- Versatility - Works as a dip, spread, or even a topping for tacos and grilled dishes.
Ingredient Swap Ideas
Swapping ingredients can help customize this dip to your dietary needs or what you have on hand, while keeping the core flavors intact.
- Chipotle chili in adobo - Use smoked paprika and a pinch of cayenne pepper if you prefer milder heat or don't have chipotle on hand.
- Black beans - Swap canned black beans with cooked black turtle beans or pinto beans for a different but equally creamy base.
- Olive oil - Replace with avocado oil or a mild vegetable oil if you want a more neutral flavor.
- Lime juice - Use fresh lemon juice for a slightly different citrus brightness that still goes with the spices.
Ingredients
- 1 can (15 ounces) black beans drained and rinsed
- 1 to 2 chipotle peppers in adobo sauce adjusted to taste for spiciness
- ½ teaspoon ground cumin adds warm, earthy notes
- 1 tablespoon fresh lime juice straightforward brightness
- ¼ cup olive oil smooths and enriches the dip
- 1 garlic clove peeled and roughly chopped for depth
- ½ teaspoon salt rounds out flavors
- ¼ teaspoon black pepper for subtle heat
- Optional: fresh cilantro or green onions chopped for garnish
Instructions
- Place the black beans, chipotle peppers, cumin, lime juice, olive oil, garlic, salt, and pepper into a blender or food processor.
- Blend until the mixture is smooth and creamy, stopping occasionally to scrape down the sides as needed.
- Taste and adjust seasoning, adding more salt, lime juice, or chipotle if you prefer extra tang or heat.
- Transfer the dip to a serving bowl and garnish with chopped cilantro or green onions if you like.
- Serve with tortilla chips, fresh vegetable sticks, or spread on sandwiches for a smoky, spicy boost.
6. Cashew Cream and Herb Dip
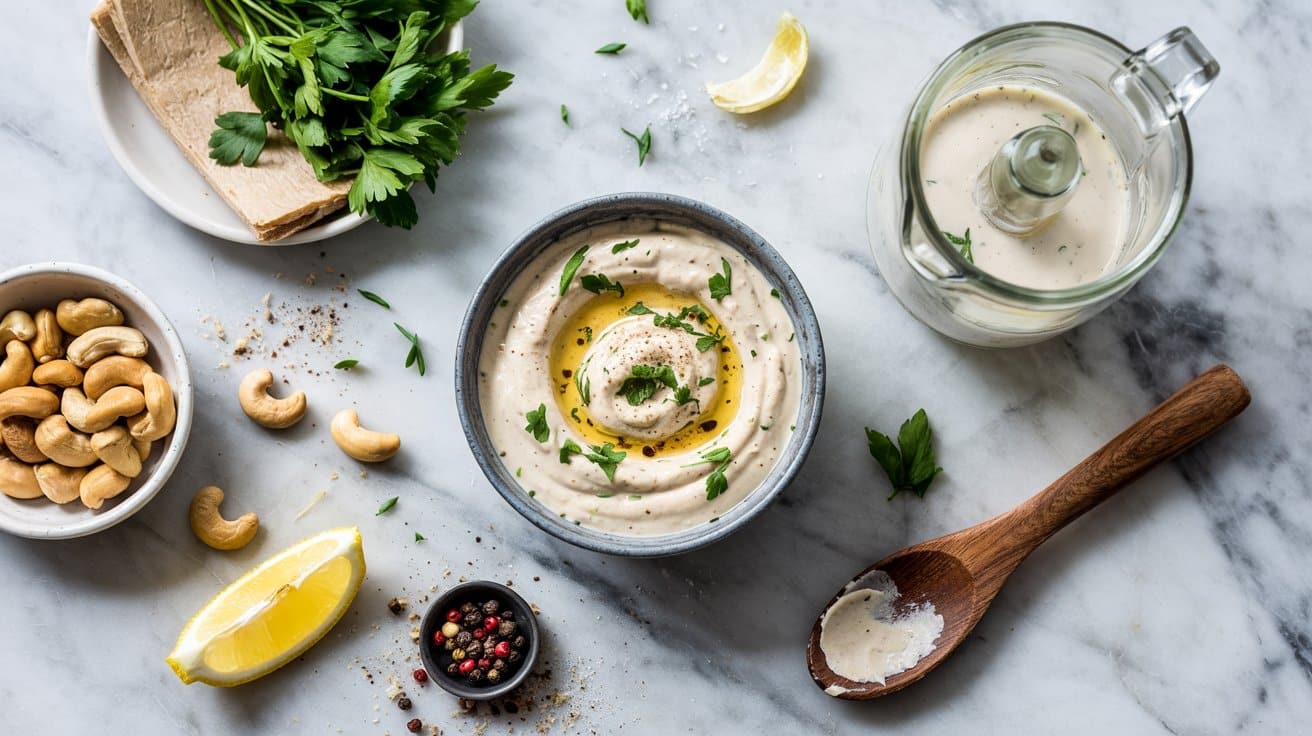
This cashew cream and herb dip offers a smooth, naturally creamy base with a fresh punch from garlic and herbs. It's a simple recipe that comes together quickly, perfect for a snack, appetizer, or even a flavorful spread.
Its rich texture and herby brightness make it versatile and satisfying, whether you're serving it with veggies, crackers, or using it as a sandwich spread. You'll appreciate how easily it fits into a plant-based, dairy-free lifestyle without sacrificing indulgence.
Why This Recipe Works
This dip blends convenience and fresh flavors, making it an ideal choice for many occasions.
- Convenience - Soaked cashews blend quickly into a creamy base without complex steps.
- Flavor balance - Garlic and herbs add fresh, savory notes that brighten the creamy texture.
- Texture - Smooth and rich, giving a satisfying mouthfeel that mimics dairy dips.
- Versatility - Works well as a dip, spread, or sauce, fitting many different snacks and meals.
Ingredient Swap Ideas
Swapping ingredients can help adapt this dip for different diets and flavor preferences without losing its essence.
- Cashews - Use blanched almonds or macadamia nuts soaked overnight for a slightly different nutty taste.
- Herbs - Replace parsley with cilantro or basil to suit your favorite herb profile.
- Garlic - Use roasted garlic instead of raw for a milder, sweeter flavor.
- Add-ons - Include a squeeze of lemon juice or a splash of apple cider vinegar to add brightness and tang.
Ingredients
- 1 cup raw cashews, soaked in water for at least 4 hours or overnight
- 2 cloves garlic, peeled
- ¼ cup fresh parsley leaves, packed
- ¼ cup fresh chives or green onions, chopped
- ½ teaspoon sea salt
- ¼ teaspoon black pepper
- ⅓ cup water, or more as needed for desired consistency
- 1 tablespoon olive oil (optional, for richness)
Instructions
- Drain and rinse the soaked cashews thoroughly. Place them in a blender or food processor.
- Add garlic, parsley, chives, salt, and pepper to the blender. Pour in half the water and blend until smooth and creamy, stopping to scrape down the sides as needed.
- Add more water gradually if the mixture is too thick, blending to reach a creamy dip consistency.
- Stir in olive oil if using, then taste and adjust seasoning with extra salt or herbs if desired.
- Transfer the dip to a bowl and chill in the refrigerator for at least 30 minutes before serving to let the flavors meld.
This dip stays fresh in the fridge for up to 4 days and is a reliable choice whenever you need a flavorful, dairy-free option.
7. Roasted Garlic and Cauliflower Dip
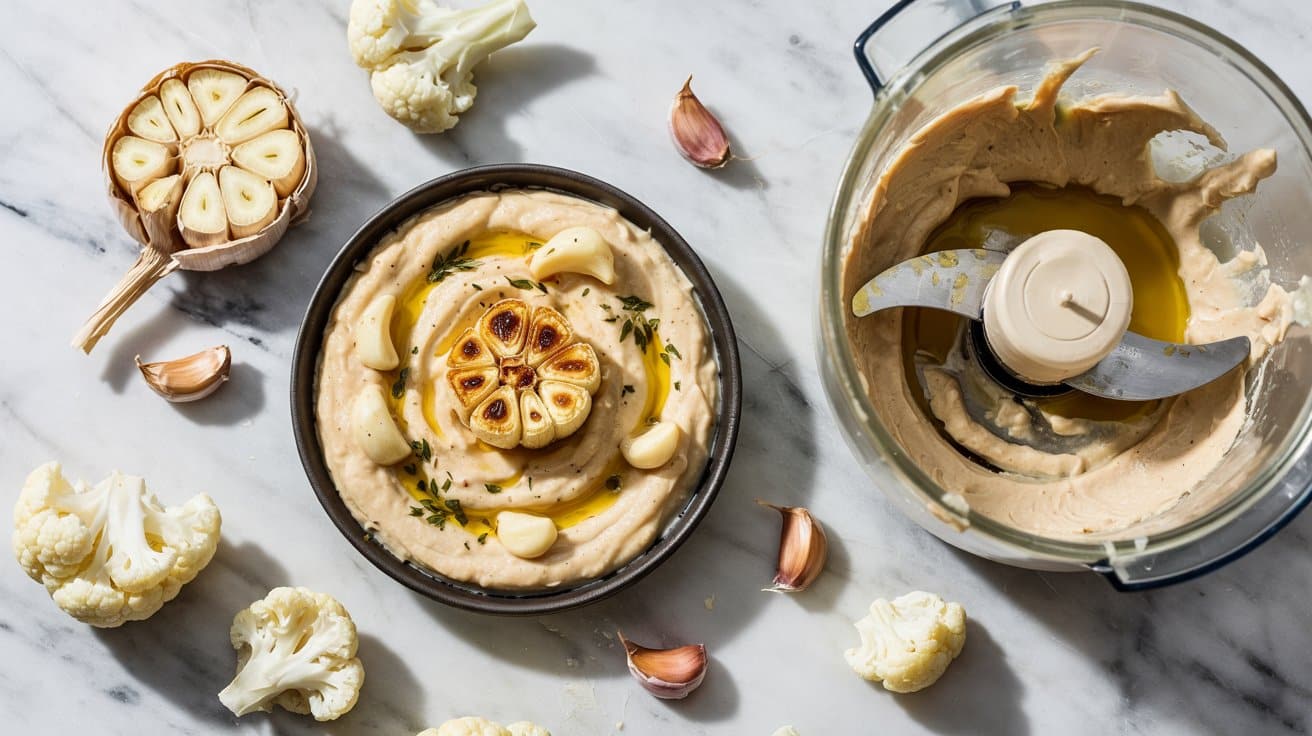
This roasted garlic and cauliflower dip brings together gentle sweetness and a rich, creamy texture that stands out without feeling heavy. The slow roasting softens the cauliflower and garlic, mellowing their flavors and adding subtle caramelized notes.
It's a wholesome, low-calorie option that fits well for snacks, appetizers, or party spreads.
Making this dip is straightforward and doesn't require fancy ingredients or complicated steps. You'll appreciate how simple roasting and blending transform humble vegetables into a tasty, satisfying dip that goes well with fresh veggies or crackers.
Why This Recipe Works
This recipe combines nourishing ingredients and approachable steps to create a flavorful, versatile dip that suits everyday occasions or casual get-togethers.
- Convenience - Easy roasting and blending steps minimize preparation time and fuss.
- Flavor balance - The roasted garlic adds a deep savoriness that goes with the mild cauliflower.
- Texture - Smooth and creamy, perfect for dipping or spreading.
- Health benefits - Low in calories and packed with nutrients, suitable for health-conscious eaters.
Ingredient Swap Ideas
Swapping ingredients can help tailor this dip to dietary preferences or pantry availability without losing its essential character.
- Roasted cauliflower - Substitute with roasted broccoli for a similar taste and texture with a slightly different nutrient profile.
- Garlic - Use garlic powder in smaller amounts if fresh garlic is unavailable, though it won't have the same roasted depth.
- Greek yogurt - For a dairy-free option, replace with a creamy plant-based yogurt or blended silken tofu to maintain creaminess.
- Lemon zest - Swap lemon zest with a splash of apple cider vinegar or a few drops of fresh lime juice for a different tang.
Ingredients
- 1 medium head cauliflower - broken into florets for roasting.
- 1 whole bulb garlic - separated into cloves, peeled but left whole.
- 2 tablespoons extra-virgin olive oil - for roasting and flavor.
- ¼ cup plain Greek yogurt - adds creaminess and tang (substitute as noted above if needed).
- 1 teaspoon lemon zest - for bright citrus flavor.
- 1 tablespoon fresh lemon juice - enhances freshness and acidity.
- ½ teaspoon salt - adjust to taste.
- ¼ teaspoon black pepper - freshly ground for mild heat.
Instructions
- Preheat your oven to 400°F (200°C). Arrange the cauliflower florets and whole garlic cloves on a baking sheet. Drizzle with olive oil and toss to coat evenly.
- Roast the vegetables in the oven for about 25-30 minutes, stirring halfway through, until the cauliflower is golden and tender and the garlic is soft. Remove from the oven and let cool slightly.
- Squeeze the softened garlic cloves out of their skins into a food processor or blender. Add the roasted cauliflower, Greek yogurt, lemon zest, lemon juice, salt, and pepper.
- Blend until the mixture is smooth and creamy, scraping down the sides as needed. Taste and adjust seasoning with more salt, pepper, or lemon juice if preferred.
- Transfer the dip to a serving bowl and chill for at least 30 minutes before serving to allow the flavors to meld. Serve with fresh vegetable slices, pita chips, or crackers.
8. Smashed White Bean and Basil Dip
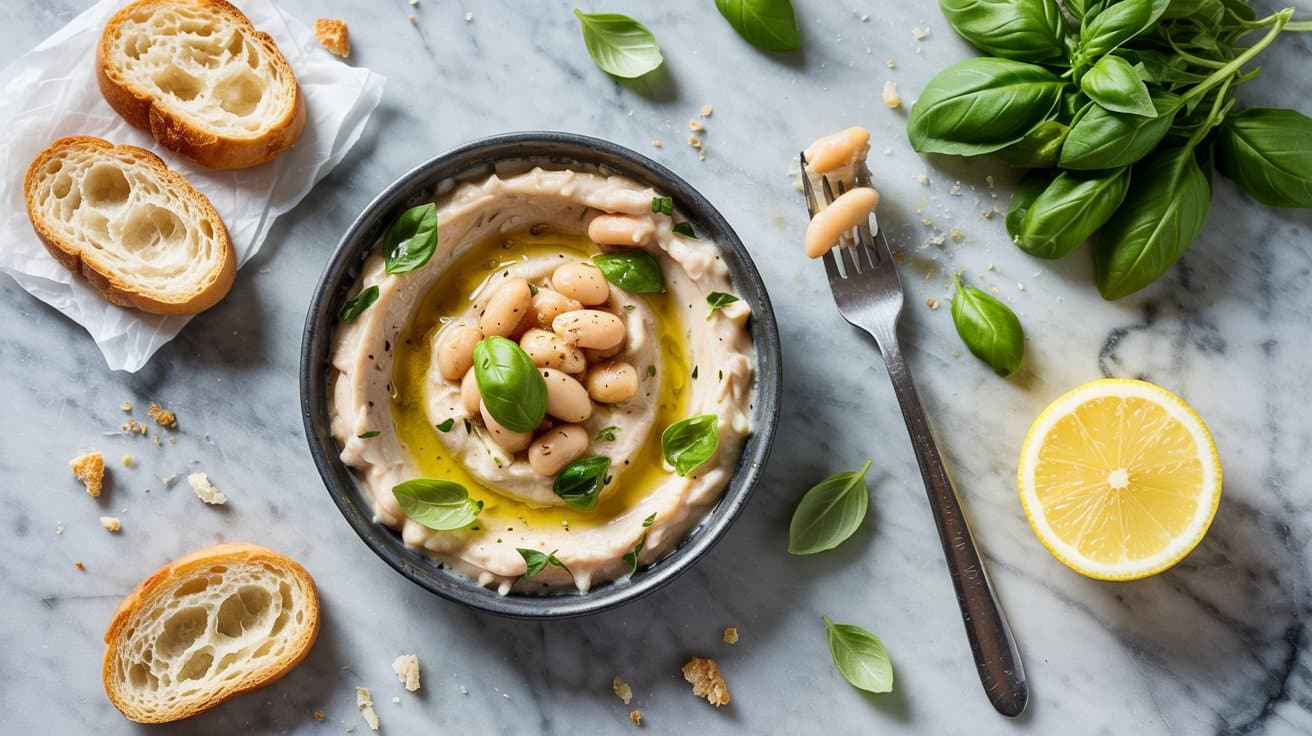
This smashed white bean and basil dip is a wonderfully simple spread that combines creamy white beans with the bright freshness of basil. The lemon juice adds a gentle tang, while olive oil rounds out the flavor with a silky texture.
You can whip this up quickly using pantry staples, making it a great option for a healthy snack or a light appetizer. It pairs nicely with fresh veggies, crusty bread, or crackers, adding a satisfying and nutritious touch to any occasion.
Why This Recipe Works
This recipe stands out for its straightforward preparation, satisfying taste, and flexibility in serving. It delivers fresh and balanced flavors with minimal fuss.
- Convenience - Requires just a few ingredients and comes together in minutes without complicated steps.
- Flavor balance - Combines creamy beans with bright lemon and aromatic basil for a refreshing yet rich dip.
- Texture - Offers a smooth, slightly chunky consistency that spreads easily and adds interest.
- Appeal - Suitable for many diets, making it an inviting option for gatherings or everyday snacking.
Ingredient Swap Ideas
Adjusting ingredients can tailor the dip to your dietary needs or preferred flavors without losing its essence. Here are some helpful substitutions:
- White Beans - Use cannellini or chickpeas if you want a slightly different nutty flavor and texture.
- Basil - Substitute fresh parsley or cilantro for a new herbal note depending on your taste.
- Lemon Juice - Try lime juice for a slightly different citrus twist.
- Olive Oil - Use avocado oil for a milder taste and similar health benefits.
Ingredients
- 1 can (15 ounces) white beans - drained and rinsed, such as cannellini or great northern beans.
- ¼ cup fresh basil leaves - loosely packed, chopped for freshness.
- 2 tablespoons extra-virgin olive oil - adds richness and smooth texture.
- 1 tablespoon freshly squeezed lemon juice - brightens the dip with acidity.
- 1 small garlic clove - minced for subtle savory depth.
- ¼ teaspoon salt - enhances overall flavor.
- Freshly ground black pepper to taste - adds a slight kick.
Instructions
- Place the drained white beans in a medium bowl. Use a fork or a potato masher to smash them roughly, leaving some larger pieces for texture.
- Add the chopped basil, minced garlic, olive oil, and lemon juice to the beans. Stir to combine evenly.
- Season with salt and freshly ground black pepper, adjusting according to your preference.
- Taste and add a little more lemon juice or olive oil if needed for brightness or creaminess.
- Transfer the dip to a serving bowl and enjoy with sliced veggies, pita bread, or crackers.
This white bean dip keeps well in the refrigerator for up to 3 days, making it easy to prepare in advance for quick snacks or gatherings.
9. Muhammara (Roasted Red Pepper and Walnut Dip)
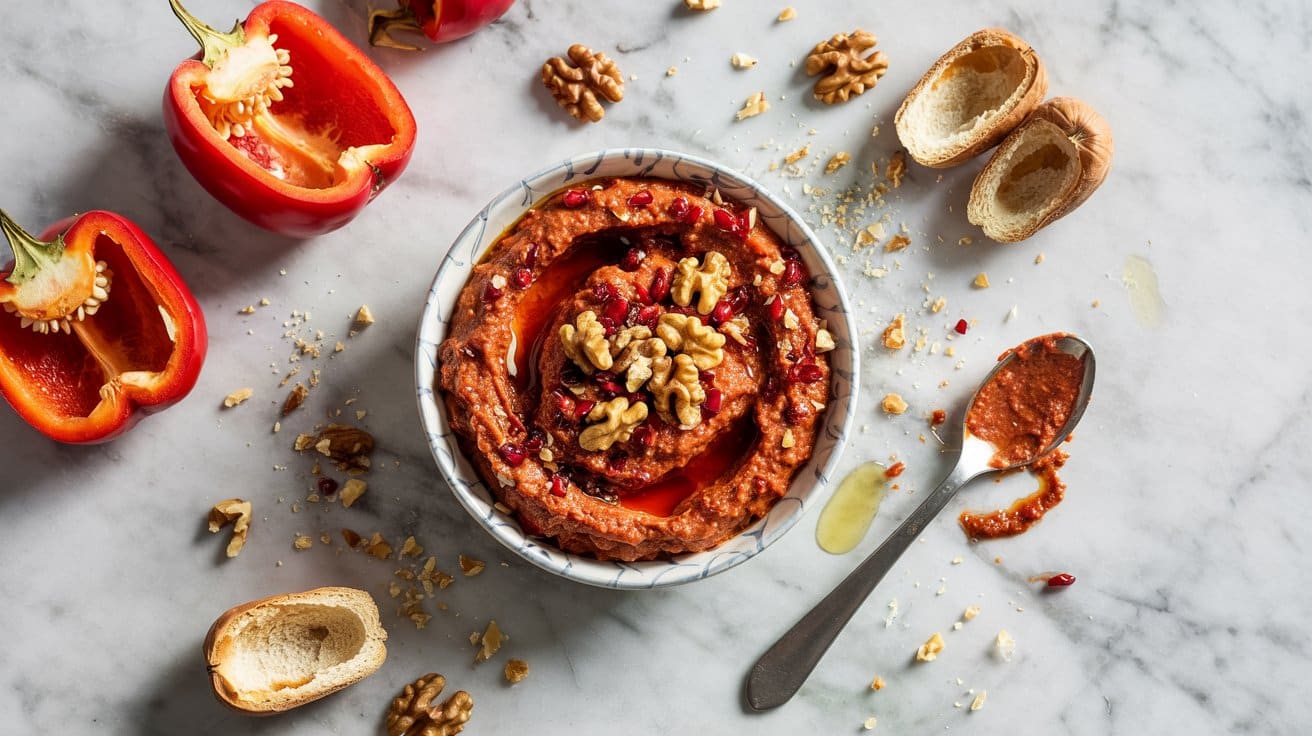
Muhammara is a Middle Eastern dip known for its rich flavor and smooth, slightly chunky texture. Made with roasted red peppers, walnuts, and a hint of pomegranate molasses, it offers a thoughtful balance of sweetness, acidity, and earthy nuttiness.
This recipe is straightforward and comes together quickly, making it a good addition to snacks, appetizers, or even as a spread for sandwiches.
You'll appreciate how the smoky roasted peppers mix with the crunchy walnuts and the subtle warmth from spices, creating a dip that's both bright and comforting. It's also versatile, pairing well with fresh vegetables, warm pita bread, or as a side with grilled meats.
Why This Recipe Works
This Muhammara recipe combines convenience with bold, balanced flavors to create a uniquely satisfying dip.
- Simple Preparation - The recipe uses roasted red peppers that can be store-bought or easily roasted at home, streamlining your prep time.
- Balanced flavor - Sweetness from pomegranate molasses goes with the earthiness of walnuts and smoky peppers nicely.
- Appealing Texture - Ground walnuts provide a pleasant crunch that contrasts with the smooth pepper puree.
- Versatile Use - It works well as a dip, spread, or condiment, making it great for casual gatherings or everyday meals.
Ingredient Swap Ideas
Adjusting ingredients can help customize this dip for dietary preferences or ingredient availability while keeping its core character intact.
- Walnuts - Substitute with pecans or almonds for a slightly different nutty flavor and texture.
- Pomegranate Molasses - Use balsamic vinegar mixed with a small amount of honey as a sweet and tangy alternative.
- Roasted Red Peppers - Fresh roasted bell peppers can replace jarred versions if you prefer a fresher taste.
- Spices - Add smoked paprika or chili flakes for extra smoky heat if you want more spice.
Ingredients
- 2 cups roasted red bell peppers drained if jarred, roughly chopped
- 1 cup walnuts toasted
- 3 tablespoons pomegranate molasses for sweetness and depth
- 1 garlic clove minced
- 1 tablespoon fresh lemon juice for brightness
- ½ teaspoon ground cumin adds warm earthiness
- ½ teaspoon smoked paprika optional for smokiness
- ½ teaspoon salt adjust to taste
- 2 tablespoons olive oil for richness
- 1 tablespoon breadcrumbs optional, for thickening and texture
Instructions
- Toast the walnuts in a dry skillet over medium heat for about 3-4 minutes until fragrant, stirring frequently. Remove from heat and let cool slightly.
- Combine walnuts, roasted red peppers, garlic, lemon juice, pomegranate molasses, cumin, smoked paprika (if using), salt, and breadcrumbs in a food processor. Pulse until you get a coarse, slightly chunky paste.
- Slowly drizzle in the olive oil while the processor runs, blending until the mixture comes together but still has some texture.
- Taste and adjust seasoning by adding more salt, lemon, or pomegranate molasses if needed.
- Transfer to a serving bowl and refrigerate for at least 30 minutes for flavors to meld. Serve chilled or at room temperature with pita bread, fresh vegetables, or as a spread.
10. Cucumber and Mint Raita
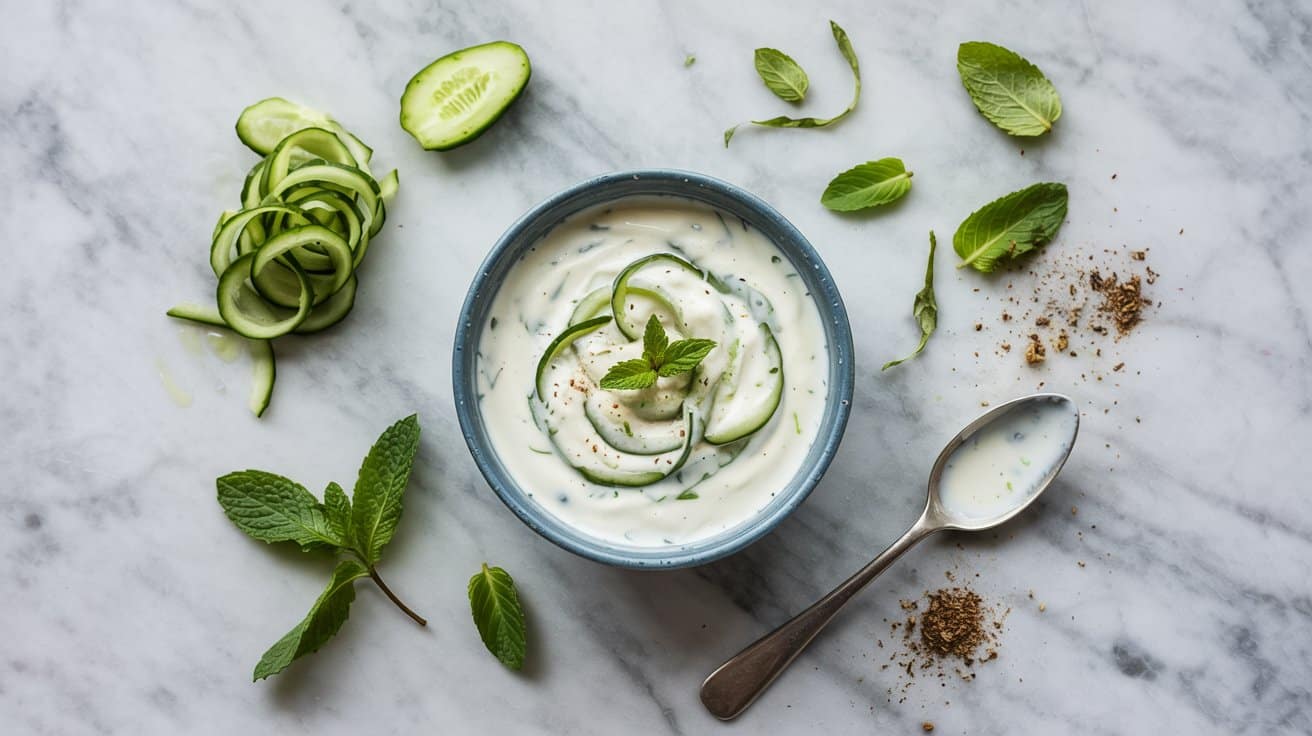
Cucumber and mint raita is a simple, refreshing yogurt-based dip that's a staple in Indian cuisine. It combines grated cucumber and fresh mint with creamy yogurt to create a cooling side dish that perfectly balances spicy meals.
The raita's cool texture and mildly tangy flavor make it an ideal companion for curries, biryanis, or grilled dishes. It comes together quickly with minimal ingredients and requires no cooking, making it a practical addition to weeknight dinners or weekend gatherings.
Why This Recipe Works
This cucumber and mint raita offers an easy way to add a fresh, cooling element to any meal. It's light, flavorful, and can be whipped up in just minutes.
- Convenience - Requires no cooking and comes together in under 10 minutes.
- Flavor balance - Combines creamy yogurt with refreshing cucumber and bright mint for a gentle tang.
- Texture - The grated cucumber adds a crisp contrast to the smooth yogurt base.
- Appeal - Suitable for family meals and complements a variety of spicy dishes.
Ingredient Swap Ideas
Adjusting this raita can help accommodate different dietary preferences or ingredient availability without losing its essence.
- Yogurt - Use Greek yogurt for a thicker texture or dairy-free yogurt alternatives to keep it vegan.
- Cucumber - Substitute sliced or finely chopped cucumber if grating isn't an option. Seedless cucumber works best to avoid excess moisture.
- Mint - Swap fresh mint with cilantro for a slightly different herbal note.
- Spices - Add a pinch of ground cumin or chaat masala for extra flavor complexity.
Ingredients
- 1 cup plain yogurt - Use full-fat or low-fat, well stirred.
- 1 medium cucumber - Grated with excess water squeezed out.
- 2 tablespoons fresh mint leaves - Finely chopped for freshness.
- ½ teaspoon roasted cumin powder - Adds mild earthiness.
- ¼ teaspoon salt - Adjust to taste.
- ¼ teaspoon black pepper - Freshly ground for subtle heat.
- Optional - A pinch of sugar to balance tanginess.
Instructions
- Grate the cucumber and transfer it to a clean cloth or paper towel. Squeeze gently to remove excess water.
- In a medium bowl, whisk the yogurt until smooth and creamy.
- Add the grated cucumber, chopped mint, roasted cumin powder, salt, and black pepper to the yogurt. Mix well to combine.
- Taste and adjust salt or pepper as needed. If desired, stir in a pinch of sugar to balance the flavors.
- Chill the raita in the refrigerator for at least 15 minutes before serving to let the flavors meld.
Serve chilled alongside spicy Indian dishes or use as a cooling dip for snacks.
11. Carrot and Ginger Dip
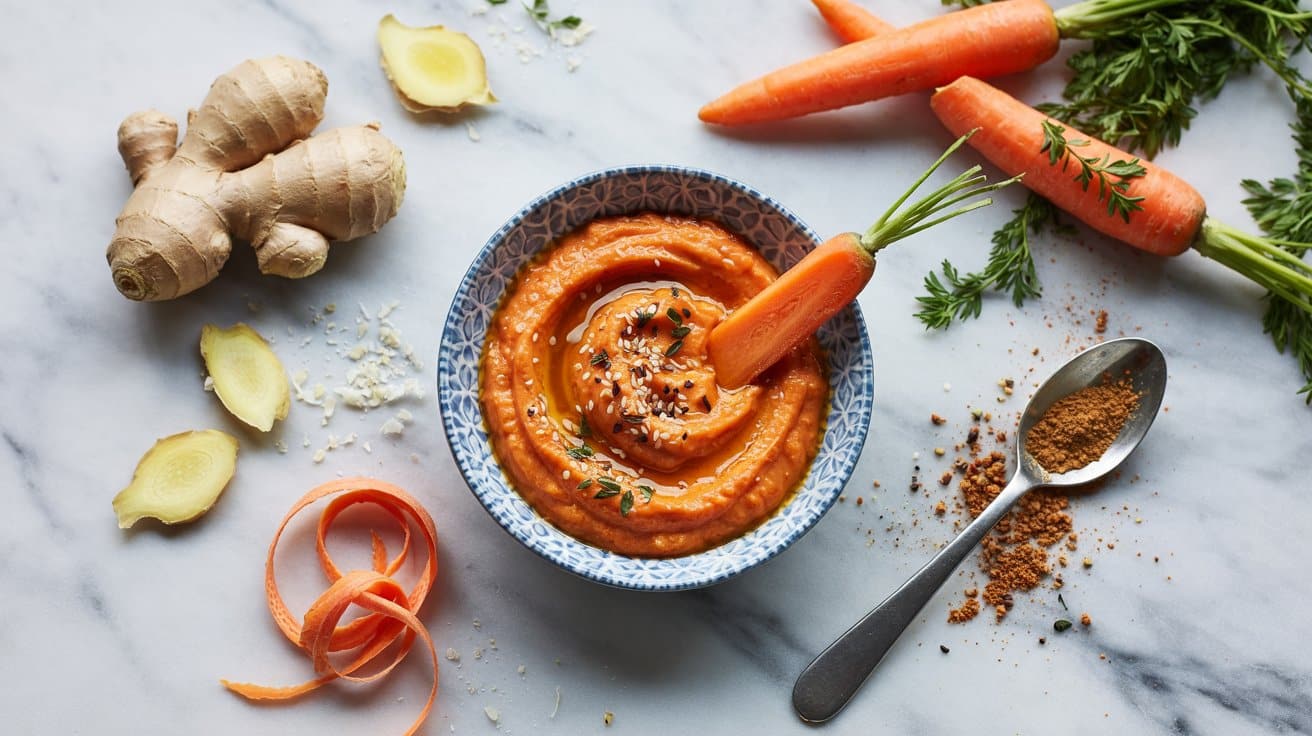
This carrot and ginger dip is a fresh, bright addition to your appetizer lineup. Roasted carrots bring a natural sweetness that goes well with the spicy warmth of fresh ginger, creating a smooth, flavorful spread that feels both healthy and satisfying.
The dip comes together quickly and easily, making it a great choice for busy evenings or casual gatherings. It works perfectly as a snack with crackers or fresh vegetables, or as a unique side at your next get-together.
Why This Recipe Works
This recipe combines ease and taste, offering a nutritious dip with a satisfying flavor. Carrot and ginger dip stands out for its simple preparation and impressive balance of sweet and spicy notes.
- Convenience - Roasting carrots softens them for quick blending without complex prep steps.
- Flavor balance - Sweet roasted carrots blend with the zesty bite of fresh ginger for a bright yet comforting taste.
- Texture - Smooth and creamy with a slight natural sweetness, ideal for dipping or spreading.
- Versatility - Works well as a dip, spread, or a topping to add flavor to many dishes.
Ingredient Swap Ideas
Swapping ingredients can help adapt this dip to suit different preferences or dietary needs while preserving its essence.
- Replace fresh ginger with ground ginger if fresh isn't available; use about half a teaspoon for a milder ginger flavor.
- Use sweet potatoes instead of carrots for a richer, thicker dip with a similar sweetness.
- Swap olive oil for avocado oil for a different but still smooth and healthy fat option.
- Add a splash of orange juice instead of lemon juice for a sweeter citrus kick.
Ingredients
- 4 large carrots - peeled and cut into chunks for roasting.
- 1 tablespoon fresh ginger - peeled and chopped finely.
- 2 tablespoons olive oil - for roasting and blending.
- 1 tablespoon lemon juice - to brighten the flavor.
- ½ teaspoon salt - or to taste.
- ¼ teaspoon black pepper - freshly ground for mild heat.
- 2 tablespoons water or more - to adjust the consistency as needed.
Instructions
- Preheat your oven to 400°F (200°C). Toss the carrot chunks with 1 tablespoon of olive oil and a pinch of salt. Spread them on a baking sheet in a single layer and roast for 25 to 30 minutes, until tender and lightly caramelized.
- Once the carrots are cool enough to handle, transfer them to a blender or food processor. Add the chopped fresh ginger, lemon juice, remaining olive oil, salt, and pepper.
- Blend the mixture until smooth, adding water a tablespoon at a time to reach your desired consistency. Taste and adjust seasoning if needed.
- Transfer the dip to a bowl and let it chill in the refrigerator for at least 30 minutes if you prefer it cold. Serve with fresh vegetables, crackers, or use it as a spread on bread or sandwiches.
12. Beet and Walnut Dip
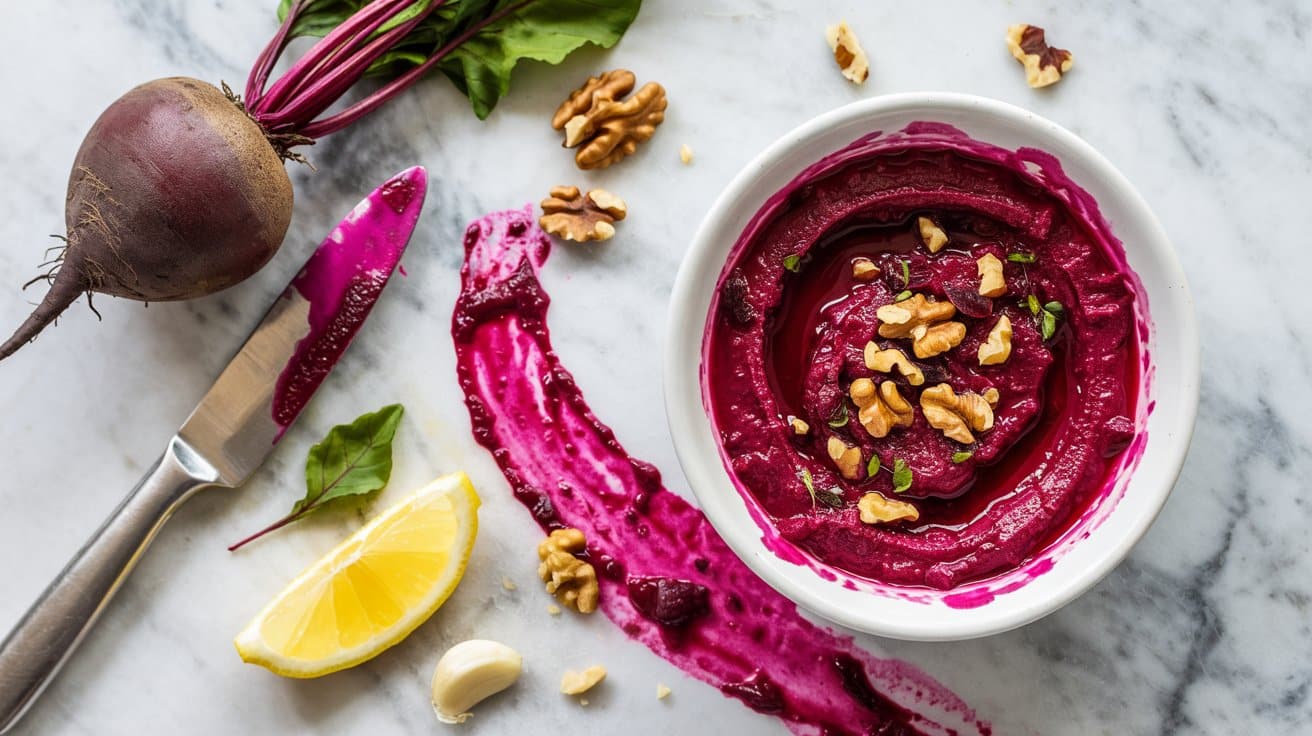
This Beet and Walnut Dip brings together earthy roasted beets and crunchy walnuts for a bright, nutrient-rich spread that's as flavorful as it is colorful. It's easy to prepare, making it a great option for quick snacks or as part of an appetizer platter when you want something wholesome and interesting on the table.
The smooth texture combined with a subtle garlicky kick makes it appealing to all kinds of palates. This dip pairs well with fresh vegetables, crackers, or warm pita bread, adding both visual appeal and nutrition to any gathering or everyday meal.
Why This Recipe Works
This dip offers a simple way to enjoy beets with a rich, satisfying texture and a balanced flavor.
- Convenience - Roasting the beets ahead of time simplifies the preparation, and the dip blends up quickly.
- Flavor balance - Earthy beets combine with the mild bitterness of walnuts and a touch of garlic for a well-rounded taste.
- Texture - Creamy puree contrasts nicely with the slight grit from chopped nuts for added mouthfeel.
- Versatility - Works well as a dip, spread, or even a sandwich topping, making it adaptable for various occasions.
Ingredient Swap Ideas
Swapping ingredients helps you tailor the dip to fit your dietary preferences or ingredient availability without losing its essence.
- Walnuts - Substitute with pecans or almonds for a different nutty flavor and texture.
- Beets - Use pre-cooked or canned beets if fresh ones aren't available, adjusting seasoning as needed.
- Garlic - Replace fresh garlic with roasted garlic for a milder, sweeter taste.
- Olive oil - Use avocado oil or a mild vegetable oil to change the oil base without overpowering the other flavors.
Ingredients
- 3 medium beets - scrubbed, trimmed, and roasted until tender.
- ½ cup toasted walnuts - roughly chopped for texture.
- 1 small garlic clove - minced for a gentle pungency.
- 2 tablespoons extra-virgin olive oil - to add smoothness and richness.
- 1 tablespoon fresh lemon juice - for brightness and balance.
- ½ teaspoon salt - to enhance flavors.
- ¼ teaspoon black pepper - freshly ground for subtle heat.
Instructions
- Preheat your oven to 400°F (200°C). Wrap each beet in foil and roast for 45 to 60 minutes until they are tender when pierced with a fork. Let them cool completely.
- Peel the cooled beets by rubbing off the skins with your hands or a paper towel, and cut them into chunks.
- In a food processor, combine the roasted beet chunks, toasted walnuts, minced garlic, olive oil, lemon juice, salt, and pepper. Pulse until the mixture is smooth but still has some texture.
- Taste and adjust seasoning, adding more salt, lemon juice, or olive oil if needed to reach your preferred balance.
- Transfer the dip to a serving bowl and chill for at least 30 minutes before serving to let the flavors meld. Serve with fresh veggie sticks, crackers, or warm pita slices.
13. Edamame and Mint Dip
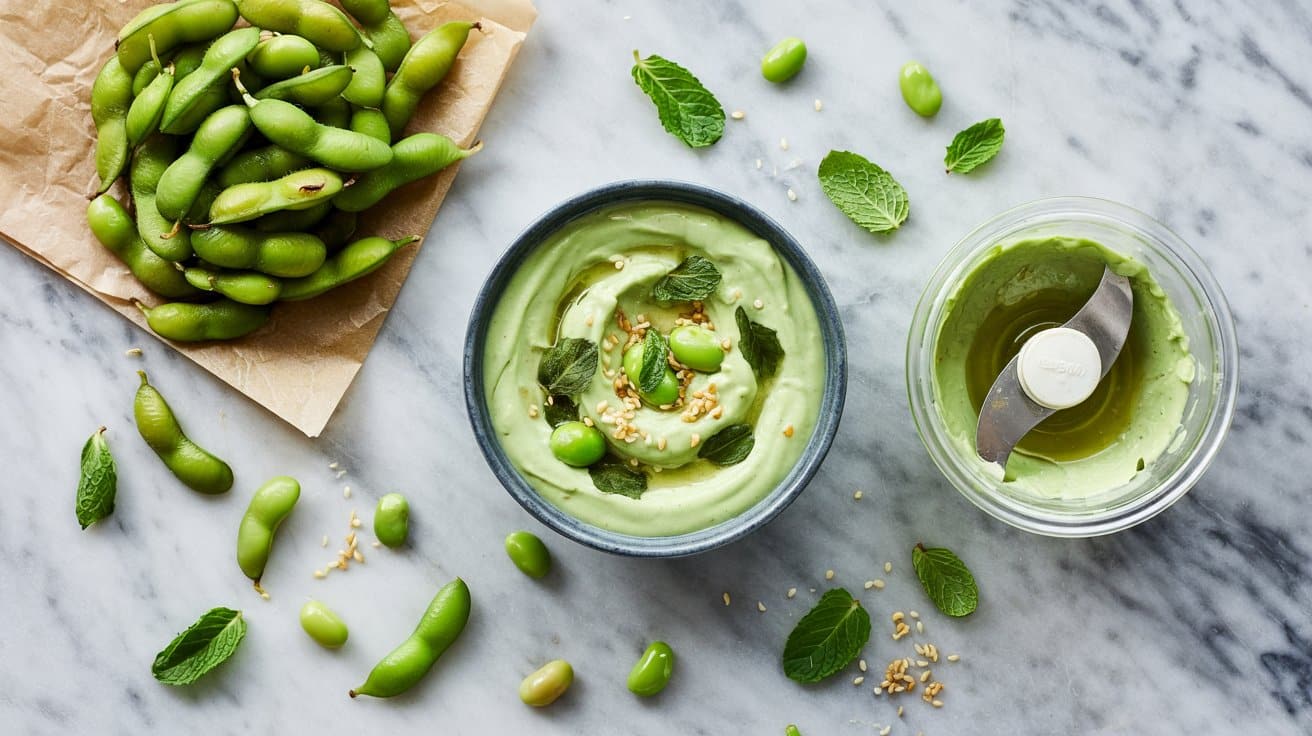
This bright edamame and mint dip brings fresh, bright flavors to the table with very little fuss. The creamy texture from the edamame goes well with the cool, herbal notes of mint, while a splash of lemon juice adds a sharp, refreshing zing.
It's quick to prepare, making it an ideal snack or appetizer for busy days. Plus, it offers a satisfying protein boost without relying on heavy ingredients, which fits nicely into a wholesome, balanced diet.
Why This Recipe Works
This dip combines ease and flavor, making it a handy addition to your repertoire.
- Convenience - Takes just minutes to blend with minimal prep and cleanup.
- Flavor balance - Combines fresh mint, tangy lemon, and mild edamame for a lively but approachable taste.
- Texture - Smooth and creamy with a slight bite from the edamame for interest.
- Appeal - Works well as a snack, party dip, or topping for veggies and crackers.
Ingredient Swap Ideas
Adjusting ingredients here lets you tailor this dip to suit dietary needs or flavor preferences without losing its essence.
- Swap fresh mint with basil or cilantro for a different herbal note.
- Use frozen shelled peas instead of edamame for a sweeter, milder alternative.
- Replace lemon juice with lime juice to add a sharper citrus twist.
- Add a handful of toasted pumpkin seeds or sunflower seeds for extra texture and nutrition.
Ingredients
- 1 ½ cups shelled edamame - cooked and cooled, ready for blending.
- ¼ cup fresh mint leaves - roughly chopped to release their flavor.
- 2 tablespoons lemon juice - freshly squeezed to brighten the dip.
- 2 tablespoons extra-virgin olive oil - for creaminess and richness.
- 1 garlic clove - minced to add subtle pungency.
- ½ teaspoon salt - to enhance all the flavors.
- ¼ teaspoon black pepper - freshly ground for mild heat.
- 2 to 3 tablespoons water - to adjust the dip's consistency as needed.
Instructions
- Combine the cooked edamame, mint leaves, lemon juice, olive oil, and minced garlic in a food processor or blender. Pulse until the mixture starts to come together.
- Season with salt and black pepper, then continue blending until smooth. Scrape down the sides as needed.
- Add water one tablespoon at a time to reach your preferred consistency-it should be creamy but scoopable.
- Taste and adjust seasoning, adding more lemon juice or salt if you like.
- Transfer the dip to a bowl and serve with fresh vegetables, pita chips, or crackers. Alternatively, refrigerate for 30 minutes to let the flavors meld before serving.
14. Pumpkin and Sage Dip

This pumpkin and sage dip brings a simple, seasonal twist to your usual appetizer selection. It combines the smooth texture of pureed pumpkin with the warm, earthy aroma of sage.
The result is a creamy, flavorful dip that works great for fall gatherings or anytime you want something a bit different to serve with crackers or veggies.
The easy preparation makes it a good choice when you want a snack that's both wholesome and gluten-free. The blend of spices adds depth without overwhelming the natural sweetness of the pumpkin, creating a balanced and inviting dish.
Why This Recipe Works
This dip is practical to prepare, enjoyable across various occasions, and offers a comforting flavor. It pairs well with many dippers and fits gluten-free diets naturally.
- Convenience - Requires minimal ingredients and comes together quickly.
- Flavor balance - Combines sweet pumpkin with savory sage and warming spices.
- Texture - Creamy and smooth, perfect for spreading or dipping.
- Diet-friendly - Naturally gluten-free, suitable for many dietary needs.
Ingredient Swap Ideas
Swapping ingredients helps adjust the dip to fit different tastes or dietary restrictions without losing its character. Simple substitutions can also add variety or enhance nutrition.
- Pumpkin puree - Use butternut squash puree for a similar texture with a slightly different flavor.
- Sage - Substitute with fresh thyme or rosemary for a different herbal note.
- Creamy base - Replace Greek yogurt with dairy-free yogurt or mayonnaise for a dairy-free option.
- Spices - Experiment by adding a pinch of cinnamon or nutmeg to highlight warm flavors.
Ingredients
- 1 cup canned pumpkin puree - Use plain pumpkin puree, not pumpkin pie filling.
- ½ cup Greek yogurt - Adds creaminess and a slight tang.
- 1 tablespoon fresh sage, finely chopped - Brings an earthy herbal flavor.
- 1 small garlic clove, minced - Adds a gentle savory bite.
- ½ teaspoon ground cumin - Gives warmth and depth.
- ¼ teaspoon smoked paprika - Provides subtle smokiness.
- 1 tablespoon olive oil - To smooth the dip and carry flavor.
- Salt and black pepper to taste - Balances and enhances all other flavors.
Instructions
- In a medium bowl, combine the pumpkin puree and Greek yogurt, stirring until smooth.
- Add the finely chopped fresh sage, minced garlic, ground cumin, and smoked paprika to the bowl. Mix thoroughly to distribute the flavors evenly.
- Drizzle in the olive oil and stir gently until the dip reaches a creamy consistency.
- Season with salt and black pepper to your preference, stirring once more to combine.
- Cover and chill the dip for at least 30 minutes before serving to allow the flavors to meld.
Serve this pumpkin and sage dip with fresh vegetable sticks, gluten-free crackers, or warm pita bread. It's a simple way to bring seasonal warmth and satisfying flavor to your snack table.
15. Tomato Basil Bruschetta Dip
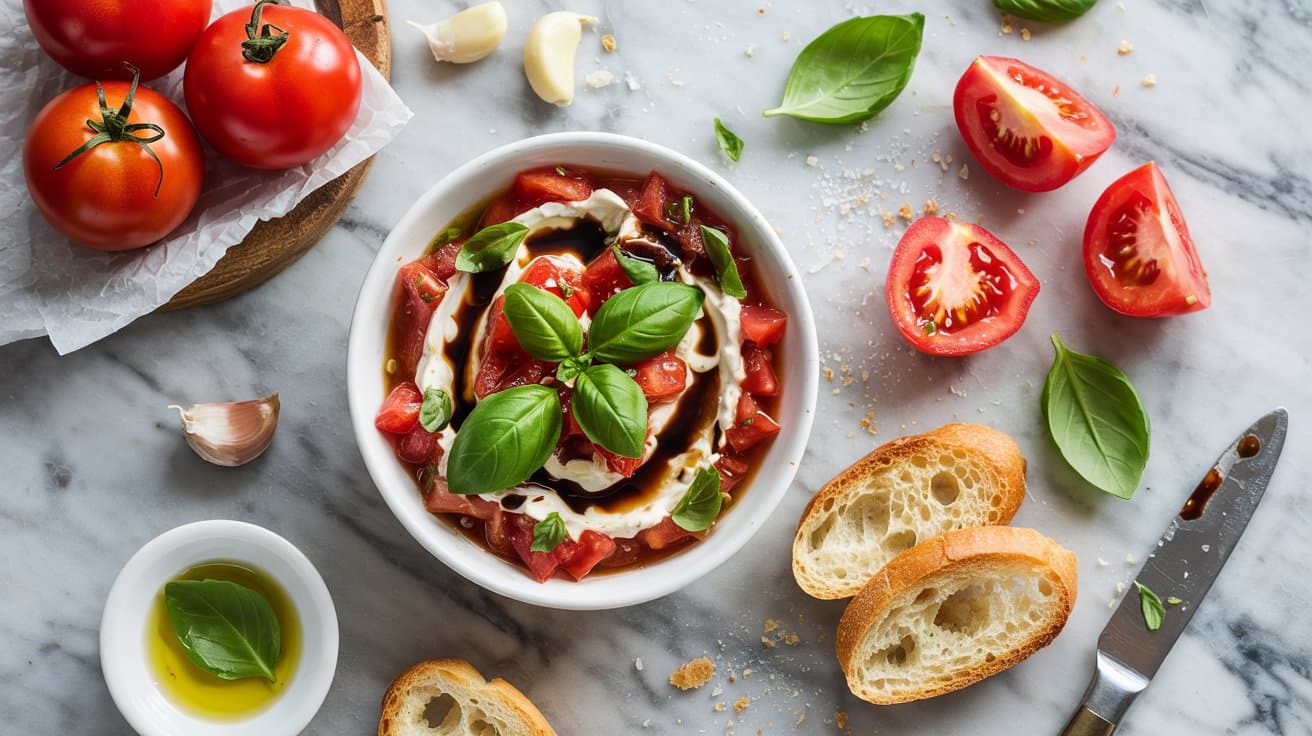
This Tomato Basil Bruschetta Dip brings together fresh, bright flavors in a simple, chunky spread that's ideal for snacking or entertaining. The combination of ripe tomatoes, fragrant basil, and garlic creates a bright and refreshing taste that goes well with crunchy bread or crisp vegetables.
You can prepare this dip quickly and customize it with different textures and toppings. It's a versatile option that adds a wholesome touch to gatherings or casual bites at home.
Why This Recipe Works
This recipe delivers fresh, approachable flavors with minimal prep time, making it a reliable choice for busy days or social occasions. The balance of juicy tomatoes and herbal brightness makes every bite satisfying and light.
- Convenience - Comes together quickly with fresh ingredients and requires no cooking.
- Flavor balance - Combines acidity, sweetness, and herbal notes for a lively taste.
- Texture - Features a chunky yet smooth consistency, perfect for dipping.
- Appeal - Suitable for all ages and easy to serve alongside various snacks or meals.
Ingredient Swap Ideas
Adjusting ingredients can help meet dietary needs or suit different flavor preferences without losing the dip's essence. Simple swaps can keep this recipe accessible and enjoyable for everyone.
- Fresh tomatoes - Substitute cherry or grape tomatoes for a slightly sweeter, bite-sized option.
- Basil - Use fresh parsley or cilantro if basil isn't available or preferred.
- Olive oil - Replace with avocado oil for a milder flavor and similar healthy fats.
- Parmesan cheese - Omit or use a dairy-free cheese alternative to keep it vegan-friendly.
Ingredients
- 4 medium ripe tomatoes - chopped into small chunks
- ½ cup fresh basil leaves - finely chopped
- 2 cloves garlic - minced
- ¼ cup extra-virgin olive oil - plus more for drizzling
- ¼ cup grated Parmesan cheese - optional, for added richness
- 1 tablespoon balsamic vinegar - for a touch of acidity
- ½ teaspoon salt - adjust to taste
- ¼ teaspoon freshly ground black pepper - for seasoning
- 1 baguette or crusty bread - sliced and toasted, for serving
Instructions
- Combine the chopped tomatoes, basil, and minced garlic in a medium bowl. Stir gently to blend the flavors without breaking down the tomatoes too much.
- Add the olive oil, balsamic vinegar, salt, and pepper. Mix everything well to ensure the seasonings are evenly distributed.
- If using, fold in the grated Parmesan cheese for a subtle savory note that goes with the fresh vegetables.
- Let the dip rest at room temperature for 10 to 15 minutes to allow the flavors to meld together.
- Serve the dip with toasted baguette slices or fresh vegetables, drizzling a little extra olive oil on top if desired.
This Tomato Basil Bruschetta Dip is a fresh and straightforward way to enjoy bright, summery flavors in a dip form. It's perfect for quick meals or sharing at any gathering.
Plant-based dips can deliver rich, creamy mouthfeel using ingredients like soaked cashews, roasted eggplant, or pureed white beans; explore creamy vegan dip ideas for party-worthy options. Healthier mayonnaise swaps commonly use avocado, olive oil emulsions, or yogurt to reduce saturated fat while keeping spreadable texture; compare options at mayonnaise substitutes for healthier swaps.

Andrew Gray is a seasoned food writer and blogger with a wealth of experience in the restaurant and catering industries. With a passion for all things delicious, Andrew has honed his culinary expertise through his work as a personal chef and caterer.
His love for food led him to venture into food writing, where he has contributed to various online publications, sharing his knowledge and insights on the culinary world. As the proud owner of CooksCrafter.com, Andrew covers a wide range of topics, including recipes, restaurant reviews, product recommendations, and culinary tips.
Through his website, he aims to inspire and educate fellow food enthusiasts, offering a comprehensive resource for all things food-related.